

How to Connect Windows Virtual PC to the Network
InformationThis will show you how to connect Windows Virtual PC to your network so that your created virtual machine or XP Mode will be able to access the internet.
For more information, see: Networking in Windows Virtual PC - Windows Virtual PC - Site Home - TechNet Blogs
Warning
You will need to be logged in as an administrator to be able to do this tutorial.
Here's How:
1. Open the created or XP Mode virtual machine in Windows Virtual PC that you want to connect to the network.
2. On the virtual machine's menu bar, click on Tools.
A) If you see Disable Integration Features, then go to step 5. (see screenshot below)3. To Install Integration Features in Windows Virtual PC
B) If you see Install Integration Features, then go to step 3. (see screenshot below)
C) If you see Enable Integration Features, then go to step 4. (see screenshot below)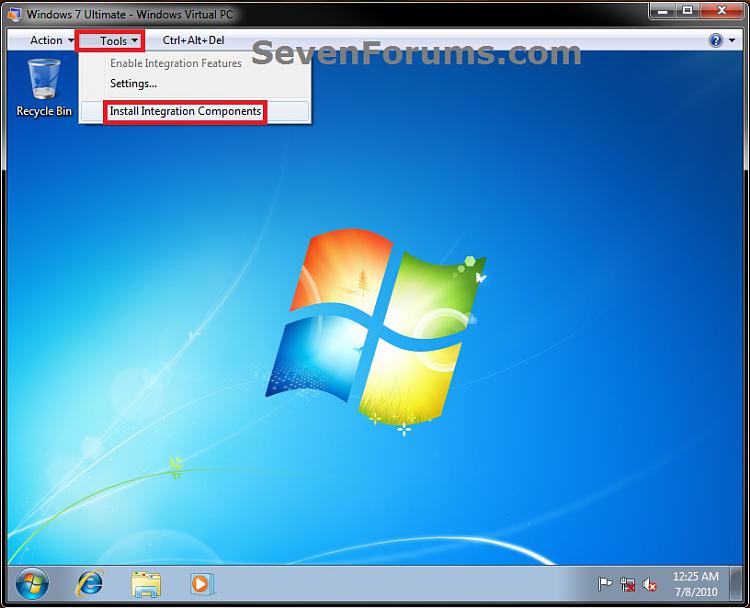
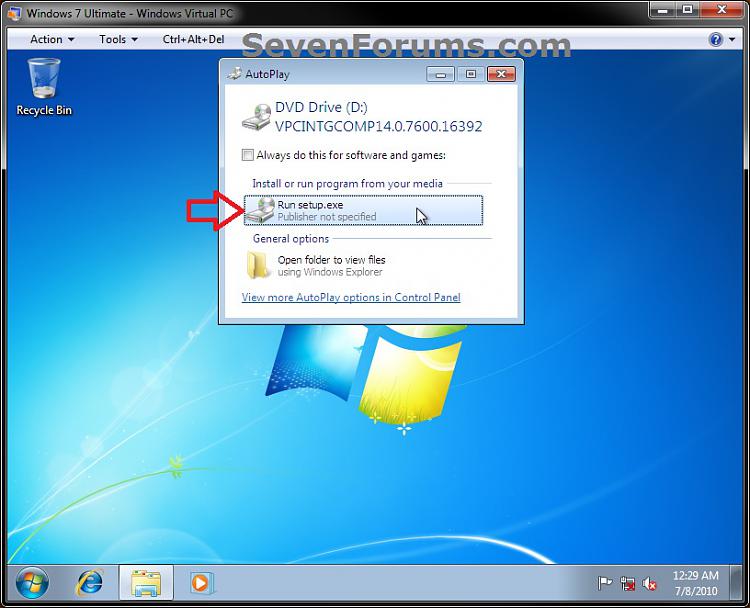
A) Click on Install Integration Components. (see screenshot below step 2B)4. To Enable Integration Features in Windows Virtual PC
B) Follow steps 15 to 20 here (click on link) to finish installing.
C) When finished, continue on to step 4.
A) Click on Enable Integration Components. (see screenshot below step 2C)5. To Enable "Virtual PC Network Filter Driver" in Windows 7
B) Log on using the user name and password for the virtual machine. (see screenshots below)
NOTE: If you do not see the user name for you virtual machine, then click on Use another account to enter the user name and password and click on OK.
C) When finished, continue on to step 5.
NOTE: This step is to be done in your host Windows 7 computer and not in the virtual machine in Windows Virtual PC.
A) Open the Control Panel (icons view), then click on the Network and Sharing Center icon.6. If you Use a Router with "MAC Address Filtering" Enabled
B) In the Network and Sharing Center, click on the Change adapter settings link on the left side. (see screenshot below)
C) Right click on your internet network connection, and click on Properties. (see screenshot below)
NOTE: Make note of the network adapter name (ex: Marvel Yukon....). You will need to know this in step 7B below.
D) If prompted by UAC, then click on Yes.
E) If not already, check the Virtual PC Network Filter Driver box, and click on OK. (see screenshot below)
F) Close the Network Connections window. (see screenshot below step 5C)
NoteIf you do not, then skip this step and go to step 7 instead.
If you do, then this step will show you how to get the MAC address of the virtual machine in Windows Virtual PC so you can add it to the MAC Filtering Rules of your router to allow the virtual machine access through the router.A) In the virtual machine, open a command prompt and type ipconfig /all (space after g) and press enter.7. To Set the Virtual Machine Network Settings
B) In the command prompt, look for the MAC address (ex: 00:03:ff:1e:03:57) to the right of Physical Address. Write this MAC address number down. (see screenshot below)
C) In your Windows 7 computer (not virtual machine), open your web browser (ex: Internet Explorer) and log in to your router.
NOTE: You would usually do this by typing in your router's IP address in the web browser's address bar and pressing enter. Consult your router's manual to see what it's default IP address is.
D) Go to your router's Network Filter settings, and add the virtual machine's MAC address (step 6B) to the MAC Filtering Rules and save it. (see screenshot below)
NOTE: This is for a D-Link router, but this will vary depending on what brand and model of router you have. Consult your router's manual on how to enter the MAC address.
E) You can now close the web browser in your Windows 7 computer (not virtual machine).
F) Close the command prompt in the virtual machine. (see screenshot below step 6B)
G) Continue on to step 7.
A) On the virtual machine's menu bar, click on Tools and Settings.8. Select the Network location type you want for the virtual machine to have the settings for that location automatically applied. (see screenshot below)
B) In the left pane, select Networking, then select your network adapter name (step 5C above) from the drop down box and click on OK. (see screenshot below)
NOTE: If you have more than one network adapter available and you do not know which one to select, then test using each one until you have a connection.
C) Continue on to step 8.
9. The virtual machine in Windows Virtual PC should now be able to connect to your network and access the internet from it.
That's it,
Shawn
Related Tutorials
- How to Create a Virtual Machine in Windows Virtual PC
- How to Install and Setup Virtual Windows XP Mode in Windows 7
- How to Enable the Built-in Administrator Account in Windows XP Mode
- How to Change Virtual Machine Settings in Windows Virtual PC
- How to Boot from a CD or DVD in a Windows Virtual PC
- How to Install, Enable, and Disable Windows Virtual PC Integration Features
- How to Select Host Devices to Share with Virtual Machines in Windows Virtual PC
Windows Virtual PC - Connect Virtual Machine to Network
-
-
-
-
-
New #5
Brink, awesome tutorial as always... more so at this moment that I am going through such a nightmare with my vhd.

-
-
New #7
Brink - Today, for the first time, the Shared Networking (NAT) setting did NOT permit my XP Mode to connect to the internet.
So I increased the number of network adapters to 2 and added the Intel 82579LM NIC in my hardware that contains the Win 7 Pro host. XP Mode now also connects to the internet.
But ... what happened?
What happened to block the original Shared Networking (NAT)?
My gateway router does NOT do MAC address filtering for wired PCs (including this 7 + XP Mode machine) - only for WiFi.
Now, with only the Shared Networking (NAT) on (with the #2 NIC temporarily turned off), ipconfig /all in XP Mode shows that the Gateway is 192.168.131.254. However, when I point the XP Mode browser at that IP, I get nothing.
By the way, my external Gatweay is 192.168.1.1, and its DHCP range does not include 192.168.131 anything, so I am concluding that 192.168.131.254 is generated inside my Win 7 host.
Anyway, Shared Networking (NAT) is no longer working, but it used to.
Thoughts? Thanks.
-
New #8
Hello glnz, :)
Did you make any changes to anything before this happened?
You might see if adjusting the DHCP range of the router to include the IP address of the VM may let it connect with the NIC #1 again.
-
New #9
Brink - thanks for fast response
No changes that I can think of today. As soon as I turned on XP Mode, the NAT connection didn't work and I couldn't do much.
When I increased the number of network cards to 2 and added the Intel NIC, then the XP Mode connected to the outside world and I ran a bunch of updates in XP Mode - XP itself and Avast AV.
I don't particularly want to add 192.168.131.xx to my actual outside router as a new DHCP range. (Not sure that I can.) Anyway, that should not be relevant to connecting in Shared Networking (NAT), right?
Might something in my Win 7 Pro host no longer accept connections from the XP Mode's Shared Networking (NAT)? I think - not sure - that the Win 7 is supposed to "be" that 192.168.131.254 "Gateway", right? Any particular reason why it might stop? Is there any way for me to check on the Win 7 side?

Windows Virtual PC - Connect Virtual Machine to Network
How to Connect Windows Virtual PC to the NetworkPublished by Brink


 Quote
Quote
Related Discussions