Desk Gluing Time
Not a problem and I only know this because when I was in shop class in high school I did a lot of work for people around town (it was a small town) I made a lot of storage shelves for the elementary we also fixed...
Good stuff there crazyeyes, sounds like you grew up in a pretty nice community. I'm living downtown Ottawa right now, and I'm pretty sure most of the sharp objects have been removed from the local high schools, haha!
Oh I forgot this thing is looking great and the false fronts is a great idea. What do you plan on using as a finish material...
I've got some solid maple to put around the exposed edges of the plywood, and I'll hopefully be staining the whole thing a nice dark cherry red of some kind.. still working on that. Always nice to be spending insurance money instead of your own, eh? I bought one spare sheet of plywood, but I wasn't about to cut into it when a simple fix like this was available, no matter how ghetto it was
")
I decided it was time to glue the two surfaces together that would comprise of the actual desk surface and take a break from working on the drawers for a while.
Here it is, the first piece. At first I wanted to lay it face down, so I could evenly distribute screws through the bottom, but in the end, I went face up so I would protect the surface, and it would be a LOT easier to line up the holes.
I threw on the top layer, lined them up, and thought to myself: Hmm, I wonder what it'll look like with the top shelf stacked on:
Pretty cool. This was the first time I had actually pulled a chair up to it to get a real grasp of how big this desk is going to be. I was pretty psyched.
Just a note, the two pieces of wood on each end holding up the shelf will actually be the inner supports (ie, pushed inwards towards the middle of the desk a foot or two), and the cubby holes on the outer ends will support the long shelf. The long shelf also has to be trimmed a couple inches, it won't reach right to the end of the desk.
This next part was really quite a challenge on my own.
I lined it up as best as I could (According to the holes that I cut out, since the edges are easy to trim later), lifted one end with a mighty, strong arm, squirted as much glue as I could with my other arm (And only as far as I could reach!), put it down gently, ran to the other side and repeated.
Let me tell you - with the amount of glue I put down, and the fact that each side weighs 20-30 pounds - it did NOT want to slide around easily to get into perfect position.
In the end, I had to muscle it around a bit to get the holes lined up satisfactorily.
(I spoke with a couple friends about this afterward, and one of them suggested making some pilot holes and screwing in a few screws BEFORE the gluing, and then retracting the screws so that just the tips go through the bottom board. That way after the glue is put down, you shuffle around the top board until the tips of the screws find the pilot holes, thus, eliminating the issue of getting proper alignment before the glue becomes too tacky.)
I then threw some weight on top of the table, attached as many clamps as I could find, and started putting some 1.25" screws through the bottom.
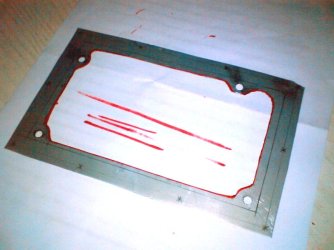
A few clamp shots of the hole - everything lined up pretty much perfect. 1/2" on the left and right, 1/2" at the bottom, and I think just a little under 3/4" at the top. (The size of the lip between the upper and lower holes)
I wasn't satisfied with the way the clamping was going on lengthwise on the surface. I didn't have enough clamps to place them every half foot, so luckily, Mike had some of these nice, big, cedar logs lying around that I re-purposed temporarily.
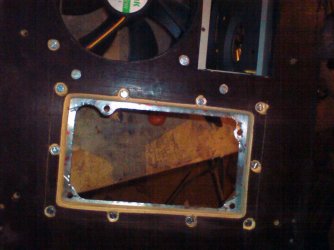
The end result turned out quite nicely. The hole was lined up properly. There is only a small overhang / underhang of maybe 2/16's of an inch on two of the edges of the surfaces that should be easy to correct with a flush-bit on the router later.
We'll take a look at them next update! Thanks for staying tuned!


")