Dual Boot Installation with Windows 7 and XP

How to Setup a Dual Boot Installation with Windows 7 and XP


   Information
This will show you how to install Windows 7 and XP to dual boot with when you already have either Windows 7 or XP installed first.
   Note
With a dual boot installaton, you will have two operating systems (OS) installed. When you start the computer, you will have the choice to choose which OS you would like to start up to. This method is the easiest way of doing a dual boot with these two operating systems.
   Tip
When dual booting with another OS (ex: Vista or XP), you may not always have that OS partition show up in Computer with a driver letter in Windows 7. If this happens, then you will just need to add a drive letter to the OS (ex: Vista or XP) partition in Windows 7 Disk Management for it to show up in Computer with a driver letter.
   Warning
To stop XP from deleting your Windows 7 System Restore Points everytime XP is started, then see System Restore Points - Stop XP Dual Boot Delete to hide Windows 7 from XP.

Windows 7 Minimum Hardware Requirements


NOTE: For more information on this, see: Windows 7 system requirements
  • 1 GHz 32-bit or 64-bit processor
  • 1 GB RAM for 32-bit Windows 7 OR 2 GB RAM for 64-bit Windows 7
  • 16 GB available disk space 32-bit Windows 7 OR 20 GB for 64-bit Windows 7
  • Support for DirectX 9 graphics with 128 MB memory (in order to enable Aero theme)
  • DVD-R/W Drive
  • Internet or phone access to activate Windows 7.
Windows XP Minimum Hardware Requirements

NOTE: For more information on this, see: System requirements for Windows XP operating systems
  • PC with 300 megahertz (MHz) or higher processor clock speed recommended; 233-MHz minimum required;* Intel Pentium/Celeron family, AMD K6/Athlon/Duron family, or compatible processor recommended
  • 128 megabytes (MB) of RAM or higher recommended (64 MB minimum supported; may limit performance and some features)
  • 1.5 gigabyte (GB) of available hard disk space.*
  • Super VGA (800 × 600) or higher resolution video adapter and monitor
  • CD-ROM or DVD drive
  • Keyboard and Microsoft Mouse or compatible pointing device
EXAMPLE: Windows Boot Manager
NOTE: This is the boot screen where you select what operating system that you would like to start. By default, you have 30 seconds to choose another operating system before the default operating system will start automatically.
Example.jpg


OPTION ONE

When XP is Installed First


NOTE: If you have a RAID setup, you will need to have the Windows 7 RAID drivers on a USB flash drive available to select and load while installing Windows 7.
1. Do step 2 or 3 below for where you wanted to install Windows 7 at.

2. To Create a New Partition from the XP Hard Disk Drive
A) With your Windows 7 installation disc boot into the Command Prompt from the System Recovery Options screen.
NOTE: Make sure that the CD/DVD drive is selected first in the boot order in the BIOS.

B) In the command prompt, select and shrink the XP volume by how many MB (1024 MB = 1 GB) you want to have for this Windows 7 partition. (See screenshot below)
NOTE: You would do steps 2 to 9 in METHOD TWO at that link. Windows 7 will need a minimum of 16 GB (16384 MB).
XP-W7_1.jpg
C) Click on the X at the top right corner to close the command prompt. (See screenshot above)

D) Click on the X at the top right corner to close System Recovery Options. (See screenshot below)
XP-W7_2.jpg
E) Go to step 4.
3. To Use a Separate Hard Disk Drive than the XP Drive
A) Boot from your Windows 7 installation disc.
NOTE: Make sure that the CD/DVD drive is selected first in the boot order in the BIOS.
4. Click on the Install now button. (See screenshot below)
XP-W7_3.jpg
5. When you get to this point, select the partition (step 2) or hard drive to install Windows 7 on. (See screenshot below)
XP-W7_4.jpg
6. Finish installing Windows 7.
NOTE: You would start at step 9 in that link to finish installing Windows 7.

7. When finished, restart the computer to have the option to boot from XP (Earlier Verision of Windows) or Windows 7. (See screenshot below)

   Note
If you are only booting into Windows 7 and do not have XP listed in the Windows Boot Manager, then you can install only EasyBCD (step 8 Option Two below) to add XP (or Windows 7) while started in Windows 7 the same way to the boot list.

Example.jpg


OPTION TWO

When Windows 7 is Installed First


   Warning

1. To Create a New Partition from the Windows 7 Hard Disk Drive
NOTE: If you want to install XP on a separate internal hard drive instead, then skip this step and go to step 2.
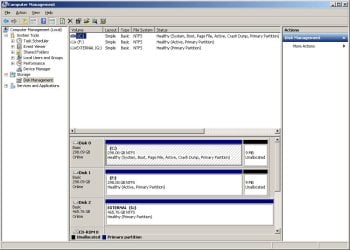
A) In Windows 7, select and shrink the Windows 7 volume in Disk Management by how many MB (1024 MB = 1 GB) you want to have for this XP partition. (See screenshots below)
NOTE: You would do all of Method One at that link.
W7-XP-1.jpg

W7-XP-2.jpg

W7-XP-3.jpg
2. Insert your XP installation disc, then restart the computer and press any key to boot from it when prompted. (See screenshot below)
NOTE: Make sure that the CD/DVD drive is selected first in the boot order in the BIOS.
Step1.jpg
3. From XP Setup, Press Enter. (See screenshot below)


   Warning

W7-XP-4.jpg
4. Press F8. (See screenshot below)
NOTE: On some multimedia keyboards, you may need to press the F-Lock or Function key before pressing F8.
W7-XP-5.jpg
5. Select the partition (step 1) or hard drive that you want to install XP on using the arrow keys and press Enter.
W7-XP-6.jpg
6. Finish installing XP.


   Tip
If you get Error loading Operating System after XP restarts:
  • Using your Windows 7 installation disc, boot to the command prompt at startup.
  • Type in these comands below, and press enter after each one.
    • bootrec /FixMbr
    • bootrec /FixBoot
    • bootrec /RebuildBcd
  • Exit the command prompt and restart the computer.
  • At this point, Windows 7 should boot up the same way before trying to install XP.
  • Continue to step 8 below and run EasyBCD from Windows 7 instead.

7. In XP, download and install .Net Framework 2.0 (32-bit) version or .Net Framework 2.0 (64-bit) version first, and EasyBCD (free version) for your 32-bit (x86) or 64-bit (x86) XP.
NOTE: In XP, Net Framework is required to be installed to run EasyBCD. After you click on Register (at bottom of link) for the free EasyBCD, registration is not required to download it.

8. Run EasyBCD (free version).
NOTE: This is required to repair the Windows 7 boot file and add XP to the Windows Boot Manager list.

9. On the left side of EasyBCD, click on the Add New Entry button. (See screenshot below)
A) In the top section under Operating Systems, click on the Windows tab. (See screenshot below)
B) To the right of Type, select Windows NT/2k/XP/2k3 from the drop down menu. (See screenshot below)
:warn:WARNING: Be sure to leave the Automatically detect correct drive box checked.

C) To the right of Name, you can leave the default Microsoft Windows XP as the name to be displayed in the Windows Boot Manager, or you can type whatever name you would like to have instead. (See screenshot below)
D) Click on the Add Entry button. (See screenshot below)
W7-XP-7.jpg
10. On the left side of EasyBCD, click on the BCD Deployment button, select (dot) the Install the Windows Vista/7 bootloader to the MBR option, and click on the Write MBR button. (See screenshot below)
W7-XP-9.jpg
11. Close EasyBCD.

12. Restart the computer to have the option to boot from Microsoft Windows XP or Windows 7. (See screenshot below)
Example2.jpg
   Tip
If Windows 7 will not start up when selected, then use your Windows 7 installation DVD to do a Startup Repair.

That's it,
Shawn


Last edited:
In EasyBCD 2.02 on Edit Boot Menu tab, delete the XP entry which is showing the wrong drive (C).

Then on Add New Entry tab, add XP by name, type and D drive, accept any offered boot files. Save and restart.

Was the 100mb Win7 System Reserved partition already deleted with boot files recovered into Win7 before you installed XP?

When this screenshot was taken (latest try) Windows XP was installed first to partition D. After booted into WinXP, I installed Win7 to partition C. Rebooted and it went straight into Win7 without the boot options. Then I picked up from I think Step 8 of Method 2 per the directions and did exactly as was stated. Rebooted and received error. Tried to repair boot files, etc. Rebooted, still get the error. Then I took the screenshot. Would the 100MB section for Win7 be listed in this case or would it not?

Also, I have tried selecting D for the WinXP entry, but then the bootloader path is \NST\easyldr1 and I get the error easyldr1 is missing or corrupt.
 

My Computer My Computer

At a glance

Windows 7 Ultimate x64
OS
Windows 7 Ultimate x64
Are ntldr, ntdetect.com and boot .ini on C and what are the boot.ini entries ?
 

My Computers My Computers

  • At a glance

    7 X64i5 84002x8gb 3200mhz
    Computer type
    PC/Desktop
    OS
    7 X64
    CPU
    i5 8400
    Motherboard
    gigabyte b365m ds3h
    Memory
    2x8gb 3200mhz
    Hard Drives
    various
    PSU
    pure power 11 400w cm
    Case
    Coolermaster
    Cooling
    cryorig m9i
  • At a glance

    7x64g54008gb ddr4 2400
    Computer type
    PC/Desktop
    OS
    7x64
    CPU
    g5400
    Motherboard
    ga b365m ds3h
    Memory
    8gb ddr4 2400
    PSU
    xfx pro 450w
This totally saved my butt. Thank you 100 Million times over and Seven Forums....add a "Buy me a beer" button!
 

My Computer My Computer

At a glance

Windows 7 Ultimate x64QuadCore AMD Phenom II X4 B45, 3100 MHz4GB Kingston HyperX DDR3 1600MHzMSI R5770 Hawk 1GB GDDR5
OS
Windows 7 Ultimate x64
CPU
QuadCore AMD Phenom II X4 B45, 3100 MHz
Motherboard
ASRock M3A770DE
Memory
4GB Kingston HyperX DDR3 1600MHz
Graphics Card(s)
MSI R5770 Hawk 1GB GDDR5
Sound Card
M-Audio Delta 1010 PCI
Monitor(s) Displays
2X Acer 22" LCD
Screen Resolution
1680X1050
Hard Drives
2x Hitachi 7200RPM SATA 500GB
1x Seagate Barracuda 7200RPM 500GB
PSU
Thermaltake 675watt 80 Bronze
Case
Generic
Cooling
Thermaltake SpinQ 360
Mouse
Logitech G9 Laser
Here's a riddle (at least for me):

I've installed Windows 7 to be the second system with Windows XP using baarod's method with a little modification using tips from this tutorial.

What I've done is described in this baarod's tutorial.

And the riddle:

Everything is working properly but here is what I see when I am on XP:


And here is what I see when I am on W7:


Why is it like this?

Hello Luciak,

This is normal. Whatever OS you have started up in will see itself as the C: drive by default, and the other OS with another drive letter. :)

Shawn


Then please tell me why this NEVER happens no matter which one I load first the 100MB SYSTEM Partition is ALWAYS C!!!! Its driving me crazy because there has to be a way to make that thing go away!!!!
And Sure I knwo there is a tutorial to make that go away. This has me wanting to throw the PC out the window.
In the section.... Starting with XP loaded first you say to boot into the Command Prompt using the Windows 7 disc. HOW?? When you already have XP loaded hitting f8 LOADS THE XP COMMAND PROMPT!! So what does the disc being in the drive have to do with anything?
 

My Computer My Computer

At a glance

windows72x FX74Geil pc6400Diamond Viper 2900XT
Computer Manufacturer/Model Number
ME
OS
windows7
CPU
2x FX74
Motherboard
ASUS L1N64 WS SLI
Memory
Geil pc6400
Graphics Card(s)
Diamond Viper 2900XT
Sound Card
Integrated
Monitor(s) Displays
Hanspree 25"
Hard Drives
2xWD Raptor 150GB RAID0
PSU
Ultra 1000
Case
Junk
Cooling
Water and air
Brink,

I finally got the hard drive issue sorted.

Did a clean install of XP onto a blank standalone drive in the same system (unplugged all other drives), followed the instructions on the tutorial and loaded EasyBCD. However when I opened EasyBCD all of the fields were greyed out and I couldn't do anything.

Then I reconfigured the cabling such that Windows 7 was the Master and the hard drive with XP as secondary. Installed EasyBCD into the windows 7 partition and started it - the machine didn't offer alternative boots (as expected) but came up as it should have in Windows 7.

At this point your tutorial says follow the steps from point 8. However, points 8/9 assume that you are starting from Windows XP and tell you to add Windows XP which is fine (i couldn't do anything from XP remember)

Then in step 10 the instructions say to add Windows7/Vista to the bootloader. That struck me as wrong since I was already booted in Windows 7 and Windows 7 showed up in the existing operating systems screen. I think the tutorial needs a tweak to tell folk that in step 10, if they are working in windows 7 that they need to add XP to the bootloader not Windows 7. It's common sense but it made me stop and check myself, not everyone will.

Anyway, once I clicked the radio button (dot) for XP and "Write MBR" everything came up perfectly.

Thanks for writing the tutorial, it gave me the confidence to do this. Great job.

Adrian

PS: The tutorial for protecting restore points is good, but relatively unhelpful unless you are able to move massive amounts of files around between partitions (and thereby have sub optimal disk space usage) so that they can be accessed by XP after you shut off the 7/vista drive. That means messing with the already confusing 7/vista directory(folder) tree in order to put all of the documents into the library. That also doesn't resolve the issue of Application data files such as outlooks that are stored in restricted areas of Windows 7 (I know one can move them but what a pain) not being available to say outlook in XP.

The preamble was for this question, is there any way to tell Windows to put the shadow copies anywhere else other than on the same drive. (It strikes me as odd that if I have two physical drives, I cannot direct the system restore points to the alternative drive, so that if one drive dies, I have a valid restore point saved off-line for the dead drive.)

Anyway, thanks again for all of the hard work you do on this site.

Adrian
 

My Computer My Computer

At a glance

32 Bit Windows 7 Pro (trying to dual boot wit...
OS
32 Bit Windows 7 Pro (trying to dual boot with XP)
abeeftec: You must boot to the Command Prompt of the DVD: System Recovery Options

Are you runnning the Win7 DVD from XP or booting it? This could be why SysReserved is taking C.

Please post back a screenshot of your maxmimized full Disk Mgmt Drive map with listings, using Snipping Tool in Start Menu.

NotSoYoung: If you unplugged all other HD's during XP install, then you don't need EasyBCD as you can boot directly from the BIOS.

After install, plug back in other OS HD, set preferred one to boot first in BIOS setup, use one-time BIOS Boot Menu key to boot the other.

This is a cleaner method that leaves the HD's independent to come and go as you please, whereas the Windows-managed Dual Boot interlocks them requiring surgery to later remove XP>

Thanks a bunch for answering. This is something I have just never had to do before. Work on Pcs and never booted into the command prompt. I figured it out though last night.

The problem was that I wasnt getting C drive for main drive in either XP or Win7. It was changing it in 7 once XP was installed. So it made the System reserved Drive C. And when you are doing this for someone else you want to make sure when they go to install a program they can just install it as normal.

When the OS drive shows as G programs would have to be redirected to G because they automatically are aimed at C drive.

All i had to do was install XP first and then 7 and it Dual boots fine. I made the Partition as I installed XP and just installed 7 afterward but before installing any drivers. It all worked perfectly.
Thanks
 

My Computer My Computer

At a glance

windows72x FX74Geil pc6400Diamond Viper 2900XT
Computer Manufacturer/Model Number
ME
OS
windows7
CPU
2x FX74
Motherboard
ASUS L1N64 WS SLI
Memory
Geil pc6400
Graphics Card(s)
Diamond Viper 2900XT
Sound Card
Integrated
Monitor(s) Displays
Hanspree 25"
Hard Drives
2xWD Raptor 150GB RAID0
PSU
Ultra 1000
Case
Junk
Cooling
Water and air
abeeftec: You must boot to the Command Prompt of the DVD: System Recovery Options

Are you runnning the Win7 DVD from XP or booting it? This could be why SysReserved is taking C.

Please post back a screenshot of your maxmimized full Disk Mgmt Drive map with listings, using Snipping Tool in Start Menu.

NotSoYoung: If you unplugged all other HD's during XP install, then you don't need EasyBCD as you can boot directly from the BIOS.

After install, plug back in other OS HD, set preferred one to boot first in BIOS setup, use one-time BIOS Boot Menu key to boot the other.

This is a cleaner method that leaves the HD's independent to come and go as you please, whereas the Windows-managed Dual Boot interlocks them requiring surgery to later remove XP>


Greg,

Understood. I want both systems available easily. I'm not the only user of the PC.

I have older Apps that run better in XP than in 7 (some only in XP) and they need to share data.

What surgery do you mean to uninstall XP of a stand alone drive?

Thanks
 

My Computer My Computer

At a glance

32 Bit Windows 7 Pro (trying to dual boot wit...
OS
32 Bit Windows 7 Pro (trying to dual boot with XP)
Would need to see a Disk Mgmt screenshot to advise you with certainty, but normally to remove XP from a separate-HD Dual Boot you would mark Win7 HD partition Active in Disk Mgmt, power down to unplug the XP HD, then boot the Win7 DVD Repair console or Repair CD to run Startup Repair up to 3 separate times to write the System Boot files to the Win7 partition.
 
Would need to see a Disk Mgmt screenshot to advise you with certainty, but normally to remove XP from a separate-HD Dual Boot you would mark Win7 HD partition Active in Disk Mgmt, power down to unplug the XP HD, then boot the Win7 DVD Repair console or Repair CD to run Startup Repair up to 3 separate times to write the System Boot files to the Win7 partition.

According to the disk Mgmt screen The Windows 7 is the boot partition so I'm not sure what you mean. I don't know how to "uninstall" the dual boot, but no doubt the info is out there somewhere.

For now my system works. Thanks for your help.
 

Attachments

  • dskmgmnt screenshot.jpg
    dskmgmnt screenshot.jpg
    77.7 KB · Views: 155

My Computer My Computer

At a glance

32 Bit Windows 7 Pro (trying to dual boot wit...
OS
32 Bit Windows 7 Pro (trying to dual boot with XP)
That looks fine to me. :)

If you are happy with it - leave it as it is.

No, you can't choose to store shadow copies somewhere else.:(
 

My Computers My Computers

  • At a glance

    7 X64i5 84002x8gb 3200mhz
    Computer type
    PC/Desktop
    OS
    7 X64
    CPU
    i5 8400
    Motherboard
    gigabyte b365m ds3h
    Memory
    2x8gb 3200mhz
    Hard Drives
    various
    PSU
    pure power 11 400w cm
    Case
    Coolermaster
    Cooling
    cryorig m9i
  • At a glance

    7x64g54008gb ddr4 2400
    Computer type
    PC/Desktop
    OS
    7x64
    CPU
    g5400
    Motherboard
    ga b365m ds3h
    Memory
    8gb ddr4 2400
    PSU
    xfx pro 450w
What surgery do you mean to uninstall XP of a stand alone drive?
Thanks

Since you asked me, I will finish my response having now seen the screenshot:

If Win7 is C in screenshot then it is already System drive so removing XP would be as easy as deleting it's partition or removing it's HD, then deleting XP entry in EasyBCD.

To remove Win7 however, you would have to write the System Boot Files to XP.

No one was suggesting you do this now.
 
WOW, 124 pages of responses, I would have to take a month to read it all... I did read a few pages but I did not see anything that resembles the problem I am having and I hope it has a simple solution.

I have Windows 7 Ultimate 32 bit install on a WD Velociraptor 74GB Drive (see attachment) and there is a also a System Reserve, which btw, I don't really know what it is and I can only assume is something that Windows 7 did.

On another drive, also a WD 160GB Raptor is where I have my Windows XP W/SP3 + a partition for Data and Backups.

My BIOS has the capability of allowing me to choose which drive I want to make the first Boot so, if I choose the 74GB (Windows 7), I am able to go to it and even if I use EasyBCD to have dual booting at boot time, if I choose Win XP I immediately get an error telling me something about NTLR so only the Windows 7 is available.

I thought about inserting my Win XP CD/DVD and doing a repair but all I manage was to blow away my windows 7 prompt and XP would boot w/o an option to choose.

If I choose the the 160GB Raptor as a first boot option in my Bios, I get on Win XP but don't have an option to even choose Windows 7 and this is where I am now.

I am stuck and I don't know where to proceed. My biggest problem is that I am using a KVM USB switch to be able to use my KB/Mouse/Monitor with the Server at the office and when I switch drives in my Bios, the KVM stops working and I have to disconnect and connect again for it to work, hence, the hassle and annoyance from trying to use this method.

Is there a simple solution to all this?

The specs on the PC I am using are not the ones you see in My System Specs but if you need them for anything, here they are... see attach.

Sorry, if this has been hashed before. :p
 

Attachments

  • DiskManagement.jpg
    DiskManagement.jpg
    114.5 KB · Views: 162
  • SystemSpecs.jpg
    SystemSpecs.jpg
    112.4 KB · Views: 137

My Computer My Computer

At a glance

Windows 7 x64 (Ultimate)Intel i5-4670K8GBs Ripjaws 2133MhzAsus GTX660 (2GBs)
Computer type
PC/Desktop
Computer Manufacturer/Model Number
Custom Built... Intel/Nvidia/ASRock
OS
Windows 7 x64 (Ultimate)
CPU
Intel i5-4670K
Motherboard
ASRock Z87 Extreme 6
Memory
8GBs Ripjaws 2133Mhz
Graphics Card(s)
Asus GTX660 (2GBs)
Sound Card
Onboard Realtek HD
Monitor(s) Displays
Acer AL2216W
Screen Resolution
1680 x 1050
Hard Drives
Samsung 840 SSD 120GBs
Samsung 750GB 32MB cache
1.5 TB
PSU
PC Cooling 750w Silencer
Case
Thermaltake Spedo Advance
Cooling
Std Cooler
Keyboard
Logitech G15
Mouse
Logitech G9
Internet Speed
Comcast 20Mbit
Antivirus
Avast
Browser
Firefox
AstaLaVista:

Just follow steps 7-12 of the "With Windows 7 Installed First" section.

What you have is basically the situation you'd be in if you installed XP after 7

Hope it helps :)
 

My Computer My Computer

At a glance

Windows 10 Pro x64Intel Core i5 7400 @ 3.00GHz8GB 2133Mhz DDR4 (OEM supplied)Gygabyte Windforce GTX 1050Ti (Factory Overcl...
Computer type
PC/Desktop
Computer Manufacturer/Model Number
Medion Erazer (note to self: insert model number) - with custom additions
OS
Windows 10 Pro x64
CPU
Intel Core i5 7400 @ 3.00GHz
Motherboard
OEM supllied with PC
Memory
8GB 2133Mhz DDR4 (OEM supplied)
Graphics Card(s)
Gygabyte Windforce GTX 1050Ti (Factory Overclocked)
Sound Card
Realtek
Monitor(s) Displays
Acer Al1980 + HKC
Screen Resolution
1360*768(HKC) / 1280*1024(Acer)
Hard Drives
1TB Toshiba
1TB WD Caviar Green
120GB Samsung Evo 840
PSU
OEM supplied (no power rating on case)
Case
OEM Supplied
Cooling
Stock
Keyboard
Logitech Wireless
Mouse
Logitect Wireless
Internet Speed
40Mb/s Down 10Mb/s Up
Antivirus
Defender
Browser
Firefox
Best way to Dual boot with separate HD's is to set preferred OS HD as first to boot in BIOS setup, then boot the other HD using one-time BIOS Boot Menu key given on first BIOS boot screen. This keeps the HD's independent to come and go as you please, whereas a Window-managed Dual Boot interlocks them and requires surgery to later remove one.

Check to see if your Foxconn mobo has a one-time Boot Menu key - also known as BBS or BIOS Boot Selection screen.

This is normally set up by installing each OS with the other one unplugged, however as you've lost the Win7 boot by repairing XP with both HD's connected, you'll first need to unplug XP HD, set Win7 HD as first HD to boot in BIOS, then boot the Win7 DVD Repair console to Startup Repair - Run 3 Separate Times.

Once Win7 starts, plug back in XP HD and attempt to boot it using the one-time BIOS Boot menu key. If you don't have one on Foxconn mobo then install EasyBCD 2.02 to Win7 to Add XP by name and type, accept any offered boot files, let it autocomplete, Save then restart to Dual Boot menu.

The 100mb System Reserved boot partition conveniently places the Repair console, normally only on the Win7 DVD or Repair CD, on the F8 Advanced Boot Tools menu.
 
AstaLaVista:

Just follow steps 7-12 of the "With Windows 7 Installed First" section.

What you have is basically the situation you'd be in if you installed XP after 7

Hope it helps :)
In that section it requires me to have Netframe 2, which I already have, matter of fact, I have the Netframe 2 with sp1.

It also asks me to install EasyBCD, my problem here is... do I need to do this on the Windows 7 side or also install on Win XP?


Best way to Dual boot with separate HD's is to set preferred OS HD as first to boot in BIOS setup, then boot the other HD using one-time BIOS Boot Menu key given on first BIOS boot screen. This keeps the HD's independent to come and go as you please, whereas a Window-managed Dual Boot interlocks them and requires surgery to later remove one.

Check to see if your Foxconn mobo has a one-time Boot Menu key - also known as BBS or BIOS Boot Selection screen.

Woof, you may think I know what I am doing but you would be wrong... I merely know how to navigate when I am told what to do in terms that even a monkey would understand
tongue.gif
biggrin.gif


OK, I went to my Bios and this is what I was able to find:

Advance BIOS Features:

  1. Boot Device Priority:... My only options is whether the CD/DVD is first or my HDD
  2. Hard Disk Drive:... Here I can choose which Drive I want to boot first with. Right now, the 160GB (Win XP) has first priority since this is the one I have been using.
  3. CD/DVD Drives:... Self explanatory I suppose.
Fox Central Control Unit:

  1. Smart BIOS:...

  • Smart Power LED ... Enable
  • Smart Boot Menu ... Enable

This is normally set up by installing each OS with the other one unplugged, however as you've lost the Win7 boot by repairing XP with both HD's connected, you'll first need to unplug XP HD, set Win7 HD as first HD to boot in BIOS, then boot the Win7 DVD Repair console to Startup Repair - Run 3 Separate Times.
Yes, I did loose it but I have been able to recover it back and I can boot with Win 7 as long as set the 74GB drive as first priority.

And No, I did not install with the other drive unplugged, I had a vague idea that I should have but I was to lazy to do so so I went ahead and did so with both drives plugged in but... I did put the 74GB (Win 7) as first priority to boot when I did the installation.

Once Win7 starts, plug back in XP HD and attempt to boot it using the one-time BIOS Boot menu key. If you don't have one on Foxconn mobo then install EasyBCD 2.02 to Win7 to Add XP by name and type, accept any offered boot files, let it autocomplete, Save then restart to Dual Boot menu.
EasyBCD is installed on the Windows 7 side and I do believe I added XP, hence, why I have the option to boot with Windows 7 and Windows XP but, if I choose XP, I end up getting that error.

How do I go back to EasyBCD and delete that entry so I can do it again? Perhaps I did not follow the guidelines properly the first time around.


The 100mb System Reserved boot partition conveniently places the Repair console, normally only on the Win7 DVD or Repair CD, on the F8 Advanced Boot Tools menu.
Ahhhhh... good to know then!

Thanks again, you guys are truly amazing at how fast you respond, that never ceases to amaze me. :eek:
 

My Computer My Computer

At a glance

Windows 7 x64 (Ultimate)Intel i5-4670K8GBs Ripjaws 2133MhzAsus GTX660 (2GBs)
Computer type
PC/Desktop
Computer Manufacturer/Model Number
Custom Built... Intel/Nvidia/ASRock
OS
Windows 7 x64 (Ultimate)
CPU
Intel i5-4670K
Motherboard
ASRock Z87 Extreme 6
Memory
8GBs Ripjaws 2133Mhz
Graphics Card(s)
Asus GTX660 (2GBs)
Sound Card
Onboard Realtek HD
Monitor(s) Displays
Acer AL2216W
Screen Resolution
1680 x 1050
Hard Drives
Samsung 840 SSD 120GBs
Samsung 750GB 32MB cache
1.5 TB
PSU
PC Cooling 750w Silencer
Case
Thermaltake Spedo Advance
Cooling
Std Cooler
Keyboard
Logitech G15
Mouse
Logitech G9
Internet Speed
Comcast 20Mbit
Antivirus
Avast
Browser
Firefox
Hi All,

Fantastically long and great thread! I couldn't find exactly what I was looking for though and I am hoping to find a quick resolution to this issue so I can have my laptop back ready for work tomorrow!

VERY IMPORTANT: I installed Win 7 Professional 64 on an HP 8540p notebook on top of an existing XP Pro install THAT WAS ENCRYPTED with PGP 10.x using Whole Disk Encryption!!!! I had forgotten to take disk encryption into consideration before the install.

l used the 7 install disk and followed the steps in this tutorial to allocate 80gb free HD space and followed through the install as normal. Now here's the kinda weird part...the 7 install went fine, but PGP Desktop doesn't prompt for a password at boot now and it gives me no option to load XP Pro. I tried using EasyBCD 2.0 to add the XP volume to the boot list, but it won't find it. I can see the other partition from 7 and assigned it as E: in Disk Manager, but when I try to explore the partition I get nothing there. Disk Management shows it as E: (Healthy, Active, Primary Partition). The Win7 partition shows C: (BOOT, page file, crash dump, primary partition). I can write to the XP partition now and it shows 153 gb free space. My HD is 250gb so that leaves only 17gb which my XP install could be on.


Any suggestions would be helpful, I'm panicking here, what I'd prefer to do at this point is just delete the 7 partition effectively uninstalling Win7 and hopefully restoring the XP Pro Partition, but right now I can't even figure out if the Win7 install just overwrote the MBR with the bootguard bootloader on it and now I need to try and install PGP on 7 and see if it re-installs the bootguard???

Well I've made a total mess of this, any suggestions on what to do now would be greatly appreciated!!
 

My Computer My Computer

At a glance

Windows 7 Professional
OS
Windows 7 Professional
overwrote MBR

OK well something I gleaned from the PGP support forums is that Win7 overwrote the MBR and therefore the proprietary "bootguard" bootloader that PGP uses for encrypted disks.
 

My Computer My Computer

At a glance

Windows 7 Professional
OS
Windows 7 Professional
AstaLaVista said:
If I choose the the 160GB Raptor as a first boot option in my Bios, I get on Win XP but don't have an option to even choose Windows 7 and this is where I am now.

My understanding from the above quote, was that you had XP only available after a botched repair job? Or rather an incomplete one :) As I said, steps 7-12 of "With Win 7 installed first" will work, needs to be done from XP though (which I thought was your only option)

Having said that, Gregs advice about booting from BIOS is a damn good one. I just find it... inconveniant to have to always switch BIOS order.
 

My Computer My Computer

At a glance

Windows 10 Pro x64Intel Core i5 7400 @ 3.00GHz8GB 2133Mhz DDR4 (OEM supplied)Gygabyte Windforce GTX 1050Ti (Factory Overcl...
Computer type
PC/Desktop
Computer Manufacturer/Model Number
Medion Erazer (note to self: insert model number) - with custom additions
OS
Windows 10 Pro x64
CPU
Intel Core i5 7400 @ 3.00GHz
Motherboard
OEM supllied with PC
Memory
8GB 2133Mhz DDR4 (OEM supplied)
Graphics Card(s)
Gygabyte Windforce GTX 1050Ti (Factory Overclocked)
Sound Card
Realtek
Monitor(s) Displays
Acer Al1980 + HKC
Screen Resolution
1360*768(HKC) / 1280*1024(Acer)
Hard Drives
1TB Toshiba
1TB WD Caviar Green
120GB Samsung Evo 840
PSU
OEM supplied (no power rating on case)
Case
OEM Supplied
Cooling
Stock
Keyboard
Logitech Wireless
Mouse
Logitect Wireless
Internet Speed
40Mb/s Down 10Mb/s Up
Antivirus
Defender
Browser
Firefox
Back
Top