Thank you! I make it.I clone 7, then clone xp,boot into 7 use easybcd and make Dual boot!
Excellent! Mission accomplished.
You used the word "clone", so does that mean you actually used the "clone" function of Macrium Reflect that I offered you? Or did you actually use the "copy partition" function of Partition Wizard? I'd like to know which approach you actually used.
Both of these programs (and EasyBCD as well) are easy to use and intuitive and contain superb functionality, so I'm glad you had success with whatever tools you ended up using.
Now i have few other questions-
1.Now i have 2 drives-one with xp-20gb and one with 7-40gb,how to make them bigger?
I don't quite follow. Are you asking about resizing the partitions in their new locations on your large 500GB drive as shown in your final screenshot from DISKMGMT.MSC?
You can use Partition Wizard to "resize" any partition, and you can also use it to "move" (i.e. to slide a partition to the left or right making use of adjacent freespace), and you can also use it to "extend" (i.e. to enlarge it by taking freespace from anywhere on the drive and sliding whatever is necessary left or right in order to enlarge the partition you are trying to enlarge).
Personally, I like to do it simply and very straightforward. Since the GUI picture of the drive shows exactly what you have specified before you push the APPLY button, you really can't make a mistake if you do it one step at a time and understand exactly what you're doing by looking at the GUI picture which is being redrawn for you.
So, if you select a partition or unallocated space with Partition Wizard, and then right-click on it, you can select the appropriate operation from the resulting popup context menu. You can also specify a sequence of operations to accomplish what you want. For example, if you right-click on the 389GB unallocated space at the right side of the drive, and you select "create" from the popup menu, and you'll be presented with a dialog to specify the type of partition you want to create (i.e. primary or logical), format (i.e. NTFS, FAT32, etc.), label for the partition, and size of the partition. If you don't want to use the entire space for the new partition, you can specify how big you want the partition to be and how large a remaining unallocated free space you want either in front of or following your new partition. Specifying 0 for the freespace on either side means that partition boundary edge will start at the extreme left or extreme right of the free space. Completely intuitive.
You can then again right click on either this newly created partition (which remember, hasn't actually been created yet until you push the APPLY button, at which time the entire sequence of steps you're building up in a queue will be performed) or any other partition, and specify another operation. For example, you can choose "move/resize". You'll be presented with another GUI dialog that allows you to move the mouse to one edge or the other of the GUI partition, and then click-and-drag that edge left or right to shrink or enlarge the partition as appropriate. If you shrink the partition on left or right, you'll generate some new unallocated freespace there, thus making your partition smaller. If you enlarge the partition left or right where unallocated freespace currently exists, you'll use up some or all of that freespace thus making your partition larger by using up currently unallocated freespace. Again, completely intuitive.
Again, as you add another process to the accumulating queue of operations, the GUI presentation of your drives and partitions is changed accordingly to correspond to what you've specified so far. You can always UNDO stepping backward one operation at a time if you want to change or eliminate a previously entered operation. And nothing will happen for real until you finally push the APPLY button.
That's how you create partitions from unallocated freespace, and also slide the partitions left or right, and also enlarge/shrink partitions to be however small or large you want.
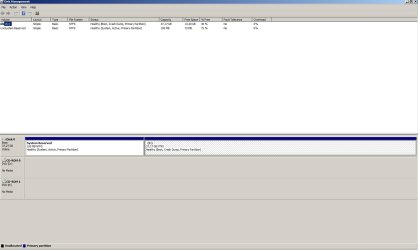
2.When i boot into XP i see system reserved drive,can i hide it?
I haven't been into WinXP for a while, but I know for a fact that you can "remove a drive letter" in Win7 using DISKMGMT.MSC.
Just run DISKMGMT.MSC while you are booted to WinXP, and then right-click on that "system reserved" drive and select "change drive letter and paths..." from the popup menu. On the resulting window, in Win7 there is a "remove" button which if you push it will eliminate the drive letter for that partition. In WinXP if there is a "remove" button, push it. Or, perhaps there is simply a "change" button, in which case you select the drive letter shown in the window and push the "change" button, and then select "none" which hopefully is there for WinXP.
Note that you can also use Partition Wizard to accomplish this un-lettering, and I believe this should work in WinXP as well as Win7. Just run Partition Wizard while booted to WinXP (you'll have to install it in WinXP, if you haven't already done so), select the "system reserved" partition and right-click on it, select "change letter" from the popup menu, and then choose "NONE" to un-letter it.
and last
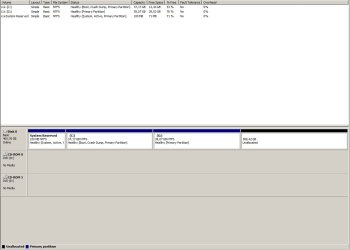
3.How to fix drive letters-i want xp to be c:,7 - d: , e: for data?now when i boot win7 7 is c;xp is g: ; when boot in xp xp is c:.I want everywhere xp to be c:,7 to be d:,and make up new drive e: for data
First, you cannot change the boot partition from being C from the perspective of the specific Windows you are booted to. So if you're booted to WinXP, then that system partition will always be C. If you are instead booted to Win7, then that system partition will again always be C. You can't change that.
So it's just the other partitions (and CD drives) where you can change letters, which I recommend doing for consistency to make it easiest for your brain to keep track of. Again you can use Partition Wizard or DISKMGMT.MSC to change drive letters. But PW can only change drive letters for your hard drive partitions, whereas DISKMGMT.MSC can also change drive letters on your CD drives.
Just select the partition or CD drive you want to change the letter of, and right-click on it. Then select "change drive letter" from the popup menu. Then select the drive and push the CHANGE button, and select an available drive letter from the dropdown list and push the OK button. And OK to confirm the change.
You can change all drive letters other than C which cannot be changed. Personally, my own multi-boot setups have all CD drive letters and other-than-C partitions lettered consistently no matter which Windows I am booted to. So for example, my CD drive is always changed to be letter N. Since you have two CD drives, you might change them to be M and N... in both WinXP and Win7. Once you change those letters then their existing letters of D and E become available for use in re-lettering your hard drive partitions.
Next, I always letter P to be the "other Windows partition", no matter which Windows I'm booted to. So if you're booted to WinXP then C is the WinXP system partition and P is the "other Windows partition", i.e. the Win7 system partition. If you're booted to Win7, then P is again the "other Windows partition", i.e. the WinXP system partition. You need to do something like this since you can't change C. C will always be the system partition for the currently operational Windows partition, so you have to come up with some other letter for all other partitions... so why not just always choose P for "the other Windows partition".
And finally, it's easy to remember that your "data" partition will always be D no matter which Windows you're booted to. So if you make that 389GB space all one partition, why not just letter it D for both WinXP and Win7. Or, if you create two data partitions, why not letter them D and E for both WinXP and Win7. That way no matter which Windows you're booted to, at least your data partitions will always have the identical drive letter... making things at least that much easier to remember. And of course, P is your "other Windows" no matter which Windows you're booted to, and M/N are your CD drives no matter which Windows you're booted to.
Questions?
Remember that as long as you're not resizing or moving the C partition, you can use Partition Wizard running under either WinXP or Win7 to do anything you want to other partitions. If you do want to work on the C partition you can start it under windows but you'll need to OK its prompt for reboot when you push the APPLY button, so that it can finish the maintenance on C while Windows is re-booting and not yet operational.
Or, you can always use that standalone boot CD for Partition Wizard to do whatever you want all at one time, and only exit the program to re-boot to Windows when you're all finished.

")
")


