
You are using an out of date browser. It may not display this or other websites correctly.
You should upgrade or use an alternative browser.
You should upgrade or use an alternative browser.
Solved Changing Win7 System/Boot Partition without Reinstall
- Thread starter Drakmyth
- Start date
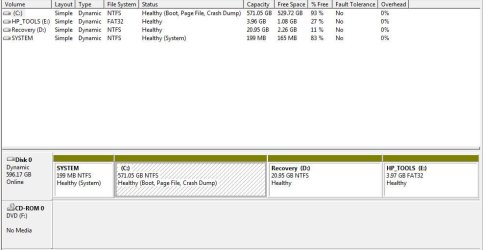
Hi there i got the same problem here.. can anyone help me how to fix it.
C: Healthy (Boot, Page File, Crash Dump)
Hp_TOOLS E: Healthy
Recovery D: Healthy
System Healthy (System)
The partition that i made, i deleted it. i just want to make it back the way it is.. please help
C: Healthy (Boot, Page File, Crash Dump)
Hp_TOOLS E: Healthy
Recovery D: Healthy
System Healthy (System)
The partition that i made, i deleted it. i just want to make it back the way it is..
please helpMy Computer
At a glance
windows 7 32
- OS
- windows 7 32

Hi there i got the same problem here.. can anyone help me how to fix it.
C: Healthy (Boot, Page File, Crash Dump)
Hp_TOOLS E: Healthy
Recovery D: Healthy
System Healthy (System)
The partition that i made, i deleted it. i just want to make it back the way it is..
If you have unallocated space take alook at this tutorial:
http://www.sevenforums.com/tutorials/2670-partition-volume-extend.html
or
Can you post a screen shot of Disk management?
http://www.sevenforums.com/tutorials/9733-screenshots-files-upload-post-seven-forums.html
Screenshot tools.
http://www.sevenforums.com/general-...ed-method-uploading-posting-screen-shots.html
How to Use the Snipping Tool in Vista - Vista Forums
Snipping Tool - Windows 7 features - Microsoft Windows
Use Snipping Tool to capture screen shots
http://www.sevenforums.com/tutorials/9717-screenshot-paint.html
http://www.sevenforums.com/tutorials/51160-screenshot-upload-using-mwsnap.html
fscapture free download
Use Snipping Tool to capture screen shots
My Computer
At a glance
ME/XP/Vista/Win7
- OS
- ME/XP/Vista/Win7

- Local time
- 10:25 PM
- Messages
- 50,634
Your disk has been converted to Dynamic which is meant for spanning large partitions across multiple HD's. It needs to be converted back before you do anything else.
To do this use the older version of Partition Wizard bootable CD, which still offers Conversion Dynamic<>Basic for free. Extract and burn this ISO to CD using ImgBurn at 4x speed: pw422.zip ISO - Windows Live
Then boot the CD, click on Disk to highlight it, from Disk tab Convert to Basic disk, OK, Apply step,.
There is no reason to remove the Page File and Crash dump from C as they're meant for optimal performance, and Boot simply means you are booted into it at the moment. Is there anything else you'd like to do?
To do this use the older version of Partition Wizard bootable CD, which still offers Conversion Dynamic<>Basic for free. Extract and burn this ISO to CD using ImgBurn at 4x speed: pw422.zip ISO - Windows Live
Then boot the CD, click on Disk to highlight it, from Disk tab Convert to Basic disk, OK, Apply step,.
There is no reason to remove the Page File and Crash dump from C as they're meant for optimal performance, and Boot simply means you are booted into it at the moment. Is there anything else you'd like to do?
do you have a link for old version of partition wizard?to tell u the truth i have no idea on what i am doing.. i got this new laptop for my wife and i just want to have the partition for files and stuff and this what happen.. i am noob with this type of stuffs.. please bear with me thanks.. 
My Computer
At a glance
windows 7 32
- OS
- windows 7 32
- Local time
- 10:25 PM
- Messages
- 50,634
No prob we'll get it sorted out for you.
Click the link in light blue in my post above. download the ISO, unzip it if necessary, then burn it to CD by rightclicking on the ISO file to Burn Disk Image, or install ImgBurn to burn Image at 4x speed.
Boot the CD this way: How to Boot your Computer from a Bootable CD or DVD - Boot to CD, or at boot tap one-time BIOS boot menu key which is ESC on HP's, choose CD drive to boot.
In PW, Click on Disk number to highlight it, then from Disk tab select Convert to Basic, click OK, then Apply.
Once it converts, rightclick on C, select Modify>Set to Logical, click OK.
Then rightclick C again to Resize, slide right grey border to left to make space for a data partiiton the size of your choice, click OK,
then rightclick the newly created Unallocated space to create New logical NTFS partition, label it, assign letter, click OK, Apply all steps.
Click the link in light blue in my post above. download the ISO, unzip it if necessary, then burn it to CD by rightclicking on the ISO file to Burn Disk Image, or install ImgBurn to burn Image at 4x speed.
Boot the CD this way: How to Boot your Computer from a Bootable CD or DVD - Boot to CD, or at boot tap one-time BIOS boot menu key which is ESC on HP's, choose CD drive to boot.
In PW, Click on Disk number to highlight it, then from Disk tab select Convert to Basic, click OK, then Apply.
Once it converts, rightclick on C, select Modify>Set to Logical, click OK.
Then rightclick C again to Resize, slide right grey border to left to make space for a data partiiton the size of your choice, click OK,
then rightclick the newly created Unallocated space to create New logical NTFS partition, label it, assign letter, click OK, Apply all steps.

Similiar Issue
Hey gregrocker hoping your still active but wondering if you could help with my little issue, I have a System Reserved (100mb sector) that shows up in My Computer and as im a perfectionist I dont like the look of it haha.
Anyway is there a way to merge this into another disk somehow, I remember doing this on an earlier Windows and it ruined everything (would not boot etc.)
I don't really want to try myself as im not very savvy when it comes to disk management and just performed a clean install on Win7 Ultimate last week and don't want to do it again or lose data.
So basically i want to get rid of System Reserved and make C drive the System, Active, Boot, Page File, Crash Dump, Primary all in one is this possible?
Heres a screen from Disk Management

Hey gregrocker hoping your still active but wondering if you could help with my little issue, I have a System Reserved (100mb sector) that shows up in My Computer and as im a perfectionist I dont like the look of it haha.
Anyway is there a way to merge this into another disk somehow, I remember doing this on an earlier Windows and it ruined everything (would not boot etc.)
I don't really want to try myself as im not very savvy when it comes to disk management and just performed a clean install on Win7 Ultimate last week and don't want to do it again or lose data.
So basically i want to get rid of System Reserved and make C drive the System, Active, Boot, Page File, Crash Dump, Primary all in one is this possible?
Heres a screen from Disk Management
My Computer
At a glance
Windows 8.1 Pro x64AMD FX-8350 @ 4.2GhzCorsair Vengeance DDR3 16GB (4gb x 4) @ 1600mhzAsus GTX780ti Watercooled
- Computer type
- PC/Desktop
- Computer Manufacturer/Model Number
- Custom
- OS
- Windows 8.1 Pro x64
- CPU
- AMD FX-8350 @ 4.2Ghz
- Motherboard
- Gigabyte GA-990FXA-UD3 rev 1.2
- Memory
- Corsair Vengeance DDR3 16GB (4gb x 4) @ 1600mhz
- Graphics Card(s)
- Asus GTX780ti Watercooled
- Sound Card
- Asus Xonar 7.1
- Monitor(s) Displays
- 27" Asus VG278H 3D LED 120hz
- Screen Resolution
- 1920x1080
- Hard Drives
- Intel 520 Series 240GB SSD
Intel 330 Series 120GB SSD
Corsair Force 3 GT 120GB SSD
Seagate 3TB SATA3
WD 2TB USB2
WD 2TB USB3
- PSU
- Enermax MaxRevo 1500w
- Case
- NZXT Phantom 630
- Cooling
- Full Custom Water Loop Including Video Cards
- Keyboard
- Razer Blackwidow Ultimate 2013, Razer Nostromo
- Mouse
- Razer Naga 2014
- Internet Speed
- Speedtest.net Down=27Mbps, Up=5Mbps
- Antivirus
- MSE
- Browser
- Chrome
seavixen32
New member
VivaLaMikey, you're best to start a new thread as many of WSF's helpers will ignore a resolved thread to concentrate on the ones still needing a solution.
My Computer
At a glance
Windows 7 Ultimate SP1 64-BitIntel Core i7 870 @ 2.93GHz8Gb Dual-Channel DDR3 @ 664MHznVidia GeForce GTX 460 1024MB dedicated RAM
- Computer Manufacturer/Model Number
- HP Pavilion Elite 495UK
- OS
- Windows 7 Ultimate SP1 64-Bit
- CPU
- Intel Core i7 870 @ 2.93GHz
- Motherboard
- MSI 2A9C (CPU1)
- Memory
- 8Gb Dual-Channel DDR3 @ 664MHz
- Graphics Card(s)
- nVidia GeForce GTX 460 1024MB dedicated RAM
- Sound Card
- Realtek HD Audio
- Monitor(s) Displays
- HP2310i
- Screen Resolution
- 1920 x 1080
- Hard Drives
- 1x1954GB Hitachi HDS22020ALA 330 (RAID), 1x1954GB Hitachi External for backup and storage
- PSU
- 460W
- Case
- HP Elite
- Cooling
- Air cooled
- Keyboard
- Logitech K750 solar-powered keyboard
- Mouse
- Logitech Wireless M180 mouse
- Internet Speed
- 2Mb
- Other Info
- Pure Avanti Flow Internet Radio with iPod Dock, 64Gb iPod, HP USB Speakers, Sony MDR-V500 Headphones, Sony Vaio F-Series Laptop
- Local time
- 10:25 PM
- Messages
- 50,634
Since this thread is getting Google hits, here are the steps for removing the System Reserved partition:
Boot free Partition Wizard bootable CD, rightclick on Win7 partition to Modify>Set to Active, click OK.
Next click on Disk # to highlight disk, from Disk tab select Rebuild MBR, Apply all steps. Reboot.
If Win7 doesn't start boot into the Win7 DVD Repair console or System Repair Disk to run Startup Repair - Run 3 Separate Times until Win7 starts.
Once Win7 starts and holds the System Active Boot flags on its partition, boot back into PW CD, click on SysReserved partition to Delete, click OK.
Then rightclick on Win7 partition to Resize, slide left grey border to the left to take up the deleted space, OK, Apply all steps.
Boot free Partition Wizard bootable CD, rightclick on Win7 partition to Modify>Set to Active, click OK.
Next click on Disk # to highlight disk, from Disk tab select Rebuild MBR, Apply all steps. Reboot.
If Win7 doesn't start boot into the Win7 DVD Repair console or System Repair Disk to run Startup Repair - Run 3 Separate Times until Win7 starts.
Once Win7 starts and holds the System Active Boot flags on its partition, boot back into PW CD, click on SysReserved partition to Delete, click OK.
Then rightclick on Win7 partition to Resize, slide left grey border to the left to take up the deleted space, OK, Apply all steps.
vivalamickey: Hi , I have installed the Lion Theme for windows and i didnt do the point restore ,there is any way to comeback to windows if i dont like it or i have to install windows again?
Thanks Rickjaard
Thanks Rickjaard
My Computer
At a glance
win-7 ultimate
- OS
- win-7 ultimate
How to change the Boot partition letter
Hi Guys,
I came across this thread when searching how to change the Boot partition letter. However it is not quite covering my problem, but no luck anywhere else.
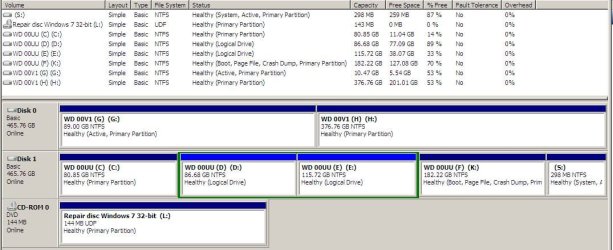
I've attached my Comp Management snip.
I would like to change my K: partition back to F: (W7 changed it to K: for some reason), I can reinstall programs if need be but would prefer not to have to reinstall W7.
FYI:
I have W7 Windows folder on K:.
I have XP Windows folder on C: and another on G:.
I moved the W7 boot files to S: to avoid W7 backups getting too large.
Hi Guys,
I came across this thread when searching how to change the Boot partition letter. However it is not quite covering my problem, but no luck anywhere else.
I've attached my Comp Management snip.
I would like to change my K: partition back to F: (W7 changed it to K: for some reason), I can reinstall programs if need be but would prefer not to have to reinstall W7.
FYI:
I have W7 Windows folder on K:.
I have XP Windows folder on C: and another on G:.
I moved the W7 boot files to S: to avoid W7 backups getting too large.
Attachments
My Computer
At a glance
Windows 7 Ultimate 32bit
- OS
- Windows 7 Ultimate 32bit
- Local time
- 10:25 PM
- Messages
- 50,634
You cannot change an OS partition drive letter without ruining the OS, no matter what anyone claims.
In your case you apparently installed Win7 from another OS so that it doesn't see itself as C as it will when correctly installed from boot. Always install an OS from boot to take this advantage.
Your option now is to boot the installer to reinstall Win7 from boot. This will place Win7 on C whenever it is booted and reconfigure the multi-boot menu for the other OS's.
In your case you apparently installed Win7 from another OS so that it doesn't see itself as C as it will when correctly installed from boot. Always install an OS from boot to take this advantage.
Your option now is to boot the installer to reinstall Win7 from boot. This will place Win7 on C whenever it is booted and reconfigure the multi-boot menu for the other OS's.
Greg,
Thanks for the quick reply.
So, if I understand you correctly, after reinstalling W7 from the DVD it will always assign the drive letter C: to itself when it boots up?
When I installed my second XP from the boot CD (before W7 was installed), this came up as G:. Only the first XP install comes up as C:
Kevin
Thanks for the quick reply.
So, if I understand you correctly, after reinstalling W7 from the DVD it will always assign the drive letter C: to itself when it boots up?
When I installed my second XP from the boot CD (before W7 was installed), this came up as G:. Only the first XP install comes up as C:
Kevin
My Computer
At a glance
Windows 7 Ultimate 32bit
- OS
- Windows 7 Ultimate 32bit
- Local time
- 10:25 PM
- Messages
- 50,634
XPired is not as advanced so will take the next drive letter whether booted or not.
Win7 is engineered to always be C when installer is booted, and when seen from the other OS's takes a virtual letter which is insignificant.
Win7 is engineered to always be C when installer is booted, and when seen from the other OS's takes a virtual letter which is insignificant.
greenpinman
New member
- Local time
- 12:25 AM
- Messages
- 3
Actually the sata connections do have something to do with which disk to boot from, if it is a system bought after august 2011, since that is when all comp manu's were to comply with sata 3 compat standard and the blue sata hook up is the primary drive as far as the mobo is concerned and will send a "operating System not found error" if the boot volume isn't on that drive and from the post it is trying to follow by marking that volume as activeTo answer some of your questions, you installed Win 7 with Disk 1 being your primary drive, so that is where the boot files were placed. The OS was then installed where you told it to.
The way to make sure a drive is primary is to only have one driveor set it as first in the Drive priority in the Bios, which will then list it in the Boot device priority, or at least that is the way it works on my system.
The fact it says disk 0 or disk 1, etc., depends only on the SATA connectors and is not an indication of primary drive. The fact one partition says "System", may indicate which drive is primary (different partition managers may use different terminology). I have recently discovered that a System partition can be on a secondary drive, as long as there is no active partition prior to it.
Another option for changing your system is to set the Win 7 partition active, which you already have it appears. Then run the startup repair option from the install DVD 2 or 3 times.
Note: They say a picture is worth a thousand words. Win 7 has a neat little utility called the Snipping tool. Using it to make a picture of your Disk Management window and attaching it using the paperclip can be very helpful, although your description was very clear...But if you need additional information, you might use it.
My Computer
At a glance
windows 7 pro x64intel Core2 quad8GB (4 x 2GB)evga nvidia GTX 560
- Computer Manufacturer/Model Number
- dell XPS 630i
- OS
- windows 7 pro x64
- CPU
- intel Core2 quad
- Motherboard
- dell opp150 a00
- Memory
- 8GB (4 x 2GB)
- Graphics Card(s)
- evga nvidia GTX 560
- Sound Card
- unk
- Monitor(s) Displays
- dell 2200WFP 22 " lcd
- Hard Drives
- Seagate 2 x 1.5TB
Seagate 500GB
- PSU
- 750 W oem
- Case
- XPS red
- Cooling
- Fan x 3
greenpinman
New member
- Local time
- 12:25 AM
- Messages
- 3
before giving tips like this a warning should be included that the system reserved hidden volume contains oem factory restore images and drivers for everything on the comp when it was boughtSince this thread is getting Google hits, here are the steps for removing the System Reserved partition:
Boot free Partition Wizard bootable CD, rightclick on Win7 partition to Modify>Set to Active, click OK.
Next click on Disk # to highlight disk, from Disk tab select Rebuild MBR, Apply all steps. Reboot.
If Win7 doesn't start boot into the Win7 DVD Repair console or System Repair Disk to run Startup Repair - Run 3 Separate Times until Win7 starts.
Once Win7 starts and holds the System Active Boot flags on its partition, boot back into PW CD, click on SysReserved partition to Delete, click OK.
Then rightclick on Win7 partition to Resize, slide left grey border to the left to take up the deleted space, OK, Apply all steps.
My Computer
At a glance
windows 7 pro x64intel Core2 quad8GB (4 x 2GB)evga nvidia GTX 560
- Computer Manufacturer/Model Number
- dell XPS 630i
- OS
- windows 7 pro x64
- CPU
- intel Core2 quad
- Motherboard
- dell opp150 a00
- Memory
- 8GB (4 x 2GB)
- Graphics Card(s)
- evga nvidia GTX 560
- Sound Card
- unk
- Monitor(s) Displays
- dell 2200WFP 22 " lcd
- Hard Drives
- Seagate 2 x 1.5TB
Seagate 500GB
- PSU
- 750 W oem
- Case
- XPS red
- Cooling
- Fan x 3
- Local time
- 10:25 PM
- Messages
- 50,634
In what OEM brands does the Recovery or Tools get placed in the 100mb System Reserved partition to which I am referring? The only thing that fits there is the boot files.
OEM drivers stored in a partition or drivers disk are out of date almost as soon as they're shipped. Win7 is driver-complete in it's installer and via optional Updates, and the latest OEM drivers if needed are on the model's Support Downloads webpage. Drivers in Factory Recovery are baked into the image.
Stick around and read to learn how the most influential installation and repair methods were developed over three years here before disputing them in your third post.
OEM drivers stored in a partition or drivers disk are out of date almost as soon as they're shipped. Win7 is driver-complete in it's installer and via optional Updates, and the latest OEM drivers if needed are on the model's Support Downloads webpage. Drivers in Factory Recovery are baked into the image.
Stick around and read to learn how the most influential installation and repair methods were developed over three years here before disputing them in your third post.
Last edited:
Similar threads
- Replies
- 6
- Views
- 8K

- Replies
- 4
- Views
- 709
- Replies
- 19
- Views
- 3K
- Replies
- 15
- Views
- 6K
