Solved Disk structure is corrupt and unreadable

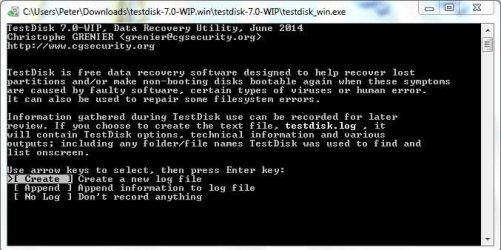
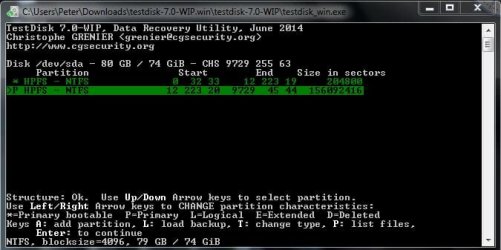
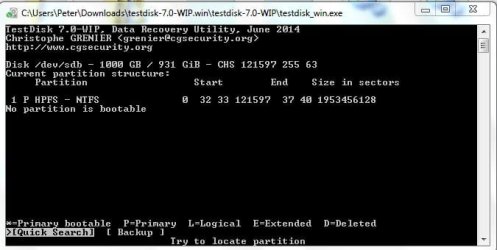
yep, click on testdisk_win.exe to run Test Disk and then follow the screen as indicated.

Read each screen.

And yes, you have to navigate with up/down Left/right arrow keys and use Enter key or any other key indicated in the screen. At anytime you can quit Test Disk by pressing Q repeatedly


If you have any doubts post the screenshot as you did above.
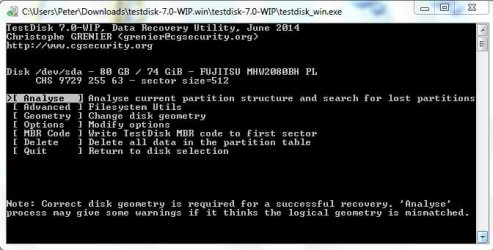
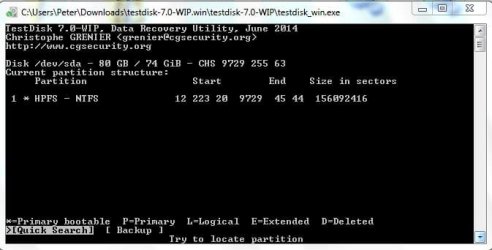
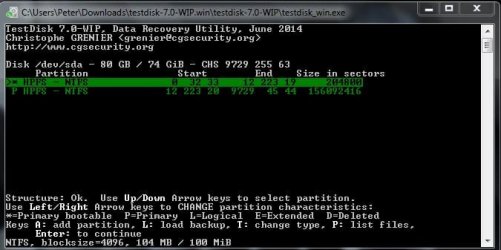
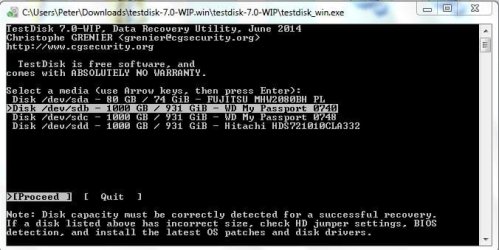
 

My Computer

OS
Windows 7 Home Premium 32 bit
Not sure what to do at last screen. And, will I need a separate empty volume for the result?
 

Attachments

  • CaptureTD1.JPG
    CaptureTD1.JPG
    64.3 KB · Views: 106
  • CaptureTD2.JPG
    CaptureTD2.JPG
    55.6 KB · Views: 106
  • CaptureTD3.JPG
    CaptureTD3.JPG
    53.8 KB · Views: 106
  • CaptureTD4.JPG
    CaptureTD4.JPG
    55.4 KB · Views: 106
  • CaptureTD5.JPG
    CaptureTD5.JPG
    42.5 KB · Views: 102
  • CaptureTD6.JPG
    CaptureTD6.JPG
    50.7 KB · Views: 108
  • CaptureTD7.JPG
    CaptureTD7.JPG
    49.9 KB · Views: 105
  • CaptureTD8.JPG
    CaptureTD8.JPG
    39.4 KB · Views: 103

My Computer

OS
Windows 7 Pro 64bit
No you have selected the wrong drive. Quit Test Disk. Press Q Q Q Q or X on the window.

Then remove all other external drives except your problem drive.

Run Test disk. No log Enter

You will see two drives 1. Your system drive and 2. your problem drive.

You should be able to differentiate by reading the capacity. I think your system drive is some 80GB

Select your 1TB problem drive by arrow keys and proceed.
 

My Computer

OS
Windows 7 Home Premium 32 bit
Right. Saw that, and here is current.
 

Attachments

  • CaptureTD1A.JPG
    CaptureTD1A.JPG
    62.8 KB · Views: 106
  • CaptureTD2A.JPG
    CaptureTD2A.JPG
    54.6 KB · Views: 108
  • CaptureTD3A.JPG
    CaptureTD3A.JPG
    57.4 KB · Views: 107
  • CaptureTD4A.JPG
    CaptureTD4A.JPG
    58.9 KB · Views: 108
  • CaptureTD5A.JPG
    CaptureTD5A.JPG
    43.6 KB · Views: 104

My Computer

OS
Windows 7 Pro 64bit
Quitting and starting again. Saw your note about removing other drives.
 

My Computer

OS
Windows 7 Pro 64bit
QUit Quit Quit . You still didn't remove the other external drives. It is a cardinal rule to have only your problem drive connected so that there is no possibility of selecting a wrong drive.

So safely Remove all other external drives.

Confirm with Windows Disk Management that the problem drive is the one connected. You seem to have many 1 TB drives and we don't want to make any mistake. A wrong move in Test disk will cost you dear.

So with only your problem drive connected run TestDisk. With the arrow key select your 1 TB drive.

In the fourth screen by default Analyse is highlighted. But we do not want to analyse. With the arrow key go one step down and select Advanced File Utilities.

If you think a screen by screen guidance is required we can do it. I am on station. Post each screen and then follow the instructions.
 

My Computer

OS
Windows 7 Home Premium 32 bit
After Advanced File Util I'm at this screen. Saw note about other drives, done.
 

Attachments

  • Capture.JPG
    Capture.JPG
    40.7 KB · Views: 104

My Computer

OS
Windows 7 Pro 64bit
Have you made sure that the drive connected is your problem drive by looking at it in Windows Disk Management?

Yes /no
 

My Computer

OS
Windows 7 Home Premium 32 bit
OK, good.

Boot is highlighted. In the normal course we will press Enter to go to the next screen.

But I am just curious. So with the right arrow key move to List and press enter. We will see whether it shows all your files.

Post that screen.
 

My Computer

OS
Windows 7 Home Premium 32 bit
OK, good.

Boot is highlighted. In the normal course we will press Enter to go to the next screen.

But I am just curious. So with the right arrow key move to List and press enter. We will see whether it shows all your files.

Post that screen.
List screen result attached.

No way to go back to previous screenso I can enter Boot. Starting over. I do enter Boot, correct?

edit: entering 'quit' brought me back to previous Boot/List etc.
 

Attachments

  • Capture.JPG
    Capture.JPG
    33.1 KB · Views: 61

My Computer

OS
Windows 7 Pro 64bit
OK. Press enter to Quit.

If it does not take you to the previous screen, repeat TestDisk till you come to the Boot screen and press Enter on Boot to go to the next screen.( make sure to select your 1 TB drive always.)

If it goes to the previous screen, then move to Boot with the arrow key and press enter.

Post that screen.
 

My Computer

OS
Windows 7 Home Premium 32 bit
Enter Boot screen result...
 

Attachments

  • Capture.JPG
    Capture.JPG
    46.4 KB · Views: 61

My Computer

OS
Windows 7 Pro 64bit
Looks good so far. Now we shall know whether we can attain nirvana.:)

Now with the right arrow key move to Repair MFT and press Enter.

Report what happens. Post any screen that comes up.

If TestDisk starts scanning in its attempt to repair MFT, let it do it. Again it may take a long time.
 

My Computer

OS
Windows 7 Home Premium 32 bit
Not a good sign :)
 

Attachments

  • Capture.JPG
    Capture.JPG
    30 KB · Views: 61

My Computer

OS
Windows 7 Pro 64bit
That is bad luck. The mirror also is corrupted.

So then data recovery is the only option. Quit Test Disk.

Get on to PhotoRec.

Follow the process under recovery in this guide. (Only that portion under recovery. What is earlier said there is how I created a corrupt disk to test PhotoRec for recovery. You need not format the drive and then run PhotoRec. You will simply run PhotoRec in the present condition of your faulty drive.)

Take your time to read through the guide till you get a grip on it and then start. One redeeming feature of PhotoRec is that it does not write anything to the faulty drive and there is no way you can ruin the faulty drive any further even if you make any false moves. So you can play with it to your heart's delight.:)

Before you run PhotoRec you have to connect the empty drive on which you want to copy.

http://www.sevenforums.com/software/193467-guide-using-photorec-recovery-software.html

I am off for my dinner and will henceforth peep in once in a while as is my practice.
 

My Computer

OS
Windows 7 Home Premium 32 bit
At "11. Tenth Window" of the tutorial, the screen shows a line he has chosen for the destination that says "recovery". This is not among my choices. I quit photorec and put a folder in the testdisk folder named Recovery, but it does not show up when getting to the destination screen again. I need to figure out which choice to make.

http://www.sevenforums.com/software/193467-guide-using-photorec-recovery-software.html

The screen captures are first visible portion of my choices and then the remainder further down after arrowing down.

I would also like to know if the choices could be other than in the testdisk directory. I ask because if I choose .mp4, for example, the results (if most or all are found) would be huge and would not fit on C. It would have to be an external drive.

Which also leads me to another question: will this program recover files that have been deleted over the past year? In which case, we're talking literally multiple terabytes.
 

Attachments

  • Capture1.JPG
    Capture1.JPG
    75.3 KB · Views: 60
  • Capture2.JPG
    Capture2.JPG
    79.2 KB · Views: 60

My Computer

OS
Windows 7 Pro 64bit
While jumanji enjoys his dinner, I can answer some questions.

Yes, the destination folder can be any directory/folder.
I'm wondering if the Recovery folder you created wasn't one level up
capture1a.png

The only stipulation is that the folder is NOT on the same partition / volume as the data you are trying to recover. I'll go one further and state that it should be a separate drive, which I believe is the case for your recovery.

Suggest creating a Recovery folder in your Downloads folder, not under Testdisk.
 

My Computer

Computer type
Laptop
Computer Manufacturer/Model Number
HP Pavilion dv6-6c10us
OS
x64 (6.3.9600) Win8.1 Pro & soon dual boot x64 (6.1.7601) Win7_SP1 HomePrem
CPU
AMD A6-3420M APU with Radeon(tm) HD Graphics
Motherboard
Hewlett-Packard 1805
Memory
6.00 GB
Graphics Card(s)
AMD Radeon(TM) HD 6520G
Sound Card
(1) AMD High Definition Audio Device (2) IDT High Definiti
Monitor(s) Displays
HP W2072a 20" LCD (1600 x 900) @ 60 Hz
Screen Resolution
1366 x 768 x 32 bits (4294967296 colors) @ 60 Hz
Hard Drives
ST640LM0 00 HM641JI SATA Disk Device
Keyboard
Logitech k520 wireless KB
Mouse
Logitech m320 wireless mouse (bundled with KB)
Internet Speed
15/5 | 54 MB Wireless 'n'
Antivirus
Realtime: Defender or Avast | On-demand: Malwarebytes, ESET
Browser
IE 11 on Win8, IE 10 on win 7
Other Info
Media: [Gimp, Audacity, VLC] || Comm: [WEmail 2012, Skype] || Productivity: [OpenOffice,| Textpad] || Utils: [Sysinternals, cCleaner, Speccy, Defraggler]
While jumanji enjoys his dinner, I can answer some questions.

Yes, the destination folder can be any directory/folder.
I'm wondering if the Recovery folder you created wasn't one level up
View attachment 321459

The only stipulation is that the folder is NOT on the same partition / volume as the data you are trying to recover. I'll go one further and state that it should be a separate drive, which I believe is the case for your recovery.

Suggest creating a Recovery folder in your Downloads folder, not under Testdisk.
Unfamiliar with DOS navigation. How do I get to a destination other than testdisk folder? See my edited previous post with related questions about old deleted files, huge results etc.. Thanks.

edit: never mind, used arrow keys to get to a folder I created on a USB drive. Question is: is it wise to have this USB drive connected while running the PhotoRec recovery? Again, need to mention that my results for video files (if found) will be gigantic, too large for space on C, only an external drive.
 
Last edited:

My Computer

OS
Windows 7 Pro 64bit
By way of some explanation,

In the subject guide I created a Recovery folder on one of the partitions H on my internal drive ( Which shows up as drive H) and then navigated to it.

I know it is a bit difficult to navigate till you get a grip on it.

When this question was raised by a OP who used TestDisk I wrote this post http://www.sevenforums.com/hardware...suddenly-became-unllocated-3.html#post2395385

You will now be using an external drive to copy the files. It is optional to create a Recovery folder in it ( Which you should before you started PhotoRec) but preferable, to segregate it in case you have other data present on the external drive.

Depending upon whether you created such a folder on the external drive, you will navigate to that external drive or go one step ahead and into that folder on that external drive.

Screenshot 7 onwards in the above referredd post should guide you on how to navigate to that external drive/Recovery folder in that external drive. ( Don't look at Screenshots 1 to 6 :). Those pertain to TestDisk.)

Once you have the basic idea you can play around with the arrow keys and feel how it takes you everywhere.:)
 

My Computer

OS
Windows 7 Home Premium 32 bit
Back
Top