HDD 2Tb Unallocated, how to retrieved all data

TonyH

New member
Local time
1:29 AM
Messages
17
Hi,
i have external drive WD (My Book essential) 2Tb only one partition.
OS win 7
laptop acer
suddenly OS win 7 did not detect the HDD, when i checked at computer Management, it said not initialize and offline.
this step i already done :
1. initialize and make it online at computer management.
2. choose new simple volume..
3. assign the drive letter.
4. choose do not format this volume.
5. click finish.
6. when i read some article that said if you still want the data, you can not initialize the drive, after that i delete the volume.
7. latest status was unallocated and online.

what i have done :
1. i just follow Jumanji step in other thread using mini partiion tool, run the quick scan until finish and no luck finding the partition.
2. try easyUS partition recovery, choose data recovery. the result is many file listed but all of them can't be used.
3. lastly running minitool power data recovery and choose lost partition recovery, 5% until now.

question :
1. the step i have done, is it wrong ?
2. the data still can recovered ?
3. how to recover the data ?

please help and Thanks in advance.
 

My Computer My Computer

At a glance

Windows 7 ultimate x64i5
Computer type
Laptop
Computer Manufacturer/Model Number
Acer
OS
Windows 7 ultimate x64
CPU
i5
Update progress, using software recovery that mention above.
all the data recovered can't be used. is there a way to revert back to original data before unallocated ?
 

My Computer My Computer

At a glance

Windows 7 ultimate x64i5
Computer type
Laptop
Computer Manufacturer/Model Number
Acer
OS
Windows 7 ultimate x64
CPU
i5
hmmm... you have come here after messing up your drive right and left.

Initialising the drive is OK. It only writes the MBR code to sector 0. You messed it up by creating a new volume which writes the partition table at sector 0 and also writes zeros to the NTFS boot sector at 2048 destroying the original NTFS that existed.Deleting that volume will only remove the partition table at sector 0. Leaves the NTFS boot sector unaffected. All zeros as of now in your case - a clean one sector wipe..

Immediately after initialising, had you run PW, it would have found the original valid NTFS at sector 2048 and would have written the partition table in sector 0 and perhaps you would have been singing merrily. No longer, since by creating a new volume, you have wiped the NT File System at sector 2048.

Now using TestDisk, we may need to find whether the backup of that can be found and is OK.

Download Windows version of TestDisk from here TestDisk Download - CGSecurity
Note: Download only Windows version and not the Windows 64-bit version even if you have Windows 64 bit on your machine.
Extract it and run testdisk_win.exe with only your external drive plugged in ( Please remove any other external drives/pen drives)

A. At the first window, select “No Log” and press the <Enter> key. ( You can move the HighLight with UP/Down arrow keys and horizontally with Left/Right arrow keys))
B. Select which disk to analyse, choose “Proceed” and <Enter>. ( Choose Disk not drive and choose your external identified with its capacity))
C. Select partition type – Intel if it’s a PC then <Enter>.
D. Choose Advanced > press <Enter>.
E. Choose Boot > press <Enter>.

Post the resultant screen. After taking the screenshot and posting it, quit TestDisk by repeatedly pressing Q or hitting the X on the top right corner. You can run TestDisk again after getting my instructions.

Follow the instructions. Do not deviate and try something on your own. It is dangerous if you do not know what it does exactly.

Using Snipping tool for screenshots: How to Use the Snipping Tool in Vista

Uploading to SevenForums: http://www.sevenforums.com/tutorials/9733-screenshots-files-upload-post-seven-forums.html
 
Last edited:

My Computer My Computer

At a glance

Windows 7 Home Premium 32 bit
OS
Windows 7 Home Premium 32 bit
Hi Jumanji, yeahh i am wrong. because i just follow the instruction from unknown source.
i just realize when i search more of information about this.
i see, that how it work for created new volume.

i already follow the instruction from you, and i dont see boot option.
attachment for the screen capture.

Thanks a lot for the response.
 

Attachments

  • testdisk_1.JPG
    testdisk_1.JPG
    45.7 KB · Views: 39
  • testdisk_2.JPG
    testdisk_2.JPG
    27.3 KB · Views: 40

My Computer My Computer

At a glance

Windows 7 ultimate x64i5
Computer type
Laptop
Computer Manufacturer/Model Number
Acer
OS
Windows 7 ultimate x64
CPU
i5
I didn't expect this. Hmmm... it really makes me feel that I should quit my indulgence in data recovery and live a peaceful life :).

If what you have done as described in steps 1 to 7 in the first part of your first post is all that had happened, you should get the boot screen I mentioned.

Does this mean what you did in the later part viz running the EaseUs Partition Recovery and Minitool Power Data recovery botched your drive further???? Too many cooks can of course spoil the broth.

Necessarily we have to investigate further and find the status of your drive.

To start with Post a screenshot of Windows Disk Management with only your external drive connected. Follow the guidelines here : http://www.sevenforums.com/tutorials/274797-disk-management-post-screen-capture-image.html

Also post a screenshot of Partition Wizard. The very first screen that appears when you launch PW.

I shall see it tomorrow morning. You must also be running late with an hour or so ahead of me.
 

My Computer My Computer

At a glance

Windows 7 Home Premium 32 bit
OS
Windows 7 Home Premium 32 bit
Hi,
don't feel like that, i don't expect much also.
we already try best we can do :)

before i just run the recovery partition and data, i dont know both of that can botched my drive.
here is the request of the screen shot:


ok continue next morning.
Thanks again for your support today.
have a great dream :)
 

Attachments

  • computer_managment.JPG
    computer_managment.JPG
    92.4 KB · Views: 0
  • PW.JPG
    PW.JPG
    118.3 KB · Views: 0

My Computer My Computer

At a glance

Windows 7 ultimate x64i5
Computer type
Laptop
Computer Manufacturer/Model Number
Acer
OS
Windows 7 ultimate x64
CPU
i5
OK, I wanted you to post only the first screen that appears when you launch PW. You had obscured it with the PRW Window and I can't see what is behind. Never mind. What I can see is enough.

Now go ahead and install bootice. If your system is 32bit , download v1.3.3.2 x86. If your system is 64 bit download v1.3.3.2 x64 【BOOTICE v1.3.3.2: 功能强大的启动维护工具】-å*é€¸è½© Extract the downloaded .rar file to get the single *.exe file which you will run.

1.Select your 2TB external drive > Sector Edit > click on Partitions button and post a screenshot of what it shows. 2.Then select sector 63 and post a screenshot. 3.Select sector 2048 and post a screen shot.

4. Keep your mouse pointer inside the bootice Window and use the mouse roller to scroll through all sectors starting from 2048. If you see the sectors populated - but not 00 s, then you have the data ( though we will not know in what shape they will be which we will come to know only when we recover the data if we can manage to.)

On how to use bootice: http://www.sevenforums.com/hardware-devices/310295-lost-partitions.html#post2584426

At the moment we are only examining the drive and not writing anything to it. No need to save or restore or edit the sector contents. So keep away from making any changes unless I ask you to.
 
Last edited:

My Computer My Computer

At a glance

Windows 7 Home Premium 32 bit
OS
Windows 7 Home Premium 32 bit
Hi Jumanji,
here is your request :
1,2,3. screen shot
4. the only 00 is sector 2048, other have sector populated.
 

Attachments

  • Bootice_3.jpg
    Bootice_3.jpg
    136 KB · Views: 35
  • Bootice_2.jpg
    Bootice_2.jpg
    141.9 KB · Views: 35
  • Bootice_1.jpg
    Bootice_1.jpg
    198.2 KB · Views: 0

My Computer My Computer

At a glance

Windows 7 ultimate x64i5
Computer type
Laptop
Computer Manufacturer/Model Number
Acer
OS
Windows 7 ultimate x64
CPU
i5
Good. You have been catching up and doing a good job.

I shall give you some detailed instructions in a few hours from now. Though I had seen your post much earlier, I was busy with the Airconditioner Technician who had come to attend a fault. Before I go to bed, you can expect my post which you can carry out tomorrow.

The sector 0 has the MBR but no partition table. Sector 63 should normally be all zeros but there is some junk in it. Sector 2048 is all zeros, No NTFS, as expected since creating the new volume had done it.

Now I just want a few clarifications before my next post.

1. Quickly scroll through sectors 1 to 2047 and tell me whether you see any junk in those. Normally it should all be zero.

2. Also confirm when you created a new volume and later deleted it, you did it all in Windows Disk Management.

I have my plan ready to roll out but need sometime to organise the matter and write.
 

My Computer My Computer

At a glance

Windows 7 Home Premium 32 bit
OS
Windows 7 Home Premium 32 bit
Hi Jumanji,
that ok, no need hurry.
i just see a light of hope from your last post :)
1. - I checked sector 34 until 2047, most of the value similar to sector 63.
- from sector 1 to 34, there is no zero.
2. yes confirm, i did created new volume and deleted it from windows disk management.
 

My Computer My Computer

At a glance

Windows 7 ultimate x64i5
Computer type
Laptop
Computer Manufacturer/Model Number
Acer
OS
Windows 7 ultimate x64
CPU
i5
I am also hoping that there is a possibility to restore your drive. Yesterday I did a small experiment. On my 750GB external drive which I keep exclusively for my experiments, I created an MBR drive with a single partition in Windows Disk Management, copied some 30GB of data onto it and then did all that you did.:)

In your case we don't know exactly what happened to the sector 0. A drive asks to be initialised only when sector 0 containing the MBR code and the partition table gets corrupted. Initialising the drive only writes the MBR code to sector 0- not even the partition table. Only when one creates a new volume the partition table is written into sector 0 in its assigned space. Simultaneously it also writes zeros to sector 2048 where the first volume/partition always starts and making that sector ready to write the NTFS onto it when one formats.

That initialising a drive will destroy all data is a myth. Initialising stops with sector 0 and does not touch any other sector if one stops with just initialising. Nothing new here. See my post here http://www.sevenforums.com/hardware...-initialize-drive-isnt-there.html#post2841509 . Shows where the MBR code lies and where the Partition table rests, all in sector 0.

Now to carryon with the experiment, I destroyed the MBR code and the partition table in sector 0 by writing all zeros to sector 0 (using bootice). My drive became inaccessible. When I invoked Windows Disk Management it wanted me to initialise. I initialised it as an MBR. MBR code written into sector 0. I proceeded to create a new volume, assign a drive letter to it but "do not format". Exactly what the OP did. Creating a new volume wrote the partition table to Sector 0. Simultaneously it wrote all zeroes to sector 2048 where my original NTFS existed.Now Partition Wizard also will not find the partition since it sees only zeroes at sector 2048 and no NTFS. I now use TestDisk to find whether the backup of the NTFS exists and is in good shape. It did find the backup ok and wrote it into sector 2048. My drive came back alive with all data that I had originally written intact. And it was a surprise double delight. TestDisk not only wrote the NTFS boot record into sector 2048 but also wrote the corresponding Partition table into Sector 0. I was thinking that I may have to run Partition recovery Wizard to find and write the partition table after TestDisk wrote the NTFS on 2048.

There was a little unknown phenomenon when I did this experiment. When I did the create new volume, assign a drive letter but do not format operation and then checked with bootice, it showed a FAT16 partition starting at sector 2048 even though sector 2048 was all zeros. TestDisk also found it as a FAT16 partition. I asked it to look at it as an NTFS and look for the NTFS backup. It did find the backup OK and wrote the NTFS backup to sector 2048 bringing my drive back alive.

With the renewed conviction that doing all this does in no way affect the data, I am now going to ask the OP to do the same thing again. (In the previous run TestDisk did not find a partition and therefore the NTFS back up.)

And so, Tony H, do the following.

1. Write zeros to sector 0

2. When Windows Disk Management asks you to initialise it do it as an MBR disk.

3. Create a new volume, assign a drive letter but do not format. Safely remove the drive and plug it in again. (If it refuses to be safely removed citing that some program is still holding it, close all programs , shut down your PC, unplug your drive and plug it in after the reboot.)

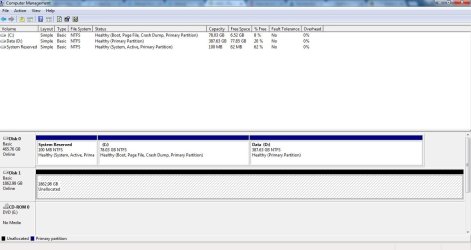
4. After this, run bootice, click on the Partitions button and check whether it shows a FAT16 partition at 2048.

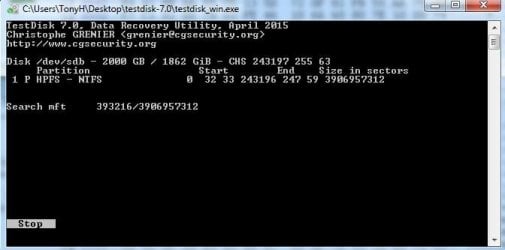
5. If it shows, then run TestDisk and repeat what you have done as per my post #3

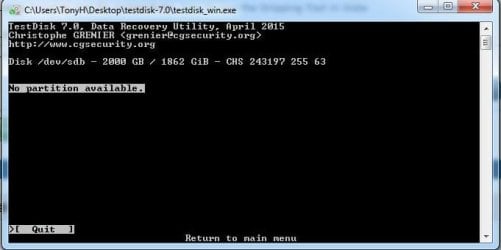
Does it show you a FAT16 Partition found, instead of the " No partition available" message you got last time?

If it does find, post the screenshot. I shall give further instructions to find the NTFS Backup.

If not, we may turn to other avenues to get the data. Yes, we don't lose hope till we finish with all that we can.

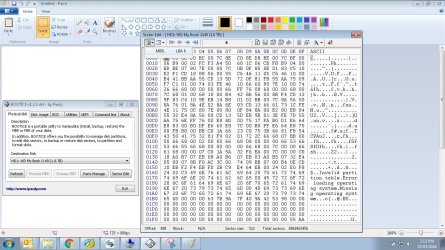
Now I shall only give instructions on how to write zeros to sector 0 and write it to the drive.
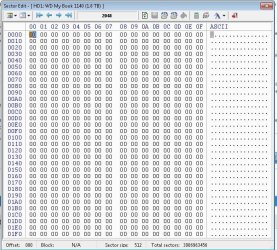
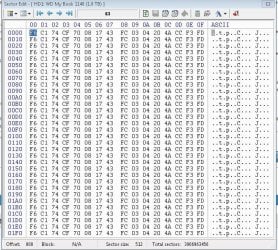
Using bootice select your external drive >Sector Edit. You will be at sector 0 ( Make doubly sure you don't do this on your system drive. :) )

Run the mouse pointer diagonally across to select all fields > Right Click > Fill Selection > Fill with 0x00 > OK

22-03-2016 23-11-05.jpg

22-03-2016 23-16-09.jpg

You will see all fields 00. Click on Save Changes on the top menu bar. Done. You have written 00 to sector 0 of the drive.

Quit bootice, safely remove your drive and then plug it in again.

Go to Step 2 above, Windows Disk Management. You will be asked to initialise the drive.

Proceed as instructed already.

I am keeping my fingers crossed. :)
 
Last edited:

My Computer My Computer

At a glance

Windows 7 Home Premium 32 bit
OS
Windows 7 Home Premium 32 bit
Hi Jumanji,
That great, really appreciate the experiment you did. :cool:

just followed the step you mention, here is the result :
1. Run the Bootice
- Changed value 00 to sector 0, Done.
- I dont find the Fat16 partition at LBA 2048 (screen shot)
Bootice_4_after.jpg
2. Run the TestDisk
- Followed the #3 post, but i don't choosed boot because i read you only need to know is there Fat16 partition available.
- The Fat16 partition available (screen shot)
testdisk_3_after.JPG
i really read your post carefully, hope i dont miss that you ask for.
just able to do it now. :)
 

My Computer My Computer

At a glance

Windows 7 ultimate x64i5
Computer type
Laptop
Computer Manufacturer/Model Number
Acer
OS
Windows 7 ultimate x64
CPU
i5
That looks good. And yes, I wanted you to stop at this for further instructions.

Screenshots will follow explaining what exactly you should do now. Please wait.
 

My Computer My Computer

At a glance

Windows 7 Home Premium 32 bit
OS
Windows 7 Home Premium 32 bit
Do the following:

When you get the screen showing the Fat16 Partition, move Highlight to [Type] Press Enter key

2 move to type.jpg

This will be the next screen. [Proceed] Enter

3yougetthis21-03-2016 21-24-32.jpg

On this next screen type 07 after the question mark as shown and press Enter

4type07.jpg

You will get this next screen showing that the partitionType has been changed to HPFS - NTFS.
[BOOT] Enter

5yougetthis.jpg

Do you get this screen now? If the Backup boot sector status is OK, then and only then [Backup BS] Enter

6backupok.jpg

When you get this screen type y on your keyboard to say yes. Wait for a few seconds.

721-03-2016 21-37-07.jpg

Do you get this screen saying that both Boot sector and Backup boot sector are OK now?

821-03-2016 21-40-20.jpg

Now quit,quit quit quit till you quit TestDisk or just click on the X close button on top right corner.

Safely remove your external drive and then plug it in.

Can you access your drive and see all your data?

As always a pessimist :), I keep my fingers crossed.

Do this slowly. Take your time to look into each screenshot before you press Enter or any other command. It may take a few seconds for TestDisk to execute each command. So after each command wait for a few seconds for the next screen to appear.

If any screen is different from what is shown above, post that screen and quit TestDisk. Do not play with TestDisk. :)
 

My Computer My Computer

At a glance

Windows 7 Home Premium 32 bit
OS
Windows 7 Home Premium 32 bit
Hi Jumanji,
no good, the screen is different.
both status boot sector and backup boot sector are bad.
testdisk_4_after.JPG

i always like your warning, it kept me alert anytime :)
 

My Computer My Computer

At a glance

Windows 7 ultimate x64i5
Computer type
Laptop
Computer Manufacturer/Model Number
Acer
OS
Windows 7 ultimate x64
CPU
i5
That is absolute bad luck. The backup boot sector is also bad.

The screenshots I posted were from my experiment, where it could find the backup OK exactly after doing what you had done in the first part. Since I don't know how EaseUS Data Recovery and the Power Data Recovery work, I can't say for sure that those could have botched up your drive but only suspect.

Now you are left with only one option. Trying to recover data using PhotoRec. PhotoRec will try to rebuild your files without depending upon the file system. Using that you can get only all the files without the original file names and folder structure. You can read about PhotoRec here PhotoRec - Digital Picture and File Recovery Of particular interest will be PhotoRec step by step in that page. You will find photorec_win.exe in the same TestDisk Folder. A rudimentary guide on using PhotoRec is here written by one jumanji :). http://www.sevenforums.com/software/193467-guide-using-photorec-recovery-software.html . Straightaway go to the topic under Recovery ( Do not format your drive) Note: You should have another formatted external drive with adequate space plugged in to copy the files recovered by PhotoRec.

You can also try the Free Trial version of GetDataback Simple https://www.runtime.org/data-recovery-software.htm, scan your external drive and check whether it shows all your files complete with the original folder structure and filenames.If the MFT is not corrupted it should be able to do that. You can preview the files also and if you are happy you have buy a licence to copy.

Another commercial software recommended by the author of TestDisk when PhotoRec fails, is Zero Assumption Recovery.

PhotoRec, Getdataback as well as Zero Assumption Recovery do not write anything to the drive under recovery and are absolutely safe.

Keep us posted when you try these things.

Note: On your last screenshot, Move Highlight to [Rebuild BS] and press Enter. Check whether it can successfully restore the boot Sector, before proceeding with PhotoRec/ Getdataback/ZAR. I missed it.
 

My Computer My Computer

At a glance

Windows 7 Home Premium 32 bit
OS
Windows 7 Home Premium 32 bit
Hi Jumanji,
i will try the software recovery that you mention after my new HDD arrived (yesterday purchase from online shop).
will update the post also when i have tried all the option available.
Thanks a lot for all your help and support, i have gained much knowledge from this thread. :)
 

My Computer My Computer

At a glance

Windows 7 ultimate x64i5
Computer type
Laptop
Computer Manufacturer/Model Number
Acer
OS
Windows 7 ultimate x64
CPU
i5
While you wait for your online order to be delivered, you can try Rebuild BS in TestDisk. I missed it and added it at the end of my last post. So you could have missed it.. It will try to rebuild the NTFS Boot Sector at sector 2048. If it is successful, OK. If not go to PhotoRec/ Getdataback/ZAR

When you try Rebuild BS post the screenshot of what happened. I haven't tried it anytime before and so I need to learn too :D.

And yes, you do learn how to use certain tools.Especially bootice is a nice tool. You can click on the Partition Table button, that gives you details of all partitions and important sectors. You can save those individual sectors.

When you have problems with your HDD, you can examine what happened and restore the important sectors from the back up. In your case for example, when it asked you to initialise, you could have examined Sector 0 and restored it from the backup you had made. You could have also restored Sector 2048 from the backup. In this particular case Sector 0 and Sector 2048 are the most important sectors. We could manage to get Sector 0 right, but were unable to recover Sector 2048. If only you had backed up sector 2048 with bootice earlier, we could have easily restored it.

In most cases, restoring the important sectors by itself will clear the problems. Even if not, it makes further data recovery easier since we have all important sectors right.
 

My Computer My Computer

At a glance

Windows 7 Home Premium 32 bit
OS
Windows 7 Home Premium 32 bit
Hi Jumanji,
ok i will try rebuild BS first.

i see, but how to backup sector 0 and 2048 ?

some strange thing happen, today i plug the drive and in the computer management written not initialized.
ehmmm i will redo yesterday step and then rebuild BS.
 

My Computer My Computer

At a glance

Windows 7 ultimate x64i5
Computer type
Laptop
Computer Manufacturer/Model Number
Acer
OS
Windows 7 ultimate x64
CPU
i5
Rebuilding BS on progress
 

Attachments

  • testdisk_5_after.JPG
    testdisk_5_after.JPG
    27.5 KB · Views: 25

My Computer My Computer

At a glance

Windows 7 ultimate x64i5
Computer type
Laptop
Computer Manufacturer/Model Number
Acer
OS
Windows 7 ultimate x64
CPU
i5
Back
Top