How to Recover the First Partition on a HDD Used by an Older Operating System into the New OS in a Dual Boot Configuration
Most dual or multi boot setups have an older Operating System (OS) like Windows XP in the first position on the Hard Disk Drive (HDD) and a second, newer OS like Windows 7 in the second position on the HDD and when the time comes to remove the older OS partition, Windows is not capable of recovering that space into the second partition natively, a third party program must be used, this will show the best way to accomplish this from start to finish.
Information
Partition Wizard is a very reliable tool for your tool kit and it is a free download for home / personal use, first download the Partition Wizard Bootable Disk (PWBD) ISO file to the desktop, be sure to get the PWBD and not the installed version; scroll down to see the download link for the Bootable CD ISO file at this link below.
Partition Wizard Free Bootable Disk
Then burn the ISO file to a CD, it was designed for use and works best from a CD rather than a DVD
Warning
As with anything that makes changes to the Windows structure there is always the chance for an error to occur, it would be advisable to make reliable backups to the media of your choice of any important data, i.e. pictures, music or documents, that you would not want to lose before you make any changes to your system, it is always better to be safe than sorry.
Once you have made backups and moved all the important data you need to save from the old Windows and you want to remove the older OS partition completely, it's not all that complicated a process.
Let's get started!
Step One
Mark Windows 7 as Active
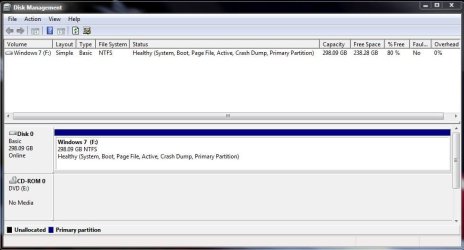
In the snip below of Windows 7's disk management you can see that XP, on the first partition on the HDD is marked as "System, Active" if that partition is just removed as it is it will cause Windows 7 to not be able to boot-up at all, as the "System, Active" partition is where all the boot files for the dual boot are stored; a new set of boot files for Windows 7 has to be created to the W_7 partition before the XP partition can be removed.
click any image to enlarge

You will need to mark the Windows 7 partition as "Active" so that the repair procedure will know where you want the new system volume, (the partition the boot files that are needed to start Windows are stored on), then you will need to run 3 separate startup repairs with a system restart between each repair so that Windows will create the new boot files to the new "Active" Windows 7 partition.
View these tutorials below that explain the process in greater detail and if assistance is needed post a question in this same tutorial and we will assist you.
How to Run a Startup Repair in Windows 7
Startup Repair - Run 3 Separate Times
Be advised: Once Windows 7 is "System, Active" and the repairs have been run and Windows 7 is booting good on its own, Windows XP will no longer boot-up so make sure you have everything you need from that partition before you do this step.
If you should find yourself needing to retrieve something from the XP partition after the repairs have been done, the "Move To" option in this tutorial can be used to great effect to move personal data from XP to Windows 7 in Windows Explorer.
Step Two
Wipe the XP Partition
In the BIOS set the boot order to boot first from the Optical Disk Drive (ODD), insert the Partition Wizard Bootable Disk (PWBD) and re-start the PC. It'll take a minute or two for it to setup with no input from the user needed.
Once the program has started you can remove the disk from the ODD.
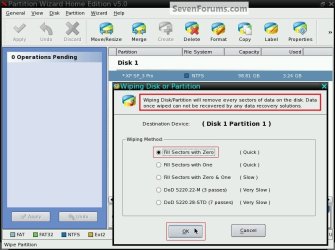
This will show how to do a partition specific wipe, also known as a "secure erase" to the Windows XP partition, this step will over-write every sector on the partition with zeroes, effectively 'removing' all the old XP code, along with the XP drivers and any other data on the partition making the best possible 'clean' space to recover into the Windows 7 partition.
Once this procedure has been done any data left on the partition will be gone and not even the best data recovery programs will be able to retrieve it.
1) In the Partition Wizard program, right click the XP partition (the first partition) and click "Wipe Partition", in the dialog box that opens select the type of wipe you want to run and click OK.
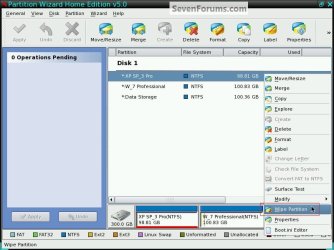
2) In the left pane at the "Operations Pending" column click Apply then Yes to the 'conformation' dialog box.
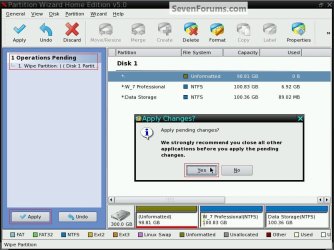
3) You will get a progress graph, when it is finished click OK for the 'successful' dialog box.
Depending on the size partition you do the wipe to it could take a considerable amount of time, to wipe this 98+GB partition it took just over 30 minutes, just relax and let it finish.
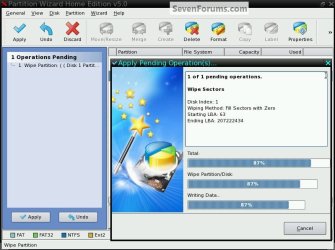
4) It would be a good idea to boot into Windows 7 to let it recognize the changes to the partition structure and make sure all is well before you go on to the next step.
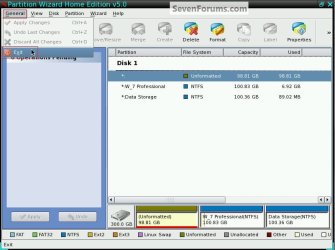
Remove the PWBD from the ODD and at the upper left corner at "General" click "Exit" to close the Partition Wizard program and start Windows 7.
Step Three
Recover the Space
Put the PWBD back into the ODD and restart the PC.
There are 2 steps to do here but they can both be done in one operation so read through this section first to get an idea before you get started.
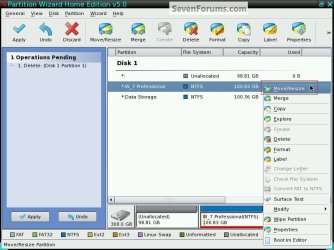
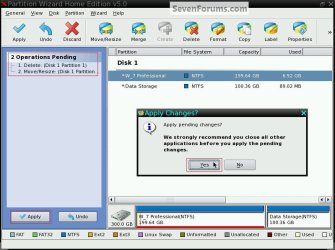
1) Right click the space from the old XP partition and click delete, you will see an entry added to the "Operations Pending" column but don't click apply yet.

2) Now right click the Windows 7 partition and click "Move/Resize", in the dialog box that opens click and hold to drag the left slider so that there is no "Unallocated Space" before or after the Windows 7 partition and click OK.
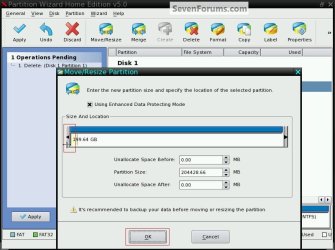
3) Now in the left pane "Operations Pending" column click Apply and then Yes to the 'conformation' dialog box.
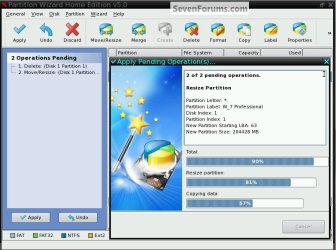
4) You will get a progress graph, when it finishes click OK for the 'successful' box.
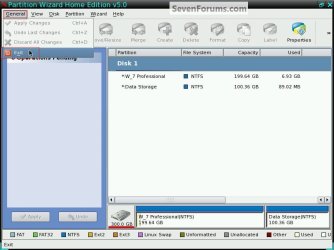
That's it, you're finished with the Partition Wizard program, remove the PWBD from the ODD and at the upper left corner at "General" click "Exit" to close the PW program and start Windows.
Enjoy!

Related Tutorials
- Startup Repair
- SSD / HDD : Optimize for Windows Reinstallation
- Partition Wizard : Use the Bootable CD
- System Repair Disc - Create
- Startup Repair - Run 3 Separate Times
- Repair Install
- Safe Mode
- Dual Boot Installation with Windows 7 and Vista
- Dual Boot Installation with Windows 7 and XP
- http://www.sevenforums.com/tutorials/107566-dual-boot-create-partitions-using-pwbd.html
- System Restore
- Partition or Volume - Delete
- Partition or Volume - Shrink
- Partition or Volume - Extend
- Virtual Hard Disk - Create and Attach VHD
- Copy & Paste - in Windows Recovery Console
- Clean Install with a Upgrade Windows 7 Version
- How to Properly Delete a OS in a Dual Boot
- How to Recover Deleted Partitions in Vista, Windows 7, and Windows 8
Last edited by a moderator: