How to Create a "Switch User" Shortcut in Windows 7
Information
Fast User Switching or Switch User is a feature in the Windows 7 Home Basic, Home Premium, Professional, Ultimate, and Enterprise editions that allows you to switch to a different user account on your computer without having to close any programs and files first in the user account that you are currently logged on to, and then be able to switch right back where you left off. This makes it easier to share a computer with other users on the same computer.
This will show you how to create or download a Switch User shortcut.
This will show you how to create or download a Switch User shortcut.
Tip
"Switch User" Keyboard Shortcut
Press the keys below one at a time, and not together, to open the Start Menu, navigate to "Switch User", and use it by pressing W.
Windows rb:, Right Arrow, Right Arrow, W

Press the keys below one at a time, and not together, to open the Start Menu, navigate to "Switch User", and use it by pressing W.
Windows
rb:, Right Arrow, Right Arrow, W
Warning
Standard users must double click on the Switch User shortcut for it to work for them.
The Windows 7 Starter edition does not support this shortcut since it does not have the Fast User Switching feature included in it.
The only alternative for the Windows 7 Starter edition is to log off the user account from the Start Menu arrow menu, then select another user account in the log on screen to log on to instead.
EXAMPLE: Switch User

BEFORE doing OPTION ONE or OPTION TWO below
ONLY if you have the Windows 7 Home Basic or Home Premium Edition
Note
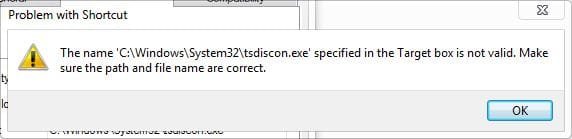
If you have the Windows 7 Home Basic or Home Premium edition installed, then you will need to download the tsdiscon.exe file to add it. These editions do not have the C:\Windows\System32\tsdiscon.exe file that is required for this shortcut to work in them.
If you have the Windows 7 Professional, Ultimate, or Enterprise edition installed, then you need to skip this section and go directly to OPTION ONE or OPTION TWO below. These editions have the C:\Windows\System32\tsdiscon.exe file included by default.
If you have the Windows 7 Professional, Ultimate, or Enterprise edition installed, then you need to skip this section and go directly to OPTION ONE or OPTION TWO below. These editions have the C:\Windows\System32\tsdiscon.exe file included by default.
1. Click on the download button below to download the latest tsdiscon.zip file version to use with your 32-bit or 64-bit Windows 7 Home Basic or Home Premium edition.
NOTE: Use the latest version first. If it does not work for you, then try one of the other older versions.
Windows 7 - tsdiscon.exe 6.1.7600.16385 version
Download
Windows 7 - tsdiscon.exe 6.1.7601.16562 version
Download
Windows 7 - (latest) tsdiscon.exe 6.1.7601.17514 version
Download
2. Click on Save, and save the .zip file to the desktop.
3. Open the .zip file and extract the tsdiscon.exe file to the desktop.
4. Right click on the tsdiscon.exe file, and click on Properties, General tab, on the Unblock button, and on OK. (see screenshot below)
NOTE: If you do not have a Unblock button under the General tab, then the shortcut is already unblocked and you can continue on to step 5.

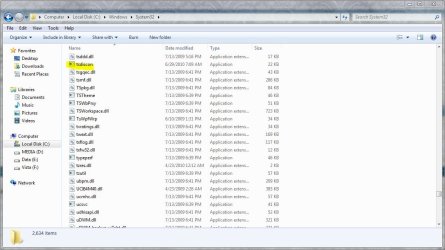
5. Move the tsdiscon.exe file into the C:\Windows\System32 folder.
6. When done, you can delete the downloaded .zip file on the desktop if you like, or save it to use again.
7. You can now proceed to do either OPTION ONE or OPTION TWO below to get the Switch User shortcut.
OPTION ONE
To Download the "Switch User" Shortcut
1. Click on the Download button below to download the Switch_User.zip file.
Download
2. Click on Save, and save the .zip file to the desktop.
3. Open the .zip file and extract the Switch User shortcut to the desktop.
4. Right click on the Switch User shortcut, and click on Properties, General tab, on the Unblock button, and on OK. (See screenshot below)
NOTE: If you do not have a Unblock button under the General tab, then the shortcut is already unblocked and you can continue on to step 5.
5. You can now Pin to Taskbar or Pin to Start Menu this shortcut, assign a keyboard shortcut to it, or move it where you like for easy use.
6. When done, you can delete the downloaded .zip file on the desktop if you like, or save it to use again.
OPTION TWO
To Manually Create the "Switch User" Shortcut
1. Right click on a empty area on desktop, and click on New and Shortcut.
2. Copy and paste the command below into the location area, and click on the Next button. (See screenshot below)
%windir%\System32\tsdiscon.exe

3. Type Switch User for the name, and click on the Finish button. (See screenshot below)
NOTE: You can name this anything you would like though.

4. Right click on the new Switch User shortcut on the Desktop and click on Properties.
5. Click on the Shortcut tab, then click on the Change Icon button. (See screenshot below)

6. Click on OK. (See screenshot below)

7. In the line under "Look for icons in this file", copy and paste the location below and press Enter. (See screenshot below)
%windir%\System32\imageres.dll

8. Select the icon highlighted in blue above and click on OK. (See screenshot above)
NOTE: You can use any icon that you would like instead though.
9. Click on OK. (See screenshot below)

10. You can now Pin to Taskbar or Pin to Start Menu this shortcut, assign a keyboard shortcut to it, or move it where you like for easy use.
That's it,
Shawn
Related Tutorials
- How to Enable or Disable Fast User Switching in Vista and Windows 7
- How to Add or Remove "Switch User" from CTRL+ALT+DEL Screen and Start Menu
- How to Create a Lock Computer Shortcut on Your Windows 7 Desktop
- How to Create a Log Off Shortcut in Windows
- How to Create a Shut Down Windows Shortcut in Windows 7
- How to Create a Shut Down Computer Shortcut in Windows
- How to Create a Restart Computer Shortcut in Windows
- How to Create an Abort Shortcut in Windows
- How to Create a Hibernate Shortcut in Windows
- How to Create a Sleep Shortcut in Windows
- How to Add or Remove Switch User from CTRL+ALT+DEL Screen and Start Menu
Attachments
Last edited:
")

")