How to Create, Customize, and Maintain Windows 7 Image in Audit Mode with Sysprep Tool
Information
There were two things that made me start writing this tutorial. First one was a very misleading article I read on the Internet and the second one was this response on another tutorial of mine:
...
That said, a follow up article on how to maintain, backup, etc this arrangement (split drives for op and data) in case of a hdd or ssd failure, etc I think would be good. I found lots of chatter about setting it up, but nothing on maintaining and enhancing the setup.
We have covered various Sysprep scenarios at the Seven Forums tutorials but it's true we have not had one telling what then when you have sysprepped, what about upgrading or maintaining the sysprepped system.
I have been planning this for weeks now, finally it's ready. I hope you will enjoy reading it, maybe even learn a new trick or two. All feedback is welcome, post your comments and questions in this thread.
Leipzig, February 4th, 2014
Kari
Note
Here at the Seven Forums we have several tutorials about installing and customizing Windows, about various scenarios for System Preparation Tool and Audit Mode, and to backup and maintain your Windows 7 setup.
This "walkthrough" tutorial is rather more a supplement to several tutorials already published here, gathering them together showing how to combine different features and procedures in order to create a fully working and highly customized Windows setup, than a tutorial showing you something new.
When a tutorial describing a procedure which is needed or recommended already exists at the Seven Forums or on our sister forums, I will instead of re-typing the information provide a link to said tutorial telling which part(s) of that you need or can do.
This tutorial follows a logical, chronological chain of events and procedures. You should be able to follow it and do everything told on your own PC with quite limited Windows and computing knowledge. I will try to explain everything as clearly as I can but you are always welcome to ask if there's something you did not understand or you disagree. Simply post your questions and issues in this thread.
No commercial third party tools or programs are needed to follow this tutorial, everything will be done using native built-in Windows tools and two additional programs, Windows AIK from Microsoft and Reflect Free from Macrium which are both free to download and use.
No advanced knowledge of Windows or computing is needed, the processes and procedures shown are easy to follow and repeat with basic Windows knowledge.
CONTENTS
This tutorial will cover the following subjects:
- Preparing for installing and customizing Windows
- Supporting videos
- Installing Windows
- Entering Audit Mode from post install OOBE dialogs
- Installing “all users” software
- Customizing the Default User Profile
- Installing Windows AIK (Automated Installation Kit)
- Partitioning and drive letters with Disk Management
- Creating an Answer File
- Creating Windows PE (Preinstallation Environment) boot disk
- Using Windows System Preparation Tool (Sysprep)
- Creating an initial System Image
- Finalizing Windows installation
- System Maintenance and Windows Update
- Upgrading Windows with non-default system folder locations
- Recovery using System Image
- Using the System Image to deploy Windows to another PC
- Links and additional information
- Auf Wiedersehen!
Part 1. Preparations
How to prepare for Windows installation and customization
You will of course need a valid Windows 7 installation media to follow and repeat the process shown in this tutorial. It can be a DVD or a USB stick, even an ISO file if you will do the this on a virtual machine.
Tip
You can do everything told in this tutorial on a virtual machine, in fact I recommend it. It has many advantages. You might for instance have a fully working Windows 7 setup, no need for reinstall at the moment, but creating a customized image for future reinstallation on a virtual machine is fast and makes reinstall when needed a piece of cake. Restoring a system image with your software already preinstalled is usually faster than doing a clean install with no additional software, making your Windows personal and customized from the first boot to desktop.
In Part 11. we will generalize the image (see Part 11. for further explanation), removing all hardware related information and drivers from the image so that it can be used later on any hardware capable of running Windows 7, not only on your own machine. This, of course, requires a valid product key for Windows and each program on image for each computer you use the image to install Windows.
You can use any virtualization platform (Virtual PC, VirtualBox, VMware, Parallels) on any operating system (Windows, Linux, Mac) for following this tutorial to create a customized Windows 7 System Image. See for instance this tutorial for installing Windows 7 on Virtual PC: http://www.sevenforums.com/tutorials/8254-windows-virtual-pc-create-virtual-machine.html. Create the image on a Windows 7 virtual machine running on a Linux Mint machine on a VirtualBox virtual machine, save the image on a stick and take it with you when visiting that Apple fan boy cousin of yours and install Windows 7 from your image to a Parallels virtual machine running on his Mac.
Notice that you can only install 32 guests on Windows Virtual PC, regardless if the host system is 32 or 64 bit. In order to create a 64 bit Windows guest vm on Windows 7 host you need to use third party virtualization programs. Two most common and well known free alternatives are VMWare Player and Oracle VirtualBox, both free to download and use.
This tutorial, the process itself, screenshots and videos were made on a Hyper-V Windows 7 virtual machine running on a Windows 8.1 Pro HP Envy 17 laptop. The vm was given 2GB of RAM, two virtual hard disks (100GB and 500GB) and two virtual CD/DVD drives.
You will also need install media for all software you want to include on your image. Get the install CDs and DVDs ready, download any install files needed and save them to Users\Public\Downloads on a reference computer, not the one you will be using to create our image (Public folders are pre-shared and can be easily accessed when needed). Alternatively for instance if you do not have access to another PC, you can of course use an external storage device, a USB stick or external HDD.
In addition you will need these two tools, both free to download:
If working with a virtual machine, save both installation files on Users\Public\Downloads on your host system.
You will need some time; as the video #1 (Part 2. below) shows, the whole process took from me an hour and a half. But: that's if you know exactly what you are doing and do not need any instructions. Let's be honest, you might need an additional half an hour to occasionally stop to read instructions. This time comes in addition to that needed for Windows installation. Also if you want to include Windows Updates to your image you will need an hour or two more, depending on how many updates will be needed.
Give it two and a half hours, maybe three, four or five if you decide to add Windows Updates to your image. Might sound a lot but think what you get: a highly customized Windows 7 image which makes your all future reinstalls easy and fast. Doing this on a virtual machine allows you to pause the vm or take a snapshot and continue the next day if you want to.
Part 2. Supporting videos
The whole process done in this tutorial on video
The two videos below can be watched here, at YouTube or be downloaded directly to your computer for better quality. Below the videos you'll find list of video content with timestamps on both videos for respective procedures.
Video #1 is mostly to show an unedited time flow, the whole process in real time. Video #2 is edited from video #1 raw footage, with additional explaining still slides. I recommend to download the video #2 to be used as a reference, video #1 to see exactly how a certain procedure is done if it's unfamiliar to you.
An ideal situation would be a dual display setup, playing and pausing the video on one display while creating your image on second display on a virtual machine.
Video #1 - Raw version, uncut, no additional instructions or explanations, no narration. Duration 1:34:09
Video #1 shows the whole process (tutorial parts 4 to 13) of customizing the Windows image, creating an initial system image and finalizing your Windows installation. Video is uncut showing the time flow of the whole process in real time, duration about an hour and a half. Please notice video is not narrated and does not contain any additional instructions or explanations. it's sole purpose is to be a reference; if you want to see how a certain process is done, check the timestamp of it from the list below the videos, jump to that point in video and watch.
Watch full screen in 1080p.
Video #2 - Edited and narrated, with additional instructions and explanations. Duration 15:28
The second video is the same process narrated, cut to 15 minutes and with additional instructions and explanations in between various procedures.
Contents of the video
Red = approx. timestamp in video #1
Green= approx. timestamp in video #2
Tutorial Part 4:
- Entering Audit Mode from post install OOBE dialogs (0:00:58)(0:01:33)
- Quit and close Sysprep dialog (0:02:50)(0:02:06)
Tutorial Part 5:
- Connect to network share or external storage to get software installers (0:03:20)(0:02:32)
- Install “all users” software (0:03:57)(0:03:16)
- VLC Player
- SkyDrive Desktop App (Windows Essentials)
- IE 11
- Windows XP Mode
- Windows Virtual PC
- Office 2013 Professional Plus, install all at first use
- MSE & definition updates
- Reboot requested by updates (IE11 & VPC) (0:24:20)(0:03:45)
Tutorial Part 6:
- Back to Audit Mode desktop, customizing default user profile (0:29:45)(0:03:58)
- Desktop background from wallpaper thread at Seven Forums
- Set IE favourites (VF, 7F, 8F, 9F) and home page (7F)
- Screensaver
- Icon settings
- Folder view settings
- Install AIK (0:36:28)(0:05:48)
Tutorial Part 8:
- Disk Management (0:39:55)(0:06:20)
- Change CD/DVD drives D: and E: to W: and X:
- Rename C: > System
- Raw Disk 1 500GB > All to D:, rename D: > User Profiles
- Launch Windows SIM, create Answer File (0:42:17)(0:07:35)
- CopyProfile (copy customized elements to default profile)
- PC Owner & Organization
- FolderLocations (relocate Users & ProgramData)
- Reboot requested by system updates (0:46:45)(0:09:50)
Tutorial Part 11:
- Back to Audit Mode desktop (0:49:10)(0:10:00)
- Elevated Command Prompt (0:49:28)(0:10:08)
- Stop WMP network Sharing Service in case running
- Sysprep
- Shutdown
- Boot with WinPE (0:59:35)(0:11:41)
- WinPE desktop (1:00:06)(0:12:00)
- Create System Image (Macrium) (1:00:15)(0:12:10)
- Image ready, shutdown (1:15:40)(0:12:39)
Tutorial Part 13:
- Boot to sysprepped C: to finalize installation (1:15:50)(0:12:45)
- OOBE dialogs (1:25:18)(0:13:14)
- Initial user desktop, check theme and customizations (1:13:40)(0:01:33)
- Create new user profile, switch user to check it was created on D: (1:31:35)(0:13:47)
- Shutdown, end credits, The End (1:33:20)(0:14:20)
- Video #1 (879 MB H.264/MPEG-4): https://onedrive.live.com/redir?res...728&authkey=!AJYTtlVKeJ4I0j4&ithint=video,mp4
- Video #2 (317 MB H.264/MPEG-4): https://onedrive.live.com/redir?res...727&authkey=!AEKIKf_Q8hMHy1Y&ithint=video,mp4
Part 3. Installing Windows
How to install Windows
The whole process starts as any Windows installation: boot your computer or virtual machine with Windows 7 install media. As we have covered Windows installation quite extensively here at the Seven Forums I will not go in to details of installation. If you need any help in installing Windows 7, consult one or more of these tutorials:
- http://www.sevenforums.com/tutorials/20146-custom-install-windows-7-a.html
- http://www.sevenforums.com/tutorials/1649-clean-install-windows-7-a.html
- http://www.sevenforums.com/tutorials/31402-clean-install-upgrade-windows-7-version.html
- http://www.sevenforums.com/tutorials/91798-install-windows-7-usb-pen-drive-using-grub4dos.html
- http://www.sevenforums.com/tutorials/10280-install-windows-7-without-using-any-external-device.html
- http://www.sevenforums.com/tutorials/171382-clean-install-windows-7-windows-xp-desktop.html
- http://www.sevenforums.com/tutorials/174907-clean-install-factory-coa-activation-key.html
- http://www.sevenforums.com/tutorials/306285-install-windows-msata-ssd-drive.html
- http://www.sevenforums.com/tutorials/219487-clean-reinstall-factory-oem-windows-7-a.html
Part 4. Entering Audit Mode
How to reboot to Audit Mode during installation
When Windows has finished installing the system core on your hard disk or virtual hard disk, the preinstallation environment (Windows PE) which took care of the installation has done its job. A WinPE is like a mini operating system, taking care of vital system functions so that the real OS can be installed, analyzed or repaired. The WinPE checks its own checklist and if all lights are green, hands over the control to real Windows.
Windows thanks WinPE and boots first time. This first boot is called an OOBE boot, OOBE Mode (Out-Of-Box Experience), also known as Welcome Mode. To put it very simple it is (usually) a first ever boot after installation. If you buy a new computer with preinstalled Windows and turn it on, what you see and experience is OOBE Mode: Windows is there, ready to serve you but there's no user accounts yet, no personal data, nothing. A virgin Windows installation.
What we want now is to tell Windows "Sorry, I would like to do some stuff before entering OOBE". Windows accepts our request and let's us reboot to so called Audit Mode, kind of mix of WinPE and OOBE. Not WinPE per se but clearly not OOBE, either.
We do this, postpone the OOBE and boot to work on Audit Mode by pressing CTRL + SHIFT + F3 (press and hold CTRL and SHIFT keys simultaneously, press F3, release all three keys) when OOBE asks your name:

Windows reboots now, rebooting to Audit Mode. As no user accounts exist it uses a so called built-in administrator user profile.
Audit Mode alone is nothing, can nothing. A built-in native Windows tool called System Preparation Tool (noun = Sysprep, verb = to sysprep) is needed to tell Audit Mode what to do. As soon as Windows shows the desktop in Audit Mode, it asks Sysprep to come to help as Audit Mode understands that although powerful together with Sysprep, alone it could do nothing.
This is why the first you will notice when finally in Audit Mode desktop is the Sysprep dialog open in the middle of your display:

Normally arriving to Audit Mode for some short maintenance or customization need we could simply click Cancel to close the Sysprep dialog leaving it to stay in the background. However, this time we have some real work to do including installing software which might need Windows Update (WU does not always like Sysprep), so we quit Sysprep: select System Cleanup Action: Enter Audit Mode and Shutdown Options: Quit, click OK to exit.
Part 5. Installing “all users” software
What software should and should not be installed to initial system image
Time to install software. Everything we install now will be made available to all future users of the computer. If you want to install something only you can use and the program's installer allows "Only You" installation modus, do not install it now but instead first after we have finished and Windows is all set up.
My standard software packet to be installed on every image includes Microsoft Office, VLC Player, Windows Virtual PC and XP Mode, Microsoft Security Essentials and SkyDrive app from Windows Essentials. What you want to and need to install is of course up to you.
First things first: Attach your external storage where you downloaded your software installers in Part 1. If you stored everything on Users\Public\Downloads on another computer as I recommended, you need to connect to it now. It can be easily done with following command, both from virtual machine and physical computer as long as the other computer is on the same network.
Open Command Prompt and give following command, press Enter:
Code:
net use DRIVE: \\ComputerName\SharePathOrName /user:ComputerName\Username... where..
- DRIVE: = a temporary drive letter you give to your shared folder
- ComputerName = the name of the computer where the folder you are trying to access is located
- SharePathOrName = either the name of the shared folder if a share name is given, or the path of said folder
- Username = your username on the computer you are trying to connect to
Code:
net use Z: \\AGM-W8LAP02\Users\Public\Downloads user:AGM-W8LAP02\KariNow press Enter. Windows thinks a few seconds, asking then your password if password protected sharing enabled on either of the computers, in which case you must give the correct password for the user account and computer you are trying to connect to.

Now install your software.
Note
In Part 1. you downloaded two third party tools, Macrium Reflect Free and Windows Autemated Installation Kit. We will install Windows AIK later but for fluent process flow install the Macrium now.
When you do no longer need access to your network share, right click it on Windows Explorer's Computer view and select Disconnect:

Optional: Windows Update
Here's something for you to think: Depending on how old install media you are using, there might be anything up to several hundreds of important Windows updates waiting for you. At some point rather sooner than later you have to install those updates.
There's no need to make updates now to be included in image. However, if you don't update now the update process must be done every time this image is used for deployment (= fancy word for installing by distributing a pre-configured Windows image to a computers). On the other hand, installing Windows updates now takes time but then they are included in the image and a new Windows installed using the image is up todays stand updated.
I let you decide what you want to do. A real life example: I wanted to include all updates, including three language packs in my image. Following two screenshots show the updates I made. It took almost 4 hours (yes, no typo: four hours!) and two reboots before Windows finally told me there's no more updates available.


If time is a factor for you, forget the updates for now. If not, I wholeheartedly recommend you to install all important updates, plus from optional updates all language packs you will need (notice: language packs only available for Ultimate and Enterprise editions). The more complete your image is, the more it satisfies you to see how little you have to do when image is used for reinstall.
Important to remember if you decide to run Windows Updates at this point: Windows Update might need to reboot your PC several times. Let update do it in peace:

As long as we have not especially told Windows to leave Audit Mode, it always returns back to Audit Mode opening the Sysprep dialog. You can now simply close by clicking the Cancel button:

Part 6. Customizing the Default User Profile
Default User Profile explained, how to customize it
Now it's up to you to decide what to do, how to customize the Windows Default User Profile which is used as the base profile when a new user account is created.
Everything (almost!) you modify now will be included in the new Default User Profile. Desktop background, Windows colors and sounds, screensaver, icon settings, view and positioning, folder sort settings, Internet Explorer Home Page and Favorites.
Take you time, make a nice default desktop. Open IE, browse Internet to open the sites you'd like to save as favorites, change Home Page to whatever you'd like to.

You can customize the theme as you want to, everything done now will be copied to Default User Profile.
More about customizing Default User Profile:
Seven Forums: http://www.sevenforums.com/tutorials/285983-user-profile-customize-during-installation.html
Microsoft: Customize the default local user profile when preparing an image of Windows
Here some tips about what you can do now:
- http://www.sevenforums.com/tutorials/86795-internet-explorer-import-export-favorites.html
- http://www.sevenforums.com/tutorial...ompatibility-view-websites-import-export.html
- http://www.sevenforums.com/tutorials/130771-internet-explorer-autocomplete-turn-off.html
- http://www.sevenforums.com/tutorials/41198-folder-view-set-default-all-folders.html
- http://www.sevenforums.com/tutorial...rangement-change-windows-explorer-window.html
- http://www.sevenforums.com/tutorials/295-folder-options-open.html
- http://www.sevenforums.com/tutorials/394-hidden-files-folders-show-hide.html
- http://www.sevenforums.com/tutorials/3952-file-folder-arrangement-group-sort-arrange.html
- http://www.sevenforums.com/tutorials/2109-screen-saver-change.html
- http://www.sevenforums.com/tutorials/2111-screen-saver-turn-off.html
- http://www.sevenforums.com/tutorials/62025-screen-saver-allow-prevent-changing.html
Part 7. Installing Windows AIK
Windows AIK and SIM: What and why?
Windows Automated Installation Kit is needed in our project because it icludes the right tool to create and edit an Answer File. An Unattended Answer File which we will later create is a set of instructions to Windows System Preparation Tool (Sysprep) about what the user wants to prepare, modify, edit and add in basic Windows System Image.
For the purpose of this tutorial, Windows AIK is a must. First, download and save it to your computer: Download The Windows® Automated Installation Kit (AIK) for Windows® 7 from Official Microsoft Download Center

The Windows AIK comes as an ISO file. You need to burn it to a DVD or mount as a virtual DVD if you are working on a physical computer, or attach it as a virtual DVD on a virtual machine.
Now install the Windows AIK:

Notice: You can prepare, create and edit answer files on any Windows PC. If you are editing your Windows 7 deployment answer files on a Windows 8 / 8.1 PC like I am at the moment, you need to use this instead: Download Windows Assessment and Deployment Kit (ADK) for Windows® 8 from Official Microsoft Download Center. Different name, same stuff
") .
. Part 8. Disk Management
Set disk system for customized Windows using Disk Management
Before we create an answer file and sysprep our image, it's important to check that the disks are OK, as we want to.
Click Start, right click Computer on the right pane of Start Menu and select Manage. From Management Console select Disk Management:


Modify your partitions and disks as you wish; change drive letters, create, shrink or extend your partitions, rename your drives.
A few tutorials about and around Disk Management:
- http://www.sevenforums.com/tutorials/2674-partition-volume-create-new.html
- http://www.sevenforums.com/tutorials/66118-drive-rename.html
- http://www.sevenforums.com/tutorials/82994-drive-letter-add-change-remove-windows.html
- http://www.sevenforums.com/tutorials/146694-partition-extended-logical-drives.html
- http://www.sevenforums.com/tutorials/2670-partition-volume-extend.html
- http://www.sevenforums.com/tutorials/2672-partition-volume-shrink.html
- http://www.sevenforums.com/tutorials/2668-partition-volume-delete.html
- http://www.sevenforums.com/tutorials/71432-partition-mark-active.html

Warning
Do not change the drive letter for Windows system drive C:!
Part 9. Creating an Answer File
How to create and edit an Answer File
Now it's time to have some Geek Fun! No, I'm just kidding; working with answer files can be boring. Luckily when you have created a good answer file, later on it's easy to edit in Notepad to make small changes in order to adapt it to new scenarios. An answer file can be extremely flexible, doing almost anything its master (you!) wants.
More about Answer Files, Sysprep and its functions: http://www.sevenforums.com/tutorials/286053-system-preparation-tool-use-customize-windows.html
First, launch the Windows System Image Manager which was automatically installed on your PC when you installed the Windows AIK:

Start a new answer file:

An answer file needs to know for which Windows version and edition it is made for, therefore we need to open a correct basic Windows Installation Image:

Browse to folder Sources on your Windows install DVD or USB, find the catalog file (.clg) for your Windows edition:

This is what you see now:

- A list of Components and Packages for your selected Windows version and edition
- Content of the answer file, still empty except for section headers
- Properties of selected answer file item
- System messages
9.1 OPTIONAL: If you do not want to relocate any folders jump to next step.
See the following 4 self-explaining screenshots to see how you change the location of Users and ProgramData folders:


Done!
9.2 CUSTOMIZING: Customize the default user profile
Now we copy our modified desktop settings to Default User Profile. The Default User Profile in Windows is a reference profile; when a new user account is created it gets settings like desktop background and settings, IE favorites and home page, theme and default program shortcuts from this profile.
We need to change the value of a variable called CopyProfile to True. To do this, we need to go back upwards a bit on components list and select the the main component Microsoft Windows Shell Setup, right click it and select Add Setting to pass 4 specialize:

As you can see the Properties pane is now showing variable CopyProfile among othe things. This is the variable we need to set to True to copy our personalization settings to Default User Profile. As this variable only has two possible values, True and False (default), we do not have to type anything. Simply click the variable and select correct value from drop down list. We want it to be True. If you want you can also input values for ComputerName, Owner and Organization:

Profile copied, owner and organization info given. We are almost done!
Tip
You want to personalize the OEM information, seen for instance in Computer Properties? It's easy:

Our Answer file is ready, time to check if it's OK. Click Tools > Validate Answer File:

No errors found, validation results only harmless notifications:

Only thing missing is to save the answer file. Select File > Save Answer File As:

in this example we save the answer file on root of D: drive with name MyAnswerFile.xml:

You can close the Windows System Image Manager now.
Tip
If you have an extra test rig, you can play with Windows System Image Manager to test various components, to see how much amazing things you can do with Sysprep and an answer file.
Follow this tutorial first through to get a working image. Then on your test rig start from beginning of this tutorial until you reach this part and start playing. Test different answer files, change the values of various variables, create your own answer files and sysprep your test rig.
When done, or in case of failing due over zealous creative answer files, just start from beginning.
Even easier if you use virtual machines. Create a new vm, start from beginning of this tutorial and continue until this part. Open the Windows System Image Manager and now create a snapshot (VirtualBox), checkpoint (Hyper-V) or use Undo Disk feature (Virtual PC). Play with answer files and sysprepping, boot to OOBE to test, restore the snapshot to play with a different scenario.
Part 10. Creating Windows PE boot disk
How to create a WinPE disk for imaging, recovery and system maintenance
As told in the beginning of Part 4., a WinPE system is needed when Windows is installed. Installation uses its own PE system to set up the core of the operating system.
WinPE is also a practical tool later on, for troubleshooting, imaging and recovery. We need to create our own WinPE disk now.
If you have followed this tutorial to the letter you installed the free Macrium Reflect imaging and backup tool in Part 5. Macrium has a built-in feature to create a WinPE disk, I'll let our resident Macrium Guru, Distinguished Senior Geek and a friend of mine Wolfgang tell you more about that: http://www.sevenforums.com/tutorials/73828-imaging-free-macrium.html. Tutorial will also tell you how to create a WinPE disk using Macrium.
Another of our resident gurus, Siw2 has specialized in creating ever more unbelievably nice PE systems. For this tutorial I use one of his gems. Siw works constantly with updates to his excellent WinPE , download links to latest versions will be edited here as new versions will become available.
Get the current versions of Siw's WinPE: http://www.sevenforums.com/software/325669-new-versions-simple-winpe-maker-7.html#post2854336
So, you have now downloaded Siw2's WinPE zip packet. Open and extract it:

When extracted, right click the file RE64v2-runmeasadmin and select Run as administrator:

The PE creator starts working:

Download suggested tools:

For our purposes now we do not need any additional drivers. Press (not click as the screenshot says
") ) N and hit Enter:
) N and hit Enter:
Press any key:

Now create a WinPE ISO file, press Y and Enter:

ISO done. If you are working on this image on a physical computer, burn the ISO now by selecting Y. IF you want to burn ISO to disk later using your own burner tools, or if you are now working on a virtual machine which allows virtual CD/DVD drives to be used for booting, select N and press Enter:

WinPE created, time for "main course": Sysprep!
Part 11. Using Windows System Preparation Tool
How to prepare a Windows image
Let's reboot one more time; Sysprep fails if there are any delayed reboots due software installation or Windows Update.
Windows returns to Audit Mode, we need to click Cancel to close the Sysprep dialog:

Open an elevated Command Prompt:

Sysprep fails if Windows Media Player Network Sharing Service (WMPNetworkSvc) is running. Give the following command on Command Prompt and hit Enter:
Code:
net stop WMPNetworkSvc
Sysprep command has various switches, each being responsible of a certain task. We need to use four of them now, in this order:
- /generalize
- Removes all hardware related information and drivers from our image, making it possible to use this image to deploy (install) the image on any PC. This is for us an added bonus now, we need to generalize the image anyway because the CopyProfile function we did requires it
- /oobe
- We tell Windows that next time the computer is started with this image, we want to finalize Windows installation and enter the OOBE mode
- /shutdown
- Instructs Sysprep to run as instructed in our answer file, shutting the computer down when ready
- /unattend:DRIVE:\AnswerFileName.xml
- Run anattended, instructions can be found in AnswerFileName.xml on drive DRIVE:
Only the command itself is missing. Type this to Command Prompt:
Code:
%windir%\system32\sysprep\sysprep.exe /generalize /oobe /shutdown /unattend:D:\MyAnswerFile.xml
Sysprep works now and shuts down the computer when done:

Part 12. Creating an initial System Image
How to create a complete Windows image to be used for reinstallation and recovery
When geeks at the IT department have "sysprepped an image to be deployed", fancy geek lingo to say they've customized Windows to be installed, they quite often use Microsoft's ImageX to "capture the deployment image", again just fancy geek expression for creating an image. ImageX is a good solution for this and might be worth its own tutorial. For our purposes now, we'll use Macrium reflect Free and its easy to understand graphical user interface.
To start, remove Windows install media from drive. Insert the newly created WinPE disk, or on virtual machines attach WinPE ISO to a virtual CD/DVD drive.
Turn on the computer. It boots automatically to Windows PE desktop.
Launch Macrium Reflect (screenshots from Siw2's PE disk):

See following 4 self-explaining screenshots:


Shutdown the computer.
Part 13. Finalizing Windows installation
First boot of newly installed Windows
Let's finalize Windows installation.
Remove the WinPE disk from drive or detach it from virtual drive. Power on the computer. It boots now to OOBE Mode as if this was first time ever it was booted.
In Part 5. if you decided to install Windows Language Packs, Windows stops first to ask in which language you'd like to install:

From here continue final steps as told in this tutorial, from Step 11: http://www.sevenforums.com/tutorials/1649-clean-install-windows-7-a.html
Part 14. System Maintenance and Updating
How to maintain a Windows setup
Windows 7 is extremely good in taking care of itself. A general consensus seems to be that you do not need and should not use any so called optimizers and cleaners. Any modifications in system registry made by these "tools" most probably causes more harm than when registry is left alone.
If you however feel you'd like to do occasional registry cleaning, use respected, known to work products like CCleaner from Piriform. In my personal, very subjective opinion any registry cleaning is completely unnecessary on a well maintained system; since the days of XP I have never used any cleaners on any of my Vista, Seven and Eight systems and have had absolutely no registry related issues or errors.
Below a few points in maintaining your Windows 7 system I feel are important. Other senior geeks might have a different approach, this is however what has worked for me:
- Create a logical and clear folder structure
- A 2 TB drive with one folder "My Stuff" and everything stored in it is not very clever. The same drive divided to a few partitions and partitions named with self-explanatory names, each containing a logical folder structure is already much better. A simple suggestion for such a system using a music partition as an example:
- Partition name: My Music
- Root level folders: CD Rips, MP3, Other
- 1st level subfolders in each root level folder: Use genres or artists / composers
- 2nd level subfolders in each 1st level subfolder: Use album names
- A 2 TB drive with one folder "My Stuff" and everything stored in it is not very clever. The same drive divided to a few partitions and partitions named with self-explanatory names, each containing a logical folder structure is already much better. A simple suggestion for such a system using a music partition as an example:
- Use cloud based storage as much as possible
- Based on my own experience I can wholeheartedly recommend using SkyDrive (7 GB free) and paying for extra storage on it. About available SkyDrive Storage Subscriptions: Storage plan subscription and billing questions - Microsoft Windows Help
- Add your cloud storage folders to existing Libraries, set as default "Save As" locations. See tutorial for more information: http://www.sevenforums.com/tutorials/595-library-set-save-folder.html
- Learn how to backup and image your system. If using cloud storage folders as default "Save As" location as suggested above, backing up will be easy and fast as most personal data is already backed up, stored on cloud service
- Some backup tutorials:
- http://www.sevenforums.com/tutorials/615-backup-user-system-files.html
- http://www.sevenforums.com/tutorials/663-backup-complete-computer-create-image-backup.html
- http://www.sevenforums.com/tutorials/278866-synctoy-backup-user-data.html
- http://www.sevenforums.com/tutorials/73828-imaging-free-macrium.html
- Some backup tutorials:
- Pay attention to what you install. Do you really need every possible screensaver or game demo? If you are using Microsoft Office, do you really need OpenOffice and LibreOffice?
- Uninstall any software as soon as you are sure you will not use it again
- Let Windows system folders stay protected, do not change permissions for instance in Windows and Program Files folders
- Use a standard user account and UAC. Do not rename the built-in administrator account to be used as your personal account! Tutorial: http://www.sevenforums.com/tutorial...ac-change-prompt-behavior-standard-users.html
- Install all important and recommended Windows Updates. From optional updates, select those you need / want to, hide the rest. See http://www.sevenforums.com/tutorials/2797-windows-update-settings-change.html for additional information
- Run Disk Cleanup on regular basis (Start > All Programs > Accessories > System Tools > Disk Cleanup). See the tutorial for additional information: http://www.sevenforums.com/tutorials/818-disk-cleanup-open-use.html
- Even if you'd prefer to have your PC always on or just hibernated instead of turning it off, reboot every now and then to make a fresh start. It might be "cool" to brag that "My rig has been contunously pn for two months now" but, besides being "cool" it really is not so clever
- If you have an occasional need to let other people to use your Windows computer (not those users having a personal user account on your computer), enable the built-in Guest user account. See tutorial: http://www.sevenforums.com/tutorials/7412-guest-account-turn-off.html
Part 15. Upgrading Windows
How to prepare for upgrading Windows when system folders are on non-default locations
A clean install is always the best method to upgrade your Windows. If you however prefer an in-place upgrade (upgrade install), or if you want to upgrade to a superior edition of Windows using Anytime Upgrade, and you have relocated any system folders like in tutorial we did for Users and ProgramData folders, you have to prepare your Windows for upgrade.
There are two rules concerning us if we want to in-place upgrade a sysprepped Windows 7 where some of the system folders are relocated on another drive than C:.
Rule #1:
- You cannot sysprep an upgraded Windows, be it upgraded to superior edition using Anytime Upgrade, in-place upgraded using install media, or if a repair install has been done (repair install = in-place upgrade to same edition). An unofficial solution to work around this exists, I have tested it and it really works but as I am trying my best to keep these tutorials in accordance with officially supported scenarios, I will not go deeper in this subject.
Rule #2:
- You cannot in-place upgrade or Anytime Upgrade if some of the system folders are relocated on another than C: drive (as Users and ProgramData in this tutorial, part 9.) without first relocating said folders back to C:.
These rules mean that if you have for instance relocated Users folder on D: and then later on you decide to in-place upgrade to Windows 8, you need to move the Users folder back to C:, then in-place upgrade to Windows 8, and when done you are no longer able to relocate Users to another drive with Sysprep as told in tutorial. You are still able to move it manually, but the Sysprep does not run on an upgraded Windows.
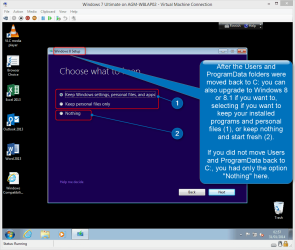
Following two screenshots will show a practical example of the above. First, Users and ProgramData relocated on D:, user inserts Windows 8 install DVD and launches the installer:

Windows can be upgraded but it's done using a custom, clean install, saving the old install (Windows 7) and user files on it to a folder called Windows.old, from where user can later retrieve the personal files to respective new Windows user folders on newly installed Windows 8. However, all software must be reinstalled as they cannot be transferred to new installation.
User decided agains, wanting to keep everything, also the installed apps. A simple Sysprep operation moves the Users and ProgramData back to C:, and after a reboot user tries again. This time he'll see a bit different opening dialog from Windows 8 installer:

Most geeks are fine with these rules because clean install is always better than upgrade install; geeks do not in-place upgrade
. For those few who decide to abandon an excellent space saving system and do the in-place upgrade anyway, here's how to relocate Users and ProgramData back to C:
Hopefully you still have your original answer file stored in some place, you don't need to use Windows System Image Manager to create an answer file now as the answer file we want to can be edited from the original one. For those who no longer have the original MyAnswerFile.xml (part 9.) I'll post the edited "Move folders back to C:" answer file at the end of this part.
You found it? Good, edit it cutting the parts we do not need, leaving just the folder locating part:

Now you have a much shorter answer file. Between the <FolderLocations> you can easily spot the locations we used to relocate these folders to D:, you just change those two D's to C's and check that everything else is as it should be:

Save the modified answer file to root of any drive except C: naming it as you want to, with an .xml file extension. I use the name MovingBack.xml for now, saving it to D: drive:

Now reboot your computer to be sure there's no pending restarts due updates. When done, insert Windows install media to the drive you told in your answerr file as location of source catalog (last line in answer file), open an elevated command prompt[/URL] (tutorial), stop the Windows Media Player Network Sharing Service...:
Code:
net stop WMPNetworkSvc... and run Sysprep:
Code:
%windir%\system32\sysprep\sysprep.exe /oobe /reboot /unattend:D:\MovingBack.xml
Sysprep starts working:

When Sysprep is done it reboots to OOBE Mode. This time though your user account already exists so you need to use a temporary new username to get further because OOBE initial user cannot be an existing user:


Users and ProgramData folders are now moved back to C: drive:

Note
Some application specific data cannot be moved at once. In most case the move lefts no trails on drive D: used in this tutorial or whatever drive you had Users and ProgramData relocated before moving them back to C:.
In this example case for instance Microsoft Security Essentials could not move its application data. Instead of moving its app data from D:\ProgramData it creates a new subfolder to C:\ProgramData. This is why you might find D:\ProgramData still existing, with some obsolete subfolders:

This is totally harmless and you can delete D:\ProgramData manually, taking first its ownership. See tutorial: Take Ownership of file
In this example case for instance Microsoft Security Essentials could not move its application data. Instead of moving its app data from D:\ProgramData it creates a new subfolder to C:\ProgramData. This is why you might find D:\ProgramData still existing, with some obsolete subfolders:
This is totally harmless and you can delete D:\ProgramData manually, taking first its ownership. See tutorial: Take Ownership of file
Finally, here's the MovingBack.xml for those who did not find the original MyAnswerFile.xml to edit. Copy & Paste to Notepad to modify according to your needs:
Code:
<?xml version="1.0" encoding="utf-8"?>
<unattend xmlns="urn:schemas-microsoft-com:unattend">
    <settings pass="oobeSystem">
        <component name="Microsoft-Windows-Shell-Setup" processorArchitecture="x86" publicKeyToken="31bf3856ad364e35" language="neutral" versionScope="nonSxS" xmlns:wcm="http://schemas.microsoft.com/WMIConfig/2002/State" xmlns:xsi="http://www.w3.org/2001/XMLSchema-instance">
            <FolderLocations>
                <ProfilesDirectory>D:\Users</ProfilesDirectory>
                <ProgramData>D:\ProgramData</ProgramData>
            </FolderLocations>
        </component>
    </settings>
    <cpi:offlineImage cpi:source="catalog:x:/sources/install_windows 7 ultimate.clg" xmlns:cpi="urn:schemas-microsoft-com:cpi" />
</unattend>
Part 16. Recovery using System Image
How to reinstall or recover Windows
At some point you start thinking a reinstall. Usually this would include backing up personal files and folders, wiping the hard disk(s), reinstalling Windows, reinstalling software and finally restoring your personal files and folders.
In our method in this tutorial almost everything is done in the same way, except that we do not have to reinstall first Windows and then software. We simply backup the user data, reboot to WinPE, restore the image, reboot to OOBE and finally restore our personal data.
If you have a test rig to play with or you use virtual machines, you can test this and compare: the time neede for a clean install of Windows, updating it and installing all your software is much more than what restoring the image done as in this tutorial takes, both resulting the same.
Here's how to restore your image instead of reinstalling everything:
Shutdown the computer, remove all CDs and DVDs. Insert the WinPE boot disk we created in part 10. and power on the computer. When WinPE has booted, click CMD to launch Command Prompt to connect to a network share to retrieve your system image:

Close the Command Prompt.
Alternatively attach an external storage device containing the image.
Now launch Macrium:
On Restore tab, open the image file and browse to where you the image stored:


Click Restore Image:

Click Select a disk to restore to and select the first hard disk on your computer, the one which you want to conatin the system drive C: after the restore and click Next, click Finish:


Macrium starts restoring your image. It will take some time:

When done, shutdown the computer and remove the WinPE disk. Power on computer, it will now boot to OOBE Mode. As this is exactly the same as when doing a first ever boot on your Windows, you'll need to go through the finalizing installation part exactly as described in part 13.
When done, everything is there as you wanted, Windows is ready for a fresh start:


If you restored the original image to a bigger HDD than what was used when the image was created, you'll find some unused HDD capacity at the end of the system disk and can expand your C: drive by taking the unused space and adding it to C: drive:

See the list of Disk Management tutorials at the end of part 8 for more information on expanding the C: drive or creating a new partition using the unused space.
Restore your personal data and you are ready to go.
Part 17. Deploying Windows
Using the System Image to deploy Windows to other computers
To put it simple, deploying means installing Windows using a pre-made image file. As we have now created a personal, customized system image which contains no user accounts or product key, has all necessary software and Windows updates already installed, has very personalized Default User Profile, and finally was prepared using the Sysprep Generalize switch, you can use this image and method described in previous part (part 16) to install image on any PC which is capable of running Windows.
The generalize switch removed any hardware information like machine identity, hardware drivers and so on. This image is truly totally hardware independent.
Remember when deploying your image that it was created for a system with relocated Users and ProgramData and a 100GB C: drive, meaning the PC you want to deploy this image must have at least two hard disks and the system disk must be at least 100GB. The size of the secondary HDD is not important as long as you think it's big enough to hold your user data.
Part 18. Links and additional information
Where to go for further information?
I recommend you reading these articles and tutorials:
- Understanding Audit Mode
- Customize Windows in Audit Mode
- Windows Automated Installation Kit (Windows AIK)
- What is Sysprep?
- How to Use Sysprep: An Introduction
- http://www.sevenforums.com/installa...pproach-installing-setting-up-windows-pc.html
- http://www.sevenforums.com/tutorials/286053-system-preparation-tool-use-customize-windows.html
Part 19. That's it!
Thanks for reading!
I hope this walkthrough tutorial has given you something new, something you can use. Feel free to post your comments and questions in this thread.
I would also be very pleased to hear from you in case you'll find typing or factual errors in this tutorial, I'm happy to edit it.
Happy Sysprepping!
Kari
Attachments

Last edited:


 )
)