How to Enable or Disable Require Password on Wakeup in Windows 7
Information
Seems a needless extra step to have to log on every time your computer resumes from standby, suspend, or hibernate. This will show you how to resume from suspend directly to the desktop without requiring a password on wakeup.
OPTION ONE
Through Power Options
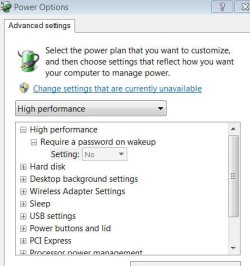
1. Open the Power Options Advanced Plan Settings.
2. Click on the Change settings that are currently unavailable link.
3. If prompted by UAC, then click on Yes.
4. To Disable Require Password on Wakeup
A) Change the Require a password on wakeup setting to NO , and click on OK.

5. To Enable Require Password on Wakeup
A) Change the Require a password on wakeup setting to YES , and click on OK.
6. Close the rest of the windows you have opened.
OPTION TWO
Through System Settings
NOTE: This option will change the password protection on wakeup setting in all power plans in your user account.
1. Open the Control Panel (Icons View), and click on the Power Options icon.
2. In the left pane, click on the Require a password on wakeup link. (see screenshot below)

3. Click on the Change settings that are currently unavailable link. (see screenshot below)

4. If prompted by UAC, then click on Yes (if administrator) or enter administrator's password (if standard user).
5. To Disable Require Password on Wakeup
A) Select (dot) Don't Require a password. (see screenshot below step 7)
B) Go to step 7.
6. To Enable Require Password on Wakeup
A) Select (dot) Require a password. (see screenshot below step 7)
7. Click on the Save changes button. (see screenshot below)
NOTE: The Save changes button will remain grayed out until you make a change in the settings.

8. You can close the Power Options window when done. (see screenshot below step 2)
OPTION THREE
Through an Elevated Command Prompt
1. Open an elevated command prompt.
2. To Disable Require Password on Wakeup
WARNING: If you've created custom power profiles you'll have to get the GUID for the one you want to change from powercfg -l first and substitute it for the <profile> parameter in these commands below.
A) In the elevated command prompt type these commands below and press enter following each one.
Code:
powercfg -SETACVALUEINDEX [B][COLOR=red]<profile>[/COLOR][/B] SUB_NONE CONSOLELOCK 0
powercfg -SETDCVALUEINDEX [B][COLOR=red]<profile>[/COLOR][/B] SUB_NONE CONSOLELOCK 0
Related Tutorials
- How to Change the Power Plan Settings in Windows 7
- How to Select a Power Plan in Windows 7
- How to Create or Delete a Custom Power Plan in Windows 7
- How to Enable or Disable Hibernate in Windows 7
- How to Restore the Default Power Plan Settings in Windows 7
- How to Create a Password for a Windows 7 User Account
- How to Change the Return to Sleep Timeout for a Unattended Wake Up in Windows 7
- How to Change the User Account Password if Unable to Login to Windows
- How to Enable or Disable Windows 7 Screen Saver Password Protection
- How to Automatically Log On a User Account at Windows 7 Startup
Last edited by a moderator:
")