

How to Add, Remove, or Rearrange Command Bar Buttons in Windows 7 Explorer
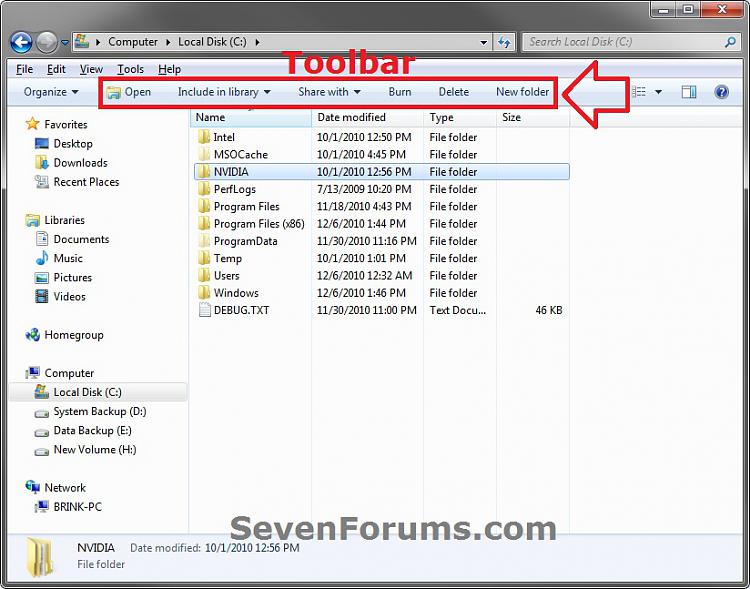
InformationThis will show you how to customize the command bar (toolbar) in Windows Explorer to add, remove, or rearrange command bar buttons of your choice for all users in Windows 7.
You must be logged in as an administrator to be able to do this tutorial.
EXAMPLE: Windows Explorer Command Bar
OPTION ONETo Add and Remove Command Bar Buttons using "Explorer Toolbar Editor" Program
NOTE: Explorer Toolbar Editor helps you add or remove buttons from the Windows Explorer toolbar in Windows 7. Explorer Toolbar Editor supports multiple folder types and displays the current set of buttons for each one. Also, you can use it to reorder the toolbar buttons.
1. Download, install, and run Explorer Toolbar Editor.
NOTE: Detailes instructions for how to use the program are at the site's download link below.
OPTION TWOTo Add and Remove Command Bar Buttons using "Custom Explorer Toolbar" Program
NOTE: This option doesn't have as many folder type options as doing OPTION TWO or OPTION THREE below, but does make it easier do for the folder types included in the program. Custom Explorer Toolbar is small utility for Windows 7 only, which allows you to easily customize the toolbar of Windows Explorer, and add buttons that were existed in previous versions of Windows, like Copy, Cut, Paste, Select All, and more. This utility also allows you to remove the toolbar buttons that you previously added.
1. Download and run CustomExplorerToolbar.exe.
Download
NoteSystem Requirements And Limitations
- This utility only works on Windows 7. It doesn't work on Windows Vista. Both 32-bit and x64 systems are supported.
- Some buttons might not be displayed on Explorer toolbar, even if you added them with CustomExplorerToolbar tool.
- Be aware that CustomExplorerToolbar cannot remove the default buttons provided by Windows operating system. It can only remove buttons that you previously added.
OPTION THREETo Manually Remove Command Bar Buttons in All Windows in Windows Explorer
NOTE: If you want to add, remove, or rearrange command bar buttons in specific windows in Windows Explorer, then do the OPTION THREE section below instead.
NoteYou will not be able to remove the default Burn, Print, E-mail, Play all, and Slide show command bar buttons provide by Windows 7 unless you had previously manually added them, or change the folder template to another one that doesn't have them by default.
If you really wanted to completely remove Burn from the command bar in all windows, then you could disable the built-in burning features in Windows 7.
1. Open the Start Menu, then type regedit in the search box and press enter.2. If prompted by UAC, then click on Yes.
3. In regedit, navigate to the location below. (see screenshot below)
HKEY_LOCAL_MACHINE\SOFTWARE\Microsoft\Windows\CurrentVersion\Explorer\CommandStore\shell4. To Backup the Command Bar Button before Deleting it
NOTE: See the table under step 8 in OPTION THREE below to know what each key below the Shell key is for which command bar button.
WarningIf you do not backup (export) the key for a command bar button before deleting it in step 5, you will not be able to restore the command bar button again.
A) Under the Shell key in the left pane of regedit, right click on the key (ex: Windows.includeinlibrary) for the command bar button (ex: Include in Library) that you want to remove, and click on Export.5. Under the Shell key in the left pane of regedit, right click on the key (ex: Windows.includeinlibrary) for the command bar button (ex: Include in Library) that you want to remove, and click on Permissions.
B) Save this .reg file backup to your desktop, then move it to where you like to keep it backed up at.
6. Take ownership of the registry key and set permissions of the key to "Allow" your user account "Full Control" of it. (see screenshot below)
7. Under the Shell key in the left pane of regedit, right click on the key (ex: Windows.includeinlibrary) for the command bar button (ex: Include in Library) that you want to remove, and click on Delete. (see screenshot below step 3)
8. Click on Yes to confirm the deletion. (see screenshot below)
9. Repeat steps 4 to 8 for any other command bar buttons that you would like to remove from all Windows Explorer windows.
10. When finished, close regedit.
11. If open, close and reopen Windows Explorer to see the changes applied.
NoteTo Restore a Command Bar Button Deleted in OPTION TWO
1. Double click on the backup .reg file from step 4.
2. If prompted, click on Run, Yes, Yes, and OK to approve merging the .reg file.
3. If open, close and reopen Windows Explorer to see the changes applied.
OPTION THREETo Manually Add, Remove, or Rearrange Command Bar Buttons in Specific Windows
1. Open the Start Menu, then type regedit in the search box and press enter.2. If prompted by UAC, then click on Yes.
3. In regedit, navigate to the location below of the Windows Explorer window that you would like to add, remove, or rearrange a command bar button(s) in.
Folder Templates
NOTE: To remove default command bar buttons for these type of windows, you will need to use the OPTION TWO section above instead.General Items Folder Template Windows (see also step 4)
Contacts Folder Template Windows (see also step 4)Code:HKEY_LOCAL_MACHINE\SOFTWARE\Microsoft\Windows\CurrentVersion\Explorer\FolderTypes\{5c4f28b5-f869-4e84-8e60-f11db97c5cc7}
Code:HKEY_LOCAL_MACHINE\SOFTWARE\Microsoft\Windows\CurrentVersion\Explorer\FolderTypes\{de2b70ec-9bf7-4a93-bd3d-243f7881d492}Documents Folder Template Windows (see also step 4)
Music Folder Template WindowsCode:HKEY_LOCAL_MACHINE\SOFTWARE\Microsoft\Windows\CurrentVersion\Explorer\FolderTypes\{7d49d726-3c21-4f05-99aa-fdc2c9474656}
Pictures Folder Template Windows (see also step 4)Code:HKEY_LOCAL_MACHINE\SOFTWARE\Microsoft\Windows\CurrentVersion\Explorer\FolderTypes\{94d6ddcc-4a68-4175-a374-bd584a510b78}
Videos Folder Template WindowsCode:HKEY_LOCAL_MACHINE\SOFTWARE\Microsoft\Windows\CurrentVersion\Explorer\FolderTypes\{b3690e58-e961-423b-b687-386ebfd83239}
Code:HKEY_LOCAL_MACHINE\SOFTWARE\Microsoft\Windows\CurrentVersion\Explorer\FolderTypes\{5fa96407-7e77-483c-ac93-691d05850de8}
Libraries
General (Generic) Library Folder Windows
Documents Library Folder WindowsCode:HKEY_LOCAL_MACHINE\SOFTWARE\Microsoft\Windows\CurrentVersion\Explorer\FolderTypes\{5f4eab9a-6833-4f61-899d-31cf46979d49}
Music Library Folder WindowsCode:HKEY_LOCAL_MACHINE\SOFTWARE\Microsoft\Windows\CurrentVersion\Explorer\FolderTypes\{fbb3477e-c9e4-4b3b-a2ba-d3f5d3cd46f9}
Pictures Library Folder WindowsCode:HKEY_LOCAL_MACHINE\SOFTWARE\Microsoft\Windows\CurrentVersion\Explorer\FolderTypes\{3f2a72a7-99fa-4ddb-a5a8-c604edf61d6b}
Videos Library Folder WindowsCode:HKEY_LOCAL_MACHINE\SOFTWARE\Microsoft\Windows\CurrentVersion\Explorer\FolderTypes\{0b2baaeb-0042-4dca-aa4d-3ee8648d03e5}
Code:HKEY_LOCAL_MACHINE\SOFTWARE\Microsoft\Windows\CurrentVersion\Explorer\FolderTypes\{631958a6-ad0f-4035-a745-28ac066dc6ed}
Search Results
General (Generic) Search Results Windows
Contacts Search Results WindowsCode:HKEY_LOCAL_MACHINE\SOFTWARE\Microsoft\Windows\CurrentVersion\Explorer\FolderTypes\{7fde1a1e-8b31-49a5-93b8-6be14cfa4943}
Documents Search Results WindowsCode:HKEY_LOCAL_MACHINE\SOFTWARE\Microsoft\Windows\CurrentVersion\Explorer\FolderTypes\{20338b7b-531c-4aad-8011-f5b3db2123ec}
Federated "open" Search Results WindowsCode:HKEY_LOCAL_MACHINE\SOFTWARE\Microsoft\Windows\CurrentVersion\Explorer\FolderTypes\{36011842-dccc-40fe-aa3d-6177ea401788}
Music Search Results WindowsCode:HKEY_LOCAL_MACHINE\SOFTWARE\Microsoft\Windows\CurrentVersion\Explorer\FolderTypes\{8faf9629-1980-46ff-8023-9dceab9c3ee3}
Pictures Search Results WindowsCode:HKEY_LOCAL_MACHINE\SOFTWARE\Microsoft\Windows\CurrentVersion\Explorer\FolderTypes\{71689ac1-cc88-45d0-8a22-2943c3e7dfb3}
Videos Search Results WindowsCode:HKEY_LOCAL_MACHINE\SOFTWARE\Microsoft\Windows\CurrentVersion\Explorer\FolderTypes\{4dcafe13-e6a7-4c28-be02-ca8c2126280d}
Code:HKEY_LOCAL_MACHINE\SOFTWARE\Microsoft\Windows\CurrentVersion\Explorer\FolderTypes\{ea25fbd7-3bf7-409e-b97f-3352240903f4}4. If the name of the Windows Explorer location you selected above is in RED (General Items, Contacts, Documents, and Pictures folder templates), then:
NOTE: If not in red, then skip this step and go to step 5 or 6.
- In the left pane under FolderTypes, right click on the {long number} CLSIDkey below and click on Permissions. Take ownership (step 3 in Option Two of Method TWO at this link) of this key with your administrator account, and set permissions to Allow your administrator account Full Control of the key. (see screenshots below)
5. To Add or Remove Buttons to be Displayed when a Item is Selected
- Continue on to step 5 or 6 below.
NOTE: When you select an item (ex: file or folder), the buttons displayed on the Windows Explorer command bar locations below are defined in the TasksItemsSelected registry key.
A) In the left pane, click on the TasksItemsSelected key under the exanded {long CLSID number} key above. (see screenshot below)
NOTE: If there is not a TasksItemsSelected key, then right click on the {long CLSID number} CLSID key, click on New and Key, type TasksItemsSelected and press enter.6. To Add or Remove Buttons to be Displayed when No Items are SelectedB) Go to step 7.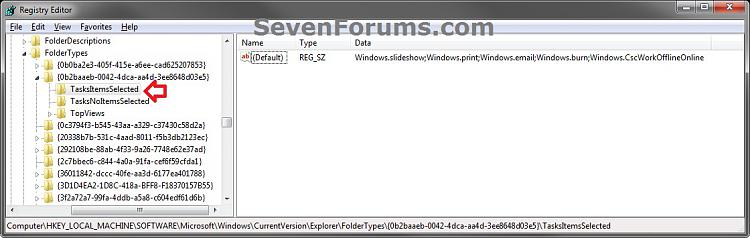
NOTE: When you open a folder without anything selected, the buttons displayed on the Windows Explorer command bar locations below are defined in the TasksNoItemsSelected registry key.
A) In the left pane, click on the TasksNoItemsSelected key under the exanded {long CLSID number} key location above. (see screenshot below)
NOTE: If there is not a TasksNoItemsSelected key, then right click on the {long CLSID number} key, click on New and Key, type TasksNoItemsSelected and press enter.7. In the right pane of TasksItemsSelected or TasksNoItemsSelected, right click on (Default) and click on Modify. (see screenshots below steps 5A and 6A)B) Continue on to step 7.
A) Do steps 8, 9,and/or 10 below for what you would like to do.8. To Add a Command Bar Button
A) Type in the Value data (see table below) for the button that you want to add in the order you want it to be displayed within the other listed buttons. (see screenshot below step 11.9. To Remove a Command Bar Button
NOTE: Be sure to leave only one semicolon (;) inbetween each Value data entry to separate them.
FOR EXAMPLE: If I wanted to add the Cut and Paste buttons to the Pictures Library command bar after the default Burn button, I would add Windows.Cut and Windows.Paste in the Edit String (modify) window with the other default command bar button entries like this below.
Code:Windows.slideshow;Windows.burn;Windows.Cut;Windows.Paste;Windows.CscWorkOfflineOnline
A) Remove the Value data (see table below step 8A) for the button that you want to remove. (see screenshot below step 11)10. To Rearrange the Display Order of the Command Bar Buttons
NOTE: Be sure to leave only one semicolon (;) inbetween each remaining Value data entry to separate them.
FOR EXAMPLE: If I wanted to remove the Cut and Paste buttons added to the Pictures Library command bar from step 8, I would edit out Windows.Cut and Windows.Paste in the Edit String (modify) window like this below.
BEFORE
AFTERCode:Windows.slideshow;Windows.burn;Windows.Cut;Windows.Paste;Windows.CscWorkOfflineOnline
Code:Windows.slideshow;Windows.burn;Windows.CscWorkOfflineOnline
A) Arrange the Value data (see table below step 8A) listed in the Edit String (modify) window in the order of how you would like them displayed on the command bar. (see screenshot below step 11)11. When finished adding, removing, or rearranging the button's Value data (ex: Windows.burn) in the Edit String box, click on OK. (see screenshot below)
NOTE: Be sure to leave only one semicolon (;) inbetween each Value data entry to separate them.
FOR EXAMPLE: If I wanted to rearange the Cut and Paste buttons added to the Pictures Library command bar from step 8, I would edit the Windows.Cut and Windows.Paste value data in the Edit String (modify) window like this below.
BEFORE
AFTERCode:Windows.slideshow;Windows.burn;Windows.Cut;Windows.Paste;Windows.CscWorkOfflineOnline
Code:Windows.slideshow;Windows.burn;Windows.Paste;Windows.Cut;Windows.CscWorkOfflineOnline
 12. Repeat the steps above if you would like to add, remove, or rearrage command bar buttons for any other Windows Explorer location in step 3.13. When finished, close regedit.
14. If open, close and reopen Windows Explorer to see the changes applied at the location you selected in step 3 (not the registry location).That's it,NoteTo Undo All Changes Made in OPTION THREE and Restore All Default Command Bar Buttons
1. Click on the Download button below to download the file below.
Restore_Default_Toolbar_Buttons_in_Windows_Explorer.reg2. Click on Save, and save the .reg file to the desktop.
3. Right click on the downloaded .reg file and click on Merge.
4. Click on Run, Yes, Yes, and OK when prompted.
5. When done, you can delete the downloaded .reg file if you like.
6. If open, close and reopen Windows Explorer to see the changes applied at the location you selected in step 3 (not the registry location).
Shawn
Related Tutorials
- How to Remove Windows Explorer Toolbar in Windows 7
- How to Add a Delete Button to the Windows 7 Explorer Toolbar
- How to Enable or Disable Built-in CD and DVD Burning Features in Windows 7 and Windows 8
- How to Add or Remove "Include in library" in Windows 7 Context Menu
- How to Add or Remove "Map Network Drive" and "Disconnect Network Drive" Options
- Add Windows Photo Viewer "Slide show" to Context Menu in Windows 7 and Windows 8
Windows Explorer Toolbar Buttons - Customize
-
New #1
Hi Brink. I am a big fan of tool bar shortcut buttons, this is a good list. But one that I was hoping for is still missing--a "Home" button. Since everything on Windows Explorer v7 moves, there is no way to establish a home base where you can always go with a single click. It seems like such a simple thing. Any hope for that?
-
New #2
I have updated this tutorial and added OPTION ONE for how to remove one or more toolbar button(s) from all Windows Explorer windows in Windows 7.
-
New #3
Hello, thanks for a great tutorial! But I need some help, please.
I need to add the "rename" and "delete" buttons to my Downloads Folder. it is in users/downloads. I can't figure out how to add them. Please tell me how to.
I have tried adding to many of the keys you listed, and I can easily add them to say, "My Documents", but what do I do for the "Downloads" Folder?
-
New #4
Hello Majesticeternit, and welcome to Seven Forums.
The C:\Users\(user-name)\Downloads folder uses the General Items folder template by default unless you changed it. You would add Windows.rename (Rename) and Windows.Delete (Delete) at step 5 in Option Two to the General Items folder template registry location (step 3 Option Two) to add these buttons to all folders using the General Items folder template. You will probably need to create a new TasksItemsSelected key first though as detailed in the note under step 5A.
Please let me know if you have more questions on this. :)
-
New #5
Thank you for your reply!
Unfortunately, it doesn't help. I looked at another thread on this site about adding the Delete button to Windows Explorer. It included a .reg file. That works just fine. The delete button shows up. But when I follow your instructions, nothing changes, not if I try Windows.rename or Windows.Copy or Windows.Paste or nothing at all.
I have permissions, and as I said, the delete button is added and works. So I don't know.
-
New #6
No worries. Together we'll get it figured out for you. First, if you could confirm what folder template is set for your C:\Users\(user-name)\Downloads folder, I'll be happy to write up a custom REG file that will add the buttons for you. :)
-
New #7
Wow, thank you!
When I checked to see what template it was using, I saw that it was a Picture template. I don't know why it was that way, I didn't change it, I didn't know how. But I changed it to General, and both buttons are there! Thank you!
-
-
New #9
Hi, i still can't find how to remove such entries as: system properties, uninstall programs, map network drive and control panel. These entries are in my computer, here is screenshot.Last edited by Brink; 05 Aug 2014 at 13:40. Reason: removed broken image
Windows Explorer Toolbar Buttons - Customize
How to Add, Remove, or Rearrange Command Bar Buttons in Windows 7 ExplorerPublished by Brink


 Quote
Quote
Related Discussions