How to Change or Save a Windows 7 Theme
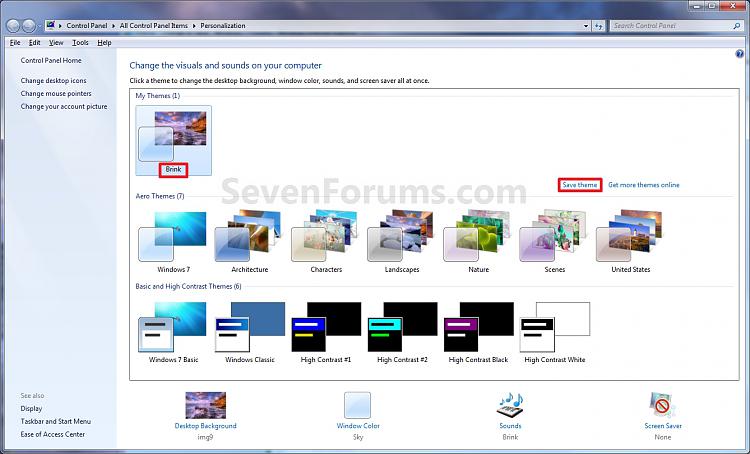
InformationThis will show you how to choose a theme to change the pictures (desktop background), colors, and sounds on your computer all at once in Windows 7.
You will also see how to save and delete your custom theme. Saving or deleting a theme is not available in Windows 7 Starter and Home Basic.
Note
- My Themes is your current theme. These .theme files are located in the hidden C:\Users\User-Name\AppData\Local\Microsoft\Windows\Themes folder.
- Aero Themes are the Windows Aero themes. They are located in the C:\Windows\Resources\Themes folder.
- Basic and High Contrast Themes are the Windows 7 Basic, Windows Classic, High Contrast #1, High Contrast #2, High Contrast Black, and High Contrast White themes. They are located in the C:\Windows\Resources\Ease of Access Themes folder.
- Regional Themes - See: Themes - Regional
Tip
- If you would like to, you can also load a theme pack to your computer from a friend or website to have available to use as your current theme.
- For free themes from Microsoft, see: Windows 7 themes - Microsoft Windows
OPTION ONETo Change the Theme in Windows 7 Starter and Home Basic
1. Open the Control Panel (icons view), and click on the Display icon.
2. In the left blue pane, click on the Change color scheme link. (see screenshot below)
3. Select the color scheme (theme) that you would like, and click on Apply to test to see how you like it. (see screenshot below)
NOTE: Aero themes are not available in the Windows 7 Starter and Home Basic editions.
4. When finished, click on OK. (see screenshot below step 3)
5. Close the Display window. (see screenshot below step 1)
OPTION TWOTo Change the Theme in Windows 7 Home Premium, Professional, Ultimate, and Enterprise
1. Right click on a empty space on the desktop and click on Personalize. (See screenshot below)That's it,
2. To Change the Theme
A) Click on one of the available themes. (See screenshot below)3. To Create a Custom Theme
NOTE: See the NOTE box at the top of the tutorial for more about these. To have the regional themes added, see: Themes - Regional.
B) Go to step 4.
NOTE: Any changes that you make to a theme that you have already saved will automatically be updated and saved to it. There will be no need to save it as a new theme again in step 4 below unless you want a new theme.
A) Change the Desktop Background picture and settings.4. To Save the Current Theme to a File
B) Change the Window Color and Appearance settings.
C) Change the Sounds for the Windows 7 sound events to any sound file that you would like instead.
D) Change the Screen Saver and settings to be used for this theme pack.
E) Change, add, or remove any Desktop Icons that you want to with.
F) Change the Mouse Pointers to use pointers of your choice.
G) Proceed to OPTION TWO below to save your customized theme as a theme pack.
NOTE: This will be your custom theme with a picture (desktop background), colors, sounds, and screen saver that you have selected and put together for the theme.
A) Under My Themes, click on the Save theme link towards the right. (See screenshot above)5. To Delete a Selected Theme
NOTE: This will save your theme as .theme file for use on your computer only. If you want to share the theme with family and friends, then see: Theme Pack - Create, Save, Install, and Delete.
B) Type in a name you want for this theme, and click on the Save button. (See screenshot below)
NOTE: You cannot delete the current theme. If you want to delete the current theme, then you must select another theme in step 2 first.
Shawn
Related Tutorials
- How to Allow or Prevent Changing Theme
- How to Make your own Windows 7 Theme Pack
- How to Change the Windows 7 Desktop Background
- How to Change the Window Color and Appearance in Windows 7
- How to Enable or Disable Windows 7 Transparency
- How to Change the Event Sound Effects in Windows 7
- How to Create a Desktop Slideshow in Windows 7
- How to Prevent or Allow Themes to Change Windows 7 Desktop Icons
- How to Use the Regional Themes in Windows 7
- How to Change or Restore Default Windows 7 Desktop Icons
- How to Change the Screen Saver in Windows 7
- How to Change the Mouse Pointers in Windows 7
- How to Prevent or Allow Themes to Change Windows 7 Mouse Pointers
- How to Create a Windows 7 Personalization Shortcut
- How to Apply Custom Themes in Windows 7
- How to Enable or Disable the Windows 7 Taskbar Thumbnail Previews
- How to Specify a Default Theme to Load for New Users in Windows 7
- Change Windows 7 to Look and Function like Windows XP again
- How to Enable Custom Themes without Modifying System Files
- How to Add or Remove "Personalize" from Desktop Context Menu in Windows 7 and Windows 8
Theme - Change or Save
-
New #1
Themes in Windows 7 directory
Can you please tell me where the themes directory in Windows 7 is? Is it C:\Windows\Resources\Themes?
Thanks,
Michael Higham
-
New #2
Hello Michael, and welcome to Windows 7 Forums.
Yes, there and at C:\Windows\Resources\Ease of Access Themes.
Shawn
-
New #3
Getting additional themes from a website
Hi Shawn,
From the Themes Website (which have Classic themes), where do I place these downloaded Windows Classic themes to? And also, where do I place these downloaded Windows Aero type themes to?
Thanks,
Michael
-
New #4
Hi Michael,
I would save the .theme files at: :)
Aero: C:\Windows\Resources\Themes
and
Classic: C:\Windows\Resources\Ease of Access Themes
-
New #5
Getting Windows Vista themes to work in Windows 7...
Hello,Will Windows Vista themes work on Windows 7 or will only Windows 7 themes work on Windows 7?Thanks,Michael
-
New #6
Good question Michael.
I have not tried that yet. Vista only comes with the aero.theme and Windows Classic.theme files and Windows 7 already includes these.
I would image that as long as it was a .theme file it may work, but I cannot confirm that.
-
New #7
-
-
New #9
Theme does not keep as Default
Hello, and thanks for reading this.
My problem is this: Ive already set my background pictures (presentation), colors, sounds and screensaver as I wished, I saved it and set it as default, but, once I reboot, I found that the theme has changed and the current one appears (in Personalize window) as "Not saved Theme" and actually keeps the last picture used on the theme I created (wich appears right next to this new one) as its ONLY pic.
I can re-set mine again, but everytime I turn on my pc, that will happen over n over again, in fact, I just reinstalled W7 2 nights ago, but the problem remains. I think could b something related to my config or so (I wish).
By the way, Im using Kaspersky I S -2010, Google Desktop and a couple little programs starting with Windows.
Thougth that might help.
Please help me, the cool appearance and presentation features is one of the things I like the most about Seven (among a lot of other great stuff).
Again, please help me.
Thankful
Juan Sebastian Jiménez
Related Discussions


 Quote
Quote