How to Change the Window Color and Appearance in Windows 7
Information
This will show you how to change the Window Color and Appearance settings for how windows, the Start Menu, and the taskbar are displayed in Windows 7.
Warning
Aero Requirements to be Enabled in Windows 7
NOTE: If Aero is not enabled, then you will not see the Window Color and Appearance screen in step 3A of OPTION TWO below.
NOTE: If Aero is not enabled, then you will not see the Window Color and Appearance screen in step 3A of OPTION TWO below.
- Aero is not included in Windows 7 Home Basic or Windows 7 Starter editions.
- 1 GHz 32-bit or 64-bit processor
- 1 GB of system memory
- A graphics card with support for DirectX 9 graphics with at least 128 MB of memory.
- The graphics card must support Pixel Shader 2.0 and the Windows Display Driver Model (WDDM).
- Activate Windows 7.
- You must be have True Color (32 bit) set instead of High Color (16 bit).
- The Themes and Desktop Window Manager Session Manager Services are set to Start and Automatic.
- The desktop composition and Animated controls and elements inside windows options enabled in Visual Effects.
- Refresh or update your WEI score.
- You must be using a "Aero" theme.
Tip
All advanced appearance settings for a single user are stored in the three registry keys below.
- HKEY_CURRENT_USER\Control Panel\Colors
- HKEY_CURRENT_USER\Control Panel\Desktop\Colors
- HKEY_CURRENT_USER\Control Panel\Desktop\WindowMetrics
OPTION ONE
To Change "Window Color and Appearance" in ONLY Windows 7 Starter and Home Basic
Note
If you have the Windows 7 Home Premium, Professional, Ultimate, or Enterprise edition, then use OPTION TWO below instead.
1. Open the Control Panel (icons view), and click on the Display icon.
2. In the left blue pane, click on the Change color scheme link. (see screenshot below)

3. Click on the Advanced button. (see screenshot below)
NOTE: Aero themes are not available in the Windows 7 Starter and Home Basic editions.

4. Go to step 7B in OPTION TWO below to do steps 7B to 9.
5. When finished, click on OK. (see screenshot below step 3)
6. Close the Display window. (see screenshot below step 1)
OPTION TWO
To Change "Window Color and Appearance" in ONLY Windows 7 Home Premium, Professional, Ultimate, and Enterprise
Note
If you have the Windows 7 Starter or Home Basic edition, then use OPTION ONE above instead.
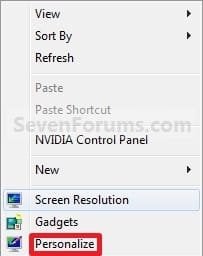
1. Right click on a empty space on the desktop and click on Personalize. (see screenshot below)

2. Click on the Window Color link at the bottom of the window. (see screenshot below)
NOTE: The name that is grayed out under Window Color, is the current color selected.

Warning
- If you have selected from the Basic and High Contrast Themes , then you will not see the Window Color and Appearance screen below step 3A. Instead, go to step 7.
- If you have selected from the Aero Themes, then you will see the Window Color and Appearance screen below step 3A. Continue to step 3.
3. Select a Color
A) Click on an available color that you would like the Start Menu, window borders, and taskbar to be. (see screenshot below step 5A)

4. Enable or Disable Transparency
A) Check or uncheck Enable transparency to enable or disable transparency for the Start Menu, window borders, and taskbar. (see screenshot below step 3A)
5. Adjust Color Intensity
A) Slide the Color intensity slider to the left to lighten the color (step 3) or to the right to darken the color (step 3). (see screenshot below step 3A)
WARNING: If you slide the slider to far to the right, the Start menu, windows, and taskbar, may no longer be transparent (if enabled) since the color will be to dark. You would just need to slide it some to the left to lighten the color again.
6. To Adjust the Color Mixer Settings
NOTE: If you do not want to adjust the color mixer settings, then skip this step to keep the default color selected in step 3 and go to step 7 instead.
A) Click on the Show color mixer button. (see screenshot below)
NOTE: This is if you would like to adjust the color's (step 3A) hue, saturation, and brightness to create a custom color.
B) Slide the sliders to adjust the color.
NOTE: If you do not wish to continue to step 7, then click on the Save Changes button to apply the changes and close the window below. You're done.

7. To Change the "Advanced Window Color and Appearance" Settings
WARNING: Colors and sizes selected for items will only be used if you have selected a Windows Classic or High Contrast theme. If any other theme is applied, you will not be able to change colors and sizes for items.
A) Click on the Advanced appearance settings link. (see screenshot above)
NOTE: You will not need to do this if you have a Basic and High Contrast Theme selected. Continue to step 7B instead.
B) To Change a Window Item Setting
- To Select a Item - Click on the Item drop down menu and select a window item you want to change. (See screenshots below step 7C)
NOTE: You can also click on the different displayed windows at the top of the "Window Color and Appearance" window to select a Item to. - To Change the Item Size - Change the Size number to what you want.
- To Change the Item Color - Click on the Color 1 and Color 2 drop down menu and select a color.
NOTE: The color will only change if you have the Windows Classic theme selected.
- To Change the Item Font - Click on the Font drop down menu and select a font. (See screenshotd below)
- To Change the Item Font Size - Click on the Size drop down menu and select a number for the size. The higher the number, the larger the size.
- To Change the Item Font Color - Click on the Color drop down menu and select a color.
- To Have the Item Font in Bold - Click the B button to highlight it. If it is not highlighted, then the font will not be in bold.
- To Have the Item Font in Italic - Click on the I button to highlight it. If it is not highlighted, then the font will not be in italic.


D) Repeat steps 7B and 7C until you change all the Items you wanted.
8. The Default Advanced Appearance Settings


9. When finished, click on OK. (see screenshots above or below step 7C)
10. Click on the Save Changes button in the Window Color and Appearance window. (see screenshot below step 6B)
NOTE: You will not have this to do if you have a Basic and High Contrast Theme selected.
11. Close the the Personalization window. (see screenshot below step 2)
That's it,
Shawn
Related Tutorials
- How to Backup and Restore Advanced Appearance Settings in Windows
- How to Create a Window Color and Appearance Shortcut
- How to Allow or Prevent Changing Window Color and Appearance in Vista and Windows 7
- How to Make your own Windows 7 Theme Pack
- How to Change the Windows 7 Desktop Background
- How to Change or Save a Windows 7 Theme
- How to Enable or Disable Windows 7 Transparency
- How to Create a Desktop Slideshow in Windows 7
- How to Change the Default Fonts in Windows 7
- How to Change the Size of the Windows 7 Explorer Address and Search Bar
- How to Change the Width of Window Borders
- How to Create a Windows 7 Personalization Shortcut
- Turn On Windows 7 Aero with a Incompatible Graphics Card
- How to Enable Aero in Unsupported Editions of Windows 7
- How to Change the Desktop Background in Windows 7 Starter and Home Basic Editions
- How to Change the Screen Saver in Windows 7
- How to Add or Remove "Personalize" from Desktop Context Menu in Windows 7 and Windows 8
- How to Add or Remove "Advanced Window Color and Appearance" from Desktop Context Menu in Windows 7
Attachments
Last edited:

")