How to Add or Remove Computer from Navigation Pane in Windows 7
Information
This will show you how to add or remove Computer in the Windows Explorer Navigation Pane in Windows 7.
Warning
- You can only do this while logged into an administrator account.
- This will affect all user account's on the computer.
- This will also add or remove the default Computer desktop icon as well.
EXAMPLE: Computer in Navigation Pane
NOTE: This is Computer added (default) (left screenshot below) and removed (right screenshot below) from the Navigation Pane.


Here's How: 1. Open the Start Menu and type regedit.exe in the search line, then press enter.
2. If prompted by UAC, then click on Yes.
3. In Regedit, go to the location below: (See screenshot below step 4) HKEY_CLASSES_ROOT\CLSID\{20D04FE0-3AEA-1069-A2D8-08002B30309D}\ShellFolder
4. In the left pane of regedit, right click on the ShellFolder key and click on Permissions. (See screenshot below)

5. At the top, select the Administrators group. At the bottom, check the Allow box to the right of Full Control and click on OK. (See screenshot below)

7. In the right pane of regedit, right click on a empty space and click on New and DWORD (32-bit) Value. Type Attributes and press enter. (See screenshots below)
NOTE: If Attributes is already here, then you can skip this step and go to step 8 below instead.


8. In the right pane of regedit, right click on Attributes and click on Modify. (See screenshot below)

9. To Add Computer to the Navigation Pane
NOTE: You can also right click on Attributes and click on Delete and Yes to restore Computer to the Navigation Pane. A) Type in b084010c and click on OK. (see screenshot below)

B) Go to step 9.
10. To Remove Computer from the Navigation Pane A) Type in b094010c and click on OK. (see screenshot below)

11. If you have 64-bit Windows 7 Installed
Note
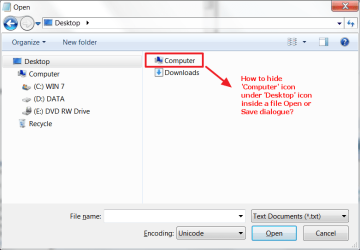
To also add or remove Computer from the "Open" and "Save as" type windows as well in 64-bit Windows 7, you will also need to do this step.
If you have a 32-bit Windows 7 installed, then skip this step since doing steps 1 to 7/8 will add or remove Computer from the "Open" and "Save as" type windows as well.
Code:
HKEY_LOCAL_MACHINE\SOFTWARE\Wow6432Node\Classes\CLSID\{20D04FE0-3AEA-1069-A2D8-08002B30309D}\ShellFolder11. Close regedit.
12. Restart the computer to fully apply.
That's it,
Shawn
Related Tutorials
- How to Add or Remove the Windows 7 Libraries Folder from the Navigation Pane
- How to Add or Remove Favorites from the Windows 7 Navigation Pane
- How to Add or Remove Homegroup from the Windows 7 Navigation Pane
- How to Add or Remove Network from the Windows 7 Navigation Pane
- How to Add or Remove Control Panel from the Windows 7 Navigation Pane
- How to Add or Remove your User Folder from the Windows 7 Navigation Pane
- How to Show or Not Show All Folders in the Windows 7 Navigation Pane
- How to Turn On or Off Expand to Current Folder in Windows 7 Navigation Pane
- How to Pin Computer to the Windows 7 Taskbar
- How to Add or Remove a Default Desktop Icon in Windows 7
- How to Turn the Navigation Pane On or Off in Windows 7
- How to Rename "Computer" in the Windows 7 Explorer Navigation Pane
- How to Add or Remove "Computer" from Desktop Context Menu
- How to Change "Computer" Folder Name in Vista, Windows 7, and Windows 8
Last edited:
")
 .
.