Solved I need to move the boot files of win7x64

The Apathetic

New member
Member
VIP
Local time
2:42 AM
Messages
167
Location
Tanta, Egypt
Hello there,

I spent about 6 hours assembling my new pc (2600k GTX570 etc etc) anyway, I connected my 2 black WDs to it and attempted to install the windows, here is what I did, the HDD had a system installed on it from the previous pc, so I formatted the C and formatted the 100mb hidden drive (I thought it would contain files that could cause problems with the new installation, now I know it doesn't), installed the windows on C and everything was fine, up until I found out that the windows had put the damn Boot files in a partition of my 2nd HDD and hid the partition, I almost had a heart attack when I didn't find the partition cause it was very freaking important, it had 400 gigs of very hard to get "back again" stuff, anyway, I opened the disk management and thankfully found the partition there with no drive letter, I assigned 1 to it and right then I realized what happened, now this drive is the boot drive for the damn windows while the 100mb partition is sitting in my computer visible with a letter and completely useless..

How do I fix this? is there a way at all to move the boot files from my precious partition to the 100mb partition (I know it's not as simple as move and past), then make that 100mb partition the "System, Active" instead of just "Active" while removing that status from my other partition, and finally hiding the 100mb partition.

Awaiting your replies, I really need to fix this asap. Thank you.
 

My Computer My Computer

At a glance

Windows 7 Ultimate x64AMD Phenom II x4 B502x4 G.skill DDR3 CL9 @1600Powercolor HD 6950 2G GDDR5
Computer Manufacturer/Model Number
Custom
OS
Windows 7 Ultimate x64
CPU
AMD Phenom II x4 B50
Motherboard
GA-MA770T-UD3P
Memory
2x4 G.skill DDR3 CL9 @1600
Graphics Card(s)
Powercolor HD 6950 2G GDDR5
Sound Card
Built in + Creative T6200 5.1 sub system
Monitor(s) Displays
LG FLATRON W1934S
Screen Resolution
1440x900
Hard Drives
2 1T WD Blacks (No Raid), 1 2T WD Green
PSU
NZXT HALE90 1000W 80Gold+
Case
HAF 932
Cooling
5 Fans
Keyboard
Upgrading~
Mouse
Upgrading~
Internet Speed
ADSL 2mb
Rt click and run as admin on Sisparv6.cmd

When it asks, select the drive letter of "partition of my 2nd HDD" to mark inactive
 
Last edited:

My Computers My Computers

  • At a glance

    7 X64i5 84002x8gb 3200mhz
    Computer type
    PC/Desktop
    OS
    7 X64
    CPU
    i5 8400
    Motherboard
    gigabyte b365m ds3h
    Memory
    2x8gb 3200mhz
    Hard Drives
    various
    PSU
    pure power 11 400w cm
    Case
    Coolermaster
    Cooling
    cryorig m9i
  • At a glance

    7x64g54008gb ddr4 2400
    Computer type
    PC/Desktop
    OS
    7x64
    CPU
    g5400
    Motherboard
    ga b365m ds3h
    Memory
    8gb ddr4 2400
    PSU
    xfx pro 450w
Thank you very much, however, after I made this post, I rearranged the HDDs, made the 1 that has the system installed on to be "disk0" (it was disk1) and made the 2nd HDD disk1 (it was disk0), which effectively caused boot file error and had to install a new windows, it's all fixed now and windows installer used the 100mb hidden partition as it should have been.

However, now the important partition still has the old boot files from the previous windows install, it's status is "active" but no longer labeled as "system" (the hidden 100mb has all that now thankfully), now how do I get rid of the old boot files on the important partition (they can't be simply deleted as you know) and deactivate it?

Sorry for the inconvenience.
 

My Computer My Computer

At a glance

Windows 7 Ultimate x64AMD Phenom II x4 B502x4 G.skill DDR3 CL9 @1600Powercolor HD 6950 2G GDDR5
Computer Manufacturer/Model Number
Custom
OS
Windows 7 Ultimate x64
CPU
AMD Phenom II x4 B50
Motherboard
GA-MA770T-UD3P
Memory
2x4 G.skill DDR3 CL9 @1600
Graphics Card(s)
Powercolor HD 6950 2G GDDR5
Sound Card
Built in + Creative T6200 5.1 sub system
Monitor(s) Displays
LG FLATRON W1934S
Screen Resolution
1440x900
Hard Drives
2 1T WD Blacks (No Raid), 1 2T WD Green
PSU
NZXT HALE90 1000W 80Gold+
Case
HAF 932
Cooling
5 Fans
Keyboard
Upgrading~
Mouse
Upgrading~
Internet Speed
ADSL 2mb
You need permisssion from trusted installer - I have no idea why that is.

Anyone with admin rights can change that.

Take ownership of the boot folder and bootmgr and delete them if you really want.

I would leave them - you never know when you might want to boot via that partition - and they are very small.

I always create the boot critical files on every primary partition - very useful in case of catastrophe.
 

My Computers My Computers

  • At a glance

    7 X64i5 84002x8gb 3200mhz
    Computer type
    PC/Desktop
    OS
    7 X64
    CPU
    i5 8400
    Motherboard
    gigabyte b365m ds3h
    Memory
    2x8gb 3200mhz
    Hard Drives
    various
    PSU
    pure power 11 400w cm
    Case
    Coolermaster
    Cooling
    cryorig m9i
  • At a glance

    7x64g54008gb ddr4 2400
    Computer type
    PC/Desktop
    OS
    7x64
    CPU
    g5400
    Motherboard
    ga b365m ds3h
    Memory
    8gb ddr4 2400
    PSU
    xfx pro 450w
Hi, where can I find the file 'Sisparv6.cmd'? I'm having the same issues on my system. Drive 0 has Vista on it and its the 'system' drive and Drive 1 has 7 on it and its the 'boot' drive. When I remove Drive 0, I get a bootmgr is missing error.
 

My Computer My Computer

At a glance

Windows 7 Home Premium 64-bit
OS
Windows 7 Home Premium 64-bit
Run it in windows 7 - rt click an run as admin on sisparv6.cmd.

Enter your windows 7 drive letter as your new system partition.

Enter N to adding existing entries.
 
Last edited:

My Computers My Computers

  • At a glance

    7 X64i5 84002x8gb 3200mhz
    Computer type
    PC/Desktop
    OS
    7 X64
    CPU
    i5 8400
    Motherboard
    gigabyte b365m ds3h
    Memory
    2x8gb 3200mhz
    Hard Drives
    various
    PSU
    pure power 11 400w cm
    Case
    Coolermaster
    Cooling
    cryorig m9i
  • At a glance

    7x64g54008gb ddr4 2400
    Computer type
    PC/Desktop
    OS
    7x64
    CPU
    g5400
    Motherboard
    ga b365m ds3h
    Memory
    8gb ddr4 2400
    PSU
    xfx pro 450w
Greg, there is no sisparv6.cmd on my Win 7 Pro X64 system.
 

My Computer My Computer

At a glance

Windows 10 Pro X64Intel Quad Core i7-4770 @ 3.4Ghz16.0GB PC3-12800 DDR3 SDRAM 1600 MHzIntel Integrated HD Graphics
Computer type
PC/Desktop
Computer Manufacturer/Model Number
Lenovo IdeaCenter 450
OS
Windows 10 Pro X64
CPU
Intel Quad Core i7-4770 @ 3.4Ghz
Memory
16.0GB PC3-12800 DDR3 SDRAM 1600 MHz
Graphics Card(s)
Intel Integrated HD Graphics
Sound Card
Realtek HD Audio
Monitor(s) Displays
HP 22" LCD
Screen Resolution
1680 x 1050
Hard Drives
250GB Samsung EVO SATA-3 SSD
2TB Seagate ST2000DM001 SATA-2
1.5TB Seagate ST3150041AS SATA
Keyboard
Dell USB
Mouse
Lenovo USB
Internet Speed
Cable via Road Runner 3MB Upload, 30MB Download
Antivirus
Windows Defender, MBAM Pro, MBAE
Browser
Seamonkey
Other Info
UEFI/GPT
PLDS DVD-RW DH16AERSH
Run it in windows 7 - rt click an run as admin on sisparv6.cmd.

Enter your windows 7 drive letter as your new system partition.

Enter N to adding existing entries.

Aah, it got deleted or something. I'm getting a 404 error when trying to follow the link in the email notification I got.
 

My Computer My Computer

At a glance

Windows 7 Home Premium 64-bit
OS
Windows 7 Home Premium 64-bit
Can someone please re-post sisparv6.cmd and keep it on here for 24 hours at least so I get a chance to grab it? Thanks!
 

My Computer My Computer

At a glance

Windows 7 Home Premium 64-bit
OS
Windows 7 Home Premium 64-bit
If you will describe the problem and perhaps post back a screenshot of your full Disk Mgmt Drive map with listings (using Snipping Tool in Start Menu) we can help you with the conventional method for recovering the System Boot Files into Win7 partition: mark Win7 Active, run Startup Repair up to 3 separate times from booted DVD or Repair CD.
 
I am not at my home computer right now but I can describe what is happening. Initially, I had a hard drive with Vista installed on it. I then installed a second hard drive and installed Windows 7 on that drive. When I remove the drive with Vista on it, I get the bootmgr is missing error. With the Vista disk back in, and booted in 7, in disk manager I noticed the Vista disk has the System attribute and the 7 disk has the Boot attribute. If this isn't enough information, I'll post a screen shot later today when I get home.
 

My Computer My Computer

At a glance

Windows 7 Home Premium 64-bit
OS
Windows 7 Home Premium 64-bit
If you will describe the problem and perhaps post back a screenshot of your full Disk Mgmt Drive map with listings (using Snipping Tool in Start Menu) we can help you with the conventional method for recovering the System Boot Files into Win7 partition: mark Win7 Active, run Startup Repair up to 3 separate times from booted DVD or Repair CD.

Follow Gregrocker's post.
 

My Computer My Computer

At a glance

ME/XP/Vista/Win7
OS
ME/XP/Vista/Win7
Hello djforsberg, welcome to Seven Forums!


Leave the Windows 7 HDD connected separately and set it as the second boot device in the BIOS after the CD/DVD drive, use Option Two #1 to mark the Windows7 partition as Active and do the 3 separate startup repairs out lined in this tutorial an the link below to (re)create the "System" boot files to that partition.


Startup Repair - Run 3 Separate Times
 

My Computer My Computer

At a glance

W 7 64-bit UltimateIntel Q9550 Yorkfield8GB Dominator 8500C5DATI : XFX 5870
Computer Manufacturer/Model Number
* BFK Customs *
OS
W 7 64-bit Ultimate
CPU
Intel Q9550 Yorkfield
Motherboard
ASUS P5Q Pro
Memory
8GB Dominator 8500C5D
Graphics Card(s)
ATI : XFX 5870
Sound Card
Realtek HD Audio 7-1
Monitor(s) Displays
1x 47" LCD HDMI & 3x 26" LCD HDMI
Screen Resolution
1920x1080P & 1920x1200
Hard Drives
1x 80GB Intel X25-M G2 SSD : 1x 500GB & 1x 640GB WD Caviar Black(s)
PSU
Corsair 620HX
Case
Cooler Master RC-690
Cooling
Tuniq Tower 120, 2x 140mm and 3x 120mm case fans
Keyboard
Microsoft 500
Mouse
Razer Diamondback 3G
Internet Speed
14 Mb/s
Other Info
1x Koutech 3Gb/s SATA HDD Hot Swap Rack
Hello djforsberg, welcome to Seven Forums!


Leave the Windows 7 HDD connected separately and set it as the second boot device in the BIOS after the CD/DVD drive, use Option Two #1 to mark the Windows7 partition as Active and do the 3 separate startup repairs out lined in this tutorial an the link below to (re)create the "System" boot files to that partition.


Startup Repair - Run 3 Separate Times

Thanks, I'll try that tonight!
 

My Computer My Computer

At a glance

Windows 7 Home Premium 64-bit
OS
Windows 7 Home Premium 64-bit
Hello djforsberg, welcome to Seven Forums!


Leave the Windows 7 HDD connected separately and set it as the second boot device in the BIOS after the CD/DVD drive, use Option Two #1 to mark the Windows7 partition as Active and do the 3 separate startup repairs out lined in this tutorial an the link below to (re)create the "System" boot files to that partition.


Startup Repair - Run 3 Separate Times

Thanks, I'll try that tonight!


Be sure to post back here to let us know how it sorts out.
 

My Computer My Computer

At a glance

W 7 64-bit UltimateIntel Q9550 Yorkfield8GB Dominator 8500C5DATI : XFX 5870
Computer Manufacturer/Model Number
* BFK Customs *
OS
W 7 64-bit Ultimate
CPU
Intel Q9550 Yorkfield
Motherboard
ASUS P5Q Pro
Memory
8GB Dominator 8500C5D
Graphics Card(s)
ATI : XFX 5870
Sound Card
Realtek HD Audio 7-1
Monitor(s) Displays
1x 47" LCD HDMI & 3x 26" LCD HDMI
Screen Resolution
1920x1080P & 1920x1200
Hard Drives
1x 80GB Intel X25-M G2 SSD : 1x 500GB & 1x 640GB WD Caviar Black(s)
PSU
Corsair 620HX
Case
Cooler Master RC-690
Cooling
Tuniq Tower 120, 2x 140mm and 3x 120mm case fans
Keyboard
Microsoft 500
Mouse
Razer Diamondback 3G
Internet Speed
14 Mb/s
Other Info
1x Koutech 3Gb/s SATA HDD Hot Swap Rack
Hello djforsberg, welcome to Seven Forums!


Leave the Windows 7 HDD connected separately and set it as the second boot device in the BIOS after the CD/DVD drive, use Option Two #1 to mark the Windows7 partition as Active and do the 3 separate startup repairs out lined in this tutorial an the link below to (re)create the "System" boot files to that partition.


Startup Repair - Run 3 Separate Times

Thanks, I'll try that tonight!


Be sure to post back here to let us know how it sorts out.

Definitely :thumbsup:
 

My Computer My Computer

At a glance

Windows 7 Home Premium 64-bit
OS
Windows 7 Home Premium 64-bit
I would first post the screenshot before you possibly lose the ability to boot and then we are flying blind trying to help you.

There are often unexpected configurations, e.g logical drives which cannot be marked Active, etc.
 
Hello djforsberg, welcome to Seven Forums!


... use Option Two #1 to mark the Windows7 partition as Active and do the 3 separate startup repairs out lined in this tutorial an the link below to (re)create the "System" boot files to that partition.


Startup Repair - Run 3 Separate Times


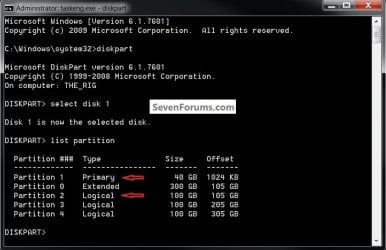
Greg has a point, when you use list partition be sure the partition Windows 7 is on is a Primary partition, if it lists as Logical this will not work and we'll need to see the snip of disk management.

click to enlarge
Logical.jpg
 

My Computer My Computer

At a glance

W 7 64-bit UltimateIntel Q9550 Yorkfield8GB Dominator 8500C5DATI : XFX 5870
Computer Manufacturer/Model Number
* BFK Customs *
OS
W 7 64-bit Ultimate
CPU
Intel Q9550 Yorkfield
Motherboard
ASUS P5Q Pro
Memory
8GB Dominator 8500C5D
Graphics Card(s)
ATI : XFX 5870
Sound Card
Realtek HD Audio 7-1
Monitor(s) Displays
1x 47" LCD HDMI & 3x 26" LCD HDMI
Screen Resolution
1920x1080P & 1920x1200
Hard Drives
1x 80GB Intel X25-M G2 SSD : 1x 500GB & 1x 640GB WD Caviar Black(s)
PSU
Corsair 620HX
Case
Cooler Master RC-690
Cooling
Tuniq Tower 120, 2x 140mm and 3x 120mm case fans
Keyboard
Microsoft 500
Mouse
Razer Diamondback 3G
Internet Speed
14 Mb/s
Other Info
1x Koutech 3Gb/s SATA HDD Hot Swap Rack
OK guys, the start repair worked. Thanks very much!
 

My Computer My Computer

At a glance

Windows 7 Home Premium 64-bit
OS
Windows 7 Home Premium 64-bit
Thank you for updating us.

If you still want to post back a screenshot of your full DIsk Mgmt drive map with listings, we can look it over for any potential problems. Use the Snipping Tool in Start Menu.
 
Back
Top