Clean Reinstall - Windows 7
To save pages of space I provide blue links to illustrated tutorials instead of illustrating them in-line. You can open these in a new tab using your middle mouse button (scroll wheel) or from the right-click context menu.
Contents
Microsoft has taken down the Digital River ISO download servers and are only providing ISO's to retail customers. This leaves those who bought a PC with Win7 at the mercy of OEM Tech Support who except for Dell rarely will provide clean Reinstallation media, to borrow a retail copy, or search for a torrent download which can be risky if not checked for add-ins.
If you have a retail copy of Windows 7, then you could try to download an ISO directly from Microsoft at the link below. The link is reported to only work in Internet Explorer.
:ar: Microsoft Software Recovery
You can borrow a friend's disk to reinstall, even extract the ISO image file using ImgBurn and then burn a new DVD using ImgBurn at 4x speed, write ISO to 4gb+ flash stick using UltraISO Software To Create Bootable USB Flash Drive, or for UEFI installs use Option One of UEFI Bootable USB Flash Drive - Create in Windows
If you have any doubt about the integrity of the ISO file or are forced to download the ISO from a torrent you can compare the SHA1 signature available freely on the MSDN Downloads page "Details" links, using a checker like HashTab which adds a HASH calculator to the ISO file Properties tabs. Having these sums match assures ISO integrity and that nothing was added to the file.
If your licensed version is unavailable you can unlock all versions in any ISO by running ei.cfg removal tool or by deleting ei.cfg file from Sources folder on bootable flash stick. Check the HASH first before unlocking the ISO.
I would use 64-bit for 4gb or more RAM, 32-bit (x86) for 3gb or less RAM.
You can slipstream the latest Updates into the installer ISO to save at least an hour's Updating after install using Update 7 installation media. However it may take an hour to do this so consider how much you want this.
Burn ISO to DVD or to USB flash stick (minimum size of 4GB required) using Windows 7 USB-DVD Download Tool which is sometimes fussy about the ISO, or alternatively to DVD using ImgBurn at 4x speed, to flash stick using UltraISO Software To Create Bootable USB Flash Drive.
For UEFI installs format flash stick with Option One of UEFI Bootable USB Flash Drive - Create in Windows making sure the settings shown in picture don't jump around after adding the ISO. You have a UEFI install if Disk Management shows an EFI System partition on the hard drive, the BIOS shows UEFI settings and it's Boot menu offers to boot the DVD or a UEFI-formatted flash stick as an EFI device.
If your files are not organized now is the time to sort them into the User folders for your named User account. ▶ Windows 7 - How to Drag and Drop to Move a Folder - YouTube
For all browsers other than IE which stores Favorites in the User folder of that name, export your bookmarks to Documents now. Import or export bookmarks - Chrome Help
Export Firefox bookmarks to an HTML file to back up or transfer bookmarks | Firefox Help
If your email is stored on computer, Google how to back up specific mail and account settings to get solutions like How do I import and export email, contacts, and calendars with Windows Live Mail? - Microsoft Windows Help.
Backup Quickbooks 2010+ Company files from where you keep them, the default location User/Public/Documents, or google your version's file location, or run a QB backup to Documents before backing them up.
De-authorize I-Tunes. You can back up your Sticky Notes to keep the one currently on your desktop following Sticky Notes - Backup and Restore.
Then back up your files externally by dragging or copying your named User account or active User folders to another hard drive, external drive, flash stick or disk. ▶ Copying files to an external drive - YouTube.
An alternative is to upload files to the cloud using Microsoft OneDrive which offers 15gb free storage for each Outlook/Live ID. Install and use the OneDrive app to drag User folders into OneDrive folder, monitor uploading progress by clicking Cloud icon in System Tray on bottom right end of taskbar. Once files are all uploaded, rightclick the Cloud Icon again to choose Settings and Unlink so that any accidental file deletions are not deleted in the Cloud. Step 7 will pick up with reinstalling OneDrive to recover your files. Remember that any accidental deletions always end up in OneDrive's as well as your PC's Recycle Bin.
For unbootable Windows copy data to another HD or USB device using the Windows 7 disk to Copy & Paste in Windows Recovery Console, free Paragon rescue disk, or a Linux boot disk.
You can Run and print an audit of hardware and software including installed Product Keys using Belarc Advisor. This audit assures you won't lose any paid software keys like Office. Note that the Windows 7 Product Key found by Belarc or another key finder will be an SLP batch key used at factory, if it has not yet been activated from COA sticker Key used for a Clean Reinstall. This SLP batch key cannot be used for reinstall. Methods for backing up Factory SLP Activation if the COA Product Key is not readable are not supported here but can be found on the web.
For unbootable Windows, you can read the installed Product Key and any Office key you don't have backed up using ProduKey - Recover lost product key (CD-Key) of Windows/MS-Office/SQL Server
If you have a Recovery partition it may not run after clean reinstall. You may want to make your Recovery Disks so you have a path back to factory condition, following the steps given in your PC's setup literature or in the Manual located on the Support Downloads webpage for your model computer. As an alternative to Recovery Disks you can save a Windows 7 Backup Image or more flexible Macrium Image of the entire HD.
You can wait until afterward to see if Recovery or (Diagnostics) Tools partitions will run from boot to decide if you want to delete those partitions and recover the space into C or elsewhere (using Step 3 here). This information may be provided for your brand PC in the Special Notes at the end of this tutorial.
Write down the Product Key from COA sticker located on back or side of PC tower, bottom or under battery of notebook. Make sure you get the characters correct as this is a main cause of activation failure. You can input or Skip the key during install then afterwards activate at Control Panel>System, which may require a quick robocall. But put the key in a safe place so you have it for the life of the PC, which may outlast the sticker's readability.
The COA sticker looks like this:

Gather your program installers. For those lacking disks, you may find them on the program's Support Downloads webpage. Favorite pre-installed apps may be found on the Downloads webpage for your model computer or manufacturer-provided Apps Disk. Others may be found by googling. Some pre-installed apps may not be available for clean reinstall - more about this for your brand PC in the Special Notes at end.
You can download clean, safe copies of your licensed Office version to burn to disk (.iso) or run .exe from Microsoft which can be activated with the Product Key you originally bought with it or audited using Belarc from Step 2 above. A good free compatible alternative to Office is OpenOffice - The Free and Open Productivity Suite.
Many of the favorite apps needed and desired for reinstall are available in the terrific app Ninite - Install or Update Multiple Apps at Once. This makes a custom installer you can save which keeps all app installers updated within.
Just in case, save in advance your Wireless or Ethernet LAN (wired) driver in your backup so if it isn't provided during install you can install it to get online quickly to install all Important and Optional Windows Updates - which will also provide most drivers. Your network LAN driver can be found on the Support Downloads webpage for your model PC. The exact make/model will be listed in your Device Manager under Network Adapters.
Unplug all other HD's and peripherals except ethernet cable to increase chances of it starting up connected after install. If not prompted for wireless key during install it's likely you'll need to install the wireless driver immediately after getting to the desktop, or if ethernet LAN is working wait for wireless driver to come in via Windows Update.
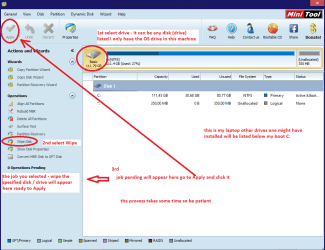
Boot the Windows 7 installer, choose Custom Install, then at the Drive Selection screen access the Drive Options (Advanced) to Delete all partitions not needed, repartition and format as shown in Steps 7 and 8 of Clean Install Windows 7 which illustrated steps will guide you through actual install.
Whether to use more than one partition depends largely if you want your data in the OS partition, or have it linked from another partition to make C partition backup image smaller - this way if Windows 7 becomes irreparable you can re-image the OS/Programs to C and the data will be current and waiting safely in its own partition.
If you don't want to keep any partitions but also don't have a new partition scheme in mind, then use the Drive Options to Delete all partitions, click Next to let the installer create and format your installation partition for you. Ignore the small boot partition which is created, although it must be kept along with the C image and never issued a letter.
Due to lack of SP2 Win7 has no USB3 drivers so use a USB2 port for flash install and make sure USB3 controller is disabled in BIOS setup. If you're prompted for drivers for any other reason during install it almost always means a bad installer, so make sure ISO download completed and create another one.
If you have an UEFI BIOS, or receive an error that Win7 cannot be installed to disk because of its formatting, and cannot overcome the error by deleting all partitions, then you may need to follow the special steps to Install Windows 7 with UEFI (Unified Extensible Firmware Interface) including if necessary to Create UEFI Bootable USB Flash Drive, or may Bypass UEFI to Install WIn7. Remember to boot installer as UEFI Device. We can help troubleshoot UEFI problems as we do here every day.
Other Steps here to Troubleshoot Windows 7 Installation Failures - Windows 7 Help Forums
Immediately after install check bottom right System Tray network icon to connect to your network if necessary. If only a TV icon with a red slash appears then open and extract network LAN driver, right click on Setup to Run as Administrator, install LAN driver watching System tray icon to choose network if required. Why can't I connect to a network? - Windows Help
Immediately after getting online install your AV. I suggest using a lightweight free Antivirus like Microsoft Security Essentials or the more aggressive Panda Cloud which perform well with the Windows 7 Firewall. Bloated AV's cause problems with Win7; if you're infected while using MSE I suggest adding inexpensive Malwarebytes Real Time Protection which also work together well.
Next enable hardware driver auto-updating, open Windows Update to Check for Updates, select all Important and Optional Updates (except Bing, unless you prefer it) to install. After requested reboots, go back again to Check for Updates until there are no more. These Updates deliver drivers, critical system, hardware and security patches. I would accept them all to be safest, keep Updates set to Automatic and regularly check for Optional to install because often needed Updates are queued there.
If Updates stall or balk check your Start menu's Shutdown button for a "!" signaling there are Updates queued there for install at Shutdown. Perform a Shutdown to install them and then keep an eye on the Shutdown button if further rounds of Updates stall to clear them there first before proceeding to again Check for Updates. Most Update jams can be resolved by several reboots - real problems are one in a million.
Any drivers still missing in Device Manager after all Updates are installed can be found on the Support Downloads webpage for the model PC or device, along with other OEM software which you can wait to see if you need.
I would not replace any drivers given by the installer or Windows Update unless performance problems point to that specific driver. We can help you troubleshoot these issues. If you install a driver and it performs badly you can Roll Back on its Driver tab in Device Manager.
"Standard VGA" Display driver is a placeholder driver which only should be used when no other possible driver will install as it will not allow Sleep or Hibernate. So if Updates don't provide a better driver, import it from the PC model's Support Downloads webpage - if necessary even Vista, or XP driver installed in Compatibility Mode. If this fails check the device maker's Support Downloads webpage to let it scan for the needed download to install.
Unknown Devices are often card reader drivers posted on the model's Support Downloads webpage along with other drivers which may be revealed by a function still missing on the PC such as laptop function keys or keyboard lighting, or can be traced using Device Manager - Finding Unknown Devices - Windows 7 Help Forums
Co-processor, SM Bus controller, USB and Storage controllers are often elements of the chipset. If no chipset is posted on your model's Downloads page, use the Intel Drive Update Utility or AMD Auto-Detect to find your chipset, or ask in our Drivers forum.
You can also trace any missing driver using Hardware Identification. It's often faster to google the Driver Detail's Hardware ID than to look it up.
I would not re-import any of the OEM software until you run for awhile to know for sure you need it. There may be patches on the PC's Support Downloads webpage needed to improve performance so browse them to be aware what's available as you test performance to decide if they're needed. But keep in mind re-installing OEM bloatware besides that which is absolutely needed for good performance or a specific function you need defeats the purpose of a Clean Reinstall.
Install programs slowly over time to gauge performance changes after each. You can roll back bad effects of a Program install or Update(s) by uninstalling it or using System Restore.
Install your preferred Reader and Flash Player declining the Optional offer. I no longer recommend installing Java unless you know you need it or are prompted to install it to run a program, as it is an infection path.
Don't let programs write themselves into msconfig>Startup as they slow startup, become freeloaders on your RAM/CPU, can spy on you and cause conflicts. No video, sound or other driver software needs to start with Windows 7 unless you know you need special settings on these.
As illustrated in Startup Programs - Change uncheck everything except AV, gadgets (aka "Sidebar"), Sync program, and Flash player updater (needed for safety and performance) in msconfig>Startup.
Then after reboot do the same in msconfig>Services after checking the box to "Hide All MS Services."
Check back with both lists periodically to see if anything writes itself back in, turn it off in its Program Preferences.
If you have any questions about a listing, Google it to learn what it does or ask us.
However I would not install any Google programs which are relentless spyware. Only use the stable Google search box in your browser and don't stay signed into any Google web apps.
Avoid spyware tracking cookies placing annoying interest ads by periodically Opting Out of Network Advertising. This will greatly relieve the banner ads which track your shopping habits and web searches.
The most important thing you can do to avoid spyware creeping in is to watch your program installs like a hawk at every step, because freeware authors have found ingenious ways to sneak in spyware with tricky check box choices - even in the License Agreement. Always do a Custom install and only allow the features you know you want, check later to remove anything extra in Control Panel>Programs and by running a full Malwarebytes and SuperAntiSpyware scan (Step 12) which roots them out as deep as they can go.
Keep an eye also on your Browser Add-Ons or Extensions to only allow the ones you know you want or are required to make a page display correctly, including Flash, Shockwave, WMP or Quicktime plug-in, a reader, Silverlight. Also under Add-Ons monitor Search services to remove any but Google in the stable browser search box, tick the box to disallow any others to replace it. Strange search service are often spyware.
If you're prone to infection add the inexpensive paid real-time protection for Malwarebytes to run alongside a lightweight recommended AV, otherwise use its excellent free scanner as needed.
Before copying your files into the new install, now would be a good time to download, install (declining trial), update and run a scan on them with Malwarebytes to make sure no infection is being re-imported.
If you backed up to OneDrive, reinstall the OneDrive App, wait for files to download from OneDrive into the OneDrive folder completely, then copy them into User folders, or move the User folders of the new Install into the OneDrive folder to Sync, Backup and Store your Files to the Cloud with OneDrive.
To copy your files into the new install, open the storage folder, open each User folder (Documents, Pictures, etc.). Next from the Organize tab choose Select All, drag the group to the corresponding folder on Explorer bar at left. Wait until the bar stops unfolding and hypertext confirms the precise copy location before releasing the left click.
If this method makes you nervous, right click on the Select All file group to Copy, then open the corresponding target user folder, in an empty space right click to Paste.
Do not copy hidden AppData folders from User Accounts as these are a corruption path- another reason not to use file transfer apps which can also lose files.
If you're using a separate data partition copy your User folders to it, then you can either move the new install's active User folders location to there following User Folders - Change Default Location, or right click each to link it to the related Library - Include a Folder then set it as default for that Library - Set Save Folder - Windows 7 Help Forums. Keep the empty C User folder in each library so you can easily see if something lands there and simply drag it to the linked User folder. If you move the User folders use another Backup Imaging app like Macrium Imaging as the built-in one will want to include the data drive which now holds System files.
A simple free method is here to Sync, Backup and Store your Files to the Cloud with Onedrive - Windows 7 Help Forums that shows how to move your User folders into OneDrive folder on C or data partition for instant backup to the cloud and simultaneous synching across all of your devices using this method.
The User Favorites folder will populate IE Bookmarks. Import another browser's Bookmarks from HTML file backed up previously. Copy Quickbooks and other Program data into it's default folder location.
Activation at Control Panel>System may in rare cases require a robocall to MS the first time to record your hardware signature in their servers. It will always work as long as you install the correct version and input the key accurately which is a frequent stumbling block - taking a well-lighted phone pic of COA sticker key to enlarge may help.
You can easily configure and share files between PC's on the same network using http://www.sevenforums.com/tutorials/43961-homegroup-create.html.
On my installs users are most impressed by the spectacular beauty of the collected national editions' 120 Windows 7 Backgrounds slideshow. You can download the folder from http://1drv.ms/1shAWUu. Type Personalize in Start search box, choose Windows 7 Aero Theme, from Slide Show link Browse to Pictures Location, Select folder, Select All as a 30 minute random slideshow, Save Changes.
With gadgets no longer being supported due to supposed risk of infection we've never seen, what works better now for millions who love them is to install v.12 or higher of 8GadgetPack which supports Windows 7. It works the same except you'll need to hide the Sidebar. The MSN weather gadget similar to Win7's popular weather gadget can be easily installed to open from the same gadget pack.
When finished, clean and order the HD perfectly using state-of-the-art free CCleaner "Run Cleaner" button and Registry tab.
Type "Defrag" into Start Search box to run a Windows defrag and set its schedule to your liking. Never defrag an SSD!
Periodically run the above as well as a full scan with free Malwarebytes and SUPERAntiSpyware on-demand scanners, declining the trial unless you're prone to infection - in which case purchasing MBAM Real Time protection at $29 for life almost always resolves this, when run in tandem with your AV. Always check that you are running the latest version of the scanner and it is fully updated.
Take advantage of the perfected Windows 7 Power Options. Most users only need the Balanced Plan, ideally to Sleep at 30, Hibernate at 45-90, with Hybrid Sleep enabled. Many users prefer Hibernate to Shut Down as it keeps in place your open work and starts up much faster while still powering down. Note that timing out to Sleep without a Hibernate safety net will wear your RAM indefinitely until you come back (vacation? ).
).
Sleep and hibernation: frequently asked questions
http://www.sevenforums.com/tutorials/23836-hibernate-shortcut-create.html
After reinstall I always scan the logs to resolve repeat errors, check System Resources, search for Problem solutions, Generate a System Health Report - as shown in these basic Troubleshooting Steps for Windows 7 to bookmark.
Finally, save a Windows 7 Backup image to external or another internal HD so you never have to reinstall again - just do a System Image Recovery to the HD or it's replacement from booted DVD/Repair CD and the stored image.
I would save at least one baseline image after reinstall to replace needing to do a reinstall in the future. However some users like to have a more current image to choose from in which case I'd save a separate one as often as you want. Win7 imaging will save past images as long as there is enough room on the storage drive for a new image.
Note that built-in Win7 backup imaging is limited to restoring the OS to the exact same partition structure, so if you want a more flexible app try our favorite free Macrium Imaging - Windows 7 Help Forums. Once you load the image and target hard drive, use the links under each existing partition to delete those you're replacing, then just drag your desired partitions to the target drive, note the new link created just below each to use sliders to adjust its size, then click Next using the default settings.
Henceforth if required to contact your OEM Tech Support do not tell them you Clean Reinstalled but troubleshoot as if you have the factory install. Otherwise they may refuse to support Clean Reinstall, but cannot void Hardware warranty. If you must ship the unit back for repair under Hardware warranty save a Windows 7 backup image and then run Factory Recovery beforehand.
Special notes for HP owners:
On newer models HP System Recovery may offer a Minimized OS Recovery option. This retains only the OS, Recovery Manager, HP Support Asst, HP Wireless LAN, drivers and activation, and is as close to a clean reinstall as you can get without doing one yourself. I would uninstall HP Wireless to use Win7's superior wireless manager.
If you format and reinstall only to C leaving all other partitions intact, F11 Recovery key should still work later if you need it. The helpful hardware diagnostics also listed on the ESC or F9 boot menu may also run after reinstall, so if they will run now from boot, I would save the small HP Tools partition to see if they remain bootable after install.
Problems with volume control lighting and HP Quick Launch buttons have been dealt with here and here.
Specific HP software which might be worth reimporting is discussed in HP Bloatware, or useful system utilities?
Some HP Recovery disks can have their files extracted to access favorite program installers using Accessing HP Recovery Disc Files.
Special notes for Dell owners:
If your Recovery partition is triggered at boot from the F8 System Recovery Options then it will no longer run after clean reinstall, so make your Recovery disks first, delete Recovery partition during reinstall.
The bootable Dell Diagnostics often will run after Reinstall so are worth saving if they will boot. Try it now to test your hardware and see if these work, choosing on F12 menu Diagnostics and then Utility Partition which sometimes has a fuller suite. If they run save the Dell Utility partition during install, if not delete all partitions. These tests can also be run online at Dell PC Diagnostics | Dell US
Useful tips for Dell re-installation plus access to their forums to resolve questions can be found at Dell Community . The Dell Reinstallation DVD has only activation and a Dell logo added and can be used as long as it is labeled to include SP1.
Special Note for Sony Vaio Owners:
Software which enables F-key functions and illumination must be reinstalled from the Sony Support Downloads webpage in the order as shown here: Function keys don't work after clean install - Windows 7 Forums
Special Note for Samsung Owners:
Software which enables F-key functions and illumination may be labeled Easy Display Manager.
Special Note to Acer Owners
There is an OEM Preload folder hidden in the C:/ drive that holds all the pre-loaded software, including the eRecovery software.
Special Note for Lenovo Owners
The only OEM software I've found to be valuable is Power Management's features to preserve battery by maintaining a lesser charge when plugged in, and fan reversal to clean out dust. Download from your model's Support Downloads webpage or Power Manager for Windows 7 (32-bit, 64-bit), Vista (32-bit, 64-bit) - Notebook
Special thanks to Wolfgang (whs) for helping to reorganize this tutorial after 1 million views, and for the many contributions users felt important enough to include. You can add yours below
Office Word version: View attachment Clean Reinstall.docx
How to Clean Reinstall Windows 7
Information
A clean reinstall is often better than getting a new computer since most PC's come larded with sponsors' bloatware and duplicate utilities that interfere with much better versions built into Windows 7. For this reason most tech enthusiasts clean reinstall using the Product Key on the COA sticker affixed to machine. This guide compiles everything that works best in tens of thousands of installs we've directly helped with here.
Warning
Please read over all steps to be sure you understand them before beginning. Ask back any questions in the Comments section below. For example, it is important enough to understand exactly how drivers are handled in the first mostly driver-complete OS that these steps are printed in red.
To save pages of space I provide blue links to illustrated tutorials instead of illustrating them in-line. You can open these in a new tab using your middle mouse button (scroll wheel) or from the right-click context menu.
Contents
- Find the right Windows 7 .iso
- Backup your user data
- Save essential system data
- Manage installed programs
- Install the Win7 ISO
- Get online to run all Windows Updates
- Reinstall your programs
- Recover your user files
- Activate the OS
- Housekeeping
- Make your first system image
- Notes for specific PC makes
Step 1
Find the right Windows 7 .iso
Microsoft has taken down the Digital River ISO download servers and are only providing ISO's to retail customers. This leaves those who bought a PC with Win7 at the mercy of OEM Tech Support who except for Dell rarely will provide clean Reinstallation media, to borrow a retail copy, or search for a torrent download which can be risky if not checked for add-ins.
If you have a retail copy of Windows 7, then you could try to download an ISO directly from Microsoft at the link below. The link is reported to only work in Internet Explorer.
:ar: Microsoft Software Recovery
You can borrow a friend's disk to reinstall, even extract the ISO image file using ImgBurn and then burn a new DVD using ImgBurn at 4x speed, write ISO to 4gb+ flash stick using UltraISO Software To Create Bootable USB Flash Drive, or for UEFI installs use Option One of UEFI Bootable USB Flash Drive - Create in Windows
If you have any doubt about the integrity of the ISO file or are forced to download the ISO from a torrent you can compare the SHA1 signature available freely on the MSDN Downloads page "Details" links, using a checker like HashTab which adds a HASH calculator to the ISO file Properties tabs. Having these sums match assures ISO integrity and that nothing was added to the file.
If your licensed version is unavailable you can unlock all versions in any ISO by running ei.cfg removal tool or by deleting ei.cfg file from Sources folder on bootable flash stick. Check the HASH first before unlocking the ISO.
I would use 64-bit for 4gb or more RAM, 32-bit (x86) for 3gb or less RAM.
You can slipstream the latest Updates into the installer ISO to save at least an hour's Updating after install using Update 7 installation media. However it may take an hour to do this so consider how much you want this.
Burn ISO to DVD or to USB flash stick (minimum size of 4GB required) using Windows 7 USB-DVD Download Tool which is sometimes fussy about the ISO, or alternatively to DVD using ImgBurn at 4x speed, to flash stick using UltraISO Software To Create Bootable USB Flash Drive.
For UEFI installs format flash stick with Option One of UEFI Bootable USB Flash Drive - Create in Windows making sure the settings shown in picture don't jump around after adding the ISO. You have a UEFI install if Disk Management shows an EFI System partition on the hard drive, the BIOS shows UEFI settings and it's Boot menu offers to boot the DVD or a UEFI-formatted flash stick as an EFI device.
Step 2
Backup your user data
If your files are not organized now is the time to sort them into the User folders for your named User account. ▶ Windows 7 - How to Drag and Drop to Move a Folder - YouTube
For all browsers other than IE which stores Favorites in the User folder of that name, export your bookmarks to Documents now. Import or export bookmarks - Chrome Help
Export Firefox bookmarks to an HTML file to back up or transfer bookmarks | Firefox Help
If your email is stored on computer, Google how to back up specific mail and account settings to get solutions like How do I import and export email, contacts, and calendars with Windows Live Mail? - Microsoft Windows Help.
Backup Quickbooks 2010+ Company files from where you keep them, the default location User/Public/Documents, or google your version's file location, or run a QB backup to Documents before backing them up.
De-authorize I-Tunes. You can back up your Sticky Notes to keep the one currently on your desktop following Sticky Notes - Backup and Restore.
Then back up your files externally by dragging or copying your named User account or active User folders to another hard drive, external drive, flash stick or disk. ▶ Copying files to an external drive - YouTube.
An alternative is to upload files to the cloud using Microsoft OneDrive which offers 15gb free storage for each Outlook/Live ID. Install and use the OneDrive app to drag User folders into OneDrive folder, monitor uploading progress by clicking Cloud icon in System Tray on bottom right end of taskbar. Once files are all uploaded, rightclick the Cloud Icon again to choose Settings and Unlink so that any accidental file deletions are not deleted in the Cloud. Step 7 will pick up with reinstalling OneDrive to recover your files. Remember that any accidental deletions always end up in OneDrive's as well as your PC's Recycle Bin.
For unbootable Windows copy data to another HD or USB device using the Windows 7 disk to Copy & Paste in Windows Recovery Console, free Paragon rescue disk, or a Linux boot disk.
You can Run and print an audit of hardware and software including installed Product Keys using Belarc Advisor. This audit assures you won't lose any paid software keys like Office. Note that the Windows 7 Product Key found by Belarc or another key finder will be an SLP batch key used at factory, if it has not yet been activated from COA sticker Key used for a Clean Reinstall. This SLP batch key cannot be used for reinstall. Methods for backing up Factory SLP Activation if the COA Product Key is not readable are not supported here but can be found on the web.
For unbootable Windows, you can read the installed Product Key and any Office key you don't have backed up using ProduKey - Recover lost product key (CD-Key) of Windows/MS-Office/SQL Server
Step 3
Save essential system data
If you have a Recovery partition it may not run after clean reinstall. You may want to make your Recovery Disks so you have a path back to factory condition, following the steps given in your PC's setup literature or in the Manual located on the Support Downloads webpage for your model computer. As an alternative to Recovery Disks you can save a Windows 7 Backup Image or more flexible Macrium Image of the entire HD.
You can wait until afterward to see if Recovery or (Diagnostics) Tools partitions will run from boot to decide if you want to delete those partitions and recover the space into C or elsewhere (using Step 3 here). This information may be provided for your brand PC in the Special Notes at the end of this tutorial.
Write down the Product Key from COA sticker located on back or side of PC tower, bottom or under battery of notebook. Make sure you get the characters correct as this is a main cause of activation failure. You can input or Skip the key during install then afterwards activate at Control Panel>System, which may require a quick robocall. But put the key in a safe place so you have it for the life of the PC, which may outlast the sticker's readability.
The COA sticker looks like this:
Step 4
Manage installed programs
Gather your program installers. For those lacking disks, you may find them on the program's Support Downloads webpage. Favorite pre-installed apps may be found on the Downloads webpage for your model computer or manufacturer-provided Apps Disk. Others may be found by googling. Some pre-installed apps may not be available for clean reinstall - more about this for your brand PC in the Special Notes at end.
You can download clean, safe copies of your licensed Office version to burn to disk (.iso) or run .exe from Microsoft which can be activated with the Product Key you originally bought with it or audited using Belarc from Step 2 above. A good free compatible alternative to Office is OpenOffice - The Free and Open Productivity Suite.
Many of the favorite apps needed and desired for reinstall are available in the terrific app Ninite - Install or Update Multiple Apps at Once. This makes a custom installer you can save which keeps all app installers updated within.
Just in case, save in advance your Wireless or Ethernet LAN (wired) driver in your backup so if it isn't provided during install you can install it to get online quickly to install all Important and Optional Windows Updates - which will also provide most drivers. Your network LAN driver can be found on the Support Downloads webpage for your model PC. The exact make/model will be listed in your Device Manager under Network Adapters.
Step 5
Install the Windows 7 .iso
Unplug all other HD's and peripherals except ethernet cable to increase chances of it starting up connected after install. If not prompted for wireless key during install it's likely you'll need to install the wireless driver immediately after getting to the desktop, or if ethernet LAN is working wait for wireless driver to come in via Windows Update.
Boot the Windows 7 installer, choose Custom Install, then at the Drive Selection screen access the Drive Options (Advanced) to Delete all partitions not needed, repartition and format as shown in Steps 7 and 8 of Clean Install Windows 7 which illustrated steps will guide you through actual install.
Whether to use more than one partition depends largely if you want your data in the OS partition, or have it linked from another partition to make C partition backup image smaller - this way if Windows 7 becomes irreparable you can re-image the OS/Programs to C and the data will be current and waiting safely in its own partition.
If you don't want to keep any partitions but also don't have a new partition scheme in mind, then use the Drive Options to Delete all partitions, click Next to let the installer create and format your installation partition for you. Ignore the small boot partition which is created, although it must be kept along with the C image and never issued a letter.
Due to lack of SP2 Win7 has no USB3 drivers so use a USB2 port for flash install and make sure USB3 controller is disabled in BIOS setup. If you're prompted for drivers for any other reason during install it almost always means a bad installer, so make sure ISO download completed and create another one.
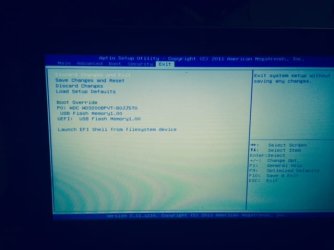
If you have an UEFI BIOS, or receive an error that Win7 cannot be installed to disk because of its formatting, and cannot overcome the error by deleting all partitions, then you may need to follow the special steps to Install Windows 7 with UEFI (Unified Extensible Firmware Interface) including if necessary to Create UEFI Bootable USB Flash Drive, or may Bypass UEFI to Install WIn7. Remember to boot installer as UEFI Device. We can help troubleshoot UEFI problems as we do here every day.
Other Steps here to Troubleshoot Windows 7 Installation Failures - Windows 7 Help Forums
Step 6
Get online to run all Windows Updates
Immediately after install check bottom right System Tray network icon to connect to your network if necessary. If only a TV icon with a red slash appears then open and extract network LAN driver, right click on Setup to Run as Administrator, install LAN driver watching System tray icon to choose network if required. Why can't I connect to a network? - Windows Help
Immediately after getting online install your AV. I suggest using a lightweight free Antivirus like Microsoft Security Essentials or the more aggressive Panda Cloud which perform well with the Windows 7 Firewall. Bloated AV's cause problems with Win7; if you're infected while using MSE I suggest adding inexpensive Malwarebytes Real Time Protection which also work together well.
Next enable hardware driver auto-updating, open Windows Update to Check for Updates, select all Important and Optional Updates (except Bing, unless you prefer it) to install. After requested reboots, go back again to Check for Updates until there are no more. These Updates deliver drivers, critical system, hardware and security patches. I would accept them all to be safest, keep Updates set to Automatic and regularly check for Optional to install because often needed Updates are queued there.
If Updates stall or balk check your Start menu's Shutdown button for a "!" signaling there are Updates queued there for install at Shutdown. Perform a Shutdown to install them and then keep an eye on the Shutdown button if further rounds of Updates stall to clear them there first before proceeding to again Check for Updates. Most Update jams can be resolved by several reboots - real problems are one in a million.
Any drivers still missing in Device Manager after all Updates are installed can be found on the Support Downloads webpage for the model PC or device, along with other OEM software which you can wait to see if you need.
I would not replace any drivers given by the installer or Windows Update unless performance problems point to that specific driver. We can help you troubleshoot these issues. If you install a driver and it performs badly you can Roll Back on its Driver tab in Device Manager.
"Standard VGA" Display driver is a placeholder driver which only should be used when no other possible driver will install as it will not allow Sleep or Hibernate. So if Updates don't provide a better driver, import it from the PC model's Support Downloads webpage - if necessary even Vista, or XP driver installed in Compatibility Mode. If this fails check the device maker's Support Downloads webpage to let it scan for the needed download to install.
Unknown Devices are often card reader drivers posted on the model's Support Downloads webpage along with other drivers which may be revealed by a function still missing on the PC such as laptop function keys or keyboard lighting, or can be traced using Device Manager - Finding Unknown Devices - Windows 7 Help Forums
Co-processor, SM Bus controller, USB and Storage controllers are often elements of the chipset. If no chipset is posted on your model's Downloads page, use the Intel Drive Update Utility or AMD Auto-Detect to find your chipset, or ask in our Drivers forum.
You can also trace any missing driver using Hardware Identification. It's often faster to google the Driver Detail's Hardware ID than to look it up.
I would not re-import any of the OEM software until you run for awhile to know for sure you need it. There may be patches on the PC's Support Downloads webpage needed to improve performance so browse them to be aware what's available as you test performance to decide if they're needed. But keep in mind re-installing OEM bloatware besides that which is absolutely needed for good performance or a specific function you need defeats the purpose of a Clean Reinstall.
Step 7
Reinstall your programs
Install programs slowly over time to gauge performance changes after each. You can roll back bad effects of a Program install or Update(s) by uninstalling it or using System Restore.
Install your preferred Reader and Flash Player declining the Optional offer. I no longer recommend installing Java unless you know you need it or are prompted to install it to run a program, as it is an infection path.
Don't let programs write themselves into msconfig>Startup as they slow startup, become freeloaders on your RAM/CPU, can spy on you and cause conflicts. No video, sound or other driver software needs to start with Windows 7 unless you know you need special settings on these.
As illustrated in Startup Programs - Change uncheck everything except AV, gadgets (aka "Sidebar"), Sync program, and Flash player updater (needed for safety and performance) in msconfig>Startup.
Then after reboot do the same in msconfig>Services after checking the box to "Hide All MS Services."
Check back with both lists periodically to see if anything writes itself back in, turn it off in its Program Preferences.
If you have any questions about a listing, Google it to learn what it does or ask us.
However I would not install any Google programs which are relentless spyware. Only use the stable Google search box in your browser and don't stay signed into any Google web apps.
Avoid spyware tracking cookies placing annoying interest ads by periodically Opting Out of Network Advertising. This will greatly relieve the banner ads which track your shopping habits and web searches.
The most important thing you can do to avoid spyware creeping in is to watch your program installs like a hawk at every step, because freeware authors have found ingenious ways to sneak in spyware with tricky check box choices - even in the License Agreement. Always do a Custom install and only allow the features you know you want, check later to remove anything extra in Control Panel>Programs and by running a full Malwarebytes and SuperAntiSpyware scan (Step 12) which roots them out as deep as they can go.
Keep an eye also on your Browser Add-Ons or Extensions to only allow the ones you know you want or are required to make a page display correctly, including Flash, Shockwave, WMP or Quicktime plug-in, a reader, Silverlight. Also under Add-Ons monitor Search services to remove any but Google in the stable browser search box, tick the box to disallow any others to replace it. Strange search service are often spyware.
If you're prone to infection add the inexpensive paid real-time protection for Malwarebytes to run alongside a lightweight recommended AV, otherwise use its excellent free scanner as needed.
Step 8
Recover your user files
Before copying your files into the new install, now would be a good time to download, install (declining trial), update and run a scan on them with Malwarebytes to make sure no infection is being re-imported.
If you backed up to OneDrive, reinstall the OneDrive App, wait for files to download from OneDrive into the OneDrive folder completely, then copy them into User folders, or move the User folders of the new Install into the OneDrive folder to Sync, Backup and Store your Files to the Cloud with OneDrive.
To copy your files into the new install, open the storage folder, open each User folder (Documents, Pictures, etc.). Next from the Organize tab choose Select All, drag the group to the corresponding folder on Explorer bar at left. Wait until the bar stops unfolding and hypertext confirms the precise copy location before releasing the left click.
If this method makes you nervous, right click on the Select All file group to Copy, then open the corresponding target user folder, in an empty space right click to Paste.
Do not copy hidden AppData folders from User Accounts as these are a corruption path- another reason not to use file transfer apps which can also lose files.
If you're using a separate data partition copy your User folders to it, then you can either move the new install's active User folders location to there following User Folders - Change Default Location, or right click each to link it to the related Library - Include a Folder then set it as default for that Library - Set Save Folder - Windows 7 Help Forums. Keep the empty C User folder in each library so you can easily see if something lands there and simply drag it to the linked User folder. If you move the User folders use another Backup Imaging app like Macrium Imaging as the built-in one will want to include the data drive which now holds System files.
A simple free method is here to Sync, Backup and Store your Files to the Cloud with Onedrive - Windows 7 Help Forums that shows how to move your User folders into OneDrive folder on C or data partition for instant backup to the cloud and simultaneous synching across all of your devices using this method.
The User Favorites folder will populate IE Bookmarks. Import another browser's Bookmarks from HTML file backed up previously. Copy Quickbooks and other Program data into it's default folder location.
Step 9
Activate the OS
Activation at Control Panel>System may in rare cases require a robocall to MS the first time to record your hardware signature in their servers. It will always work as long as you install the correct version and input the key accurately which is a frequent stumbling block - taking a well-lighted phone pic of COA sticker key to enlarge may help.
Step 10
Housekeeping
You can easily configure and share files between PC's on the same network using http://www.sevenforums.com/tutorials/43961-homegroup-create.html.
On my installs users are most impressed by the spectacular beauty of the collected national editions' 120 Windows 7 Backgrounds slideshow. You can download the folder from http://1drv.ms/1shAWUu. Type Personalize in Start search box, choose Windows 7 Aero Theme, from Slide Show link Browse to Pictures Location, Select folder, Select All as a 30 minute random slideshow, Save Changes.
With gadgets no longer being supported due to supposed risk of infection we've never seen, what works better now for millions who love them is to install v.12 or higher of 8GadgetPack which supports Windows 7. It works the same except you'll need to hide the Sidebar. The MSN weather gadget similar to Win7's popular weather gadget can be easily installed to open from the same gadget pack.
When finished, clean and order the HD perfectly using state-of-the-art free CCleaner "Run Cleaner" button and Registry tab.
Type "Defrag" into Start Search box to run a Windows defrag and set its schedule to your liking. Never defrag an SSD!
Periodically run the above as well as a full scan with free Malwarebytes and SUPERAntiSpyware on-demand scanners, declining the trial unless you're prone to infection - in which case purchasing MBAM Real Time protection at $29 for life almost always resolves this, when run in tandem with your AV. Always check that you are running the latest version of the scanner and it is fully updated.
Take advantage of the perfected Windows 7 Power Options. Most users only need the Balanced Plan, ideally to Sleep at 30, Hibernate at 45-90, with Hybrid Sleep enabled. Many users prefer Hibernate to Shut Down as it keeps in place your open work and starts up much faster while still powering down. Note that timing out to Sleep without a Hibernate safety net will wear your RAM indefinitely until you come back (vacation?
). Sleep and hibernation: frequently asked questions
http://www.sevenforums.com/tutorials/23836-hibernate-shortcut-create.html
After reinstall I always scan the logs to resolve repeat errors, check System Resources, search for Problem solutions, Generate a System Health Report - as shown in these basic Troubleshooting Steps for Windows 7 to bookmark.
Step 11
Make your first system image
Finally, save a Windows 7 Backup image to external or another internal HD so you never have to reinstall again - just do a System Image Recovery to the HD or it's replacement from booted DVD/Repair CD and the stored image.
I would save at least one baseline image after reinstall to replace needing to do a reinstall in the future. However some users like to have a more current image to choose from in which case I'd save a separate one as often as you want. Win7 imaging will save past images as long as there is enough room on the storage drive for a new image.
Note that built-in Win7 backup imaging is limited to restoring the OS to the exact same partition structure, so if you want a more flexible app try our favorite free Macrium Imaging - Windows 7 Help Forums. Once you load the image and target hard drive, use the links under each existing partition to delete those you're replacing, then just drag your desired partitions to the target drive, note the new link created just below each to use sliders to adjust its size, then click Next using the default settings.
Step 12
Notes for specific PC makes
Henceforth if required to contact your OEM Tech Support do not tell them you Clean Reinstalled but troubleshoot as if you have the factory install. Otherwise they may refuse to support Clean Reinstall, but cannot void Hardware warranty. If you must ship the unit back for repair under Hardware warranty save a Windows 7 backup image and then run Factory Recovery beforehand.
Special notes for HP owners:
On newer models HP System Recovery may offer a Minimized OS Recovery option. This retains only the OS, Recovery Manager, HP Support Asst, HP Wireless LAN, drivers and activation, and is as close to a clean reinstall as you can get without doing one yourself. I would uninstall HP Wireless to use Win7's superior wireless manager.
If you format and reinstall only to C leaving all other partitions intact, F11 Recovery key should still work later if you need it. The helpful hardware diagnostics also listed on the ESC or F9 boot menu may also run after reinstall, so if they will run now from boot, I would save the small HP Tools partition to see if they remain bootable after install.
Problems with volume control lighting and HP Quick Launch buttons have been dealt with here and here.
Specific HP software which might be worth reimporting is discussed in HP Bloatware, or useful system utilities?
Some HP Recovery disks can have their files extracted to access favorite program installers using Accessing HP Recovery Disc Files.
Special notes for Dell owners:
If your Recovery partition is triggered at boot from the F8 System Recovery Options then it will no longer run after clean reinstall, so make your Recovery disks first, delete Recovery partition during reinstall.
The bootable Dell Diagnostics often will run after Reinstall so are worth saving if they will boot. Try it now to test your hardware and see if these work, choosing on F12 menu Diagnostics and then Utility Partition which sometimes has a fuller suite. If they run save the Dell Utility partition during install, if not delete all partitions. These tests can also be run online at Dell PC Diagnostics | Dell US
Useful tips for Dell re-installation plus access to their forums to resolve questions can be found at Dell Community . The Dell Reinstallation DVD has only activation and a Dell logo added and can be used as long as it is labeled to include SP1.
Special Note for Sony Vaio Owners:
Software which enables F-key functions and illumination must be reinstalled from the Sony Support Downloads webpage in the order as shown here: Function keys don't work after clean install - Windows 7 Forums
Special Note for Samsung Owners:
Software which enables F-key functions and illumination may be labeled Easy Display Manager.
Special Note to Acer Owners
There is an OEM Preload folder hidden in the C:/ drive that holds all the pre-loaded software, including the eRecovery software.
Special Note for Lenovo Owners
The only OEM software I've found to be valuable is Power Management's features to preserve battery by maintaining a lesser charge when plugged in, and fan reversal to clean out dust. Download from your model's Support Downloads webpage or Power Manager for Windows 7 (32-bit, 64-bit), Vista (32-bit, 64-bit) - Notebook
Special thanks to Wolfgang (whs) for helping to reorganize this tutorial after 1 million views, and for the many contributions users felt important enough to include. You can add yours below
Office Word version: View attachment Clean Reinstall.docx
Last edited:
")


")