System Image Recovery

How to Do a System Image Recovery in Windows 7


   Information
This will show you how to restore your Windows 7 hard disk back to exactly how it was when you created a system image backup.
   Warning

  • You can only do a system image recovery to a HDD that is the same size or larger than the one the system image was created from. You will not be able to do a system image recovery to a smaller HDD.
  • When you restore your computer from a image backup, it is a complete restoration. You can't choose individual items to restore, and all of your current programs, system settings, and files are replaced.
  • If your backup image is on a external device (ex: USB drive), then make sure it is connected before starting. If USB drive, then also make sure that you have your BIOS settings (ex: Legacy USB) set to allow USB devices at boot.
  • A system image recovery will format everything on each hard drive that was included in a system image, and will only restore what is included (see steps 7-9 in STEP TWO below) in the system image back. Be sure to backup anything that you do not want to lose that is not included in the system image backup first.


STEP ONE

Only if You Renamed the "WindowsImageBackup" Folder


   Note
To be able to have multiple versions of system images saved on the same drive or partition, you would need to rename the older WindowsImageBackup folder from the previously created system image as described in the NOTE box at the top of this tutorial.

If you renamed the WindowsImageBackup folder for the system image version that you wanted to restore, then you will need to do the steps below before you will be able to restore that system image.

1. If you are "Able to Boot" into Windows 7 A) In Windows Explorer, navigate to the renamed (drive letter)\WindowsImageBackup folder location of the system image that you want to restore.

B) If you already have a folder named WindowsImageBackup that is not the system image version that you want to restore, then you will need to right click on it, click on Rename, and type in say WindowsImageBackup-Copy-2 as an example.

C) Now, right click on the renamed system image version (ex: WindowsImageBackup-Copy-1) that you did want to restore, click on Rename, type in WindowsImageBackup an press enter.

D) Go to the STEP TWO section below to do the System Image Recovery.
2. If you are "Not Able to Boot" into Windows 7 A) If you have the system image backup save to an external device, be sure that it is connected now.

B) Open a command prompt at boot.

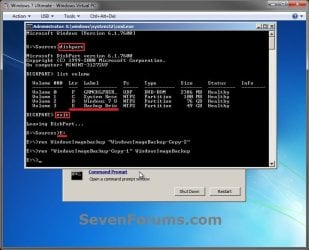
C) In the command prompt, type diskpart and press enter. (see screenshot below)

D) In the command prompt, type list volume and press enter. (see screenshot below)

E) Make note of the drive letter (ex: E: ) that you have the system image backup saved to.

F) In the command prompt, type exit and press enter. (see screenshot below)

G) In the command prompt, type the E: and press enter. (see screenshot below)
NOTE: Subsititute E: for your actual drive letter at step 2E instead.

H) If you already have a folder named "WindowsImageBackup"

NOTE: This is if you already have a folder named WindowsImageBackup that is not the system image version that you want to restore. If so, you would need to rename it to say WindowsImageBackup-Copy-2 as an example.
  • In the command prompt, type the command below and press enter. (see screenshot below)
    NOTE: Substitute WindowsImageBackup-Copy-2 in the command below with any name in quotes that you would like to rename it to instead.
Code:
[B]ren WindowsImageBackup "[COLOR=red]WindowsImageBackup-Copy-2[/COLOR]"[/B]
I) In the command prompt, type the command below and press enter. (see screenshot below)
NOTE: Substitute WindowsImageBackup-Copy-1 in the command below with the actual name of your renamed system image folder in quotes that you want to use to restore instead.
Code:
[B]ren "[COLOR=red]WindowsImageBackup-Copy-1[/COLOR]" WindowsImageBackup[/B]
J) Close the command prompt window. (see screenshot below)

K) Continue on to step 3B in the STEP TWO section below to do the System Image Recovery.
Rename-1.jpg


STEP TWO

To Do the System Image Recovery

1. If you have the system image backup save to an external device, be sure that it is connected and turned on (powered up) now.
A) Start with either step 2 or step 3 below first.
2. From "Backup and Restore" in the Control Panel while in Windows 7 A) Open the Control Panel (icons view), and click on Backup and Restore.

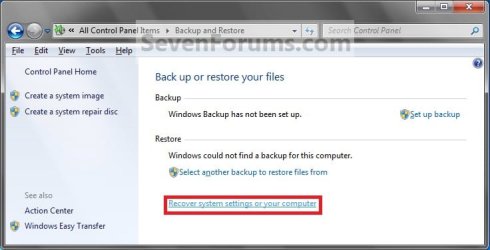
B) Click on the Recover system settings on your computer link. (see screenshot below) Step1.jpg
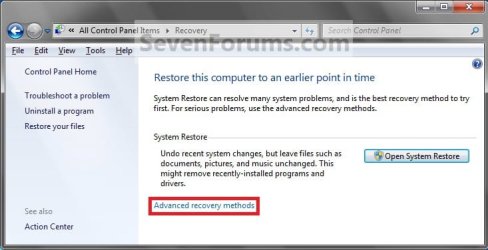
C) Click on the Advanced recovery methods link. (see screenshot below) Step2.jpg
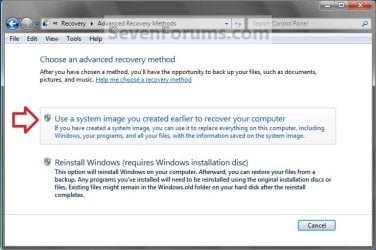
D) Select the Use a system image you created earlier to recover your computer option. (see screenshot below) Step3.jpg
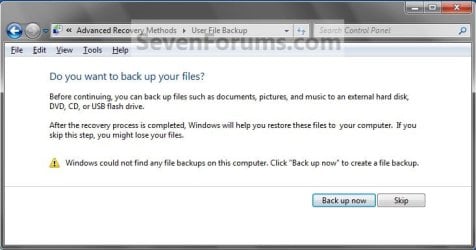
E) Select to either create a Back up now, or to Skip it and continue the system image recovery without backing up any of your current files.
NOTE: If you select Back up now, it will take you to step 6 in this tutorial link to create a User and System File back up of your current files first before continuing to step 1F. (see screenshot below) Step4A.jpg
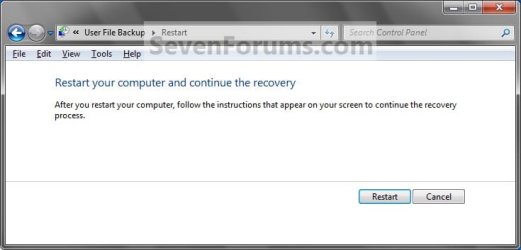
F) Click on Restart. (see screenshot below) Step5A.jpg
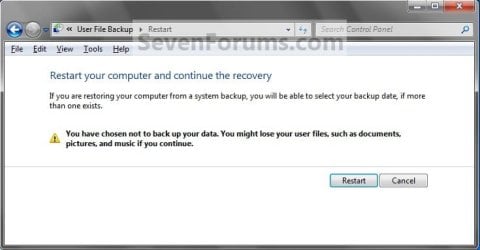
Step5B.jpg

G) Select a languange to be used for your keyboard input and click on Next. (see screenshot below) Step6.jpg
H) Go to step 4.
3. From the System Recovery Options Screen at Boot A) Boot to the System Recovery Options screen from your Windows 7 installation DVD/USB, or System Repair Disc.

B) Select the System Image Recovery option. (see screenshot below) System_Recovery_Options.jpg
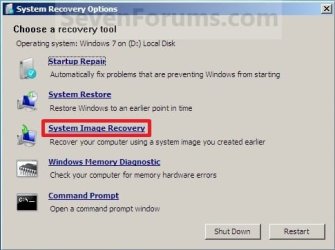
4. If you saved the system image backup to a set of DVDs, then insert the last DVD from the set when prompted. If not, go to step 5 for a system image backup on a hard drive. A) Go to step 7 below.
5. To Use the Latest System Image A) Select (dot) Use the latest available system image and click on Next. (see screenshot below) Step7.jpg
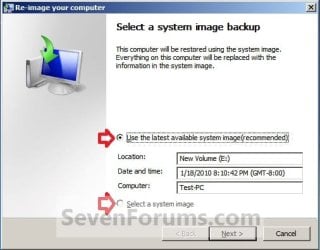
B) Go to step 7.
6. To Select a System Image A) Select (dot) Select a system image, and click on Next. (see screenshot above)
NOTE: This is if the system image that you want to use is not listed here and is at another location that you wish to choose from instead.

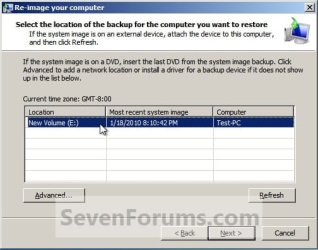
B) Select the location of the backup image for the computer you want to restore from the list, and click on Next. (see screenshot below)

   Note
To add a image from a network location, click on the Advanced button, and on the Search for a system image on the network option.

If the drive cannot be seen to select a system image from, then you may need to use the tutorial below to load your SATA or RAID drivers before it will be seen. You would click on the Advanced button, and on the Install a driver option.

SATA Drivers - Load in Windows 8 System Image Recovery
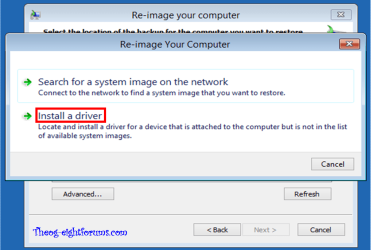
RecoveryBackup004-8.PNG


Step8A.jpg
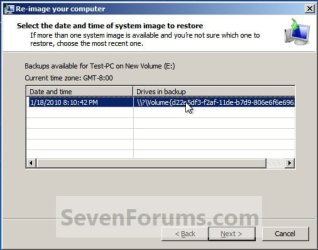
C) Select the date and time of the system image to restore, and click on Next. (see screenshot below) Step8B.jpg
7. To Do a Full System Image Recovery
NOTE: This option will format everything on each hard disk drive that was included in the system image, then restore them as they were when the system image was created.

   Note
Format and repartition disks box:
NOTE: Special thanks to MJF for this addition. 1) Grayed out and selected
You are forced to have the whole disk formatted and repartitioned to match the partition structure of the disk the image was made from. This can occur when restoring an image to a new disk or the original disk with a modified partition structure. Data on other partitions on the disk you are restoring to will be lost.

2) Grayed out and unselected
You are not given the option to format and repartition the disk. This will occur if you are restoring Windows from a partition on the same disk.

3) Not grayed out and unselected
Here you have the option to select format the whole disk and repartition or not. In this case the disk the image was taken from has a matching partition structure to the disk you are restoring the image to. By not selecting the format and repartition option your image will be restored and other partitions untouched such as valuable data partitions.
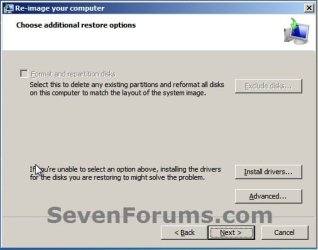
A) Check the Format and repartition disks box (if not grayed out) and uncheck Only restore system drives box (if available), and click on Next. (see screenshots below) Exclude_Disks.jpg
Step9.jpg
System_Drives.jpg
B) Go to step 10.
8. To Only Restore System Drives in System Image Recovery
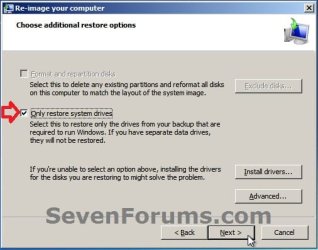
NOTE: When restoring to the same disk containing data partitions, the Format and repartition disks option may format the data partitions as well. If this is the case and you have the option to leave the Format and repartition disks box unchecked, then initially attempt your image recovery with the Format and repartition disks box unchecked. If recovery is unsuccessful, repeat the process with the format box ticked. A) If available, check the Only restore system drives box, and click on Next. (see screenshot below) System_Drives.jpg
B) Go to step 10.
9. To Exclude Restoring Specific Drives in System Image Recovery
NOTE: Since a system image recovery will format everything on each hard disk drive that was included in a system image, this will allow you to exclude specific disks so that specific disk will not be formated or restored. A) Check the Format and repartition disks box , and click on the Exclude disks button (if not grayed out). (see screenshot below)
NOTE: If the Exclude disks button is grayed out, then the HDD that you are restoring to is empty, or you do not have any disks in the system image that are able to be excluded from being restored. Exclude 001.JPG
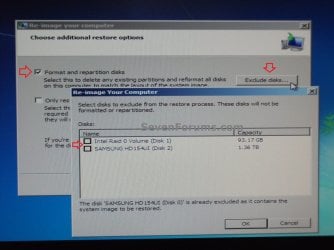
B) Unselect the drives that you want to exclude from being restored.

C) Click on Next.
10. Click on Finish. (see screenshot below) Step10.jpg
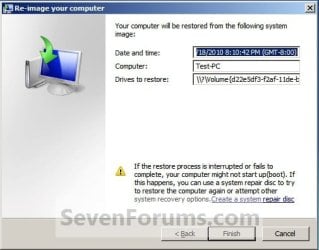
11. Click on Yes. (See screenshot below) Step11.jpg
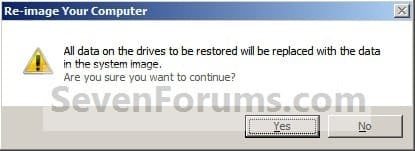
12. You will now see this screenshot below.
NOTE: If you have the backup image on DVDs, have them ready. See step 4 above. Step12.jpg
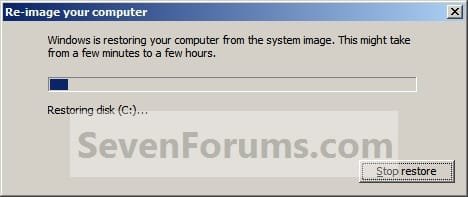
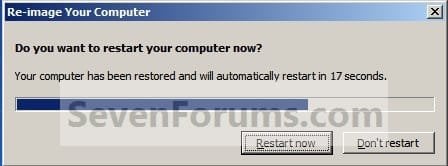
13. When it is through, click on Restart Now to finish. (see screenshot below)
NOTE: Your computer will restart and the backup image restoration will be done. Step13.jpg
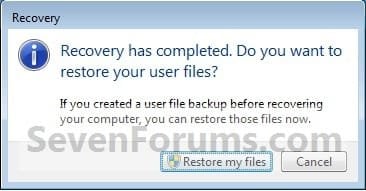
14. If you created a backup in step 1E, then you will now see this option to Restore my files after the computer restarts. (see screenshot below) Step14.jpg
That's it,
Shawn


Attachments

  • Step6A.jpg
    Step6A.jpg
    12.7 KB · Views: 244
Last edited:
Replacing a 160GB HDD with 80GB SSD

My problem is about upgrading to a smaller capacity SSD.

I have a Windows 7 Professional Upgrade installed on my 160GB HDD. My system is working perfectly now and I am very happy with it. I recently purchased an Intel X25-M to replace my system HDD. My current HDD is 160GB and the new SSD is 80GB. Currently only 30GB of my HDD is used. Questions:

Can I do the transfer using the System Image Recovery tool?
If the answer is no, does dividing the HDD into smaller partitions help?
Do I need to reactivate my system?
Any other concerns about this upgrade?

Thanks for help!..

Koray
 

My Computer My Computer

At a glance

Windows 7Core 2 Duo 1.60
Computer Manufacturer/Model Number
Lenovo Thinkpad X61 Tablet
OS
Windows 7
CPU
Core 2 Duo 1.60
Hello Koray, and welcome to Seven Forums.

Once you have created a system image backup of your 160GB HDD, you will be able to do a system image recovery to your new 80GB HDD since you will have plenty of space on it. When doing it, just replace your 160GB HDD with the 80GB HDD, then boot from your Windows 7 installation disc to start the system recovery as in the tutorial. :)

Hope this helps,
Shawn
 

My Computer My Computer

At a glance

64-bit Windows 11 Pro for WorkstationsIntel i7-8700K OC'd to 5 GHz64 GB (4x16GB) G.SKILL TridentZ RGB DDR4 3600...ASUS ROG-STRIX-GTX1080TI-O11G-GAMING
Computer type
PC/Desktop
Computer Manufacturer/Model Number
Self built custom
OS
64-bit Windows 11 Pro for Workstations
CPU
Intel i7-8700K OC'd to 5 GHz
Motherboard
ASUS ROG Maximus XI Formula Z390
Memory
64 GB (4x16GB) G.SKILL TridentZ RGB DDR4 3600 MHz
Graphics Card(s)
ASUS ROG-STRIX-GTX1080TI-O11G-GAMING
Sound Card
Integrated
Monitor(s) Displays
2 x Samsung Odyssey G7 27"
Screen Resolution
2560x1440
Hard Drives
1TB Samsung 990 PRO M.2,
4TB Samsung 990 PRO PRO M.2,
TerraMaster F8 SSD Plus NAS
PSU
Seasonic Prime Titanium 850W
Case
Thermaltake Core P3
Cooling
Corsair Hydro H115i
Keyboard
Logitech wireless K800
Mouse
Logitech MX Master 4
Internet Speed
2 Gb/s Download and 100 Mb/s Upload
Antivirus
Malwarebyte Anti-Malware Premium
Browser
Google Chrome
Other Info
Logitech Z625 speaker system,
Logitech BRIO 4K Pro webcam,
HP Color LaserJet Pro MFP M477fdn,
APC SMART-UPS RT 1000 XL - SURT1000XLI,
Galaxy S23 Plus phone
Hello Koray, and welcome to Seven Forums.

Once you have created a system image backup of your 160GB HDD, you will be able to do a system image recovery to your new 80GB HDD since you will have plenty of space on it. When doing it, just replace your 160GB HDD with the 80GB HDD, then boot from your Windows 7 installation disc to start the system recovery as in the tutorial. :)

Hope this helps,
Shawn

Thanks a lot for quick reply, Shawn! I will report back once I try it! I am looking forward to my new SSD!.. :)

Regards,

Koray
 

My Computer My Computer

At a glance

Windows 7Core 2 Duo 1.60
Computer Manufacturer/Model Number
Lenovo Thinkpad X61 Tablet
OS
Windows 7
CPU
Core 2 Duo 1.60
Can System Image restore an image to a smaller drive?

Just to be safe, you may be better using Disk Management to shrink the 160gb drive to just under 80gb , before making the image.
 

My Computers My Computers

  • At a glance

    7 X64i5 84002x8gb 3200mhz
    Computer type
    PC/Desktop
    OS
    7 X64
    CPU
    i5 8400
    Motherboard
    gigabyte b365m ds3h
    Memory
    2x8gb 3200mhz
    Hard Drives
    various
    PSU
    pure power 11 400w cm
    Case
    Coolermaster
    Cooling
    cryorig m9i
  • At a glance

    7x64g54008gb ddr4 2400
    Computer type
    PC/Desktop
    OS
    7x64
    CPU
    g5400
    Motherboard
    ga b365m ds3h
    Memory
    8gb ddr4 2400
    PSU
    xfx pro 450w
Hello SIW2,

I believe it depends on how large the image backup was when it was created. Since he only is using 30GB of space on the 160GB drive, it should be able to restore that to the 80GB drive even with the allocated space for the page file and system restore. It may be a good idea to shrink the drive as you described above though to be extra safe.
 

My Computer My Computer

At a glance

64-bit Windows 11 Pro for WorkstationsIntel i7-8700K OC'd to 5 GHz64 GB (4x16GB) G.SKILL TridentZ RGB DDR4 3600...ASUS ROG-STRIX-GTX1080TI-O11G-GAMING
Computer type
PC/Desktop
Computer Manufacturer/Model Number
Self built custom
OS
64-bit Windows 11 Pro for Workstations
CPU
Intel i7-8700K OC'd to 5 GHz
Motherboard
ASUS ROG Maximus XI Formula Z390
Memory
64 GB (4x16GB) G.SKILL TridentZ RGB DDR4 3600 MHz
Graphics Card(s)
ASUS ROG-STRIX-GTX1080TI-O11G-GAMING
Sound Card
Integrated
Monitor(s) Displays
2 x Samsung Odyssey G7 27"
Screen Resolution
2560x1440
Hard Drives
1TB Samsung 990 PRO M.2,
4TB Samsung 990 PRO PRO M.2,
TerraMaster F8 SSD Plus NAS
PSU
Seasonic Prime Titanium 850W
Case
Thermaltake Core P3
Cooling
Corsair Hydro H115i
Keyboard
Logitech wireless K800
Mouse
Logitech MX Master 4
Internet Speed
2 Gb/s Download and 100 Mb/s Upload
Antivirus
Malwarebyte Anti-Malware Premium
Browser
Google Chrome
Other Info
Logitech Z625 speaker system,
Logitech BRIO 4K Pro webcam,
HP Color LaserJet Pro MFP M477fdn,
APC SMART-UPS RT 1000 XL - SURT1000XLI,
Galaxy S23 Plus phone
Update on Windows 7 reinstallation

Hi again, I was considering system image tool, but here is an update:

I installed Windows 7 upgrade version from scratch. The whole installation process (including software installation) didn't take more than 2 hours in total. Windows 7 itself was installed and activated in 30 minutes. My major concerns were about activation since my licence is an upgrade, but no issues at all, automatic online update worked just fine.


SSD is a refreshing change! Thanks for all comments and suggestions.

Koray
 

My Computer My Computer

At a glance

Windows 7Core 2 Duo 1.60
Computer Manufacturer/Model Number
Lenovo Thinkpad X61 Tablet
OS
Windows 7
CPU
Core 2 Duo 1.60
That's great news Koray. Thank you for posting back with your results. :)
 

My Computer My Computer

At a glance

64-bit Windows 11 Pro for WorkstationsIntel i7-8700K OC'd to 5 GHz64 GB (4x16GB) G.SKILL TridentZ RGB DDR4 3600...ASUS ROG-STRIX-GTX1080TI-O11G-GAMING
Computer type
PC/Desktop
Computer Manufacturer/Model Number
Self built custom
OS
64-bit Windows 11 Pro for Workstations
CPU
Intel i7-8700K OC'd to 5 GHz
Motherboard
ASUS ROG Maximus XI Formula Z390
Memory
64 GB (4x16GB) G.SKILL TridentZ RGB DDR4 3600 MHz
Graphics Card(s)
ASUS ROG-STRIX-GTX1080TI-O11G-GAMING
Sound Card
Integrated
Monitor(s) Displays
2 x Samsung Odyssey G7 27"
Screen Resolution
2560x1440
Hard Drives
1TB Samsung 990 PRO M.2,
4TB Samsung 990 PRO PRO M.2,
TerraMaster F8 SSD Plus NAS
PSU
Seasonic Prime Titanium 850W
Case
Thermaltake Core P3
Cooling
Corsair Hydro H115i
Keyboard
Logitech wireless K800
Mouse
Logitech MX Master 4
Internet Speed
2 Gb/s Download and 100 Mb/s Upload
Antivirus
Malwarebyte Anti-Malware Premium
Browser
Google Chrome
Other Info
Logitech Z625 speaker system,
Logitech BRIO 4K Pro webcam,
HP Color LaserJet Pro MFP M477fdn,
APC SMART-UPS RT 1000 XL - SURT1000XLI,
Galaxy S23 Plus phone
My first post.
I have Windows 7 Home and have created a system image on an external hard drive. I immediately restored this image and lost my speech recognition training, plus a couple of files on the desktop were not restored to their original positions.
My question is - can I copy the Speech file in Users ... into, say my D partition and then copy it back after I have done the system image restore ? ie will I have my speech recognition back to where it was after training, etc ?
Mo
 

My Computer My Computer

At a glance

windows 7 home
OS
windows 7 home
Hello Mo, and welcome to Seven Forums.

Yes, you can do that. A system image backup should have saved and restored everything as it was exactly at the date and time you created the backup though. Did you create one before or after you trained speech recognition?
 

My Computer My Computer

At a glance

64-bit Windows 11 Pro for WorkstationsIntel i7-8700K OC'd to 5 GHz64 GB (4x16GB) G.SKILL TridentZ RGB DDR4 3600...ASUS ROG-STRIX-GTX1080TI-O11G-GAMING
Computer type
PC/Desktop
Computer Manufacturer/Model Number
Self built custom
OS
64-bit Windows 11 Pro for Workstations
CPU
Intel i7-8700K OC'd to 5 GHz
Motherboard
ASUS ROG Maximus XI Formula Z390
Memory
64 GB (4x16GB) G.SKILL TridentZ RGB DDR4 3600 MHz
Graphics Card(s)
ASUS ROG-STRIX-GTX1080TI-O11G-GAMING
Sound Card
Integrated
Monitor(s) Displays
2 x Samsung Odyssey G7 27"
Screen Resolution
2560x1440
Hard Drives
1TB Samsung 990 PRO M.2,
4TB Samsung 990 PRO PRO M.2,
TerraMaster F8 SSD Plus NAS
PSU
Seasonic Prime Titanium 850W
Case
Thermaltake Core P3
Cooling
Corsair Hydro H115i
Keyboard
Logitech wireless K800
Mouse
Logitech MX Master 4
Internet Speed
2 Gb/s Download and 100 Mb/s Upload
Antivirus
Malwarebyte Anti-Malware Premium
Browser
Google Chrome
Other Info
Logitech Z625 speaker system,
Logitech BRIO 4K Pro webcam,
HP Color LaserJet Pro MFP M477fdn,
APC SMART-UPS RT 1000 XL - SURT1000XLI,
Galaxy S23 Plus phone
Hello Mo, and welcome to Seven Forums.

Yes, you can do that. A system image backup should have saved and restored everything as it was exactly at the date and time you created the backup though. Did you create one before or after you trained speech recognition?
I've done three system images and restores. The first was just the bare bones, the second i created a notepad file on the desktop and this was restored to the default position instead of where i put it. The third system image had quite a few shortcuts on the desktop plus I did the tutorial and two or three training sessions in Speech Recognition and the restored result was that the Computer shortcut I created was put in the default position and although the library words I created were returned OK, the training and probably the tutorial were gone.
Thanks for your help,
Mo
 

My Computer My Computer

At a glance

windows 7 home
OS
windows 7 home
Mo,

I must admit that I'm not sure why it did not restore everything that you had when the system image was created. Everytime I have done a system recovery, it has always restored everything as it was when my system image backup was created. :confused:
 

My Computer My Computer

At a glance

64-bit Windows 11 Pro for WorkstationsIntel i7-8700K OC'd to 5 GHz64 GB (4x16GB) G.SKILL TridentZ RGB DDR4 3600...ASUS ROG-STRIX-GTX1080TI-O11G-GAMING
Computer type
PC/Desktop
Computer Manufacturer/Model Number
Self built custom
OS
64-bit Windows 11 Pro for Workstations
CPU
Intel i7-8700K OC'd to 5 GHz
Motherboard
ASUS ROG Maximus XI Formula Z390
Memory
64 GB (4x16GB) G.SKILL TridentZ RGB DDR4 3600 MHz
Graphics Card(s)
ASUS ROG-STRIX-GTX1080TI-O11G-GAMING
Sound Card
Integrated
Monitor(s) Displays
2 x Samsung Odyssey G7 27"
Screen Resolution
2560x1440
Hard Drives
1TB Samsung 990 PRO M.2,
4TB Samsung 990 PRO PRO M.2,
TerraMaster F8 SSD Plus NAS
PSU
Seasonic Prime Titanium 850W
Case
Thermaltake Core P3
Cooling
Corsair Hydro H115i
Keyboard
Logitech wireless K800
Mouse
Logitech MX Master 4
Internet Speed
2 Gb/s Download and 100 Mb/s Upload
Antivirus
Malwarebyte Anti-Malware Premium
Browser
Google Chrome
Other Info
Logitech Z625 speaker system,
Logitech BRIO 4K Pro webcam,
HP Color LaserJet Pro MFP M477fdn,
APC SMART-UPS RT 1000 XL - SURT1000XLI,
Galaxy S23 Plus phone
I was hasty. The test I made of using dictation by speech recognition, was poor and the training was the same as when I first did the training, but now I find that there are no new training sections in speech recognition. So the system image might have restored properly with the desktop anomalies being insignificant.

Sorry about the bad call. I will try again to restore after considerable experience with speech recognition. And I could compare the Speech files, too.
Mo
 

My Computer My Computer

At a glance

windows 7 home
OS
windows 7 home
Ok. No problem Mo. Please let us know how it turns out.
 

My Computer My Computer

At a glance

64-bit Windows 11 Pro for WorkstationsIntel i7-8700K OC'd to 5 GHz64 GB (4x16GB) G.SKILL TridentZ RGB DDR4 3600...ASUS ROG-STRIX-GTX1080TI-O11G-GAMING
Computer type
PC/Desktop
Computer Manufacturer/Model Number
Self built custom
OS
64-bit Windows 11 Pro for Workstations
CPU
Intel i7-8700K OC'd to 5 GHz
Motherboard
ASUS ROG Maximus XI Formula Z390
Memory
64 GB (4x16GB) G.SKILL TridentZ RGB DDR4 3600 MHz
Graphics Card(s)
ASUS ROG-STRIX-GTX1080TI-O11G-GAMING
Sound Card
Integrated
Monitor(s) Displays
2 x Samsung Odyssey G7 27"
Screen Resolution
2560x1440
Hard Drives
1TB Samsung 990 PRO M.2,
4TB Samsung 990 PRO PRO M.2,
TerraMaster F8 SSD Plus NAS
PSU
Seasonic Prime Titanium 850W
Case
Thermaltake Core P3
Cooling
Corsair Hydro H115i
Keyboard
Logitech wireless K800
Mouse
Logitech MX Master 4
Internet Speed
2 Gb/s Download and 100 Mb/s Upload
Antivirus
Malwarebyte Anti-Malware Premium
Browser
Google Chrome
Other Info
Logitech Z625 speaker system,
Logitech BRIO 4K Pro webcam,
HP Color LaserJet Pro MFP M477fdn,
APC SMART-UPS RT 1000 XL - SURT1000XLI,
Galaxy S23 Plus phone
I built a new system yesterday, and loaded it up with a Patriot SSD for the OS and a Hitachi HDD for storage. I was told to do the firmware upgrades prior to installing the windows 7 on the SSD. After doing so, I could make an image of the OS, and then restore it onto the newly formatted SSD. I haven't quite figured out how to do that though, although I've been told that it's possible, and not that difficult (for someone who is completed computer savvy of course).

So, here is my current status. I created a disk image using the w7 utility, and saved it out to my SSD. I guess I could have created a partition on the HDD, and saved it out there, but I wasn't quite sure how all of this is going to work. Now, when I choose to restore my system, i essentially want to pick the SSD, but it doesn't appear that I have that option. I don't really have any options at all, it just picks the original drive. Is there any way to easily get all of my system files over onto the SSD without reinstalling?
 

My Computer My Computer

At a glance

Windows 7, XP, VistaIntel I7 8608gb OCZTechnology DDR3Radeon 5770
Computer Manufacturer/Model Number
Custom
OS
Windows 7, XP, Vista
CPU
Intel I7 860
Motherboard
Gigabyte
Memory
8gb OCZTechnology DDR3
Graphics Card(s)
Radeon 5770
Monitor(s) Displays
Samsung 2343, Samsung 931b
Hard Drives
Patriot 64gb SSD, Hitachi 2tb HDD

My Computers My Computers

  • At a glance

    7 X64i5 84002x8gb 3200mhz
    Computer type
    PC/Desktop
    OS
    7 X64
    CPU
    i5 8400
    Motherboard
    gigabyte b365m ds3h
    Memory
    2x8gb 3200mhz
    Hard Drives
    various
    PSU
    pure power 11 400w cm
    Case
    Coolermaster
    Cooling
    cryorig m9i
  • At a glance

    7x64g54008gb ddr4 2400
    Computer type
    PC/Desktop
    OS
    7x64
    CPU
    g5400
    Motherboard
    ga b365m ds3h
    Memory
    8gb ddr4 2400
    PSU
    xfx pro 450w
Ok, downloaded the first one, created the disk image, tried to restore it to my SSD but the next button is grayed out whenever I select that partition. However if I select my larger disk drive, the next button becomes active again. Should be plenty of room on the SSD, 64gb free, and the image is 25gb. Any ideas?
 

My Computer My Computer

At a glance

Windows 7, XP, VistaIntel I7 8608gb OCZTechnology DDR3Radeon 5770
Computer Manufacturer/Model Number
Custom
OS
Windows 7, XP, Vista
CPU
Intel I7 860
Motherboard
Gigabyte
Memory
8gb OCZTechnology DDR3
Graphics Card(s)
Radeon 5770
Monitor(s) Displays
Samsung 2343, Samsung 931b
Hard Drives
Patriot 64gb SSD, Hitachi 2tb HDD
Move the Macrium image to the HD, make sure the partition on the SSD is at least as large as the partition you made the image of.

Should restore fine from there.

You can't restore an image to the same partition the image itself is on - it would be writing over itself.
 

My Computers My Computers

  • At a glance

    7 X64i5 84002x8gb 3200mhz
    Computer type
    PC/Desktop
    OS
    7 X64
    CPU
    i5 8400
    Motherboard
    gigabyte b365m ds3h
    Memory
    2x8gb 3200mhz
    Hard Drives
    various
    PSU
    pure power 11 400w cm
    Case
    Coolermaster
    Cooling
    cryorig m9i
  • At a glance

    7x64g54008gb ddr4 2400
    Computer type
    PC/Desktop
    OS
    7x64
    CPU
    g5400
    Motherboard
    ga b365m ds3h
    Memory
    8gb ddr4 2400
    PSU
    xfx pro 450w
Yep, that was the case, I actually was doing some reading on the Macrium site, and it said that if you encounter this issue, to use the RoboRestore utility to restore to a smaller drive. Fired that thing up, copyied the files over to the new drive, disabled the HDD drive in the bios, and voila, it booted up on the SSD drive.

Now for my last task, since the machine will not boot with both drives enabled, what's the easiest way to format the disabled drive, boot into some kind of command mode or something?
 

My Computer My Computer

At a glance

Windows 7, XP, VistaIntel I7 8608gb OCZTechnology DDR3Radeon 5770
Computer Manufacturer/Model Number
Custom
OS
Windows 7, XP, Vista
CPU
Intel I7 860
Motherboard
Gigabyte
Memory
8gb OCZTechnology DDR3
Graphics Card(s)
Radeon 5770
Monitor(s) Displays
Samsung 2343, Samsung 931b
Hard Drives
Patriot 64gb SSD, Hitachi 2tb HDD

My Computers My Computers

  • At a glance

    7 X64i5 84002x8gb 3200mhz
    Computer type
    PC/Desktop
    OS
    7 X64
    CPU
    i5 8400
    Motherboard
    gigabyte b365m ds3h
    Memory
    2x8gb 3200mhz
    Hard Drives
    various
    PSU
    pure power 11 400w cm
    Case
    Coolermaster
    Cooling
    cryorig m9i
  • At a glance

    7x64g54008gb ddr4 2400
    Computer type
    PC/Desktop
    OS
    7x64
    CPU
    g5400
    Motherboard
    ga b365m ds3h
    Memory
    8gb ddr4 2400
    PSU
    xfx pro 450w
I didn't even look at the version, I just downloaded the one from this blog.

Macrium Reflect - Blogs and News

Even though the HDD was disabled in the bios, somehow w7 still recognized that there was a drive there in the disk management tools, although it was giving me an error about having the same signature as another drive that was online. I just right clicked on Offline, and set it to online, and it cleaned itself up somehow. I was able to format it from there, and all is good to go!

By the way, these SSD drives are nice, everything is lightning quick. Glad I spent a few extra bones, hopefully it lasts
 

My Computer My Computer

At a glance

Windows 7, XP, VistaIntel I7 8608gb OCZTechnology DDR3Radeon 5770
Computer Manufacturer/Model Number
Custom
OS
Windows 7, XP, Vista
CPU
Intel I7 860
Motherboard
Gigabyte
Memory
8gb OCZTechnology DDR3
Graphics Card(s)
Radeon 5770
Monitor(s) Displays
Samsung 2343, Samsung 931b
Hard Drives
Patriot 64gb SSD, Hitachi 2tb HDD
Back
Top