System Image Recovery

How to Do a System Image Recovery in Windows 7


   Information
This will show you how to restore your Windows 7 hard disk back to exactly how it was when you created a system image backup.
   Warning

  • You can only do a system image recovery to a HDD that is the same size or larger than the one the system image was created from. You will not be able to do a system image recovery to a smaller HDD.
  • When you restore your computer from a image backup, it is a complete restoration. You can't choose individual items to restore, and all of your current programs, system settings, and files are replaced.
  • If your backup image is on a external device (ex: USB drive), then make sure it is connected before starting. If USB drive, then also make sure that you have your BIOS settings (ex: Legacy USB) set to allow USB devices at boot.
  • A system image recovery will format everything on each hard drive that was included in a system image, and will only restore what is included (see steps 7-9 in STEP TWO below) in the system image back. Be sure to backup anything that you do not want to lose that is not included in the system image backup first.


STEP ONE

Only if You Renamed the "WindowsImageBackup" Folder


   Note
To be able to have multiple versions of system images saved on the same drive or partition, you would need to rename the older WindowsImageBackup folder from the previously created system image as described in the NOTE box at the top of this tutorial.

If you renamed the WindowsImageBackup folder for the system image version that you wanted to restore, then you will need to do the steps below before you will be able to restore that system image.

1. If you are "Able to Boot" into Windows 7 A) In Windows Explorer, navigate to the renamed (drive letter)\WindowsImageBackup folder location of the system image that you want to restore.

B) If you already have a folder named WindowsImageBackup that is not the system image version that you want to restore, then you will need to right click on it, click on Rename, and type in say WindowsImageBackup-Copy-2 as an example.

C) Now, right click on the renamed system image version (ex: WindowsImageBackup-Copy-1) that you did want to restore, click on Rename, type in WindowsImageBackup an press enter.

D) Go to the STEP TWO section below to do the System Image Recovery.
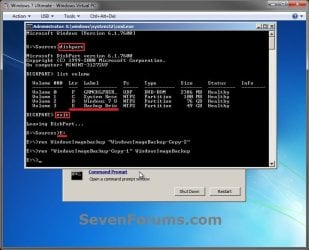
2. If you are "Not Able to Boot" into Windows 7 A) If you have the system image backup save to an external device, be sure that it is connected now.

B) Open a command prompt at boot.

C) In the command prompt, type diskpart and press enter. (see screenshot below)

D) In the command prompt, type list volume and press enter. (see screenshot below)

E) Make note of the drive letter (ex: E: ) that you have the system image backup saved to.

F) In the command prompt, type exit and press enter. (see screenshot below)

G) In the command prompt, type the E: and press enter. (see screenshot below)
NOTE: Subsititute E: for your actual drive letter at step 2E instead.

H) If you already have a folder named "WindowsImageBackup"

NOTE: This is if you already have a folder named WindowsImageBackup that is not the system image version that you want to restore. If so, you would need to rename it to say WindowsImageBackup-Copy-2 as an example.
  • In the command prompt, type the command below and press enter. (see screenshot below)
    NOTE: Substitute WindowsImageBackup-Copy-2 in the command below with any name in quotes that you would like to rename it to instead.
Code:
[B]ren WindowsImageBackup "[COLOR=red]WindowsImageBackup-Copy-2[/COLOR]"[/B]
I) In the command prompt, type the command below and press enter. (see screenshot below)
NOTE: Substitute WindowsImageBackup-Copy-1 in the command below with the actual name of your renamed system image folder in quotes that you want to use to restore instead.
Code:
[B]ren "[COLOR=red]WindowsImageBackup-Copy-1[/COLOR]" WindowsImageBackup[/B]
J) Close the command prompt window. (see screenshot below)

K) Continue on to step 3B in the STEP TWO section below to do the System Image Recovery.
Rename-1.jpg


STEP TWO

To Do the System Image Recovery

1. If you have the system image backup save to an external device, be sure that it is connected and turned on (powered up) now.
A) Start with either step 2 or step 3 below first.
2. From "Backup and Restore" in the Control Panel while in Windows 7 A) Open the Control Panel (icons view), and click on Backup and Restore.

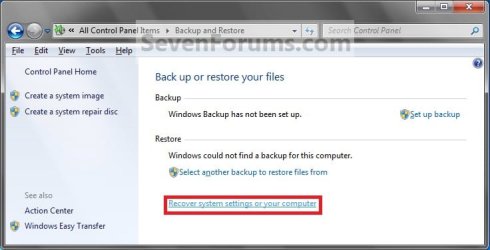
B) Click on the Recover system settings on your computer link. (see screenshot below) Step1.jpg
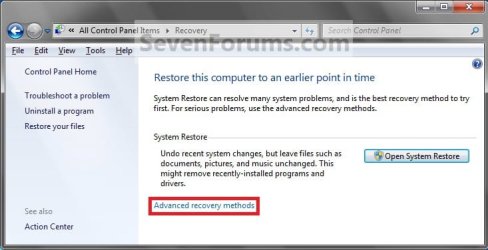
C) Click on the Advanced recovery methods link. (see screenshot below) Step2.jpg
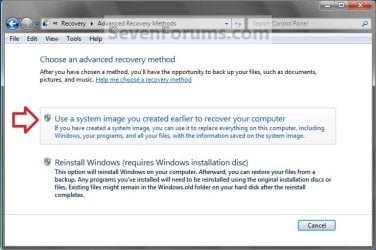
D) Select the Use a system image you created earlier to recover your computer option. (see screenshot below) Step3.jpg
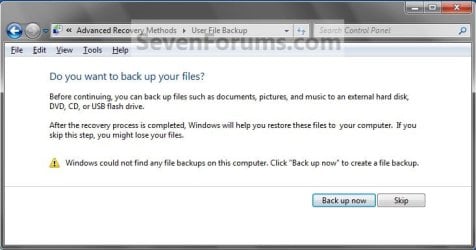
E) Select to either create a Back up now, or to Skip it and continue the system image recovery without backing up any of your current files.
NOTE: If you select Back up now, it will take you to step 6 in this tutorial link to create a User and System File back up of your current files first before continuing to step 1F. (see screenshot below) Step4A.jpg
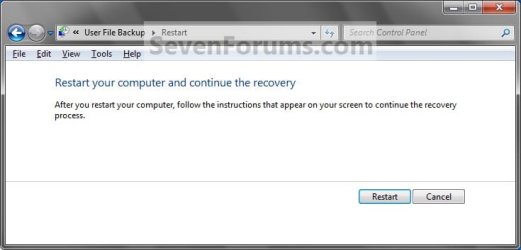
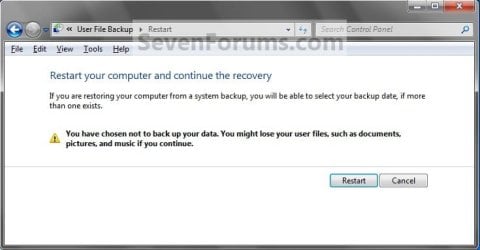
F) Click on Restart. (see screenshot below) Step5A.jpg
Step5B.jpg

G) Select a languange to be used for your keyboard input and click on Next. (see screenshot below) Step6.jpg
H) Go to step 4.
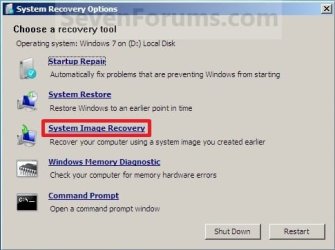
3. From the System Recovery Options Screen at Boot A) Boot to the System Recovery Options screen from your Windows 7 installation DVD/USB, or System Repair Disc.

B) Select the System Image Recovery option. (see screenshot below) System_Recovery_Options.jpg
4. If you saved the system image backup to a set of DVDs, then insert the last DVD from the set when prompted. If not, go to step 5 for a system image backup on a hard drive. A) Go to step 7 below.
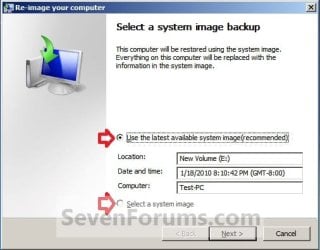
5. To Use the Latest System Image A) Select (dot) Use the latest available system image and click on Next. (see screenshot below) Step7.jpg
B) Go to step 7.
6. To Select a System Image A) Select (dot) Select a system image, and click on Next. (see screenshot above)
NOTE: This is if the system image that you want to use is not listed here and is at another location that you wish to choose from instead.

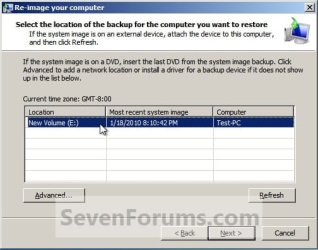
B) Select the location of the backup image for the computer you want to restore from the list, and click on Next. (see screenshot below)

   Note
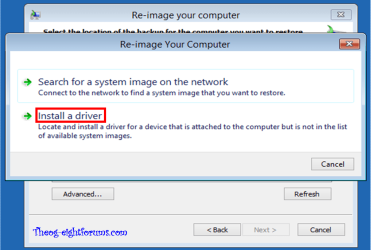
To add a image from a network location, click on the Advanced button, and on the Search for a system image on the network option.

If the drive cannot be seen to select a system image from, then you may need to use the tutorial below to load your SATA or RAID drivers before it will be seen. You would click on the Advanced button, and on the Install a driver option.

SATA Drivers - Load in Windows 8 System Image Recovery
RecoveryBackup004-8.PNG


Step8A.jpg
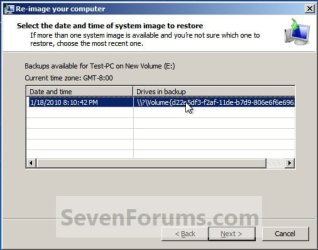
C) Select the date and time of the system image to restore, and click on Next. (see screenshot below) Step8B.jpg
7. To Do a Full System Image Recovery
NOTE: This option will format everything on each hard disk drive that was included in the system image, then restore them as they were when the system image was created.

   Note
Format and repartition disks box:
NOTE: Special thanks to MJF for this addition. 1) Grayed out and selected
You are forced to have the whole disk formatted and repartitioned to match the partition structure of the disk the image was made from. This can occur when restoring an image to a new disk or the original disk with a modified partition structure. Data on other partitions on the disk you are restoring to will be lost.

2) Grayed out and unselected
You are not given the option to format and repartition the disk. This will occur if you are restoring Windows from a partition on the same disk.

3) Not grayed out and unselected
Here you have the option to select format the whole disk and repartition or not. In this case the disk the image was taken from has a matching partition structure to the disk you are restoring the image to. By not selecting the format and repartition option your image will be restored and other partitions untouched such as valuable data partitions.
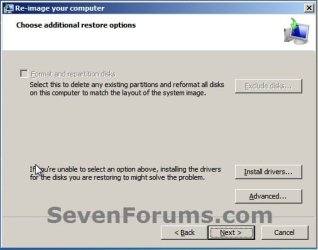
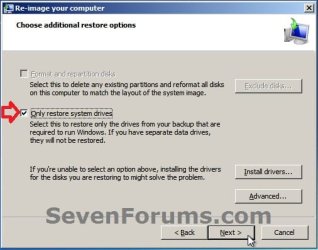
A) Check the Format and repartition disks box (if not grayed out) and uncheck Only restore system drives box (if available), and click on Next. (see screenshots below) Exclude_Disks.jpg
Step9.jpg
System_Drives.jpg
B) Go to step 10.
8. To Only Restore System Drives in System Image Recovery
NOTE: When restoring to the same disk containing data partitions, the Format and repartition disks option may format the data partitions as well. If this is the case and you have the option to leave the Format and repartition disks box unchecked, then initially attempt your image recovery with the Format and repartition disks box unchecked. If recovery is unsuccessful, repeat the process with the format box ticked. A) If available, check the Only restore system drives box, and click on Next. (see screenshot below) System_Drives.jpg
B) Go to step 10.
9. To Exclude Restoring Specific Drives in System Image Recovery
NOTE: Since a system image recovery will format everything on each hard disk drive that was included in a system image, this will allow you to exclude specific disks so that specific disk will not be formated or restored. A) Check the Format and repartition disks box , and click on the Exclude disks button (if not grayed out). (see screenshot below)
NOTE: If the Exclude disks button is grayed out, then the HDD that you are restoring to is empty, or you do not have any disks in the system image that are able to be excluded from being restored. Exclude 001.JPG
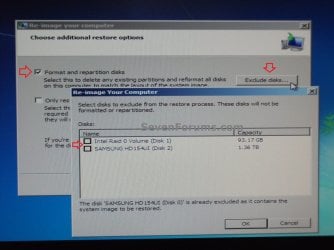
B) Unselect the drives that you want to exclude from being restored.

C) Click on Next.
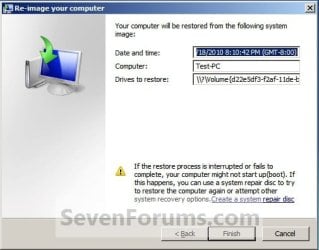
10. Click on Finish. (see screenshot below) Step10.jpg
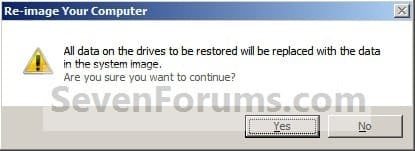
11. Click on Yes. (See screenshot below) Step11.jpg
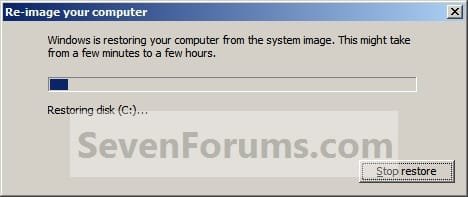
12. You will now see this screenshot below.
NOTE: If you have the backup image on DVDs, have them ready. See step 4 above. Step12.jpg
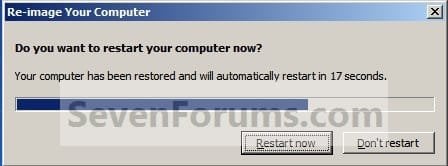
13. When it is through, click on Restart Now to finish. (see screenshot below)
NOTE: Your computer will restart and the backup image restoration will be done. Step13.jpg
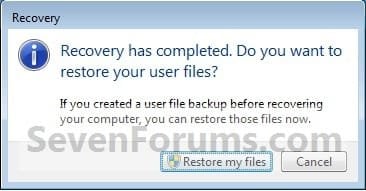
14. If you created a backup in step 1E, then you will now see this option to Restore my files after the computer restarts. (see screenshot below) Step14.jpg
That's it,
Shawn


Attachments

  • Step6A.jpg
    Step6A.jpg
    12.7 KB · Views: 244
Last edited:
How do I delete the backup images?

Thanks in advance
 

Attachments

  • images.jpg
    images.jpg
    29 KB · Views: 473

My Computer My Computer

At a glance

Windows 7 Ultimate x64
OS
Windows 7 Ultimate x64
Problem using Image to migrate HDD to SSD

Hi,

It is time to upgrade the computer and I ran into a problem restoring an image to a new SDD on win7 ultimate x86. It get a message saying no suitable disk to restore to.

Here is the history of what I have tried:

Original setup:

Disk 0: (1.0 TB)
partition C: (OS - 70GB)
partition D: (data -860 GB)
Disk 1: (1.0TB)
partition E: (data - 930 GB)

Everything works fine.

New hardware added: 2.0TB HDD, 60GB SSD

new hardware setup

Disk 0: (1.0 TB)
partition C: (OS - 70GB)
partition D: (data -860 GB)
Disk 1: (1.0TB)
partition E: (data - 930 GB)
Disk 2 : (2.0 TB)
partition F: (data 1.8 TB)
Disk 3: (60GB)
partition G: (data 60GB)

everything works

now to prep for OS migration from disk 0 to disk 3, I did the following

1. shrank partition c: from 70GB to 50GB
2. copied partition d: to partition f:
3. deleted partition d:
4. reassigned partition f: as d:

everything works - setup is as follows:

Disk 0: (1.0 TB)
partition C: (OS - 50GB)
unallocated 880 GB)
Disk 1: (1.0TB)
partition E: (data - 930 GB)
Disk 2 : (2.0 TB)
partition D: (data 1.8 TB)
Disk 3: (60GB)
partition G: (data 60GB)

I then created a system image of Disk 0 on partition D (Disk 2)

I want to restore this image to Disk 3

First attempt - reboot into recovery environment (ok)
select image to restore from (ok)
exclude disk 0 (ok)
exclude disk 1 (ok)
disk 2 is automaticaly excluded as it contains the image

click ok to restore - get message saying no suitable disk has been found.

Next attempt - physically disconnect disk 0 and 1 and retry - same result.

My understanding is that this should work as the the partition on the original drive is smaller than the size of the destination drive and the rest of the original drive was not allocated.

Any ideas,

Mark
 

My Computer My Computer

At a glance

Server 2012 R2, Windows 8.1 , W7 ultimate x64Q6600,8G, 4G, 2G7300GS, 9600GT, 8600GT
Computer type
PC/Desktop
Computer Manufacturer/Model Number
3 Home Built Computers
OS
Server 2012 R2, Windows 8.1 , W7 ultimate x64
CPU
Q6600,
Motherboard
Gigabyte ga-p35-ds4, ga-ep45-ud3p, ga-p35-dq6
Memory
8G, 4G, 2G
Graphics Card(s)
7300GS, 9600GT, 8600GT
Sound Card
onboard ALC889
Monitor(s) Displays
dell, TV
Screen Resolution
1280x1024, PAL SD TV
Hard Drives
WD 1.0T GP x2,wd 320G x2,WD 1.0T GP x2
PSU
corsair HX520,corsair HX520,corsair HX520
Case
Antec Solo, Antec Solo,Thermaltake DH101
Cooling
Thermalright TRUE, Thermalright TRUE, Ninja mini
Internet Speed
not too fast
Last edited by a moderator:

My Computer My Computer

At a glance

Server 2012 R2, Windows 8.1 , W7 ultimate x64Q6600,8G, 4G, 2G7300GS, 9600GT, 8600GT
Computer type
PC/Desktop
Computer Manufacturer/Model Number
3 Home Built Computers
OS
Server 2012 R2, Windows 8.1 , W7 ultimate x64
CPU
Q6600,
Motherboard
Gigabyte ga-p35-ds4, ga-ep45-ud3p, ga-p35-dq6
Memory
8G, 4G, 2G
Graphics Card(s)
7300GS, 9600GT, 8600GT
Sound Card
onboard ALC889
Monitor(s) Displays
dell, TV
Screen Resolution
1280x1024, PAL SD TV
Hard Drives
WD 1.0T GP x2,wd 320G x2,WD 1.0T GP x2
PSU
corsair HX520,corsair HX520,corsair HX520
Case
Antec Solo, Antec Solo,Thermaltake DH101
Cooling
Thermalright TRUE, Thermalright TRUE, Ninja mini
Internet Speed
not too fast
Solution Found

I found a solution to my problem,

In the details of the error message (no suitable drives found), they mention USB drives as not suitable... Therefore, I extented this logic to AHCI Sata drives (hot swappable) and turned off AHCI in my bios.

I tried the restore and it worked.

I rebooted and reenabled AHCI. All works. Windows disk score 5.5->7.7

All is good.


Mtp


Hi,

It is time to upgrade the computer and I ran into a problem restoring an image to a new SDD on win7 ultimate x86. It get a message saying no suitable disk to restore to.

Here is the history of what I have tried:

Original setup:

Disk 0: (1.0 TB)
partition C: (OS - 70GB)
partition D: (data -860 GB)
Disk 1: (1.0TB)
partition E: (data - 930 GB)

Everything works fine.

New hardware added: 2.0TB HDD, 60GB SSD

new hardware setup

Disk 0: (1.0 TB)
partition C: (OS - 70GB)
partition D: (data -860 GB)
Disk 1: (1.0TB)
partition E: (data - 930 GB)
Disk 2 : (2.0 TB)
partition F: (data 1.8 TB)
Disk 3: (60GB)
partition G: (data 60GB)

everything works

now to prep for OS migration from disk 0 to disk 3, I did the following

1. shrank partition c: from 70GB to 50GB
2. copied partition d: to partition f:
3. deleted partition d:
4. reassigned partition f: as d:

everything works - setup is as follows:

Disk 0: (1.0 TB)
partition C: (OS - 50GB)
unallocated 880 GB)
Disk 1: (1.0TB)
partition E: (data - 930 GB)
Disk 2 : (2.0 TB)
partition D: (data 1.8 TB)
Disk 3: (60GB)
partition G: (data 60GB)

I then created a system image of Disk 0 on partition D (Disk 2)

I want to restore this image to Disk 3

First attempt - reboot into recovery environment (ok)
select image to restore from (ok)
exclude disk 0 (ok)
exclude disk 1 (ok)
disk 2 is automaticaly excluded as it contains the image

click ok to restore - get message saying no suitable disk has been found.

Next attempt - physically disconnect disk 0 and 1 and retry - same result.

My understanding is that this should work as the the partition on the original drive is smaller than the size of the destination drive and the rest of the original drive was not allocated.

Any ideas,

Mark
 

My Computer My Computer

At a glance

Server 2012 R2, Windows 8.1 , W7 ultimate x64Q6600,8G, 4G, 2G7300GS, 9600GT, 8600GT
Computer type
PC/Desktop
Computer Manufacturer/Model Number
3 Home Built Computers
OS
Server 2012 R2, Windows 8.1 , W7 ultimate x64
CPU
Q6600,
Motherboard
Gigabyte ga-p35-ds4, ga-ep45-ud3p, ga-p35-dq6
Memory
8G, 4G, 2G
Graphics Card(s)
7300GS, 9600GT, 8600GT
Sound Card
onboard ALC889
Monitor(s) Displays
dell, TV
Screen Resolution
1280x1024, PAL SD TV
Hard Drives
WD 1.0T GP x2,wd 320G x2,WD 1.0T GP x2
PSU
corsair HX520,corsair HX520,corsair HX520
Case
Antec Solo, Antec Solo,Thermaltake DH101
Cooling
Thermalright TRUE, Thermalright TRUE, Ninja mini
Internet Speed
not too fast
I've got a problem here.. I have the system image stored on the external USB-HDD, but when I get to step 5 I see the empty table!! What is the problem with this? It seems like the PC doesnot search for the image or doesnot see the HDD at all.. Any suggestions?
 

My Computer My Computer

At a glance

Windows 7 Professional 64bit
OS
Windows 7 Professional 64bit
NightSeeker,

Did you perhaps rename the System Image folder?

If yes, then rename back to WindowsImageBackup.
 

My Computer My Computer

At a glance

MS Windows 7 Ultimate SP1 64-bitAMD A10-4600M6.00 GB Dual-Channel DDR3 @ 798MHz (11-11-12-28)AMD Radeon HD 7660G
Computer Manufacturer/Model Number
Toshiba Satellite S875D-S7239 laptop
OS
MS Windows 7 Ultimate SP1 64-bit
CPU
AMD A10-4600M
Motherboard
AMD Pumori (Socket FT1)
Memory
6.00 GB Dual-Channel DDR3 @ 798MHz (11-11-12-28)
Graphics Card(s)
AMD Radeon HD 7660G
Sound Card
High Definition Audio Device
Monitor(s) Displays
Generic PnP Monitor (1600x900@60Hz)
Screen Resolution
1600x900@60Hz
Hard Drives
SSD 119GB Corsair CSSD-V128GB2 ATA Device
Keyboard
Standard PS/2 Keyboard
Mouse
HP Wireless Optical Mobile Mouse Model FHA-3410
Internet Speed
What the local pub, local coffee shop offers.
Other Info
Optical Drive:MATSHITA BD-CMB UJ160B ATA Device


Also have an Asus ha1002xp netbook with Win 7 Ultimate installed.
Hi - Brink, thanks for another complete and thorough walkthrough BUT... I also wanted to transfer an image of W7Ux64 from a 320GB drive that is getting a bit tight to a newly-freed-up 750GB. I get most of the way through, it seems as if the recovery is going to happen... and then I get "The system image restore failed. No disk that can be used for recovering the system disk can be found." The thing is, I also tried using Acronis True Image. This s e e m s to actually be working, but doesn't actually overwrite the brand new, sacrificial victim installation of the OS I put on the big drive (as I couldn't restore to a bare drive, I thought I'd try that). Am I really going to have to replicate the original drive size and then footle about in Disk Management? Thanks :)
 

My Computer My Computer

At a glance

Windows 7 Ult x64i7 9206GB DDR3GF 9400GT
OS
Windows 7 Ult x64
CPU
i7 920
Motherboard
GA-EX58-UD5
Memory
6GB DDR3
Graphics Card(s)
GF 9400GT
Monitor(s) Displays
Syncmaster 233HD
Screen Resolution
1920 x 1080
Hard Drives
loads
Case
HAF 920

My Computer My Computer

At a glance

MS Windows 7 Ultimate SP1 64-bitAMD A10-4600M6.00 GB Dual-Channel DDR3 @ 798MHz (11-11-12-28)AMD Radeon HD 7660G
Computer Manufacturer/Model Number
Toshiba Satellite S875D-S7239 laptop
OS
MS Windows 7 Ultimate SP1 64-bit
CPU
AMD A10-4600M
Motherboard
AMD Pumori (Socket FT1)
Memory
6.00 GB Dual-Channel DDR3 @ 798MHz (11-11-12-28)
Graphics Card(s)
AMD Radeon HD 7660G
Sound Card
High Definition Audio Device
Monitor(s) Displays
Generic PnP Monitor (1600x900@60Hz)
Screen Resolution
1600x900@60Hz
Hard Drives
SSD 119GB Corsair CSSD-V128GB2 ATA Device
Keyboard
Standard PS/2 Keyboard
Mouse
HP Wireless Optical Mobile Mouse Model FHA-3410
Internet Speed
What the local pub, local coffee shop offers.
Other Info
Optical Drive:MATSHITA BD-CMB UJ160B ATA Device


Also have an Asus ha1002xp netbook with Win 7 Ultimate installed.
I'm not Brink, but:

You need to "prepare" the new HDD.

Use the preparation portion of following link. The main thing this will do is clean the disk, format the disc, and make the partition Active.

http://www.sevenforums.com/tutorials/91339-ssd-hdd-optimize-windows-reinstallation.html

karlsnooks - thanks very much and I'm definitely going to go through the info you've kindly provided - but I'm afraid I have just hung my head and slunk away, defeated, towards a fearful and uncertain tomorrow. Also, I just opted to redistribute the files more logically over my disks (now a 320GB, a 750, and a 1TB). But I will never be defeated, and when I rise again, puny human insects, I will succeed :party::party:
 

My Computer My Computer

At a glance

Windows 7 Ult x64i7 9206GB DDR3GF 9400GT
OS
Windows 7 Ult x64
CPU
i7 920
Motherboard
GA-EX58-UD5
Memory
6GB DDR3
Graphics Card(s)
GF 9400GT
Monitor(s) Displays
Syncmaster 233HD
Screen Resolution
1920 x 1080
Hard Drives
loads
Case
HAF 920
I went through this, but now have a problem...

I created a system image using W7 on my laptop's 60 gb drive, and stored it on an external drive. I then swapped out the 60 gb drive with a 120 gb drive (which contained an old XP install). I used my Windows 7 installation disk to boot up, and selected Repair Your Computer...went through the steps in this tutorial, and got the image restored to the larger drive....

However, on the restored drive, it's showing the capacity is 55.8 gb. I went into Admin tools and checked the Drive Management...my 120 gb drive has been split into two partitions (originally it only had one), and the second one says Unallocated 55 gb (or so).

Is there a way to fix it to be one partition, within Windows 7? Or do I need to re-do the image restore? I'd like to avoid having to use a third party program. Oh also, not sure if this is related, but in the tutorial, Step 6, selecting "Format and Repartition Disks"...when I got to that window, that box was already check-marked, but it was grayed out (so I couldn't uncheck it). I didn't click on any other buttons in that window, or change anything.
 

My Computer My Computer

At a glance

Windows 7 Professional 64-bitIntel Core i7 920 - 2.67 GHz8 GBnVidia GeForce GTX 260
OS
Windows 7 Professional 64-bit
CPU
Intel Core i7 920 - 2.67 GHz
Memory
8 GB
Graphics Card(s)
nVidia GeForce GTX 260
Sound Card
Sound Blaster X-Fi Xtreme
Monitor(s) Displays
Dual: Samsung SyncMaster 2494HM and 213T
Screen Resolution
1920x1080 and 1600x1200
Hello Fallstar,

Since the image was of a 60 GB HDD, that's how it was restored on the new HDD. That's all. You should be able to use Disk Management to extend the Windows 7 partition into the unallocated space to have it back. :)

Hope this helps,
Shawn
 

My Computer My Computer

At a glance

64-bit Windows 11 Pro for WorkstationsIntel i7-8700K OC'd to 5 GHz64 GB (4x16GB) G.SKILL TridentZ RGB DDR4 3600...ASUS ROG-STRIX-GTX1080TI-O11G-GAMING
Computer type
PC/Desktop
Computer Manufacturer/Model Number
Self built custom
OS
64-bit Windows 11 Pro for Workstations
CPU
Intel i7-8700K OC'd to 5 GHz
Motherboard
ASUS ROG Maximus XI Formula Z390
Memory
64 GB (4x16GB) G.SKILL TridentZ RGB DDR4 3600 MHz
Graphics Card(s)
ASUS ROG-STRIX-GTX1080TI-O11G-GAMING
Sound Card
Integrated
Monitor(s) Displays
2 x Samsung Odyssey G7 27"
Screen Resolution
2560x1440
Hard Drives
1TB Samsung 990 PRO M.2,
4TB Samsung 990 PRO PRO M.2,
TerraMaster F8 SSD Plus NAS
PSU
Seasonic Prime Titanium 850W
Case
Thermaltake Core P3
Cooling
Corsair Hydro H115i
Keyboard
Logitech wireless K800
Mouse
Logitech MX Master 4
Internet Speed
2 Gb/s Download and 100 Mb/s Upload
Antivirus
Malwarebyte Anti-Malware Premium
Browser
Google Chrome
Other Info
Logitech Z625 speaker system,
Logitech BRIO 4K Pro webcam,
HP Color LaserJet Pro MFP M477fdn,
APC SMART-UPS RT 1000 XL - SURT1000XLI,
Galaxy S23 Plus phone
Oh what a relief! Thank you so much for your help, and for the excellent tutorials! I'll give that tutorial a try tomorrow. Thanks again. :party:
 

My Computer My Computer

At a glance

Windows 7 Professional 64-bitIntel Core i7 920 - 2.67 GHz8 GBnVidia GeForce GTX 260
OS
Windows 7 Professional 64-bit
CPU
Intel Core i7 920 - 2.67 GHz
Memory
8 GB
Graphics Card(s)
nVidia GeForce GTX 260
Sound Card
Sound Blaster X-Fi Xtreme
Monitor(s) Displays
Dual: Samsung SyncMaster 2494HM and 213T
Screen Resolution
1920x1080 and 1600x1200
You're most welcome Fallstar. Please let us know how it went, or if you have any questions. :)
 

My Computer My Computer

At a glance

64-bit Windows 11 Pro for WorkstationsIntel i7-8700K OC'd to 5 GHz64 GB (4x16GB) G.SKILL TridentZ RGB DDR4 3600...ASUS ROG-STRIX-GTX1080TI-O11G-GAMING
Computer type
PC/Desktop
Computer Manufacturer/Model Number
Self built custom
OS
64-bit Windows 11 Pro for Workstations
CPU
Intel i7-8700K OC'd to 5 GHz
Motherboard
ASUS ROG Maximus XI Formula Z390
Memory
64 GB (4x16GB) G.SKILL TridentZ RGB DDR4 3600 MHz
Graphics Card(s)
ASUS ROG-STRIX-GTX1080TI-O11G-GAMING
Sound Card
Integrated
Monitor(s) Displays
2 x Samsung Odyssey G7 27"
Screen Resolution
2560x1440
Hard Drives
1TB Samsung 990 PRO M.2,
4TB Samsung 990 PRO PRO M.2,
TerraMaster F8 SSD Plus NAS
PSU
Seasonic Prime Titanium 850W
Case
Thermaltake Core P3
Cooling
Corsair Hydro H115i
Keyboard
Logitech wireless K800
Mouse
Logitech MX Master 4
Internet Speed
2 Gb/s Download and 100 Mb/s Upload
Antivirus
Malwarebyte Anti-Malware Premium
Browser
Google Chrome
Other Info
Logitech Z625 speaker system,
Logitech BRIO 4K Pro webcam,
HP Color LaserJet Pro MFP M477fdn,
APC SMART-UPS RT 1000 XL - SURT1000XLI,
Galaxy S23 Plus phone
Ok, I said I would do it in the morning, but I just did it now, and it worked perfectly. I now have all of my drive available. yay! :D
 

My Computer My Computer

At a glance

Windows 7 Professional 64-bitIntel Core i7 920 - 2.67 GHz8 GBnVidia GeForce GTX 260
OS
Windows 7 Professional 64-bit
CPU
Intel Core i7 920 - 2.67 GHz
Memory
8 GB
Graphics Card(s)
nVidia GeForce GTX 260
Sound Card
Sound Blaster X-Fi Xtreme
Monitor(s) Displays
Dual: Samsung SyncMaster 2494HM and 213T
Screen Resolution
1920x1080 and 1600x1200
LOL, that's great news. :)
 

My Computer My Computer

At a glance

64-bit Windows 11 Pro for WorkstationsIntel i7-8700K OC'd to 5 GHz64 GB (4x16GB) G.SKILL TridentZ RGB DDR4 3600...ASUS ROG-STRIX-GTX1080TI-O11G-GAMING
Computer type
PC/Desktop
Computer Manufacturer/Model Number
Self built custom
OS
64-bit Windows 11 Pro for Workstations
CPU
Intel i7-8700K OC'd to 5 GHz
Motherboard
ASUS ROG Maximus XI Formula Z390
Memory
64 GB (4x16GB) G.SKILL TridentZ RGB DDR4 3600 MHz
Graphics Card(s)
ASUS ROG-STRIX-GTX1080TI-O11G-GAMING
Sound Card
Integrated
Monitor(s) Displays
2 x Samsung Odyssey G7 27"
Screen Resolution
2560x1440
Hard Drives
1TB Samsung 990 PRO M.2,
4TB Samsung 990 PRO PRO M.2,
TerraMaster F8 SSD Plus NAS
PSU
Seasonic Prime Titanium 850W
Case
Thermaltake Core P3
Cooling
Corsair Hydro H115i
Keyboard
Logitech wireless K800
Mouse
Logitech MX Master 4
Internet Speed
2 Gb/s Download and 100 Mb/s Upload
Antivirus
Malwarebyte Anti-Malware Premium
Browser
Google Chrome
Other Info
Logitech Z625 speaker system,
Logitech BRIO 4K Pro webcam,
HP Color LaserJet Pro MFP M477fdn,
APC SMART-UPS RT 1000 XL - SURT1000XLI,
Galaxy S23 Plus phone
Installing RAID Drivers with System Image Restore

I am planning to replace the RAID 0 array in my computer with faster and larger hard drives. I have a Windows 7 Home Premium 64-bit system.

I've read this thread and saw that I can use the Windows 7 System Image Backup and System Restore utilities to perform this task. I saw also Brink's reply to one of the posts explaining that the RAID drivers have to be installed first. Here's my question:

Will I have to first install Windows 7 in order to install the RAID drivers (using the F6 option during Windows installation) or can I simply use the System Restore on the Repair Disk (prepared using Windows 7)? In other words, doe the Repair Disk allow me to insert my diskette (yes, I have an A: drive) with the drivers in it and install the RAID drivers?

Thanks.
 

My Computer My Computer

At a glance

Windows 7 Home Premium 64 bitAMD Athlon 64 x2 4800+2 GBATI Radeon 3100 (built in)
Computer Manufacturer/Model Number
Own build
OS
Windows 7 Home Premium 64 bit
CPU
AMD Athlon 64 x2 4800+
Motherboard
ASUS M3A78-CM m/b
Memory
2 GB
Graphics Card(s)
ATI Radeon 3100 (built in)
Sound Card
Built in
Monitor(s) Displays
Viewsonic
Hard Drives
WD Velociraptor 300GB x2 (RAID 0)
Hello Tango, and welcome to Seven Forums.

I've had pretty good luck with Windows 7 recognizing my RAID 0 array without having to use the F6 option to load drivers when installing to the RAID 0. If the system image that you created from your old RAID 0 setup had the drivers installed, then I do not believe you should have a problem restoring the image to the new RAID 0 array.

There's no guarantee, so have your RAID drivers on a USB flash drive to be safe in case you need to use the F6 option to load them.

You can use either your Windows 7 installation disc or System Repair disk to do this since you only need to boot into the "System Recovery Options" screen at boot to do the system image recovery.

Do note though that the system image recovery will restore on the new RAID 0 exactly the same way it was on the old RAID 0. For example, if the old RAID 0 was 250 GB and the new RAID 0 is 750 GB, then it will restored as one partition with 250 GB on the new RAID 0 leaving the other 450 GB as unallocated space. Afterwards you can just extend the 250 GB partition into the 450 GB unallocated space to have all the 750 GB together.

Hope this helps,
Shawn
 

My Computer My Computer

At a glance

64-bit Windows 11 Pro for WorkstationsIntel i7-8700K OC'd to 5 GHz64 GB (4x16GB) G.SKILL TridentZ RGB DDR4 3600...ASUS ROG-STRIX-GTX1080TI-O11G-GAMING
Computer type
PC/Desktop
Computer Manufacturer/Model Number
Self built custom
OS
64-bit Windows 11 Pro for Workstations
CPU
Intel i7-8700K OC'd to 5 GHz
Motherboard
ASUS ROG Maximus XI Formula Z390
Memory
64 GB (4x16GB) G.SKILL TridentZ RGB DDR4 3600 MHz
Graphics Card(s)
ASUS ROG-STRIX-GTX1080TI-O11G-GAMING
Sound Card
Integrated
Monitor(s) Displays
2 x Samsung Odyssey G7 27"
Screen Resolution
2560x1440
Hard Drives
1TB Samsung 990 PRO M.2,
4TB Samsung 990 PRO PRO M.2,
TerraMaster F8 SSD Plus NAS
PSU
Seasonic Prime Titanium 850W
Case
Thermaltake Core P3
Cooling
Corsair Hydro H115i
Keyboard
Logitech wireless K800
Mouse
Logitech MX Master 4
Internet Speed
2 Gb/s Download and 100 Mb/s Upload
Antivirus
Malwarebyte Anti-Malware Premium
Browser
Google Chrome
Other Info
Logitech Z625 speaker system,
Logitech BRIO 4K Pro webcam,
HP Color LaserJet Pro MFP M477fdn,
APC SMART-UPS RT 1000 XL - SURT1000XLI,
Galaxy S23 Plus phone
Thank you very much, Shawn for the clear and precise guidance. Much appreciated.
 

My Computer My Computer

At a glance

Windows 7 Home Premium 64 bitAMD Athlon 64 x2 4800+2 GBATI Radeon 3100 (built in)
Computer Manufacturer/Model Number
Own build
OS
Windows 7 Home Premium 64 bit
CPU
AMD Athlon 64 x2 4800+
Motherboard
ASUS M3A78-CM m/b
Memory
2 GB
Graphics Card(s)
ATI Radeon 3100 (built in)
Sound Card
Built in
Monitor(s) Displays
Viewsonic
Hard Drives
WD Velociraptor 300GB x2 (RAID 0)
You're most welcome Tango. :)
 

My Computer My Computer

At a glance

64-bit Windows 11 Pro for WorkstationsIntel i7-8700K OC'd to 5 GHz64 GB (4x16GB) G.SKILL TridentZ RGB DDR4 3600...ASUS ROG-STRIX-GTX1080TI-O11G-GAMING
Computer type
PC/Desktop
Computer Manufacturer/Model Number
Self built custom
OS
64-bit Windows 11 Pro for Workstations
CPU
Intel i7-8700K OC'd to 5 GHz
Motherboard
ASUS ROG Maximus XI Formula Z390
Memory
64 GB (4x16GB) G.SKILL TridentZ RGB DDR4 3600 MHz
Graphics Card(s)
ASUS ROG-STRIX-GTX1080TI-O11G-GAMING
Sound Card
Integrated
Monitor(s) Displays
2 x Samsung Odyssey G7 27"
Screen Resolution
2560x1440
Hard Drives
1TB Samsung 990 PRO M.2,
4TB Samsung 990 PRO PRO M.2,
TerraMaster F8 SSD Plus NAS
PSU
Seasonic Prime Titanium 850W
Case
Thermaltake Core P3
Cooling
Corsair Hydro H115i
Keyboard
Logitech wireless K800
Mouse
Logitech MX Master 4
Internet Speed
2 Gb/s Download and 100 Mb/s Upload
Antivirus
Malwarebyte Anti-Malware Premium
Browser
Google Chrome
Other Info
Logitech Z625 speaker system,
Logitech BRIO 4K Pro webcam,
HP Color LaserJet Pro MFP M477fdn,
APC SMART-UPS RT 1000 XL - SURT1000XLI,
Galaxy S23 Plus phone
Brink, Thanks for the tutorial on Restoration! I'm a big fan of ISR apps such as Eaz-Fix Pro, Comodo Time Machine. For the last several months I've used CTM with zero problems. Feeling a little guilty about having switched from Eaz-Fix Pro license to CTM free, I decided to go back to Eaz-Fix Pro. I uninstalled CTM and cleaned it up which went smooth. I have made several System Images and used the Re-Naming method to save multiple copies of different dates and setups. I've had my doubts as to whether it would work or not but continued to make Images. So after uninstallation of CTM I made an Image before installing Eaz-Fix. I booted into XP, installed Eaz-Fix, booted into Win 7 to install it to that OS and the installer hung, ouch! I had to pull the power for a reboot but it successfully rebooted into Win 7. I went ahead with the install and all went well. Long story short, I liked the free version of CTM over my paid license of Eaz-Fix Pro. My quickest way out of that was to try the System Image Restore. I hadn't read this tut on how to do it and didn't realize that it could be done from Win 7 GUI. So I booted to the Recovery disk and paniced when it came to the part about Format and Repartition Disks. It had one of my USB System Image drives checked for formatting. All was well after using the exclude disk options. The tutorial gave me courage that at least I was going in the right direction. Also it was good to know that the multiple Re-Naming Image method works.
Thanks, repping if Seven will allow me to rep you again.

Edit: Dang it, it wouldn't let me rep you
 

My Computer My Computer

At a glance

Windows 7 Professional 32-bit (6.1, Build 7600)Intel(R) Pentium(R) 4 3.00 GHz HT2.0 GBATI Mobility Radeon 9600 64MB
Computer Manufacturer/Model Number
Averatec 6130HS-20
OS
Windows 7 Professional 32-bit (6.1, Build 7600)
CPU
Intel(R) Pentium(R) 4 3.00 GHz HT
Memory
2.0 GB
Graphics Card(s)
ATI Mobility Radeon 9600 64MB
Sound Card
Realtek AC'97 Audio
Screen Resolution
1280 x 800
Hard Drives
Seagate 96023A 60GB 7200RPM -
Seagate FreeAgentDesktop 250GB
Cooling
20 Inch Box Fan
Mouse
Targus PAWM10 Wireless Optical Laptop Mouse
Back
Top