How to Set a Default Control Panel View in Windows 7 and Windows 8
Information
This tutorial will show you how to set the Control Panel to always open by default with a Category, Small icons, or Large icons view for all or specific users in Windows 7 and Windows 8.
This only affects what view the Control Panel opens to by default. All users will still be able to change the Control Panel view to what they like in the Control Panel.
This only affects what view the Control Panel opens to by default. All users will still be able to change the Control Panel view to what they like in the Control Panel.
OPTION ONE
Set Default Control Panel View in the Control Panel
NOTE: This option will only affect your user account.
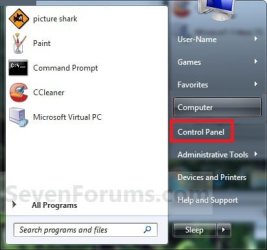
1. Open the Control Panel in Windows 7 or Windows 8.
2. Do step 3, 4, or 5 below for what you would like to do.
3. To Have the Control Panel with the Category View
A) Click/tap on the View by drop down menu arrow, select (dot) Category, and go to step 6 below. (see screenshot above)

4. For All Control Panel Items with Large Icons View
A) Click/tap on the View by drop down menu arrow, select (dot) Large icons, and go to step 6 below. (see screenshot above)

5. For All Control Panel Items with Small Icons View
A) Click/tap on the View by drop down menu arrow, elect (dot) Small icons, and go to step 6 below. (see screenshot above)

6. Close the Control Panel when done.
NOTE: The Control Panel will open to the same view as it was in when last closed by default.
OPTION TWO
Set Default Control Panel View in Group Policy
NOTE: This option requires that you are logged in as an administrator to do. You can apply this option to all or specific users.
1. Open the all users, specific users or groups, or all users except administrators Local Group Policy Editor for how you want this policy applied.
2. In the left pane, click/tap on to expand User Configuration, Administrative Templates, and Control Panel.

3. In the right pane of Control Panel, double click/tap on Always open All Control Panel Items when opening the Control Panel to edit it. (see screenshot above)
4. Do step 5, 6, or 7 below for what you would like to set.
5. To Force Icons as the Default Control Panel View
A) Select (dot) Enabled, and go to step 8 below. (see screenshot below step 8)
6. To Force Category as the Default Control Panel View
A) Select (dot) Disabled, and go to step 8 below. (see screenshot below step 8)
7. To Unforce All Views as the Default Control Panel View
NOTE: This is the default setting.
A) Select (dot) Not Configured, and go to step 8 below. (see screenshot below step 8)
8. Click/tap on OK. (see screenshot below)

9. You can now close the Local Group Policy Editor if you like.
10. If open, close and reopen Control Panel to see changes.
OPTION THREE
Set Default Control Panel View using a REG File Download
NOTE: This option requires that you are logged in as an administrator to do. This option will be applied to all users on the computer.
1. Do step 2, 3, or 4 below for what you would like to do.
2. To Force Icons as the Default Control Panel View
A) Click/tap on the Download button below to download the file below, and go to step 5 below.
Force_Control_Panel_Icons_View.reg
Download
3. To Force Category as the Default Control Panel View
A) Click/tap on the Download button below to download the file below, and go to step 5 below.
Force_Control_Panel_Category_View.reg
Download
4. To Unforce All Views as the Default Control Panel View
NOTE: This is the default setting.
A) Click/tap on the Download button below to download the file below, and go to step 5 below.
Unforce_Control_Panel_View.reg
Download
5. Save the .reg file to your desktop.
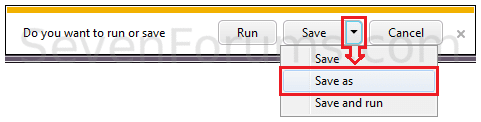
6. Double click/tap on the downloaded .reg file to merge it.
7. Click on Run, Yes (UAC), Yes, and OK when prompted.
8. If open, close and reopen Control Panel to see changes.
9. When done, you can delete the downloaded .reg file if you like.
OPTION FOUR
Set Default Control Panel View in Registry Editor
NOTE: This option requires that you are logged in as an administrator to do. This option will be applied to all users on the computer.
1. Press the Windows + R keys to open the Run dialog, type regedit, and press Enter.
2. In regedit, navigate to the location below. (see screenshot below)
HKEY_CURRENT_USER\Software\Microsoft\Windows\CurrentVersion\Policies\Explorer

3. Do step 4, 5, or 6 below for what you would like to do.
4. To Force Icons as the Default Control Panel View
A) In the right pane of Explorer, right click on a empty area and click on New and DWORD (32-bit) Value. (see screenshot above)
NOTE: If you already have the ForceClassicControlPanel DWORD entry, then go to step 4C instead.
B) Type ForceClassicControlPanel and press Enter. (see screenshot below)

C) Right click on ForceClassicControlPanel and click on Modify. (see screenshot above)
D) Type 1 and click on OK. (see screenshot below)

E) The registry will now look like this. (see screenshot below)

F) Go to step 7 below.
5. To Force Category as the Default Control Panel View
A) In the right pane of Explorer, right click on a empty area and click on New and DWORD (32-bit) Value. (see screenshot above)
NOTE: If you already have the ForceClassicControlPanel DWORD entry, then go to step 5C instead.
B) Type ForceClassicControlPanel and press Enter. (see screenshot below)
C) Double click/tap on ForceClassicControlPanel to modify it. (see screenshot above)
D) Type 0 and click/tap on OK. (see screenshot below)
E) The registry will now look like this. (see screenshot below)
F) Go to step 7 below.
6. To Unforce All Views as the Default Control Panel View
NOTE: This is the default setting.
A) In the right pane of Explorer, right click on ForceClassicControlPanel and click/tap on Delete. (see screenshot above)
B) Click/tap on Yes to confirm deletion, and go to step 7 below.
7. Close Regedit.
8. If open, close and reopen Control Panel to see changes.
That's it,
Shawn
Related Tutorials
- How to Open the Control Panel in Windows 8
- How to Add or Remove "Advanced User Accounts" to Control Panel in Windows
- How to Add or Remove "Local Group Policy Editor" to Control Panel in Windows
- How to Pin the Control Panel to the Windows 7 Taskbar
- How to Create a Control Panel All Tasks List Shortcut in Windows 7 and Windows 8
- How to Change the Default Icons in the Windows 7 Control Panel
- How to Change or Restore the Default Control Panel Icons in Windows 8
- How to Change the Default Control Panel Icon in Windows 7
- Create a Control Panel Shortcut that Always Opens to Icons View in Windows 7 and Windows 8
- Create a Control Panel Shortcut that Always Opens to Category View in Windows 7 and Windows 8
- How to Enable or Disable the Control Panel in Vista and Windows 7
- How to Enable or Disable Access to Control Panel and PC settings in Windows 8
- How to Hide or Show a Control Panel Icon in Vista, Windows 7, and Windows 8
Attachments
-
Force_Control_Panel_Icons_View.reg334 bytes · Views: 14,094
-
Force_Control_Panel_Category_View.reg334 bytes · Views: 8,526
-
Unforce_Control_Panel_View.reg536 bytes · Views: 6,963
-
 Start_Menu.jpg43.2 KB · Views: 5,996
 -
 7372.png269 bytes · Views: 0
 -
 7373.png564 bytes · Views: 1
 -
 7374.png128 bytes · Views: 0
 -
 7378.png12.3 KB · Views: 0
 -
 7380.png16 KB · Views: 0
 -
 7381.png14.7 KB · Views: 0
 -
 7382.png14.6 KB · Views: 0
 -
 7439.png599 bytes · Views: 0
 -
 7442.png5.9 KB · Views: 0
 -
 7453.png184 bytes · Views: 0
Last edited:
")
 everytime I opened Control Panel it would open in the Category View.