Solved Remove XP from a dual boot system

EdB

New member
Local time
11:35 PM
Messages
26
I know this topic has been discussed but I went through the procedure once only to have Win7 become unbootable after completing it. Only the backup saved me from ruin (hooray for backups!).

This was originally an XP system, then I installed Win7RC in a secondary partition, and eventually the full OS over the RC. I haven't booted XP in months now and would really like to get back the space. There's nothing in the XP partition that needs to be saved.

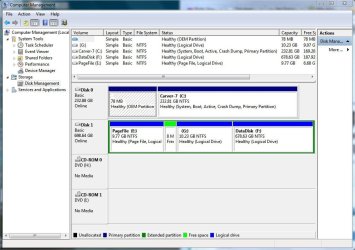
Below is a screenshot of the system disc config.

This thread may cover my situation but I want to make absolutely sure before I try again. Reading it over, I wonder if the problem was not running Startup Repair three times.

If someone could take a look and let me know if I'm on the right path, I'd much appreciate it.

EdB

Carver system config.JPG
 

My Computer

OS
Windows 7
Hello EdB.


Follow this tutorial at the link below exactly to recover all the space to the left of the Windows 7 C: partition and be sure to post back with any further questions you may have and to keep us informed.

Partition : Recover Space Used by an Older OS


Be sure to use the Partition Wizard Bootable Disk (PWBD) and not the installed version; download the PWBD ISO file from this link and burn the ISO to CD then boot the CD to make the changes.

Partition Wizard Free Bootable CD

ImgBurn Free ISO Burning Software
 

My Computer

Computer Manufacturer/Model Number
* BFK Customs *
OS
W 7 64-bit Ultimate
CPU
Intel Q9550 Yorkfield
Motherboard
ASUS P5Q Pro
Memory
8GB Dominator 8500C5D
Graphics Card(s)
ATI : XFX 5870
Sound Card
Realtek HD Audio 7-1
Monitor(s) Displays
1x 47" LCD HDMI & 3x 26" LCD HDMI
Screen Resolution
1920x1080P & 1920x1200
Hard Drives
1x 80GB Intel X25-M G2 SSD : 1x 500GB & 1x 640GB WD Caviar Black(s)
PSU
Corsair 620HX
Case
Cooler Master RC-690
Cooling
Tuniq Tower 120, 2x 140mm and 3x 120mm case fans
Keyboard
Microsoft 500
Mouse
Razer Diamondback 3G
Internet Speed
14 Mb/s
Other Info
1x Koutech 3Gb/s SATA HDD Hot Swap Rack
Thanks for the reply. I'm downloading the PWBD and backing up my system now.

Question: will programs remain intact after this process or will they require re-install. I went through all sorts of misery getting some programs (Adobe CS mostly) to work when I went from XP to W7 and I'd prefer not to repeat that.

EdB
 

My Computer

OS
Windows 7
You should have no issues at all; just make the Windows 7 C: the "System" partition and make sure it's booting good all on its own before you go to Step Two.
 

My Computer

Computer Manufacturer/Model Number
* BFK Customs *
OS
W 7 64-bit Ultimate
CPU
Intel Q9550 Yorkfield
Motherboard
ASUS P5Q Pro
Memory
8GB Dominator 8500C5D
Graphics Card(s)
ATI : XFX 5870
Sound Card
Realtek HD Audio 7-1
Monitor(s) Displays
1x 47" LCD HDMI & 3x 26" LCD HDMI
Screen Resolution
1920x1080P & 1920x1200
Hard Drives
1x 80GB Intel X25-M G2 SSD : 1x 500GB & 1x 640GB WD Caviar Black(s)
PSU
Corsair 620HX
Case
Cooler Master RC-690
Cooling
Tuniq Tower 120, 2x 140mm and 3x 120mm case fans
Keyboard
Microsoft 500
Mouse
Razer Diamondback 3G
Internet Speed
14 Mb/s
Other Info
1x Koutech 3Gb/s SATA HDD Hot Swap Rack
No luck.

I made it through steps one and two and all worked fine. The XP OS was gone, W7 was assigned Drive C: and the system rebooted into the usual configuration.

Then I ran step 3, Recover the space. After putting in the PWBD and re-allocating the space as instructed, I rebooted the system. The BIOS screen popped up (this is a Dell Dimension 8400). I closed it and the system started Windows as usual.

After the Welcome screen, the message changed to "Preparing your desktop". Uh oh. That message displayed for a couple of minutes, then W7 opened to a blank blue screen, no menu/task bar/icons, just the mouse cursor and a message in the lower right corner:

Windows 7
Build 7601
This copy of windows is not genuine​

And it sat there doing nothing, allowing nothing to be done. I rebooted several times, ran recovery several times, no change.

Right now I'm restoring the system (hopefully) back to where it was before I started this.

I let this go the last time I tried because I didn't want to waste time trying again (work to do!). Is there any reason I should try again?

Thanks,
EdB

PS: My copy of W7 is genuine; I bought it as soon as it was released!
 

My Computer

OS
Windows 7
Hello mate.


I have no idea what could have gone wrong, hundreds have followed this tutorial and had excellent results and in fact another just used it to success at the same time you were at it.

Restore 2 partition system to one drive


I have never had an issue with this method, even complete non-experienced people have used it without issue.
 

My Computer

Computer Manufacturer/Model Number
* BFK Customs *
OS
W 7 64-bit Ultimate
CPU
Intel Q9550 Yorkfield
Motherboard
ASUS P5Q Pro
Memory
8GB Dominator 8500C5D
Graphics Card(s)
ATI : XFX 5870
Sound Card
Realtek HD Audio 7-1
Monitor(s) Displays
1x 47" LCD HDMI & 3x 26" LCD HDMI
Screen Resolution
1920x1080P & 1920x1200
Hard Drives
1x 80GB Intel X25-M G2 SSD : 1x 500GB & 1x 640GB WD Caviar Black(s)
PSU
Corsair 620HX
Case
Cooler Master RC-690
Cooling
Tuniq Tower 120, 2x 140mm and 3x 120mm case fans
Keyboard
Microsoft 500
Mouse
Razer Diamondback 3G
Internet Speed
14 Mb/s
Other Info
1x Koutech 3Gb/s SATA HDD Hot Swap Rack
If you receive the non-geniune error with lockout, it means the correct drive letter has somehow slipped during repairs or reimaging.

The solution is to use FREE Rescue Kit Express | PARAGON Software Group

Boot the Paragon cd - select Normal Mode , then Boot Corrector.

Correct drive letters in the system registry.


If this doesn't help, boot the DVD or REpair CD to run Startup Repair, making sure Win7 or it's 100mb boot partition is still marked Active.
 
I'm fairly sure that gregrocker's comment - drive letter slipped - is the right diagnosis. When the BIOS popped up it said something about disks being out of order but I thought it took care of it. I'll download the rescue kit and give it a try. If it doesn't work, I'll have to write it off as something this older computer can't do. I'm just happy it can run W7 at all!

Question: when in the sequence should I do this? After step 2 or step 3?

Thanks,
Ed
 

My Computer

OS
Windows 7
Hello Ed.


I feel bad you're having issues and I'm sure Greg is right; I'll let him assist you as he's better versed with that than I; he should be back after-while.

And be sure to keep checking back and post back here with updates.
 

My Computer

Computer Manufacturer/Model Number
* BFK Customs *
OS
W 7 64-bit Ultimate
CPU
Intel Q9550 Yorkfield
Motherboard
ASUS P5Q Pro
Memory
8GB Dominator 8500C5D
Graphics Card(s)
ATI : XFX 5870
Sound Card
Realtek HD Audio 7-1
Monitor(s) Displays
1x 47" LCD HDMI & 3x 26" LCD HDMI
Screen Resolution
1920x1080P & 1920x1200
Hard Drives
1x 80GB Intel X25-M G2 SSD : 1x 500GB & 1x 640GB WD Caviar Black(s)
PSU
Corsair 620HX
Case
Cooler Master RC-690
Cooling
Tuniq Tower 120, 2x 140mm and 3x 120mm case fans
Keyboard
Microsoft 500
Mouse
Razer Diamondback 3G
Internet Speed
14 Mb/s
Other Info
1x Koutech 3Gb/s SATA HDD Hot Swap Rack
I'm not sure what Steps you're talking about. You are locked out of the OS, correct? What you need to do now is correct the drive letter to assure it is the exact same letter it functioned as before.

If so, boot Win7 DVD to run Startup Repair repeatedly after using PWBD to make sure Win7 is marked Active.

Try also entering Safe Mode by tapping F8 key at bootup to reactivate with Product Key..

Can you post back a camera snap of PWBD drive map with listings? Attach using Paper Clip in Reply Box.
 

My Computer

Computer Manufacturer/Model Number
* BFK Customs *
OS
W 7 64-bit Ultimate
CPU
Intel Q9550 Yorkfield
Motherboard
ASUS P5Q Pro
Memory
8GB Dominator 8500C5D
Graphics Card(s)
ATI : XFX 5870
Sound Card
Realtek HD Audio 7-1
Monitor(s) Displays
1x 47" LCD HDMI & 3x 26" LCD HDMI
Screen Resolution
1920x1080P & 1920x1200
Hard Drives
1x 80GB Intel X25-M G2 SSD : 1x 500GB & 1x 640GB WD Caviar Black(s)
PSU
Corsair 620HX
Case
Cooler Master RC-690
Cooling
Tuniq Tower 120, 2x 140mm and 3x 120mm case fans
Keyboard
Microsoft 500
Mouse
Razer Diamondback 3G
Internet Speed
14 Mb/s
Other Info
1x Koutech 3Gb/s SATA HDD Hot Swap Rack
After the failure last night I image-restored the system to where it was before I started, so I'll be starting from scratch.

By steps, I meant in the original "recover space..." post, Step 1 being Mark W7 partition as active; #2: Wipe XP partition and #3 Recover the space. I was just asking at which step I should try the Rescue Kit disk gregrocker recommended.

I'm going to try one more time with that disk handy just in case.

Ed
 

My Computer

OS
Windows 7
You would use the Rescue Disk to change back the drive letter if it locks you out of the OS with non-Geniune error again.

Here is how I remove first-partition XP from Dual Boot which has always worked for me:

Boot PW CD, rightclick XP Partition>Delete, OK.

Next rightclick Win7 partition>Modify>Set Active, OK. Then rightclick Win7>Resize, drag left grey border all the way to the left, OK.

Finally from the DIsk tab, click Rebuild MBR, OK. Apply all steps.

If Win7 doesn't start, boot into DVD Repair console or Repair CD, accept any offered Repair, if Win7 doesn't start on reboot boot back in to Recovery Option to run Startup Repair up to 3 separate times with reboots until Win7 starts.

I am concerned about the page file being on a separate HD and how it might affect these operations, only because I haven't seen it before in this situation. I wonder what others think.

If nothing that has been mentioned works (including Startup Repair, reactivating in Safe Mode, etc) then you can consider converting the WindowsImageBackup C drive .vhd file (judged by size when you browse into the sub-folder) to an Acronis .tib image to apply it alone to a single partition as Acronis allows. It works after Startup Repair and secures the drive letter up front.

If you have WD or Seagate HD's in the mix, Acronis has a free app on their Support Downloads webpage for your model.
 
OK!

Everything went exactly as before - ended up at the "not genuine" lockout. This time I put in the Paragon rescue disk gregrocker recommended and rebooted. After working with it, I think I've figured out the problem.

This machine is an 8+ year old Dell Dimension 8400. I've added drives, memory and a new video card to it over the years, but I never reformatted the C: drive. Dell installed in the first partition (just 78mb) some sort of OEM recovery software, and that appears to have been the problem.

The rescue disk would not reassign the Win7 partition to drive C until I released the OEM partition from drive C - at least I think that's what it was labeled, it wasn't clear - just lots of question marks next to it. When I released it, then I could release D partition (Win7) and reassign it to C.

I rebooted, it took a long time to come up, but it did in my original configuration. I've since rebooted several times and all seems to be as it should be, and reboot time is normal.

Thanks, gregrocker and barefoot and everyone else who helped. Couldn't have done it without your expert help.

EdB
 

My Computer

OS
Windows 7
This is a very rare occurence normally caused by the drive letter slipped during reimaging, however in your case I believe it is boot sector corruption causing OEM partition to grab C during repartitioning.

The Oem partition has no function if you are not using the original OS installed upon the machine. (You can browse what is on the OEM partition by rightclicking it to Explore using PWBD, or by giving it a letter in Disk Mgmt to open in Explorer.) It would be probably best to recover its space into Win7 along with XP.

In fact, the problems you have encountered strongly suggest you should wipe your HD to clean reinstall to overcome boot sector corruption since that partition sits on the boot sector. You can temporarily wipe the partition by itself by using free Partition Bootable CD: Partition Wizard Use the Bootable CD - Windows 7 Forums

SSD - HDD Optimize for Windows Reinstallation - Windows 7 Forums
Reinstalling Windows 7 - Windows 7 Forums
 
Last edited:
Hello again Ed.

I am finding that some OEM manufacturers put some kind of "lock" on their partitions and the only way to delete them is by booting to a command window and running this command.
delete partition override <enter>

DISKPART : At PC Startup
I think this is the second time I've run into this same-type issue.
click to enlarge
Override.jpg
One question about the way you ran Step One, after you marked the Windows 7 partition as Active you did do the 3 separate startup repairs to get Windows 7 booting on its own as the "System" partition before you moved on to Step Two?
 

My Computer

Computer Manufacturer/Model Number
* BFK Customs *
OS
W 7 64-bit Ultimate
CPU
Intel Q9550 Yorkfield
Motherboard
ASUS P5Q Pro
Memory
8GB Dominator 8500C5D
Graphics Card(s)
ATI : XFX 5870
Sound Card
Realtek HD Audio 7-1
Monitor(s) Displays
1x 47" LCD HDMI & 3x 26" LCD HDMI
Screen Resolution
1920x1080P & 1920x1200
Hard Drives
1x 80GB Intel X25-M G2 SSD : 1x 500GB & 1x 640GB WD Caviar Black(s)
PSU
Corsair 620HX
Case
Cooler Master RC-690
Cooling
Tuniq Tower 120, 2x 140mm and 3x 120mm case fans
Keyboard
Microsoft 500
Mouse
Razer Diamondback 3G
Internet Speed
14 Mb/s
Other Info
1x Koutech 3Gb/s SATA HDD Hot Swap Rack
Responding to your comments:

OEM/boot sector: I imagine you're right about the OEM partition being the problem; it's disconcerting to think it might've corrupted the boot sector though. I did think of recovering the OEM section but was uncertain what else Dell might've put in there that might render the computer unusable if removed.

As to re-formatting and reinstall, 1) I dread the thought of reinstalling everything (ever lost a day or three to reinstalling Adobe software? Nightmare!) and 2) I have the Win7 upgrade disk, not the clean install; doesn't it need to see a previous OS to qualify? How critical do you think a reinstall is?

And yes, I did run the three startup repairs before step 2. Still wound up with the blue screen "not genuine" message.

Thanks,
EdB
 

My Computer

OS
Windows 7

My Computer

Computer Manufacturer/Model Number
* BFK Customs *
OS
W 7 64-bit Ultimate
CPU
Intel Q9550 Yorkfield
Motherboard
ASUS P5Q Pro
Memory
8GB Dominator 8500C5D
Graphics Card(s)
ATI : XFX 5870
Sound Card
Realtek HD Audio 7-1
Monitor(s) Displays
1x 47" LCD HDMI & 3x 26" LCD HDMI
Screen Resolution
1920x1080P & 1920x1200
Hard Drives
1x 80GB Intel X25-M G2 SSD : 1x 500GB & 1x 640GB WD Caviar Black(s)
PSU
Corsair 620HX
Case
Cooler Master RC-690
Cooling
Tuniq Tower 120, 2x 140mm and 3x 120mm case fans
Keyboard
Microsoft 500
Mouse
Razer Diamondback 3G
Internet Speed
14 Mb/s
Other Info
1x Koutech 3Gb/s SATA HDD Hot Swap Rack
Oh, yes! I'm sorry if I didn't make that clear!

All works fine now after using gregrocker's Repair disk to reorder the letters. XP is gone, Win7 has the bulk of the drive, and the OEM partition sits there lurking like a virus. Here's a shot of the disk config:
 

Attachments

  • Capture.JPG
    Capture.JPG
    95.3 KB · Views: 6

My Computer

OS
Windows 7
Well that makes me happy, I thought you had a system that wouldn't boot to either OS. :party:


Are you comfortable using an elevated command window to delete that OEM partition as outlined above and then you could recover that space into the Windows 7 partition with the PWBD?

You would have to give it a drive letter in Windows 7 disk management first.
 

My Computer

Computer Manufacturer/Model Number
* BFK Customs *
OS
W 7 64-bit Ultimate
CPU
Intel Q9550 Yorkfield
Motherboard
ASUS P5Q Pro
Memory
8GB Dominator 8500C5D
Graphics Card(s)
ATI : XFX 5870
Sound Card
Realtek HD Audio 7-1
Monitor(s) Displays
1x 47" LCD HDMI & 3x 26" LCD HDMI
Screen Resolution
1920x1080P & 1920x1200
Hard Drives
1x 80GB Intel X25-M G2 SSD : 1x 500GB & 1x 640GB WD Caviar Black(s)
PSU
Corsair 620HX
Case
Cooler Master RC-690
Cooling
Tuniq Tower 120, 2x 140mm and 3x 120mm case fans
Keyboard
Microsoft 500
Mouse
Razer Diamondback 3G
Internet Speed
14 Mb/s
Other Info
1x Koutech 3Gb/s SATA HDD Hot Swap Rack
Back
Top