System Image Recovery

How to Do a System Image Recovery in Windows 7


   Information
This will show you how to restore your Windows 7 hard disk back to exactly how it was when you created a system image backup.
   Warning

  • You can only do a system image recovery to a HDD that is the same size or larger than the one the system image was created from. You will not be able to do a system image recovery to a smaller HDD.
  • When you restore your computer from a image backup, it is a complete restoration. You can't choose individual items to restore, and all of your current programs, system settings, and files are replaced.
  • If your backup image is on a external device (ex: USB drive), then make sure it is connected before starting. If USB drive, then also make sure that you have your BIOS settings (ex: Legacy USB) set to allow USB devices at boot.
  • A system image recovery will format everything on each hard drive that was included in a system image, and will only restore what is included (see steps 7-9 in STEP TWO below) in the system image back. Be sure to backup anything that you do not want to lose that is not included in the system image backup first.


STEP ONE

Only if You Renamed the "WindowsImageBackup" Folder


   Note
To be able to have multiple versions of system images saved on the same drive or partition, you would need to rename the older WindowsImageBackup folder from the previously created system image as described in the NOTE box at the top of this tutorial.

If you renamed the WindowsImageBackup folder for the system image version that you wanted to restore, then you will need to do the steps below before you will be able to restore that system image.

1. If you are "Able to Boot" into Windows 7 A) In Windows Explorer, navigate to the renamed (drive letter)\WindowsImageBackup folder location of the system image that you want to restore.

B) If you already have a folder named WindowsImageBackup that is not the system image version that you want to restore, then you will need to right click on it, click on Rename, and type in say WindowsImageBackup-Copy-2 as an example.

C) Now, right click on the renamed system image version (ex: WindowsImageBackup-Copy-1) that you did want to restore, click on Rename, type in WindowsImageBackup an press enter.

D) Go to the STEP TWO section below to do the System Image Recovery.
2. If you are "Not Able to Boot" into Windows 7 A) If you have the system image backup save to an external device, be sure that it is connected now.

B) Open a command prompt at boot.

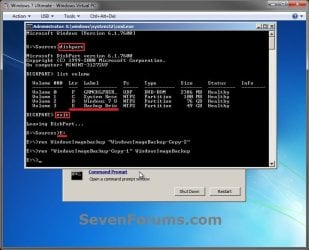
C) In the command prompt, type diskpart and press enter. (see screenshot below)

D) In the command prompt, type list volume and press enter. (see screenshot below)

E) Make note of the drive letter (ex: E: ) that you have the system image backup saved to.

F) In the command prompt, type exit and press enter. (see screenshot below)

G) In the command prompt, type the E: and press enter. (see screenshot below)
NOTE: Subsititute E: for your actual drive letter at step 2E instead.

H) If you already have a folder named "WindowsImageBackup"

NOTE: This is if you already have a folder named WindowsImageBackup that is not the system image version that you want to restore. If so, you would need to rename it to say WindowsImageBackup-Copy-2 as an example.
  • In the command prompt, type the command below and press enter. (see screenshot below)
    NOTE: Substitute WindowsImageBackup-Copy-2 in the command below with any name in quotes that you would like to rename it to instead.
Code:
[B]ren WindowsImageBackup "[COLOR=red]WindowsImageBackup-Copy-2[/COLOR]"[/B]
I) In the command prompt, type the command below and press enter. (see screenshot below)
NOTE: Substitute WindowsImageBackup-Copy-1 in the command below with the actual name of your renamed system image folder in quotes that you want to use to restore instead.
Code:
[B]ren "[COLOR=red]WindowsImageBackup-Copy-1[/COLOR]" WindowsImageBackup[/B]
J) Close the command prompt window. (see screenshot below)

K) Continue on to step 3B in the STEP TWO section below to do the System Image Recovery.
Rename-1.jpg


STEP TWO

To Do the System Image Recovery

1. If you have the system image backup save to an external device, be sure that it is connected and turned on (powered up) now.
A) Start with either step 2 or step 3 below first.
2. From "Backup and Restore" in the Control Panel while in Windows 7 A) Open the Control Panel (icons view), and click on Backup and Restore.

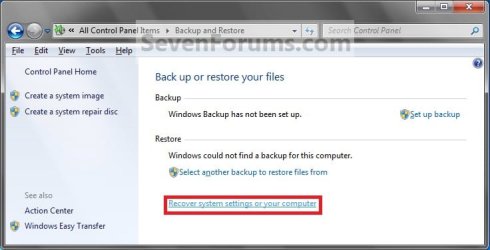
B) Click on the Recover system settings on your computer link. (see screenshot below) Step1.jpg
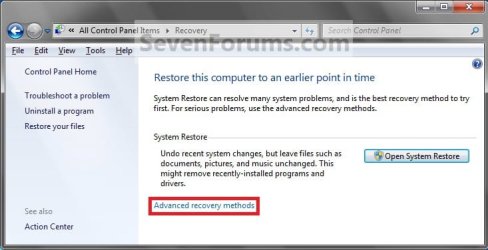
C) Click on the Advanced recovery methods link. (see screenshot below) Step2.jpg
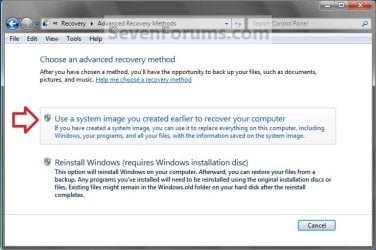
D) Select the Use a system image you created earlier to recover your computer option. (see screenshot below) Step3.jpg
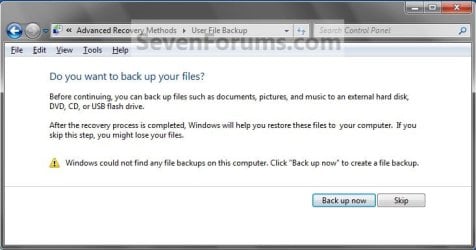
E) Select to either create a Back up now, or to Skip it and continue the system image recovery without backing up any of your current files.
NOTE: If you select Back up now, it will take you to step 6 in this tutorial link to create a User and System File back up of your current files first before continuing to step 1F. (see screenshot below) Step4A.jpg
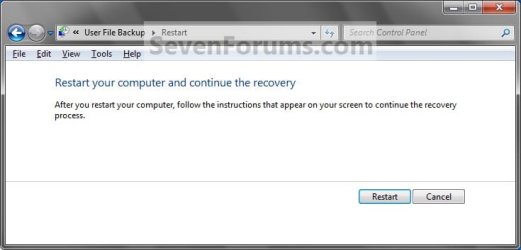
F) Click on Restart. (see screenshot below) Step5A.jpg
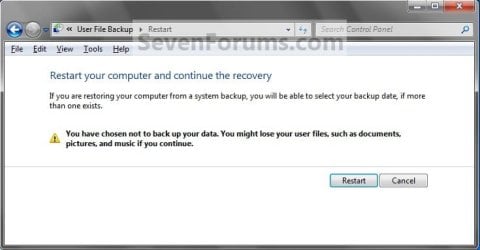
Step5B.jpg

G) Select a languange to be used for your keyboard input and click on Next. (see screenshot below) Step6.jpg
H) Go to step 4.
3. From the System Recovery Options Screen at Boot A) Boot to the System Recovery Options screen from your Windows 7 installation DVD/USB, or System Repair Disc.

B) Select the System Image Recovery option. (see screenshot below) System_Recovery_Options.jpg
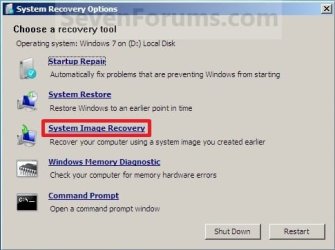
4. If you saved the system image backup to a set of DVDs, then insert the last DVD from the set when prompted. If not, go to step 5 for a system image backup on a hard drive. A) Go to step 7 below.
5. To Use the Latest System Image A) Select (dot) Use the latest available system image and click on Next. (see screenshot below) Step7.jpg
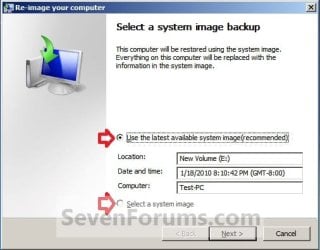
B) Go to step 7.
6. To Select a System Image A) Select (dot) Select a system image, and click on Next. (see screenshot above)
NOTE: This is if the system image that you want to use is not listed here and is at another location that you wish to choose from instead.

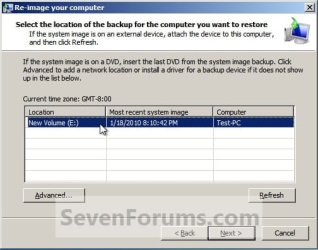
B) Select the location of the backup image for the computer you want to restore from the list, and click on Next. (see screenshot below)

   Note
To add a image from a network location, click on the Advanced button, and on the Search for a system image on the network option.

If the drive cannot be seen to select a system image from, then you may need to use the tutorial below to load your SATA or RAID drivers before it will be seen. You would click on the Advanced button, and on the Install a driver option.

SATA Drivers - Load in Windows 8 System Image Recovery
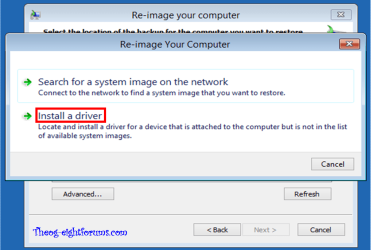
RecoveryBackup004-8.PNG


Step8A.jpg
C) Select the date and time of the system image to restore, and click on Next. (see screenshot below) Step8B.jpg
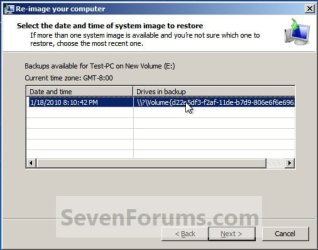
7. To Do a Full System Image Recovery
NOTE: This option will format everything on each hard disk drive that was included in the system image, then restore them as they were when the system image was created.

   Note
Format and repartition disks box:
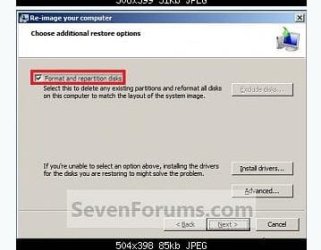
NOTE: Special thanks to MJF for this addition. 1) Grayed out and selected
You are forced to have the whole disk formatted and repartitioned to match the partition structure of the disk the image was made from. This can occur when restoring an image to a new disk or the original disk with a modified partition structure. Data on other partitions on the disk you are restoring to will be lost.

2) Grayed out and unselected
You are not given the option to format and repartition the disk. This will occur if you are restoring Windows from a partition on the same disk.

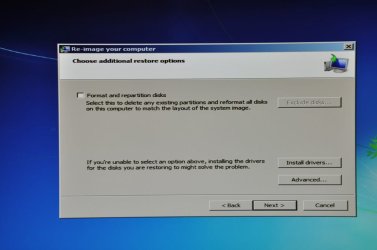
3) Not grayed out and unselected
Here you have the option to select format the whole disk and repartition or not. In this case the disk the image was taken from has a matching partition structure to the disk you are restoring the image to. By not selecting the format and repartition option your image will be restored and other partitions untouched such as valuable data partitions.
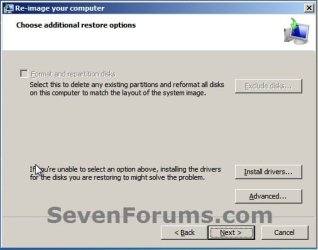
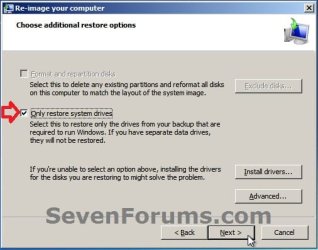
A) Check the Format and repartition disks box (if not grayed out) and uncheck Only restore system drives box (if available), and click on Next. (see screenshots below) Exclude_Disks.jpg
Step9.jpg
System_Drives.jpg
B) Go to step 10.
8. To Only Restore System Drives in System Image Recovery
NOTE: When restoring to the same disk containing data partitions, the Format and repartition disks option may format the data partitions as well. If this is the case and you have the option to leave the Format and repartition disks box unchecked, then initially attempt your image recovery with the Format and repartition disks box unchecked. If recovery is unsuccessful, repeat the process with the format box ticked. A) If available, check the Only restore system drives box, and click on Next. (see screenshot below) System_Drives.jpg
B) Go to step 10.
9. To Exclude Restoring Specific Drives in System Image Recovery
NOTE: Since a system image recovery will format everything on each hard disk drive that was included in a system image, this will allow you to exclude specific disks so that specific disk will not be formated or restored. A) Check the Format and repartition disks box , and click on the Exclude disks button (if not grayed out). (see screenshot below)
NOTE: If the Exclude disks button is grayed out, then the HDD that you are restoring to is empty, or you do not have any disks in the system image that are able to be excluded from being restored. Exclude 001.JPG
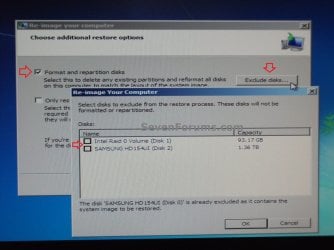
B) Unselect the drives that you want to exclude from being restored.

C) Click on Next.
10. Click on Finish. (see screenshot below) Step10.jpg
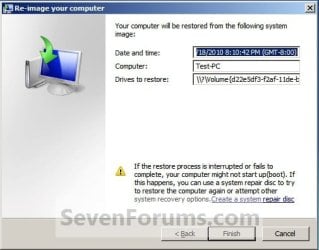
11. Click on Yes. (See screenshot below) Step11.jpg
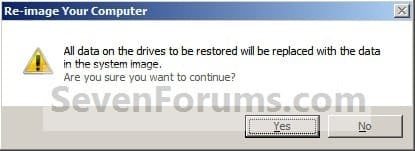
12. You will now see this screenshot below.
NOTE: If you have the backup image on DVDs, have them ready. See step 4 above. Step12.jpg
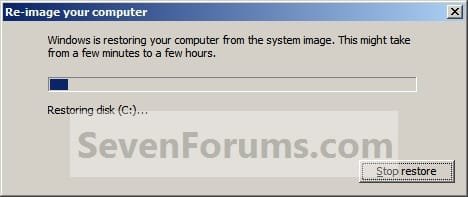
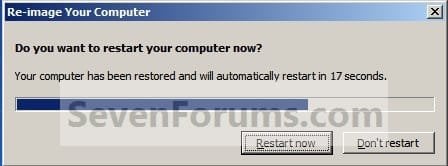
13. When it is through, click on Restart Now to finish. (see screenshot below)
NOTE: Your computer will restart and the backup image restoration will be done. Step13.jpg
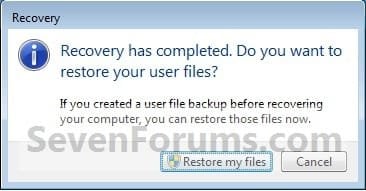
14. If you created a backup in step 1E, then you will now see this option to Restore my files after the computer restarts. (see screenshot below) Step14.jpg
That's it,
Shawn


Attachments

  • Step6A.jpg
    Step6A.jpg
    12.7 KB · Views: 244
Last edited:
No problem Gringoal.

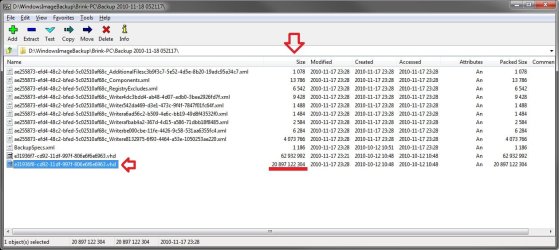
Give this a try instead then. Download and install the free program 7-Zip. Open 7-Zip and navigate to the WindowsImageBackup folder on the H: drive and open the largest VHD file in this folder to be able to extract the files you want from the system image backup.

7-Zip.jpg
 

My Computer My Computer

At a glance

64-bit Windows 11 Pro for WorkstationsIntel i7-8700K OC'd to 5 GHz64 GB (4x16GB) G.SKILL TridentZ RGB DDR4 3600...ASUS ROG-STRIX-GTX1080TI-O11G-GAMING
Computer type
PC/Desktop
Computer Manufacturer/Model Number
Self built custom
OS
64-bit Windows 11 Pro for Workstations
CPU
Intel i7-8700K OC'd to 5 GHz
Motherboard
ASUS ROG Maximus XI Formula Z390
Memory
64 GB (4x16GB) G.SKILL TridentZ RGB DDR4 3600 MHz
Graphics Card(s)
ASUS ROG-STRIX-GTX1080TI-O11G-GAMING
Sound Card
Integrated
Monitor(s) Displays
2 x Samsung Odyssey G7 27"
Screen Resolution
2560x1440
Hard Drives
1TB Samsung 990 PRO M.2,
4TB Samsung 990 PRO PRO M.2,
TerraMaster F8 SSD Plus NAS
PSU
Seasonic Prime Titanium 850W
Case
Thermaltake Core P3
Cooling
Corsair Hydro H115i
Keyboard
Logitech wireless K800
Mouse
Logitech MX Master 4
Internet Speed
2 Gb/s Download and 100 Mb/s Upload
Antivirus
Malwarebyte Anti-Malware Premium
Browser
Google Chrome
Other Info
Logitech Z625 speaker system,
Logitech BRIO 4K Pro webcam,
HP Color LaserJet Pro MFP M477fdn,
APC SMART-UPS RT 1000 XL - SURT1000XLI,
Galaxy S23 Plus phone
Thanks.

Sorry to be dumb but I am nervous about loosing the Image back up. From 7-zip do I then extract it to an internal drive or partition?
 

My Computer My Computer

At a glance

Windows 7 Home Premium 64bit.
OS
Windows 7 Home Premium 64bit.
Using 7-Zip like this is only if you wanted to extract specific files to copy from the image back into your installation instead of restoring the whole image though.

I'm not quite sure as to why the image is not showing up at step 5 or 6 (STEP TWO section) in the tutorial.

Double check to make sure that the external USB HDD is connected and try doing it using step 2 in the STEP TWO section while in Windows 7 to see that may work.
 

My Computer My Computer

At a glance

64-bit Windows 11 Pro for WorkstationsIntel i7-8700K OC'd to 5 GHz64 GB (4x16GB) G.SKILL TridentZ RGB DDR4 3600...ASUS ROG-STRIX-GTX1080TI-O11G-GAMING
Computer type
PC/Desktop
Computer Manufacturer/Model Number
Self built custom
OS
64-bit Windows 11 Pro for Workstations
CPU
Intel i7-8700K OC'd to 5 GHz
Motherboard
ASUS ROG Maximus XI Formula Z390
Memory
64 GB (4x16GB) G.SKILL TridentZ RGB DDR4 3600 MHz
Graphics Card(s)
ASUS ROG-STRIX-GTX1080TI-O11G-GAMING
Sound Card
Integrated
Monitor(s) Displays
2 x Samsung Odyssey G7 27"
Screen Resolution
2560x1440
Hard Drives
1TB Samsung 990 PRO M.2,
4TB Samsung 990 PRO PRO M.2,
TerraMaster F8 SSD Plus NAS
PSU
Seasonic Prime Titanium 850W
Case
Thermaltake Core P3
Cooling
Corsair Hydro H115i
Keyboard
Logitech wireless K800
Mouse
Logitech MX Master 4
Internet Speed
2 Gb/s Download and 100 Mb/s Upload
Antivirus
Malwarebyte Anti-Malware Premium
Browser
Google Chrome
Other Info
Logitech Z625 speaker system,
Logitech BRIO 4K Pro webcam,
HP Color LaserJet Pro MFP M477fdn,
APC SMART-UPS RT 1000 XL - SURT1000XLI,
Galaxy S23 Plus phone
I have been trying to do an Image Recovery. The Windows Backup Image is on an external HD. Nothing shows up in the "Re-image your Computer" selection (I do not get the selection box in your System Image Recovery step 3) when I enter the network path in the search network option I get a network connection error. I have tried copying the Image to an Internal drive (not C:) but the same thing happens.

I have just read the "Warnings" in the Create an Image Backup Forum and it says "Only the Windows 7 Professional, Ultimate, and Enterprise Editions can backup to a network location."

Does this mean that as I am using Home Premium I must use the Command Prompt at Boot option, will I be able to access my external drive backup, will it work?
Maybe I can help a little if you like. (I am using Windows Home Premium, 64 bit)
I need to know precisely the steps you followed in the tutorial using the the exact wording from the tutorial. When the screen displays a headings say it's a screen heading.

This is the situation as I understand it:
(1) You have an image folder called WindowsImageBackup on a plugged in external USB HDD.
(2) The image is in the root or first folder level on the external HDD
(3) Before starting recovery you can see your WindowsImageBackup on your external HDD using windows explorer.
OK?????
It appears that you have tried to recover the image ended up pressing the Advanced button and started searching a network??? But your image is not on a network - correct???

Answer the questions then
Describe your steps in detail
 

My Computer My Computer

At a glance

Windows 7x64 Home Premium SP1Intel i7 2600kG.Skill Ripjaws (DDR3-1600) 2x4GBNvidia GeForce GTS 450; Intel HD Graphics 300...
Computer type
PC/Desktop
Computer Manufacturer/Model Number
Own build
OS
Windows 7x64 Home Premium SP1
CPU
Intel i7 2600k
Motherboard
ASUS P8Z68 Deluxe
Memory
G.Skill Ripjaws (DDR3-1600) 2x4GB
Graphics Card(s)
Nvidia GeForce GTS 450; Intel HD Graphics 3000(GT2+)
Monitor(s) Displays
Dell Ultrasharp IPS panel U2311H, Samsung SyncMaster P2350
Screen Resolution
1920x1080
Hard Drives
Samsung 850 Pro SSD 256GB, Samsung SSD 840 120GB, Seagates 1TB Barracuda ST31000528AS x2
PSU
Seasonic M12II 520W
Case
Lian Li Lancool PC-K60
Cooling
Case: 1x120mm, 3x140mm CPU: Hyper 212+
Keyboard
Logitech MK520 (wireless)
Mouse
Logitech MK520
Internet Speed
6-7 Mbps
Antivirus
Norton Security Premium, Malwarebytes on 2 (MSE on 3rd PC)
Browser
FireFox
Other Info
Audio: Logitech Z523 2.1
Thanks, all help is welcome

1)Yes
2)Yes
3)Yes
4)Yes Advanced and yes search network. No it is not on a network but it does not show up in the Select a System Image backup screen display as shown in section 5A of the tutorial, even though the WindowsBackupImage folder has been copied to a spare internal HDD (not C: ) So then I search network just in case.

Steps

WindowsBackupImage folder has never been moved or renamed from it's original location on an external USB3 1TB WD HDD

Control Panel - Recover System settings of your computer
Recovery - Advanced recovery methods
Advanced recovery methods - Use a system image you created earlier to recover your computer
User File Backup - Skip(all data is already backed up on the WD HDD)
Restart
System Recovery Options - Next
Re-image your Computer
Select a system image backup - nothing is showing under the top "Use the latest available system image (recommended)"
Hit the bottom button "Select a system image" - Next
Select the location of the backup for the computer you want to restore - nothing showing - hit Refresh - nothing - hit Advanced
Select search network for Backup Image - returns "a network error occurred"
 

My Computer My Computer

At a glance

Windows 7 Home Premium 64bit.
OS
Windows 7 Home Premium 64bit.
(1)So have you tampered with your original ext HDD image apart from copying the folder?
(2)Did you copy to a root partition of one of your internal HDD. Did the copy take quite a long time as you would expect?
(3)So you should now have 2 WindowsImageBackup folders in 2 root partitions?
 

My Computer My Computer

At a glance

Windows 7x64 Home Premium SP1Intel i7 2600kG.Skill Ripjaws (DDR3-1600) 2x4GBNvidia GeForce GTS 450; Intel HD Graphics 300...
Computer type
PC/Desktop
Computer Manufacturer/Model Number
Own build
OS
Windows 7x64 Home Premium SP1
CPU
Intel i7 2600k
Motherboard
ASUS P8Z68 Deluxe
Memory
G.Skill Ripjaws (DDR3-1600) 2x4GB
Graphics Card(s)
Nvidia GeForce GTS 450; Intel HD Graphics 3000(GT2+)
Monitor(s) Displays
Dell Ultrasharp IPS panel U2311H, Samsung SyncMaster P2350
Screen Resolution
1920x1080
Hard Drives
Samsung 850 Pro SSD 256GB, Samsung SSD 840 120GB, Seagates 1TB Barracuda ST31000528AS x2
PSU
Seasonic M12II 520W
Case
Lian Li Lancool PC-K60
Cooling
Case: 1x120mm, 3x140mm CPU: Hyper 212+
Keyboard
Logitech MK520 (wireless)
Mouse
Logitech MK520
Internet Speed
6-7 Mbps
Antivirus
Norton Security Premium, Malwarebytes on 2 (MSE on 3rd PC)
Browser
FireFox
Other Info
Audio: Logitech Z523 2.1
(1)So have you tampered with your original ext HDD image apart from copying the folder?
(2)Did you copy to a root partition of one of your internal HDD. Did the copy take quite a long time as you would expect?
(3)So you should now have 2 WindowsImageBackup folders in 2 root partitions?
After you answer these I'll tell you what to do next.
 

My Computer My Computer

At a glance

Windows 7x64 Home Premium SP1Intel i7 2600kG.Skill Ripjaws (DDR3-1600) 2x4GBNvidia GeForce GTS 450; Intel HD Graphics 300...
Computer type
PC/Desktop
Computer Manufacturer/Model Number
Own build
OS
Windows 7x64 Home Premium SP1
CPU
Intel i7 2600k
Motherboard
ASUS P8Z68 Deluxe
Memory
G.Skill Ripjaws (DDR3-1600) 2x4GB
Graphics Card(s)
Nvidia GeForce GTS 450; Intel HD Graphics 3000(GT2+)
Monitor(s) Displays
Dell Ultrasharp IPS panel U2311H, Samsung SyncMaster P2350
Screen Resolution
1920x1080
Hard Drives
Samsung 850 Pro SSD 256GB, Samsung SSD 840 120GB, Seagates 1TB Barracuda ST31000528AS x2
PSU
Seasonic M12II 520W
Case
Lian Li Lancool PC-K60
Cooling
Case: 1x120mm, 3x140mm CPU: Hyper 212+
Keyboard
Logitech MK520 (wireless)
Mouse
Logitech MK520
Internet Speed
6-7 Mbps
Antivirus
Norton Security Premium, Malwarebytes on 2 (MSE on 3rd PC)
Browser
FireFox
Other Info
Audio: Logitech Z523 2.1
1) No tampering just copying
2) Yes it was copied directly to the root of the internal HDD. There is nothing else on the drive. Yes it took a very long time the folder is 225GB
3) yes I have two identical WindowsBackupImage root folders on drives F: and H:
 

My Computer My Computer

At a glance

Windows 7 Home Premium 64bit.
OS
Windows 7 Home Premium 64bit.
You attempted a recovery directly from Win 7 advanced recovery options. I have found occasionally it doesn't work. Haven't got a clue why. But do this:

(1) "Create a System Repair disk" from the backup & restore screen if you don't already have one.
(2) BOOT from the System repair disk (get back if you don't know how to do this)
(3) Follow the restore image route you have been doing. Select the Browse select option. You should see your 2 images.
(4) Don't try network searching.
(5) You can press the Refresh for the system to look again.

Do this asap please.
 

My Computer My Computer

At a glance

Windows 7x64 Home Premium SP1Intel i7 2600kG.Skill Ripjaws (DDR3-1600) 2x4GBNvidia GeForce GTS 450; Intel HD Graphics 300...
Computer type
PC/Desktop
Computer Manufacturer/Model Number
Own build
OS
Windows 7x64 Home Premium SP1
CPU
Intel i7 2600k
Motherboard
ASUS P8Z68 Deluxe
Memory
G.Skill Ripjaws (DDR3-1600) 2x4GB
Graphics Card(s)
Nvidia GeForce GTS 450; Intel HD Graphics 3000(GT2+)
Monitor(s) Displays
Dell Ultrasharp IPS panel U2311H, Samsung SyncMaster P2350
Screen Resolution
1920x1080
Hard Drives
Samsung 850 Pro SSD 256GB, Samsung SSD 840 120GB, Seagates 1TB Barracuda ST31000528AS x2
PSU
Seasonic M12II 520W
Case
Lian Li Lancool PC-K60
Cooling
Case: 1x120mm, 3x140mm CPU: Hyper 212+
Keyboard
Logitech MK520 (wireless)
Mouse
Logitech MK520
Internet Speed
6-7 Mbps
Antivirus
Norton Security Premium, Malwarebytes on 2 (MSE on 3rd PC)
Browser
FireFox
Other Info
Audio: Logitech Z523 2.1
Thank again.

I can't do this right now I'm at work, I'll get back to you tomorrow.

Just one thing, I've never booted from a disc on this computer, do I have to change the BIOS or does the system recognise the System repair disc automatically?
 

My Computer My Computer

At a glance

Windows 7 Home Premium 64bit.
OS
Windows 7 Home Premium 64bit.
You do need to temporarily change the BIOS boot order to boot from the DVD.
Good luck. Check to see how went tomorrow.
 

My Computer My Computer

At a glance

Windows 7x64 Home Premium SP1Intel i7 2600kG.Skill Ripjaws (DDR3-1600) 2x4GBNvidia GeForce GTS 450; Intel HD Graphics 300...
Computer type
PC/Desktop
Computer Manufacturer/Model Number
Own build
OS
Windows 7x64 Home Premium SP1
CPU
Intel i7 2600k
Motherboard
ASUS P8Z68 Deluxe
Memory
G.Skill Ripjaws (DDR3-1600) 2x4GB
Graphics Card(s)
Nvidia GeForce GTS 450; Intel HD Graphics 3000(GT2+)
Monitor(s) Displays
Dell Ultrasharp IPS panel U2311H, Samsung SyncMaster P2350
Screen Resolution
1920x1080
Hard Drives
Samsung 850 Pro SSD 256GB, Samsung SSD 840 120GB, Seagates 1TB Barracuda ST31000528AS x2
PSU
Seasonic M12II 520W
Case
Lian Li Lancool PC-K60
Cooling
Case: 1x120mm, 3x140mm CPU: Hyper 212+
Keyboard
Logitech MK520 (wireless)
Mouse
Logitech MK520
Internet Speed
6-7 Mbps
Antivirus
Norton Security Premium, Malwarebytes on 2 (MSE on 3rd PC)
Browser
FireFox
Other Info
Audio: Logitech Z523 2.1
So I Booted from the recovery disc (the Repair Section on the original Windows disc does the same thing) No BIOS setting needed changing the BIOS detected and booted from the disc.
The First screen was the usual System Recovery Options but on NEXT
I got an overlay - Searching for Windows Installations
then a screen I'd never before seen showing

WINDOWS 7 Partition 476837 F:Local Disk

there were two radio button options - Use recovery tools that can help etc......
and - Restore your computer using a System Image - which I buttoned

on Next I was back to the - Select a system Image Backup screen in tutorial step 5A but unfortunately again no image was showing or could be found by clicking - Select a system image.

I do not understand why the Windows Installation reported above shows local disc F: the only data on that drive is the copy of the Image Backup. My Windows 7 installation is obviously on C:

At this point I decided that my OS was so screwed up the only option was to re-install. All data was aready backed up and I was surprised how painless it was, in about 2 hours I was back to a functioning 7 system with email, Firefox and anti Virus installed together with about 60 Windows updates. Just 30 programs to go !

It will be interesting to see, when I have time, whether the old Windows Backup Image Folders will be detected on my two drives now that Windows is clean. I'll let you know.

Thanks Again for all your help and you too Brink
 

My Computer My Computer

At a glance

Windows 7 Home Premium 64bit.
OS
Windows 7 Home Premium 64bit.
My comment about changing BIOS order was for the System Repair disk not the original install DVD.
When you boot into repair mode you are booting a Winre OS and drive letters are generally not the same as in a normal windows boot. However, C: often is C: in both.

We would be interested to see if a reinstall allows you you see the existing images. But also move an old image to a folder and make a new one and see if it can be seen. This info helps others which is why we give our time for free.

Note: In your old images the core of the information is on large *.vhd files. Unless they are corrupt you can extract info using 7-zip as Brink suggested. You should be able to attach them as virtual HDD under disk management without the restore image (locate) fuss and pull off whatever you like.

Windows imaging has never let me down but it has let others down. I never trust any single piece of software including Windows Imaging. I also keep images using a free imaging program which is strongly supported by many members of this forum.
MACRIUM REFLECT Free
 

My Computer My Computer

At a glance

Windows 7x64 Home Premium SP1Intel i7 2600kG.Skill Ripjaws (DDR3-1600) 2x4GBNvidia GeForce GTS 450; Intel HD Graphics 300...
Computer type
PC/Desktop
Computer Manufacturer/Model Number
Own build
OS
Windows 7x64 Home Premium SP1
CPU
Intel i7 2600k
Motherboard
ASUS P8Z68 Deluxe
Memory
G.Skill Ripjaws (DDR3-1600) 2x4GB
Graphics Card(s)
Nvidia GeForce GTS 450; Intel HD Graphics 3000(GT2+)
Monitor(s) Displays
Dell Ultrasharp IPS panel U2311H, Samsung SyncMaster P2350
Screen Resolution
1920x1080
Hard Drives
Samsung 850 Pro SSD 256GB, Samsung SSD 840 120GB, Seagates 1TB Barracuda ST31000528AS x2
PSU
Seasonic M12II 520W
Case
Lian Li Lancool PC-K60
Cooling
Case: 1x120mm, 3x140mm CPU: Hyper 212+
Keyboard
Logitech MK520 (wireless)
Mouse
Logitech MK520
Internet Speed
6-7 Mbps
Antivirus
Norton Security Premium, Malwarebytes on 2 (MSE on 3rd PC)
Browser
FireFox
Other Info
Audio: Logitech Z523 2.1
Hi mjf,

As you requested here's the results of my reinstall(s). After the first one, which I told you about, I checked to see whether Windows would detect the original Images which were still sitting on separate internal and external drives. No luck, exactly the same results as the old OS.

I did not have a chance to re-image in this OS because as I was continuing to load software to bring my system back to normal my Motherboard crashed due to a power module failure !

So after getting that fixed I was back to square one of yet another complete reinstall. Once I got to the basis of a complete system I took another Image, saved it to my internal HD, then started Windows Recover from Image Backup and this time it found the image. I can only assume that the original image became corrupted or damaged when I had problems with my corrupted user account. Although after all my problems I don't know whether I would trust MS to correctly re-install from an image.

Just one last question, I downloaded Macrium Reflect as you suggested, whilst it is free for use with Linux systems it appears that to image Windows systems it requires an add on module which has to be paid for. Is this correct?
 

My Computer My Computer

At a glance

Windows 7 Home Premium 64bit.
OS
Windows 7 Home Premium 64bit.
I use the System Imager in windows and use Macrium to make an image also.
That gives me a double backup.

If the Windows doesn't work then maybe the Macrium will or the other way around. I'll get you a link for the Macrium tutorial.
Be right back.

7 forums Macrium tutorial.
http://www.sevenforums.com/tutorials/73828-imaging-free-macrium.html

Of course you use Windows7 to restore a Windows System Image and the Macrium software to restore a Macrium Image.

I have two hard drives. One for storage so I have plenty of extra room. You only need a new one if you make major updates.
So you can delete an old copy if storage capacity is limited for you. I keep 2-3 copies of each.

Hope that helps.
Mike
 

My Computer My Computer

At a glance

Windows7 Pro 64bit SP-1; Windows XP Pro 32bitIntel Core i7-870 Lynnfield 2.93GHz LGA 1156 ...8GB@1400MHz Crucial Ballistix DDR3-1600 4x2GBASUS ENGTX460 DirectCU/2DI/1GD5 1GB 256-bit G...
Computer Manufacturer/Model Number
Hopalong/ Godzilla
OS
Windows7 Pro 64bit SP-1; Windows XP Pro 32bit
CPU
Intel Core i7-870 Lynnfield 2.93GHz LGA 1156 95W Quad-Core
Motherboard
ASUS P7P55D-E PRO
Memory
8GB@1400MHz Crucial Ballistix DDR3-1600 4x2GB
Graphics Card(s)
ASUS ENGTX460 DirectCU/2DI/1GD5 1GB 256-bit GDDR5
Sound Card
VIA Onboard
Monitor(s) Displays
Asus VS248H-P 24"; Samsung SyncMaster 941BW 19"ws
Screen Resolution
1920x1080; 1440x900
Hard Drives
Samsung 830 120GB SSD
Intel 320 120GB SSD
Western Digital Caviar Black WD7501AALS 750GB 7200 RPM SATA 3.0Gb/s
Western Digital Caviar Black WD6401AALS 640GB 7200 RPM SATA 3.0Gb/s
PSU
COOLER MASTER Silent Pro RS850-AMBAJ3-US 850W Modular
Case
COOLER MASTER HAF 932 RC-932-KKN5-GP Black
Cooling
Scythe "Mugen-2 Rev.B" (2 ScytheKaze-Jyuni PWM fans)
Keyboard
Logitech K-320
Mouse
Kensington
Antivirus
Avast Inernet Suite
Browser
IE 9 ; Chrome
Gringoal,
Re: Macrium
The free version is totally functional and totally free (I use it). The linux element is simply the OS used on the boot recover disc that's all. Even though the recovery environment is Windows 7, linux is used because it's a simple light weight live boot environment. If you have an old version of XP you can build a BartPe recovery disk but if the linux disk is booting I personally wouldn't be bothered.
With Macrium Imaging you select which partitions you want to image in one hit and a SET is made. In recovery you select which partition to recover from the SET, one at a time. So while in Macrium Recovery (linux OS) select a partition, it is recovered then if more than one partition in the set Macrium goes back and asks if you want to select another until you say no and exit.
Macrium (even free) is more flexible in that if it's a partition (eg. recovery) you can image it and recover it). W7 is more restrictive.
The paid version has added capabilities which I can live without. I'm a bit of a sucker when using really good free software. I might buy the paid version (not much $).
RE: W7 Imaging
I use it for most routine images and Macrium as a safety net. But I understand your reticence to use it after being let down. MS only need to do a little more work to make it more robust!!!!!
 

My Computer My Computer

At a glance

Windows 7x64 Home Premium SP1Intel i7 2600kG.Skill Ripjaws (DDR3-1600) 2x4GBNvidia GeForce GTS 450; Intel HD Graphics 300...
Computer type
PC/Desktop
Computer Manufacturer/Model Number
Own build
OS
Windows 7x64 Home Premium SP1
CPU
Intel i7 2600k
Motherboard
ASUS P8Z68 Deluxe
Memory
G.Skill Ripjaws (DDR3-1600) 2x4GB
Graphics Card(s)
Nvidia GeForce GTS 450; Intel HD Graphics 3000(GT2+)
Monitor(s) Displays
Dell Ultrasharp IPS panel U2311H, Samsung SyncMaster P2350
Screen Resolution
1920x1080
Hard Drives
Samsung 850 Pro SSD 256GB, Samsung SSD 840 120GB, Seagates 1TB Barracuda ST31000528AS x2
PSU
Seasonic M12II 520W
Case
Lian Li Lancool PC-K60
Cooling
Case: 1x120mm, 3x140mm CPU: Hyper 212+
Keyboard
Logitech MK520 (wireless)
Mouse
Logitech MK520
Internet Speed
6-7 Mbps
Antivirus
Norton Security Premium, Malwarebytes on 2 (MSE on 3rd PC)
Browser
FireFox
Other Info
Audio: Logitech Z523 2.1
When to select reformat

I have used Windows imaging to make and restore many images.
If I understand it correctly, in step 2, Part 7 the recommendation is to tick the reformat box unless it is grayed out.
reimage1.JPG
I cannot recall ever voluntarily selecting this option as I have a 456GB data partition which I want to remain untouched. I also know that the partition structure is exactly the same as it always was including when the image was made. This approach has never caused me a problem. Sometimes the option is deselected and grayed out.

When I have restored an image to a brand new disk there is no option to deselect as you would expect. You want the action carried out.

I have a dilemma providing advice because it appears to run contrary to this part of the tutorial. When people reimage back to the same disk after selecting the format option they sometimes report losing their data partitions.
 

My Computer My Computer

At a glance

Windows 7x64 Home Premium SP1Intel i7 2600kG.Skill Ripjaws (DDR3-1600) 2x4GBNvidia GeForce GTS 450; Intel HD Graphics 300...
Computer type
PC/Desktop
Computer Manufacturer/Model Number
Own build
OS
Windows 7x64 Home Premium SP1
CPU
Intel i7 2600k
Motherboard
ASUS P8Z68 Deluxe
Memory
G.Skill Ripjaws (DDR3-1600) 2x4GB
Graphics Card(s)
Nvidia GeForce GTS 450; Intel HD Graphics 3000(GT2+)
Monitor(s) Displays
Dell Ultrasharp IPS panel U2311H, Samsung SyncMaster P2350
Screen Resolution
1920x1080
Hard Drives
Samsung 850 Pro SSD 256GB, Samsung SSD 840 120GB, Seagates 1TB Barracuda ST31000528AS x2
PSU
Seasonic M12II 520W
Case
Lian Li Lancool PC-K60
Cooling
Case: 1x120mm, 3x140mm CPU: Hyper 212+
Keyboard
Logitech MK520 (wireless)
Mouse
Logitech MK520
Internet Speed
6-7 Mbps
Antivirus
Norton Security Premium, Malwarebytes on 2 (MSE on 3rd PC)
Browser
FireFox
Other Info
Audio: Logitech Z523 2.1
Hello Michael,

You have it right about checking the format box and then clicking on the Exclude button to select disks not to be formatted in the image recovery. I have added a screenshot at that step to help. :)
 

My Computer My Computer

At a glance

64-bit Windows 11 Pro for WorkstationsIntel i7-8700K OC'd to 5 GHz64 GB (4x16GB) G.SKILL TridentZ RGB DDR4 3600...ASUS ROG-STRIX-GTX1080TI-O11G-GAMING
Computer type
PC/Desktop
Computer Manufacturer/Model Number
Self built custom
OS
64-bit Windows 11 Pro for Workstations
CPU
Intel i7-8700K OC'd to 5 GHz
Motherboard
ASUS ROG Maximus XI Formula Z390
Memory
64 GB (4x16GB) G.SKILL TridentZ RGB DDR4 3600 MHz
Graphics Card(s)
ASUS ROG-STRIX-GTX1080TI-O11G-GAMING
Sound Card
Integrated
Monitor(s) Displays
2 x Samsung Odyssey G7 27"
Screen Resolution
2560x1440
Hard Drives
1TB Samsung 990 PRO M.2,
4TB Samsung 990 PRO PRO M.2,
TerraMaster F8 SSD Plus NAS
PSU
Seasonic Prime Titanium 850W
Case
Thermaltake Core P3
Cooling
Corsair Hydro H115i
Keyboard
Logitech wireless K800
Mouse
Logitech MX Master 4
Internet Speed
2 Gb/s Download and 100 Mb/s Upload
Antivirus
Malwarebyte Anti-Malware Premium
Browser
Google Chrome
Other Info
Logitech Z625 speaker system,
Logitech BRIO 4K Pro webcam,
HP Color LaserJet Pro MFP M477fdn,
APC SMART-UPS RT 1000 XL - SURT1000XLI,
Galaxy S23 Plus phone
Brink,
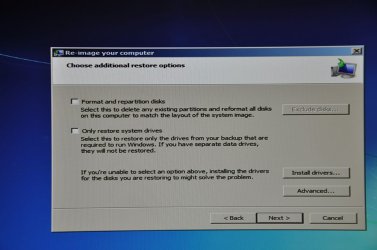
I get presented with the following two screens.
The one below is when I image C: (separate 100MB included by default)
DSC_0054R.jpg

This one is for an image of C: + D: (data partition)
I rarely image both.
DSC_0055R.jpg
The second check box just gives me the option to exclude the D: (data) partition from the reimage.

In both cases I have the option to select the format check box. In the first case I never check the format box because I don't want D: formatted.

Any comments?
 

My Computer My Computer

At a glance

Windows 7x64 Home Premium SP1Intel i7 2600kG.Skill Ripjaws (DDR3-1600) 2x4GBNvidia GeForce GTS 450; Intel HD Graphics 300...
Computer type
PC/Desktop
Computer Manufacturer/Model Number
Own build
OS
Windows 7x64 Home Premium SP1
CPU
Intel i7 2600k
Motherboard
ASUS P8Z68 Deluxe
Memory
G.Skill Ripjaws (DDR3-1600) 2x4GB
Graphics Card(s)
Nvidia GeForce GTS 450; Intel HD Graphics 3000(GT2+)
Monitor(s) Displays
Dell Ultrasharp IPS panel U2311H, Samsung SyncMaster P2350
Screen Resolution
1920x1080
Hard Drives
Samsung 850 Pro SSD 256GB, Samsung SSD 840 120GB, Seagates 1TB Barracuda ST31000528AS x2
PSU
Seasonic M12II 520W
Case
Lian Li Lancool PC-K60
Cooling
Case: 1x120mm, 3x140mm CPU: Hyper 212+
Keyboard
Logitech MK520 (wireless)
Mouse
Logitech MK520
Internet Speed
6-7 Mbps
Antivirus
Norton Security Premium, Malwarebytes on 2 (MSE on 3rd PC)
Browser
FireFox
Other Info
Audio: Logitech Z523 2.1
That's what I get as well.

You could leave only the Only restore system drives box checked, or only check the Format and repartition disks box, click on the Exclude disks button , and check the D: drive. Either way should work to exclude the D: drive for example from being formatted.
 

My Computer My Computer

At a glance

64-bit Windows 11 Pro for WorkstationsIntel i7-8700K OC'd to 5 GHz64 GB (4x16GB) G.SKILL TridentZ RGB DDR4 3600...ASUS ROG-STRIX-GTX1080TI-O11G-GAMING
Computer type
PC/Desktop
Computer Manufacturer/Model Number
Self built custom
OS
64-bit Windows 11 Pro for Workstations
CPU
Intel i7-8700K OC'd to 5 GHz
Motherboard
ASUS ROG Maximus XI Formula Z390
Memory
64 GB (4x16GB) G.SKILL TridentZ RGB DDR4 3600 MHz
Graphics Card(s)
ASUS ROG-STRIX-GTX1080TI-O11G-GAMING
Sound Card
Integrated
Monitor(s) Displays
2 x Samsung Odyssey G7 27"
Screen Resolution
2560x1440
Hard Drives
1TB Samsung 990 PRO M.2,
4TB Samsung 990 PRO PRO M.2,
TerraMaster F8 SSD Plus NAS
PSU
Seasonic Prime Titanium 850W
Case
Thermaltake Core P3
Cooling
Corsair Hydro H115i
Keyboard
Logitech wireless K800
Mouse
Logitech MX Master 4
Internet Speed
2 Gb/s Download and 100 Mb/s Upload
Antivirus
Malwarebyte Anti-Malware Premium
Browser
Google Chrome
Other Info
Logitech Z625 speaker system,
Logitech BRIO 4K Pro webcam,
HP Color LaserJet Pro MFP M477fdn,
APC SMART-UPS RT 1000 XL - SURT1000XLI,
Galaxy S23 Plus phone
Back
Top