System Image Recovery

How to Do a System Image Recovery in Windows 7


   Information
This will show you how to restore your Windows 7 hard disk back to exactly how it was when you created a system image backup.
   Warning

  • You can only do a system image recovery to a HDD that is the same size or larger than the one the system image was created from. You will not be able to do a system image recovery to a smaller HDD.
  • When you restore your computer from a image backup, it is a complete restoration. You can't choose individual items to restore, and all of your current programs, system settings, and files are replaced.
  • If your backup image is on a external device (ex: USB drive), then make sure it is connected before starting. If USB drive, then also make sure that you have your BIOS settings (ex: Legacy USB) set to allow USB devices at boot.
  • A system image recovery will format everything on each hard drive that was included in a system image, and will only restore what is included (see steps 7-9 in STEP TWO below) in the system image back. Be sure to backup anything that you do not want to lose that is not included in the system image backup first.


STEP ONE

Only if You Renamed the "WindowsImageBackup" Folder


   Note
To be able to have multiple versions of system images saved on the same drive or partition, you would need to rename the older WindowsImageBackup folder from the previously created system image as described in the NOTE box at the top of this tutorial.

If you renamed the WindowsImageBackup folder for the system image version that you wanted to restore, then you will need to do the steps below before you will be able to restore that system image.

1. If you are "Able to Boot" into Windows 7 A) In Windows Explorer, navigate to the renamed (drive letter)\WindowsImageBackup folder location of the system image that you want to restore.

B) If you already have a folder named WindowsImageBackup that is not the system image version that you want to restore, then you will need to right click on it, click on Rename, and type in say WindowsImageBackup-Copy-2 as an example.

C) Now, right click on the renamed system image version (ex: WindowsImageBackup-Copy-1) that you did want to restore, click on Rename, type in WindowsImageBackup an press enter.

D) Go to the STEP TWO section below to do the System Image Recovery.
2. If you are "Not Able to Boot" into Windows 7 A) If you have the system image backup save to an external device, be sure that it is connected now.

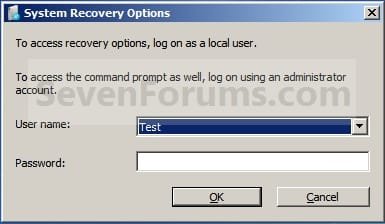
B) Open a command prompt at boot.

C) In the command prompt, type diskpart and press enter. (see screenshot below)

D) In the command prompt, type list volume and press enter. (see screenshot below)

E) Make note of the drive letter (ex: E: ) that you have the system image backup saved to.

F) In the command prompt, type exit and press enter. (see screenshot below)

G) In the command prompt, type the E: and press enter. (see screenshot below)
NOTE: Subsititute E: for your actual drive letter at step 2E instead.

H) If you already have a folder named "WindowsImageBackup"

NOTE: This is if you already have a folder named WindowsImageBackup that is not the system image version that you want to restore. If so, you would need to rename it to say WindowsImageBackup-Copy-2 as an example.
  • In the command prompt, type the command below and press enter. (see screenshot below)
    NOTE: Substitute WindowsImageBackup-Copy-2 in the command below with any name in quotes that you would like to rename it to instead.
Code:
[B]ren WindowsImageBackup "[COLOR=red]WindowsImageBackup-Copy-2[/COLOR]"[/B]
I) In the command prompt, type the command below and press enter. (see screenshot below)
NOTE: Substitute WindowsImageBackup-Copy-1 in the command below with the actual name of your renamed system image folder in quotes that you want to use to restore instead.
Code:
[B]ren "[COLOR=red]WindowsImageBackup-Copy-1[/COLOR]" WindowsImageBackup[/B]
J) Close the command prompt window. (see screenshot below)

K) Continue on to step 3B in the STEP TWO section below to do the System Image Recovery.
Rename-1.jpg


STEP TWO

To Do the System Image Recovery

1. If you have the system image backup save to an external device, be sure that it is connected and turned on (powered up) now.
A) Start with either step 2 or step 3 below first.
2. From "Backup and Restore" in the Control Panel while in Windows 7 A) Open the Control Panel (icons view), and click on Backup and Restore.

B) Click on the Recover system settings on your computer link. (see screenshot below) Step1.jpg
C) Click on the Advanced recovery methods link. (see screenshot below) Step2.jpg
D) Select the Use a system image you created earlier to recover your computer option. (see screenshot below) Step3.jpg
E) Select to either create a Back up now, or to Skip it and continue the system image recovery without backing up any of your current files.
NOTE: If you select Back up now, it will take you to step 6 in this tutorial link to create a User and System File back up of your current files first before continuing to step 1F. (see screenshot below) Step4A.jpg
F) Click on Restart. (see screenshot below) Step5A.jpg

Step5B.jpg

G) Select a languange to be used for your keyboard input and click on Next. (see screenshot below) Step6.jpg
H) Go to step 4.
3. From the System Recovery Options Screen at Boot A) Boot to the System Recovery Options screen from your Windows 7 installation DVD/USB, or System Repair Disc.

B) Select the System Image Recovery option. (see screenshot below) System_Recovery_Options.jpg
4. If you saved the system image backup to a set of DVDs, then insert the last DVD from the set when prompted. If not, go to step 5 for a system image backup on a hard drive. A) Go to step 7 below.
5. To Use the Latest System Image A) Select (dot) Use the latest available system image and click on Next. (see screenshot below) Step7.jpg
B) Go to step 7.
6. To Select a System Image A) Select (dot) Select a system image, and click on Next. (see screenshot above)
NOTE: This is if the system image that you want to use is not listed here and is at another location that you wish to choose from instead.

B) Select the location of the backup image for the computer you want to restore from the list, and click on Next. (see screenshot below)

   Note
To add a image from a network location, click on the Advanced button, and on the Search for a system image on the network option.

If the drive cannot be seen to select a system image from, then you may need to use the tutorial below to load your SATA or RAID drivers before it will be seen. You would click on the Advanced button, and on the Install a driver option.

SATA Drivers - Load in Windows 8 System Image Recovery

RecoveryBackup004-8.PNG


Step8A.jpg
C) Select the date and time of the system image to restore, and click on Next. (see screenshot below) Step8B.jpg
7. To Do a Full System Image Recovery
NOTE: This option will format everything on each hard disk drive that was included in the system image, then restore them as they were when the system image was created.

   Note
Format and repartition disks box:
NOTE: Special thanks to MJF for this addition. 1) Grayed out and selected
You are forced to have the whole disk formatted and repartitioned to match the partition structure of the disk the image was made from. This can occur when restoring an image to a new disk or the original disk with a modified partition structure. Data on other partitions on the disk you are restoring to will be lost.

2) Grayed out and unselected
You are not given the option to format and repartition the disk. This will occur if you are restoring Windows from a partition on the same disk.

3) Not grayed out and unselected
Here you have the option to select format the whole disk and repartition or not. In this case the disk the image was taken from has a matching partition structure to the disk you are restoring the image to. By not selecting the format and repartition option your image will be restored and other partitions untouched such as valuable data partitions.
A) Check the Format and repartition disks box (if not grayed out) and uncheck Only restore system drives box (if available), and click on Next. (see screenshots below) Exclude_Disks.jpg
Step9.jpg
System_Drives.jpg
B) Go to step 10.
8. To Only Restore System Drives in System Image Recovery
NOTE: When restoring to the same disk containing data partitions, the Format and repartition disks option may format the data partitions as well. If this is the case and you have the option to leave the Format and repartition disks box unchecked, then initially attempt your image recovery with the Format and repartition disks box unchecked. If recovery is unsuccessful, repeat the process with the format box ticked. A) If available, check the Only restore system drives box, and click on Next. (see screenshot below) System_Drives.jpg
B) Go to step 10.
9. To Exclude Restoring Specific Drives in System Image Recovery
NOTE: Since a system image recovery will format everything on each hard disk drive that was included in a system image, this will allow you to exclude specific disks so that specific disk will not be formated or restored. A) Check the Format and repartition disks box , and click on the Exclude disks button (if not grayed out). (see screenshot below)
NOTE: If the Exclude disks button is grayed out, then the HDD that you are restoring to is empty, or you do not have any disks in the system image that are able to be excluded from being restored. Exclude 001.JPG
B) Unselect the drives that you want to exclude from being restored.

C) Click on Next.
10. Click on Finish. (see screenshot below) Step10.jpg
11. Click on Yes. (See screenshot below) Step11.jpg
12. You will now see this screenshot below.
NOTE: If you have the backup image on DVDs, have them ready. See step 4 above. Step12.jpg
13. When it is through, click on Restart Now to finish. (see screenshot below)
NOTE: Your computer will restart and the backup image restoration will be done. Step13.jpg
14. If you created a backup in step 1E, then you will now see this option to Restore my files after the computer restarts. (see screenshot below) Step14.jpg
That's it,
Shawn


Attachments

  • Step6A.jpg
    Step6A.jpg
    47.1 KB · Views: 244
Last edited:
Here's all the drives.
 

Attachments

  • Capture.PNG
    Capture.PNG
    288.4 KB · Views: 240

My Computer

OS
Windows 7 Pro 64bit
Format options with Windows Image Restore

When restoring an image you will be presented with two possible basic decisions
A) Format and repartition disks
B) Exclude disks

For decision (A) the format option can be:
1) Grayed out and selected.
You are forced to have the whole disk formatted and repartitioned to match the partition structure of the disk the image was made from.
This can occur when restoring an image to a new disk or the original disk with a modified partition structure.
Data on other partitions on the disk you are restoring to will be lost.

2) Grayed out and unselected.
You are not given the option to format and repartition the disk. This will occur if you are restoring Windows from a partition on the same disk.

3) Not grayed out and unselected.
Here you have the option to select format the whole disk and repartition or not. In this case the disk the image was taken from has a matching partition structure to the disk you are restoring the image to. By not selecting the format and repartition option your image will be restored and other partitions untouched such as valuable data partitions.
This is the most common choice to select.

When the format and repartition option is selected then
B) Exclude disks
should be selected to deselect any other attached disks. Otherwise, they will be formatted.
 

My Computer

Computer type
PC/Desktop
Computer Manufacturer/Model Number
Own build
OS
Windows 7x64 Home Premium SP1
CPU
Intel i7 2600k
Motherboard
ASUS P8Z68 Deluxe
Memory
G.Skill Ripjaws (DDR3-1600) 2x4GB
Graphics Card(s)
Nvidia GeForce GTS 450; Intel HD Graphics 3000(GT2+)
Monitor(s) Displays
Dell Ultrasharp IPS panel U2311H, Samsung SyncMaster P2350
Screen Resolution
1920x1080
Hard Drives
Samsung 850 Pro SSD 256GB, Samsung SSD 840 120GB, Seagates 1TB Barracuda ST31000528AS x2
PSU
Seasonic M12II 520W
Case
Lian Li Lancool PC-K60
Cooling
Case: 1x120mm, 3x140mm CPU: Hyper 212+
Keyboard
Logitech MK520 (wireless)
Mouse
Logitech MK520
Internet Speed
6-7 Mbps
Antivirus
Norton Security Premium, Malwarebytes on 2 (MSE on 3rd PC)
Browser
FireFox
Other Info
Audio: Logitech Z523 2.1
Thank you MJF, I added a note in the tutorial for this. :)
 

My Computer

Computer type
PC/Desktop
Computer Manufacturer/Model Number
Self built custom
OS
64-bit Windows 11 Pro for Workstations
CPU
Intel i7-8700K OC'd to 5 GHz
Motherboard
ASUS ROG Maximus XI Formula Z390
Memory
64 GB (4x16GB) G.SKILL TridentZ RGB DDR4 3600 MHz
Graphics Card(s)
ASUS ROG-STRIX-GTX1080TI-O11G-GAMING
Sound Card
Integrated
Monitor(s) Displays
2 x Samsung Odyssey G7 27"
Screen Resolution
2560x1440
Hard Drives
1TB Samsung 990 PRO M.2,
4TB Samsung 990 PRO PRO M.2,
TerraMaster F8 SSD Plus NAS
PSU
Seasonic Prime Titanium 850W
Case
Thermaltake Core P3
Cooling
Corsair Hydro H115i
Keyboard
Logitech wireless K800
Mouse
Logitech MX Master 4
Internet Speed
2 Gb/s Download and 100 Mb/s Upload
Antivirus
Malwarebyte Anti-Malware Premium
Browser
Google Chrome
Other Info
Logitech Z625 speaker system,
Logitech BRIO 4K Pro webcam,
HP Color LaserJet Pro MFP M477fdn,
APC SMART-UPS RT 1000 XL - SURT1000XLI,
Galaxy S23 Plus phone
When restoring an image you will be presented with two possible basic decisions
A) Format and repartition disks
B) Exclude disks

For decision (A) the format option can be:
1) Grayed out and selected.
You are forced to have the whole disk formatted and repartitioned to match the partition structure of the disk the image was made from.
This can occur when restoring an image to a new disk or the original disk with a modified partition structure.
Data on other partitions on the disk you are restoring to will be lost.

2) Grayed out and unselected.
You are not given the option to format and repartition the disk. This will occur if you are restoring Windows from a partition on the same disk.

3) Not grayed out and unselected.
Here you have the option to select format the whole disk and repartition or not. In this case the disk the image was taken from has a matching partition structure to the disk you are restoring the image to. By not selecting the format and repartition option your image will be restored and other partitions untouched such as valuable data partitions.
This is the most common choice to select.

When the format and repartition option is selected then
B) Exclude disks
should be selected to deselect any other attached disks. Otherwise, they will be formatted.

Yes, good info, thx.
However I don't get to this step when I select any one of the system images that were made before I took it in for service.
When I select one of these system images and hit next, I get the error message instead of the Format Options screen. :(
 

My Computer

OS
Windows 7 Pro 64bit
What does vssadmin list shadows give you?
 

My Computers

System One System Two

  • Computer type
    PC/Desktop
    OS
    7 X64
    CPU
    i5 8400
    Motherboard
    gigabyte b365m ds3h
    Memory
    2x8gb 3200mhz
    Hard Drives
    various
    PSU
    pure power 11 400w cm
    Case
    Coolermaster
    Cooling
    cryorig m9i
  • Computer type
    PC/Desktop
    OS
    7x64
    CPU
    g5400
    Motherboard
    ga b365m ds3h
    Memory
    8gb ddr4 2400
    PSU
    xfx pro 450w
Why did you run the command from the Rec env ?

Run it in Windows.

list shadows.jpg
 

My Computers

System One System Two

  • Computer type
    PC/Desktop
    OS
    7 X64
    CPU
    i5 8400
    Motherboard
    gigabyte b365m ds3h
    Memory
    2x8gb 3200mhz
    Hard Drives
    various
    PSU
    pure power 11 400w cm
    Case
    Coolermaster
    Cooling
    cryorig m9i
  • Computer type
    PC/Desktop
    OS
    7x64
    CPU
    g5400
    Motherboard
    ga b365m ds3h
    Memory
    8gb ddr4 2400
    PSU
    xfx pro 450w
Your instructions implied the steps must be from outside windows.

Anyway, here's a sample of Shadows copies around the time frame I'm interested in.
Are Shadow copies complete system images or just some incremental file/folder changes?
And how do use these to restore my system?
By system here I mean the entire environment including O/S, apps, registry, etc which is what I assumed a system image is.
Thx!
 

Attachments

  • ShadowCopy.PNG
    ShadowCopy.PNG
    24 KB · Views: 513

My Computer

OS
Windows 7 Pro 64bit
Yes that looks promising.

I assume the o/s letters are the same - i.e. your new installation calls itself C - and your old installation also called itself C

You need to do this outside, so d/l this file - unzip it with 7-zip , then rt click and run as admin on RunMeAsAmin.cmd. It will make a boot disc for you in a few seconds.

View attachment Here.zip

Boot it up.

From the menu select Explore and find the leters for your Backup drive and your Windows drive.

Then click Shadows - Shadowpe program will pop up.

Select your backup drive in the dropdown, then click Get Shadows. In a few secs they will pop up. Higher numbers are more recent. Have a look thru and find the one you want to restore from.

Go back to the Explore app:

If you have enough space on your windows drive you can make a folder on the windows drive called windows.old and
move these folders from your windows drive into it:

Windows, Users, Program Data , Program Files, Program Files (x86).

If you don't have enough space , just delete those 5 folders from your windows drive.

Copy the 5 folders listed above from your selected Shadow copy onto your Windows drive.

It isn't very quick - took me 30 mins last time I did it.

You need to check all has copied across - so expand the copied folders , and check against the ones in your Shadow Copy - anything missing - just copy it across.

Exit Shadowpe app.

Reboot pc.

You're done .
 
Last edited:

My Computers

System One System Two

  • Computer type
    PC/Desktop
    OS
    7 X64
    CPU
    i5 8400
    Motherboard
    gigabyte b365m ds3h
    Memory
    2x8gb 3200mhz
    Hard Drives
    various
    PSU
    pure power 11 400w cm
    Case
    Coolermaster
    Cooling
    cryorig m9i
  • Computer type
    PC/Desktop
    OS
    7x64
    CPU
    g5400
    Motherboard
    ga b365m ds3h
    Memory
    8gb ddr4 2400
    PSU
    xfx pro 450w
I just made a small change to Here.zip - new one attached to previous post. It will make copying slightly easier for you.
 

My Computers

System One System Two

  • Computer type
    PC/Desktop
    OS
    7 X64
    CPU
    i5 8400
    Motherboard
    gigabyte b365m ds3h
    Memory
    2x8gb 3200mhz
    Hard Drives
    various
    PSU
    pure power 11 400w cm
    Case
    Coolermaster
    Cooling
    cryorig m9i
  • Computer type
    PC/Desktop
    OS
    7x64
    CPU
    g5400
    Motherboard
    ga b365m ds3h
    Memory
    8gb ddr4 2400
    PSU
    xfx pro 450w
Hi.
I unzipped, rt clicked on RunMeAsAdmin.cmd and selected Run as Administrator.
New window opened up with msg "Setting up....." but nothing happens after that.
I noticed the window shows "C:\Windows\System32\cmd.exe".
My environment is 64 bit - that make a difference?
:confused:
 

My Computer

OS
Windows 7 Pro 64bit
You can try the new one I posted - adjusted it slightly so should be fine for 64 bit Here.zip

Just tested it on my 64 bit 7 - works perfectly.
 

My Computers

System One System Two

  • Computer type
    PC/Desktop
    OS
    7 X64
    CPU
    i5 8400
    Motherboard
    gigabyte b365m ds3h
    Memory
    2x8gb 3200mhz
    Hard Drives
    various
    PSU
    pure power 11 400w cm
    Case
    Coolermaster
    Cooling
    cryorig m9i
  • Computer type
    PC/Desktop
    OS
    7x64
    CPU
    g5400
    Motherboard
    ga b365m ds3h
    Memory
    8gb ddr4 2400
    PSU
    xfx pro 450w
The idea is to save you a moderate size download.

It uses winRE.wim - which is on your windows partition in a hidden folder folder named Recovery.

If you don't have that - then it won't work. I don't know why you wouldn't have winre.wim there - unless the oem has removed it and is using their own version which they have put somewhere else - e.g. on an oem partition. But..from your disk management screenie - it looks like a normal installation.

You should get this when you boot it up:

Click Explore on the menu

HERE1.png

Get your drive letters from the explorer window, then click Shadows on the Menu - select your backup drive on the dropdown , click " Get Shadows"

HERE2.png

It will take a few secs to find them all , then this pops up:

HERE3.png

Click on the mount points above to acces the contents of each Shadow.
 

My Computers

System One System Two

  • Computer type
    PC/Desktop
    OS
    7 X64
    CPU
    i5 8400
    Motherboard
    gigabyte b365m ds3h
    Memory
    2x8gb 3200mhz
    Hard Drives
    various
    PSU
    pure power 11 400w cm
    Case
    Coolermaster
    Cooling
    cryorig m9i
  • Computer type
    PC/Desktop
    OS
    7x64
    CPU
    g5400
    Motherboard
    ga b365m ds3h
    Memory
    8gb ddr4 2400
    PSU
    xfx pro 450w
You can try the new one I posted - adjusted it slightly so should be fine for 64 bit Here.zip

Just tested it on my 64 bit 7 - works perfectly.

Interesting - it gets further on one pc but not the other even though they are supposedly identical.

So, I got to the Making iso stage but failed - cannot find specified path.
I did press key to continue but there was no image file to burn.
Cheers.
 

Attachments

  • Capture- make ISO.PNG
    Capture- make ISO.PNG
    134.2 KB · Views: 159
  • Capture-ImageBurner.PNG
    Capture-ImageBurner.PNG
    79.5 KB · Views: 230

My Computer

OS
Windows 7 Pro 64bit
Curious.

Have a look in Here\ISO\sources folder - if there is a boot.wim in there - you can make an .iso from the ISO folder.

View attachment BootIsoMakerV2.zip

EDIT - are you running it from your downloads folder?

You will have better luck extracting the 7-zip file directly onto your drive - so you will have C:\Here
 

My Computers

System One System Two

  • Computer type
    PC/Desktop
    OS
    7 X64
    CPU
    i5 8400
    Motherboard
    gigabyte b365m ds3h
    Memory
    2x8gb 3200mhz
    Hard Drives
    various
    PSU
    pure power 11 400w cm
    Case
    Coolermaster
    Cooling
    cryorig m9i
  • Computer type
    PC/Desktop
    OS
    7x64
    CPU
    g5400
    Motherboard
    ga b365m ds3h
    Memory
    8gb ddr4 2400
    PSU
    xfx pro 450w
what should i do if the Format and repartition disks is grey out and uncheck?
 

My Computer

OS
Windows Seven home premium 64
Hello DesDevil, and welcome to Seven Forums.

When you are not given the option to format and repartition the disk, then this will usually occur if you are restoring Windows from a partition on the same hard drive.


What other options do you have listed that are not grayed? You could compare to the screenshots in steps 7-9 of STEP TWO in the tutorial to help make it easier.
 

My Computer

Computer type
PC/Desktop
Computer Manufacturer/Model Number
Self built custom
OS
64-bit Windows 11 Pro for Workstations
CPU
Intel i7-8700K OC'd to 5 GHz
Motherboard
ASUS ROG Maximus XI Formula Z390
Memory
64 GB (4x16GB) G.SKILL TridentZ RGB DDR4 3600 MHz
Graphics Card(s)
ASUS ROG-STRIX-GTX1080TI-O11G-GAMING
Sound Card
Integrated
Monitor(s) Displays
2 x Samsung Odyssey G7 27"
Screen Resolution
2560x1440
Hard Drives
1TB Samsung 990 PRO M.2,
4TB Samsung 990 PRO PRO M.2,
TerraMaster F8 SSD Plus NAS
PSU
Seasonic Prime Titanium 850W
Case
Thermaltake Core P3
Cooling
Corsair Hydro H115i
Keyboard
Logitech wireless K800
Mouse
Logitech MX Master 4
Internet Speed
2 Gb/s Download and 100 Mb/s Upload
Antivirus
Malwarebyte Anti-Malware Premium
Browser
Google Chrome
Other Info
Logitech Z625 speaker system,
Logitech BRIO 4K Pro webcam,
HP Color LaserJet Pro MFP M477fdn,
APC SMART-UPS RT 1000 XL - SURT1000XLI,
Galaxy S23 Plus phone
Thats the only choice i had..i dunno why
so if i were to move the windows image backup to an external harddisk would it work?
 

My Computer

OS
Windows Seven home premium 64
Is the HDD that you are restoring to part of a RAID or anything other than a normal SATA connection?

If so, then you could click on Install Drivers, and select your RAID drivers to load them and see if that may allow you to have any other option.

If not, then you can still click on Next to proceed with the System Image Recovery.
 

My Computer

Computer type
PC/Desktop
Computer Manufacturer/Model Number
Self built custom
OS
64-bit Windows 11 Pro for Workstations
CPU
Intel i7-8700K OC'd to 5 GHz
Motherboard
ASUS ROG Maximus XI Formula Z390
Memory
64 GB (4x16GB) G.SKILL TridentZ RGB DDR4 3600 MHz
Graphics Card(s)
ASUS ROG-STRIX-GTX1080TI-O11G-GAMING
Sound Card
Integrated
Monitor(s) Displays
2 x Samsung Odyssey G7 27"
Screen Resolution
2560x1440
Hard Drives
1TB Samsung 990 PRO M.2,
4TB Samsung 990 PRO PRO M.2,
TerraMaster F8 SSD Plus NAS
PSU
Seasonic Prime Titanium 850W
Case
Thermaltake Core P3
Cooling
Corsair Hydro H115i
Keyboard
Logitech wireless K800
Mouse
Logitech MX Master 4
Internet Speed
2 Gb/s Download and 100 Mb/s Upload
Antivirus
Malwarebyte Anti-Malware Premium
Browser
Google Chrome
Other Info
Logitech Z625 speaker system,
Logitech BRIO 4K Pro webcam,
HP Color LaserJet Pro MFP M477fdn,
APC SMART-UPS RT 1000 XL - SURT1000XLI,
Galaxy S23 Plus phone
what should i do if the Format and repartition disks is grey out and uncheck?
As Brink points out the formatting is not an option when the image resides on a partition of the same disk.
In addition to the answer to Brink's last question........
Are you trying to restore to a dynamic disk?

Generally, I think the option you are presented with is the safest. Other partitions should be protected.
 

My Computer

Computer type
PC/Desktop
Computer Manufacturer/Model Number
Own build
OS
Windows 7x64 Home Premium SP1
CPU
Intel i7 2600k
Motherboard
ASUS P8Z68 Deluxe
Memory
G.Skill Ripjaws (DDR3-1600) 2x4GB
Graphics Card(s)
Nvidia GeForce GTS 450; Intel HD Graphics 3000(GT2+)
Monitor(s) Displays
Dell Ultrasharp IPS panel U2311H, Samsung SyncMaster P2350
Screen Resolution
1920x1080
Hard Drives
Samsung 850 Pro SSD 256GB, Samsung SSD 840 120GB, Seagates 1TB Barracuda ST31000528AS x2
PSU
Seasonic M12II 520W
Case
Lian Li Lancool PC-K60
Cooling
Case: 1x120mm, 3x140mm CPU: Hyper 212+
Keyboard
Logitech MK520 (wireless)
Mouse
Logitech MK520
Internet Speed
6-7 Mbps
Antivirus
Norton Security Premium, Malwarebytes on 2 (MSE on 3rd PC)
Browser
FireFox
Other Info
Audio: Logitech Z523 2.1
Back
Top