System Image Recovery

How to Do a System Image Recovery in Windows 7


   Information
This will show you how to restore your Windows 7 hard disk back to exactly how it was when you created a system image backup.
   Warning

  • You can only do a system image recovery to a HDD that is the same size or larger than the one the system image was created from. You will not be able to do a system image recovery to a smaller HDD.
  • When you restore your computer from a image backup, it is a complete restoration. You can't choose individual items to restore, and all of your current programs, system settings, and files are replaced.
  • If your backup image is on a external device (ex: USB drive), then make sure it is connected before starting. If USB drive, then also make sure that you have your BIOS settings (ex: Legacy USB) set to allow USB devices at boot.
  • A system image recovery will format everything on each hard drive that was included in a system image, and will only restore what is included (see steps 7-9 in STEP TWO below) in the system image back. Be sure to backup anything that you do not want to lose that is not included in the system image backup first.


STEP ONE

Only if You Renamed the "WindowsImageBackup" Folder


   Note
To be able to have multiple versions of system images saved on the same drive or partition, you would need to rename the older WindowsImageBackup folder from the previously created system image as described in the NOTE box at the top of this tutorial.

If you renamed the WindowsImageBackup folder for the system image version that you wanted to restore, then you will need to do the steps below before you will be able to restore that system image.

1. If you are "Able to Boot" into Windows 7 A) In Windows Explorer, navigate to the renamed (drive letter)\WindowsImageBackup folder location of the system image that you want to restore.

B) If you already have a folder named WindowsImageBackup that is not the system image version that you want to restore, then you will need to right click on it, click on Rename, and type in say WindowsImageBackup-Copy-2 as an example.

C) Now, right click on the renamed system image version (ex: WindowsImageBackup-Copy-1) that you did want to restore, click on Rename, type in WindowsImageBackup an press enter.

D) Go to the STEP TWO section below to do the System Image Recovery.
2. If you are "Not Able to Boot" into Windows 7 A) If you have the system image backup save to an external device, be sure that it is connected now.

B) Open a command prompt at boot.

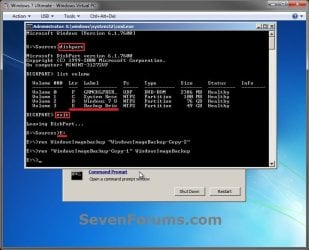
C) In the command prompt, type diskpart and press enter. (see screenshot below)

D) In the command prompt, type list volume and press enter. (see screenshot below)

E) Make note of the drive letter (ex: E: ) that you have the system image backup saved to.

F) In the command prompt, type exit and press enter. (see screenshot below)

G) In the command prompt, type the E: and press enter. (see screenshot below)
NOTE: Subsititute E: for your actual drive letter at step 2E instead.

H) If you already have a folder named "WindowsImageBackup"

NOTE: This is if you already have a folder named WindowsImageBackup that is not the system image version that you want to restore. If so, you would need to rename it to say WindowsImageBackup-Copy-2 as an example.
  • In the command prompt, type the command below and press enter. (see screenshot below)
    NOTE: Substitute WindowsImageBackup-Copy-2 in the command below with any name in quotes that you would like to rename it to instead.
Code:
[B]ren WindowsImageBackup "[COLOR=red]WindowsImageBackup-Copy-2[/COLOR]"[/B]
I) In the command prompt, type the command below and press enter. (see screenshot below)
NOTE: Substitute WindowsImageBackup-Copy-1 in the command below with the actual name of your renamed system image folder in quotes that you want to use to restore instead.
Code:
[B]ren "[COLOR=red]WindowsImageBackup-Copy-1[/COLOR]" WindowsImageBackup[/B]
J) Close the command prompt window. (see screenshot below)

K) Continue on to step 3B in the STEP TWO section below to do the System Image Recovery.
Rename-1.jpg


STEP TWO

To Do the System Image Recovery

1. If you have the system image backup save to an external device, be sure that it is connected and turned on (powered up) now.
A) Start with either step 2 or step 3 below first.
2. From "Backup and Restore" in the Control Panel while in Windows 7 A) Open the Control Panel (icons view), and click on Backup and Restore.

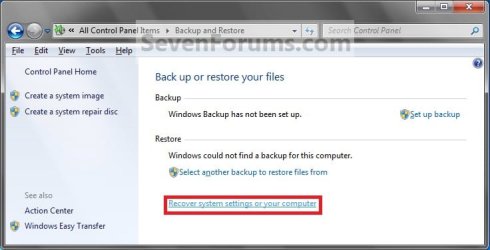
B) Click on the Recover system settings on your computer link. (see screenshot below) Step1.jpg
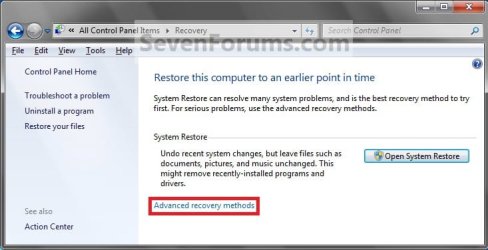
C) Click on the Advanced recovery methods link. (see screenshot below) Step2.jpg
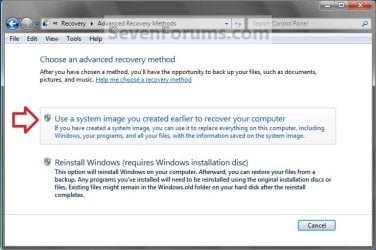
D) Select the Use a system image you created earlier to recover your computer option. (see screenshot below) Step3.jpg
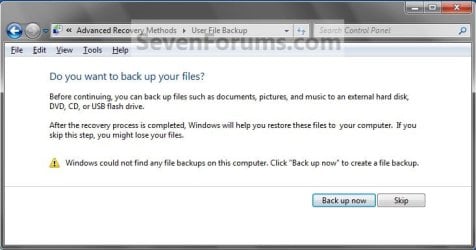
E) Select to either create a Back up now, or to Skip it and continue the system image recovery without backing up any of your current files.
NOTE: If you select Back up now, it will take you to step 6 in this tutorial link to create a User and System File back up of your current files first before continuing to step 1F. (see screenshot below) Step4A.jpg
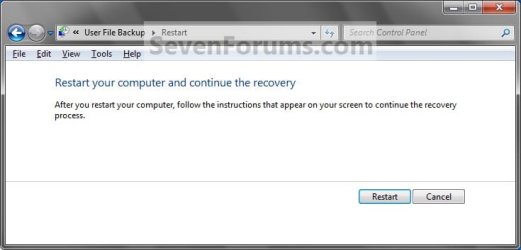
F) Click on Restart. (see screenshot below) Step5A.jpg
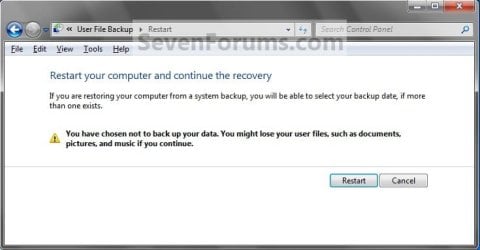
Step5B.jpg

G) Select a languange to be used for your keyboard input and click on Next. (see screenshot below) Step6.jpg
H) Go to step 4.
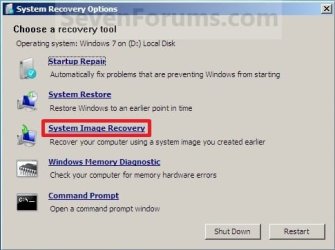
3. From the System Recovery Options Screen at Boot A) Boot to the System Recovery Options screen from your Windows 7 installation DVD/USB, or System Repair Disc.

B) Select the System Image Recovery option. (see screenshot below) System_Recovery_Options.jpg
4. If you saved the system image backup to a set of DVDs, then insert the last DVD from the set when prompted. If not, go to step 5 for a system image backup on a hard drive. A) Go to step 7 below.
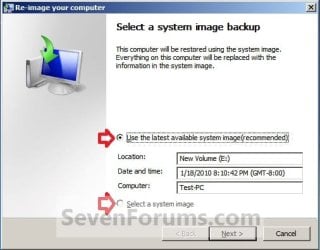
5. To Use the Latest System Image A) Select (dot) Use the latest available system image and click on Next. (see screenshot below) Step7.jpg
B) Go to step 7.
6. To Select a System Image A) Select (dot) Select a system image, and click on Next. (see screenshot above)
NOTE: This is if the system image that you want to use is not listed here and is at another location that you wish to choose from instead.

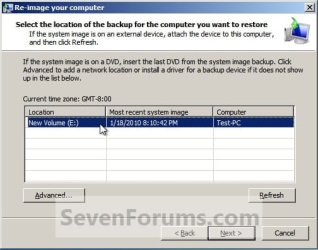
B) Select the location of the backup image for the computer you want to restore from the list, and click on Next. (see screenshot below)

   Note
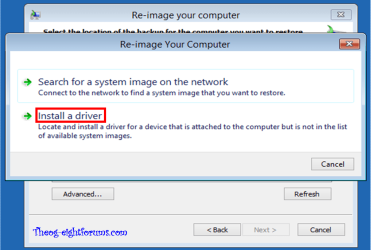
To add a image from a network location, click on the Advanced button, and on the Search for a system image on the network option.

If the drive cannot be seen to select a system image from, then you may need to use the tutorial below to load your SATA or RAID drivers before it will be seen. You would click on the Advanced button, and on the Install a driver option.

SATA Drivers - Load in Windows 8 System Image Recovery
RecoveryBackup004-8.PNG


Step8A.jpg
C) Select the date and time of the system image to restore, and click on Next. (see screenshot below) Step8B.jpg
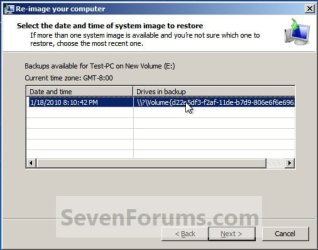
7. To Do a Full System Image Recovery
NOTE: This option will format everything on each hard disk drive that was included in the system image, then restore them as they were when the system image was created.

   Note
Format and repartition disks box:
NOTE: Special thanks to MJF for this addition. 1) Grayed out and selected
You are forced to have the whole disk formatted and repartitioned to match the partition structure of the disk the image was made from. This can occur when restoring an image to a new disk or the original disk with a modified partition structure. Data on other partitions on the disk you are restoring to will be lost.

2) Grayed out and unselected
You are not given the option to format and repartition the disk. This will occur if you are restoring Windows from a partition on the same disk.

3) Not grayed out and unselected
Here you have the option to select format the whole disk and repartition or not. In this case the disk the image was taken from has a matching partition structure to the disk you are restoring the image to. By not selecting the format and repartition option your image will be restored and other partitions untouched such as valuable data partitions.
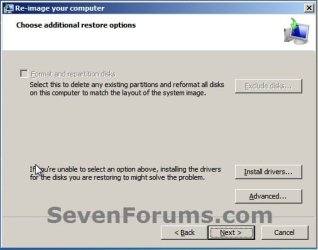
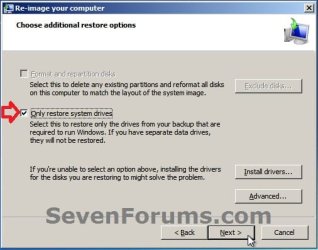
A) Check the Format and repartition disks box (if not grayed out) and uncheck Only restore system drives box (if available), and click on Next. (see screenshots below) Exclude_Disks.jpg
Step9.jpg
System_Drives.jpg
B) Go to step 10.
8. To Only Restore System Drives in System Image Recovery
NOTE: When restoring to the same disk containing data partitions, the Format and repartition disks option may format the data partitions as well. If this is the case and you have the option to leave the Format and repartition disks box unchecked, then initially attempt your image recovery with the Format and repartition disks box unchecked. If recovery is unsuccessful, repeat the process with the format box ticked. A) If available, check the Only restore system drives box, and click on Next. (see screenshot below) System_Drives.jpg
B) Go to step 10.
9. To Exclude Restoring Specific Drives in System Image Recovery
NOTE: Since a system image recovery will format everything on each hard disk drive that was included in a system image, this will allow you to exclude specific disks so that specific disk will not be formated or restored. A) Check the Format and repartition disks box , and click on the Exclude disks button (if not grayed out). (see screenshot below)
NOTE: If the Exclude disks button is grayed out, then the HDD that you are restoring to is empty, or you do not have any disks in the system image that are able to be excluded from being restored. Exclude 001.JPG
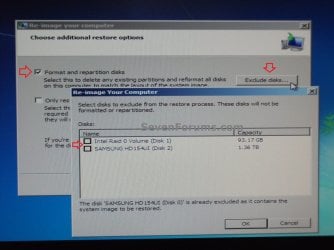
B) Unselect the drives that you want to exclude from being restored.

C) Click on Next.
10. Click on Finish. (see screenshot below) Step10.jpg
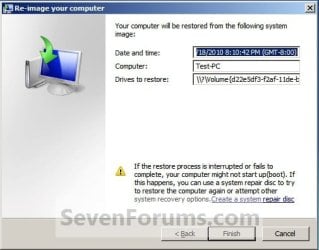
11. Click on Yes. (See screenshot below) Step11.jpg
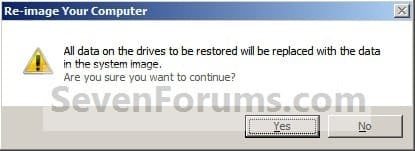
12. You will now see this screenshot below.
NOTE: If you have the backup image on DVDs, have them ready. See step 4 above. Step12.jpg
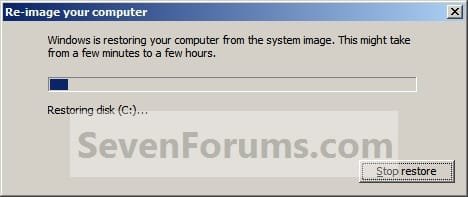
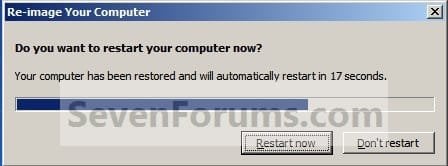
13. When it is through, click on Restart Now to finish. (see screenshot below)
NOTE: Your computer will restart and the backup image restoration will be done. Step13.jpg
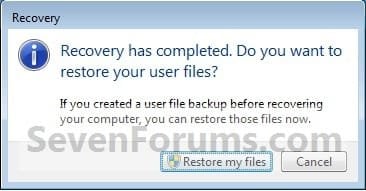
14. If you created a backup in step 1E, then you will now see this option to Restore my files after the computer restarts. (see screenshot below) Step14.jpg
That's it,
Shawn


Attachments

  • Step6A.jpg
    Step6A.jpg
    12.7 KB · Views: 244
Last edited:
after using the system image recovery once, do i need to create another system image? because i am unable to find the previous system image.. or is there anyway that i am able to recover the previous ?
 

My Computer My Computer

At a glance

Windows Seven home premium 64
OS
Windows Seven home premium 64
Hello Desdevil,

Once you created a system image, it should remain at the location that you created/saved it to originally until you manually delete it.
 

My Computer My Computer

At a glance

64-bit Windows 11 Pro for WorkstationsIntel i7-8700K OC'd to 5 GHz64 GB (4x16GB) G.SKILL TridentZ RGB DDR4 3600...ASUS ROG-STRIX-GTX1080TI-O11G-GAMING
Computer type
PC/Desktop
Computer Manufacturer/Model Number
Self built custom
OS
64-bit Windows 11 Pro for Workstations
CPU
Intel i7-8700K OC'd to 5 GHz
Motherboard
ASUS ROG Maximus XI Formula Z390
Memory
64 GB (4x16GB) G.SKILL TridentZ RGB DDR4 3600 MHz
Graphics Card(s)
ASUS ROG-STRIX-GTX1080TI-O11G-GAMING
Sound Card
Integrated
Monitor(s) Displays
2 x Samsung Odyssey G7 27"
Screen Resolution
2560x1440
Hard Drives
1TB Samsung 990 PRO M.2,
4TB Samsung 990 PRO PRO M.2,
TerraMaster F8 SSD Plus NAS
PSU
Seasonic Prime Titanium 850W
Case
Thermaltake Core P3
Cooling
Corsair Hydro H115i
Keyboard
Logitech wireless K800
Mouse
Logitech MX Master 4
Internet Speed
2 Gb/s Download and 100 Mb/s Upload
Antivirus
Malwarebyte Anti-Malware Premium
Browser
Google Chrome
Other Info
Logitech Z625 speaker system,
Logitech BRIO 4K Pro webcam,
HP Color LaserJet Pro MFP M477fdn,
APC SMART-UPS RT 1000 XL - SURT1000XLI,
Galaxy S23 Plus phone
Hello everybody,

First of all, THANX A LOT Shaun for creating such a helpful posts including this one and I'm new here, so please forgive me for any mistake and anything else....
I was sick of installing windows and doing all the work manually again and again. Also it is also very time consuming...so this tutorial was a boon for someone like me.
Actually, i urgently need to verify if my data stored on the other partitions will be lost or not.
I'm having second option under step 7. [2) Grayed out and unselected
You are not given the option to format and repartition the disk. This will occur if you are restoring Windows from a partition on the same disk.
ie. http://www.sevenforums.com/attachme...14791-system-image-recovery-exclude_disks.jpg]

Yes, my backup is stored on the "D" partition and winows is installed on the "C" partiton and I want to know if the data stored on the other partitions like "D","E","F",so on will be lost or not........
Technically I think the data on other partitions should not be in any danger as my image is itself on the other partition(whose formatting for recovery doesnt make any sense) and As it is clearly mentioned that "You are not given the option to format and repartition the disk." maybe it means that I'm not allowed to format and repartition because of the same thing.

But, i want to make sure as i have too much of valuable data for my studies on all of the other partitions that i cannot loose at all costs.
PLEASE someone enlighten me as i want to do the recovery ASAP. Thank you in advance for helping me out....
 

My Computer My Computer

At a glance

Windows 7 Home Premium x64,Windows 7 Ultimate...Intel core i7-2630qm, Intel core 2 duo E8400 ...4GB DDR3, 2GB DDR2Radeon HD6770m 2GB
Computer Manufacturer/Model Number
HP/ HP Pavilion dv6-6121tx, Desktop PC
OS
Windows 7 Home Premium x64,Windows 7 Ultimate 32bit
CPU
Intel core i7-2630qm, Intel core 2 duo E8400 3.00Ghz
Motherboard
lappy:Hewlett-Packard 3388, PC: Intel DG-33Fb
Memory
4GB DDR3, 2GB DDR2
Graphics Card(s)
Radeon HD6770m 2GB
Hard Drives
Western Digital Caviar Black 1TB Wd1002FAEX,
Toshiba 640GB MK6476GSX,
Hitachi 250 GB
Hello Devil on Hunt, and welcome to Seven Forums.

Since your "Format and repartition disks" box is unchecked, then only the C partition, and any other partitions you included in the system image when created, should be formatted and restored to. If you didn't include any other partition, then it should only format and restore to C unless you have changed the size of the C partition from what it was when the system image was created.

You are getting this with both grayed out since the system image backup was saved to another partition on the same HDD that C is on.

To be extra safe, I would recommend to backup anything that you do not want to lose to a separate HDD.

Hope this helps,
Shawn
 

My Computer My Computer

At a glance

64-bit Windows 11 Pro for WorkstationsIntel i7-8700K OC'd to 5 GHz64 GB (4x16GB) G.SKILL TridentZ RGB DDR4 3600...ASUS ROG-STRIX-GTX1080TI-O11G-GAMING
Computer type
PC/Desktop
Computer Manufacturer/Model Number
Self built custom
OS
64-bit Windows 11 Pro for Workstations
CPU
Intel i7-8700K OC'd to 5 GHz
Motherboard
ASUS ROG Maximus XI Formula Z390
Memory
64 GB (4x16GB) G.SKILL TridentZ RGB DDR4 3600 MHz
Graphics Card(s)
ASUS ROG-STRIX-GTX1080TI-O11G-GAMING
Sound Card
Integrated
Monitor(s) Displays
2 x Samsung Odyssey G7 27"
Screen Resolution
2560x1440
Hard Drives
1TB Samsung 990 PRO M.2,
4TB Samsung 990 PRO PRO M.2,
TerraMaster F8 SSD Plus NAS
PSU
Seasonic Prime Titanium 850W
Case
Thermaltake Core P3
Cooling
Corsair Hydro H115i
Keyboard
Logitech wireless K800
Mouse
Logitech MX Master 4
Internet Speed
2 Gb/s Download and 100 Mb/s Upload
Antivirus
Malwarebyte Anti-Malware Premium
Browser
Google Chrome
Other Info
Logitech Z625 speaker system,
Logitech BRIO 4K Pro webcam,
HP Color LaserJet Pro MFP M477fdn,
APC SMART-UPS RT 1000 XL - SURT1000XLI,
Galaxy S23 Plus phone
Thank you very much Shawn for clearing the doubt for me....you are simply the best

And yes, I only included "C" drive (OS partition) and a small 199mb "SYSTEM" partition which were already selected by default, so i think i'm good to go.
One last thing, can u or anybody else tell me how can i recover my system if my windows image was stored in a vhd(virtual hard disk) on the home network??

Actually, I'm planning to put my new system image of win7 home premium on the home network which will eliminate the risk of loosing the backup but in win7 home premium i am not allowed to save the image directly on network drive so i'll have to use vhd method.
Any help will be greatly appreciated....thanks a lot
 

My Computer My Computer

At a glance

Windows 7 Home Premium x64,Windows 7 Ultimate...Intel core i7-2630qm, Intel core 2 duo E8400 ...4GB DDR3, 2GB DDR2Radeon HD6770m 2GB
Computer Manufacturer/Model Number
HP/ HP Pavilion dv6-6121tx, Desktop PC
OS
Windows 7 Home Premium x64,Windows 7 Ultimate 32bit
CPU
Intel core i7-2630qm, Intel core 2 duo E8400 3.00Ghz
Motherboard
lappy:Hewlett-Packard 3388, PC: Intel DG-33Fb
Memory
4GB DDR3, 2GB DDR2
Graphics Card(s)
Radeon HD6770m 2GB
Hard Drives
Western Digital Caviar Black 1TB Wd1002FAEX,
Toshiba 640GB MK6476GSX,
Hitachi 250 GB
You're welcome.

Double check to make sure the network location is available and online first. When you get to step 6C in the tutorial, click on the Advanced button, and you should be able to select the image backup from the network location to add it to the list to select and use at step 6D. It may not be available if you did not originally save the image to the network location when the image was originally created though.

For Windows 7 Home Premium, you might consider using something like the free Macrium Reflect. It'll allow you to backup to a network location.
 

My Computer My Computer

At a glance

64-bit Windows 11 Pro for WorkstationsIntel i7-8700K OC'd to 5 GHz64 GB (4x16GB) G.SKILL TridentZ RGB DDR4 3600...ASUS ROG-STRIX-GTX1080TI-O11G-GAMING
Computer type
PC/Desktop
Computer Manufacturer/Model Number
Self built custom
OS
64-bit Windows 11 Pro for Workstations
CPU
Intel i7-8700K OC'd to 5 GHz
Motherboard
ASUS ROG Maximus XI Formula Z390
Memory
64 GB (4x16GB) G.SKILL TridentZ RGB DDR4 3600 MHz
Graphics Card(s)
ASUS ROG-STRIX-GTX1080TI-O11G-GAMING
Sound Card
Integrated
Monitor(s) Displays
2 x Samsung Odyssey G7 27"
Screen Resolution
2560x1440
Hard Drives
1TB Samsung 990 PRO M.2,
4TB Samsung 990 PRO PRO M.2,
TerraMaster F8 SSD Plus NAS
PSU
Seasonic Prime Titanium 850W
Case
Thermaltake Core P3
Cooling
Corsair Hydro H115i
Keyboard
Logitech wireless K800
Mouse
Logitech MX Master 4
Internet Speed
2 Gb/s Download and 100 Mb/s Upload
Antivirus
Malwarebyte Anti-Malware Premium
Browser
Google Chrome
Other Info
Logitech Z625 speaker system,
Logitech BRIO 4K Pro webcam,
HP Color LaserJet Pro MFP M477fdn,
APC SMART-UPS RT 1000 XL - SURT1000XLI,
Galaxy S23 Plus phone
Hi Admin/All,

I have some simple question for you guys. In case I my PC is crashed and I have a backup copy of the image file to my NAS (since I have created the Windows Backup and Restore to network drive), is it possible to run the CD recovery to when boot up and locate the Windows image file to a network drive? Or is it only by using the CD/DVD and external USB drive? I know that I can run the Windows Restore if I can log on to the Windows. What if I cannot, is this possible?

Please advice. Thank you so much.
 

My Computer My Computer

At a glance

Windows Home Premium 64 bit3GB
Computer Manufacturer/Model Number
Toshiba
OS
Windows Home Premium 64 bit
Memory
3GB
Hello Eron, and welcome to Seven Forums.

You will only be able to use the image backup if it's located where you originally saved it at. If you move it, then there's a good chance Windows will not see it to be able to do a System Image Recovery with.

If you cannot log on to Windows, then you could use step 3 in the STEP TWO section to do a System Image Recovery at boot instead.

Hope this helps,
Shawn
 
Last edited:

My Computer My Computer

At a glance

64-bit Windows 11 Pro for WorkstationsIntel i7-8700K OC'd to 5 GHz64 GB (4x16GB) G.SKILL TridentZ RGB DDR4 3600...ASUS ROG-STRIX-GTX1080TI-O11G-GAMING
Computer type
PC/Desktop
Computer Manufacturer/Model Number
Self built custom
OS
64-bit Windows 11 Pro for Workstations
CPU
Intel i7-8700K OC'd to 5 GHz
Motherboard
ASUS ROG Maximus XI Formula Z390
Memory
64 GB (4x16GB) G.SKILL TridentZ RGB DDR4 3600 MHz
Graphics Card(s)
ASUS ROG-STRIX-GTX1080TI-O11G-GAMING
Sound Card
Integrated
Monitor(s) Displays
2 x Samsung Odyssey G7 27"
Screen Resolution
2560x1440
Hard Drives
1TB Samsung 990 PRO M.2,
4TB Samsung 990 PRO PRO M.2,
TerraMaster F8 SSD Plus NAS
PSU
Seasonic Prime Titanium 850W
Case
Thermaltake Core P3
Cooling
Corsair Hydro H115i
Keyboard
Logitech wireless K800
Mouse
Logitech MX Master 4
Internet Speed
2 Gb/s Download and 100 Mb/s Upload
Antivirus
Malwarebyte Anti-Malware Premium
Browser
Google Chrome
Other Info
Logitech Z625 speaker system,
Logitech BRIO 4K Pro webcam,
HP Color LaserJet Pro MFP M477fdn,
APC SMART-UPS RT 1000 XL - SURT1000XLI,
Galaxy S23 Plus phone
Hi Shawn,

Thank you for your suggestions. In fact I have tried this Option 2 and 3, and rebooted the computer using the Boot Recovery window. I have clicked on the Advanced button and locate the NAS drive. In my case, I entered the \\NAS_IP_Address, \\NAS_IP_Address\backup, and [URL="file://\\NAS_IP_Address\backup\PC_Name"]\\NAS_IP_Address\backup\PC_Name[/URL]; however, when I searched for it, this error keeps on prompting "0xh00704cf". I have googled it and find no search results or anything. DO you have any idea?

FYI: I have the image file saved on the \\NAS_IP_Address\backup\PC_Name\

Another question would be is do I have to enter the whole path such "\\NAS_IP_Address\backup\PC_NameWindowsImageBackup? Unfortunately, I have tried this and getting the same results and error.

Please advice. Thanks again in advance.
 

My Computer My Computer

At a glance

Windows Home Premium 64 bit3GB
Computer Manufacturer/Model Number
Toshiba
OS
Windows Home Premium 64 bit
Memory
3GB
Did you move the WindowsImageBackup folder from where it was originally saved to when created?

Were you able to click on Browse and select the NAS instead of manually entering it's location?

Try with the WindowsImageBackup folder in the root directory of the drive instead.
 

My Computer My Computer

At a glance

64-bit Windows 11 Pro for WorkstationsIntel i7-8700K OC'd to 5 GHz64 GB (4x16GB) G.SKILL TridentZ RGB DDR4 3600...ASUS ROG-STRIX-GTX1080TI-O11G-GAMING
Computer type
PC/Desktop
Computer Manufacturer/Model Number
Self built custom
OS
64-bit Windows 11 Pro for Workstations
CPU
Intel i7-8700K OC'd to 5 GHz
Motherboard
ASUS ROG Maximus XI Formula Z390
Memory
64 GB (4x16GB) G.SKILL TridentZ RGB DDR4 3600 MHz
Graphics Card(s)
ASUS ROG-STRIX-GTX1080TI-O11G-GAMING
Sound Card
Integrated
Monitor(s) Displays
2 x Samsung Odyssey G7 27"
Screen Resolution
2560x1440
Hard Drives
1TB Samsung 990 PRO M.2,
4TB Samsung 990 PRO PRO M.2,
TerraMaster F8 SSD Plus NAS
PSU
Seasonic Prime Titanium 850W
Case
Thermaltake Core P3
Cooling
Corsair Hydro H115i
Keyboard
Logitech wireless K800
Mouse
Logitech MX Master 4
Internet Speed
2 Gb/s Download and 100 Mb/s Upload
Antivirus
Malwarebyte Anti-Malware Premium
Browser
Google Chrome
Other Info
Logitech Z625 speaker system,
Logitech BRIO 4K Pro webcam,
HP Color LaserJet Pro MFP M477fdn,
APC SMART-UPS RT 1000 XL - SURT1000XLI,
Galaxy S23 Plus phone
Hi Brick,

Unfortunately, I was not able to select the NAS as an option on when I click on Browse button. So I have to manually select type it on the box, instead.

I haven't moved the WindowsImageBackup on its location. FYI, the image file is located on the NAS backup folder. So there is no way put it on the root directory.

Please advice. So far, thanks for the response.

Eron
 

My Computer My Computer

At a glance

Windows Home Premium 64 bit3GB
Computer Manufacturer/Model Number
Toshiba
OS
Windows Home Premium 64 bit
Memory
3GB
Eron,

If you are unable to select the NAS while browsing, then it's not seeing it and manually entering the address/location may not work until it can see the NAS.

Are you able to select the NAS while in Windows 7? If so, then you may need to load a driver for the NAS before you will be able to select it at boot with a recovery disc.
 

My Computer My Computer

At a glance

64-bit Windows 11 Pro for WorkstationsIntel i7-8700K OC'd to 5 GHz64 GB (4x16GB) G.SKILL TridentZ RGB DDR4 3600...ASUS ROG-STRIX-GTX1080TI-O11G-GAMING
Computer type
PC/Desktop
Computer Manufacturer/Model Number
Self built custom
OS
64-bit Windows 11 Pro for Workstations
CPU
Intel i7-8700K OC'd to 5 GHz
Motherboard
ASUS ROG Maximus XI Formula Z390
Memory
64 GB (4x16GB) G.SKILL TridentZ RGB DDR4 3600 MHz
Graphics Card(s)
ASUS ROG-STRIX-GTX1080TI-O11G-GAMING
Sound Card
Integrated
Monitor(s) Displays
2 x Samsung Odyssey G7 27"
Screen Resolution
2560x1440
Hard Drives
1TB Samsung 990 PRO M.2,
4TB Samsung 990 PRO PRO M.2,
TerraMaster F8 SSD Plus NAS
PSU
Seasonic Prime Titanium 850W
Case
Thermaltake Core P3
Cooling
Corsair Hydro H115i
Keyboard
Logitech wireless K800
Mouse
Logitech MX Master 4
Internet Speed
2 Gb/s Download and 100 Mb/s Upload
Antivirus
Malwarebyte Anti-Malware Premium
Browser
Google Chrome
Other Info
Logitech Z625 speaker system,
Logitech BRIO 4K Pro webcam,
HP Color LaserJet Pro MFP M477fdn,
APC SMART-UPS RT 1000 XL - SURT1000XLI,
Galaxy S23 Plus phone
Hi Brick,

Yes, I can see the NAS when logged on to the Windows computer but not when the computer is on recovery boot session. I just wanted to know if possible that the NAS can be seen while booting up on the recovery mode.

I have the NAS that do not have drivers needed to be installed since it is connected to the switch and router, which is same as my Windows computer.

Thanks,

Eron
 

My Computer My Computer

At a glance

Windows Home Premium 64 bit3GB
Computer Manufacturer/Model Number
Toshiba
OS
Windows Home Premium 64 bit
Memory
3GB
Does the NAS have drivers available to use though? If so, then they will have to be loaded in WinPE for the NAS to be recognized.
 

My Computer My Computer

At a glance

64-bit Windows 11 Pro for WorkstationsIntel i7-8700K OC'd to 5 GHz64 GB (4x16GB) G.SKILL TridentZ RGB DDR4 3600...ASUS ROG-STRIX-GTX1080TI-O11G-GAMING
Computer type
PC/Desktop
Computer Manufacturer/Model Number
Self built custom
OS
64-bit Windows 11 Pro for Workstations
CPU
Intel i7-8700K OC'd to 5 GHz
Motherboard
ASUS ROG Maximus XI Formula Z390
Memory
64 GB (4x16GB) G.SKILL TridentZ RGB DDR4 3600 MHz
Graphics Card(s)
ASUS ROG-STRIX-GTX1080TI-O11G-GAMING
Sound Card
Integrated
Monitor(s) Displays
2 x Samsung Odyssey G7 27"
Screen Resolution
2560x1440
Hard Drives
1TB Samsung 990 PRO M.2,
4TB Samsung 990 PRO PRO M.2,
TerraMaster F8 SSD Plus NAS
PSU
Seasonic Prime Titanium 850W
Case
Thermaltake Core P3
Cooling
Corsair Hydro H115i
Keyboard
Logitech wireless K800
Mouse
Logitech MX Master 4
Internet Speed
2 Gb/s Download and 100 Mb/s Upload
Antivirus
Malwarebyte Anti-Malware Premium
Browser
Google Chrome
Other Info
Logitech Z625 speaker system,
Logitech BRIO 4K Pro webcam,
HP Color LaserJet Pro MFP M477fdn,
APC SMART-UPS RT 1000 XL - SURT1000XLI,
Galaxy S23 Plus phone
Hi Brick,

The NAS does not have any drivers to be loaded to any PC. The NAS I am talking about is ReadyNas which shouldn't have any drivers available.

Eron
 

My Computer My Computer

At a glance

Windows Home Premium 64 bit3GB
Computer Manufacturer/Model Number
Toshiba
OS
Windows Home Premium 64 bit
Memory
3GB
That's what I was afraid of. I'm not as familiar enough with a NAS to be able give better help on it to try and get around this issue of it not being seen in WinPE. You might consider posting a new thread in the Network & Sharing forum area for how to see a NAS in WinPE to hopefully get a solution for this. :(
 

My Computer My Computer

At a glance

64-bit Windows 11 Pro for WorkstationsIntel i7-8700K OC'd to 5 GHz64 GB (4x16GB) G.SKILL TridentZ RGB DDR4 3600...ASUS ROG-STRIX-GTX1080TI-O11G-GAMING
Computer type
PC/Desktop
Computer Manufacturer/Model Number
Self built custom
OS
64-bit Windows 11 Pro for Workstations
CPU
Intel i7-8700K OC'd to 5 GHz
Motherboard
ASUS ROG Maximus XI Formula Z390
Memory
64 GB (4x16GB) G.SKILL TridentZ RGB DDR4 3600 MHz
Graphics Card(s)
ASUS ROG-STRIX-GTX1080TI-O11G-GAMING
Sound Card
Integrated
Monitor(s) Displays
2 x Samsung Odyssey G7 27"
Screen Resolution
2560x1440
Hard Drives
1TB Samsung 990 PRO M.2,
4TB Samsung 990 PRO PRO M.2,
TerraMaster F8 SSD Plus NAS
PSU
Seasonic Prime Titanium 850W
Case
Thermaltake Core P3
Cooling
Corsair Hydro H115i
Keyboard
Logitech wireless K800
Mouse
Logitech MX Master 4
Internet Speed
2 Gb/s Download and 100 Mb/s Upload
Antivirus
Malwarebyte Anti-Malware Premium
Browser
Google Chrome
Other Info
Logitech Z625 speaker system,
Logitech BRIO 4K Pro webcam,
HP Color LaserJet Pro MFP M477fdn,
APC SMART-UPS RT 1000 XL - SURT1000XLI,
Galaxy S23 Plus phone
Hi Brick,

Thank you for the suggestions, though. I will looking forward to resolve this. Maybe, I will try mapping a network drive from the ReadyNas or iSCSI (I guess) then I will check if the Windows recovery boot will detect the NAS. Otherwise, I will check for some information on other forums.

Again, thanks for helping me out here. I really appreciate it.

Eron
 

My Computer My Computer

At a glance

Windows Home Premium 64 bit3GB
Computer Manufacturer/Model Number
Toshiba
OS
Windows Home Premium 64 bit
Memory
3GB
You're welcome. I wish that I could help better with it.
 

My Computer My Computer

At a glance

64-bit Windows 11 Pro for WorkstationsIntel i7-8700K OC'd to 5 GHz64 GB (4x16GB) G.SKILL TridentZ RGB DDR4 3600...ASUS ROG-STRIX-GTX1080TI-O11G-GAMING
Computer type
PC/Desktop
Computer Manufacturer/Model Number
Self built custom
OS
64-bit Windows 11 Pro for Workstations
CPU
Intel i7-8700K OC'd to 5 GHz
Motherboard
ASUS ROG Maximus XI Formula Z390
Memory
64 GB (4x16GB) G.SKILL TridentZ RGB DDR4 3600 MHz
Graphics Card(s)
ASUS ROG-STRIX-GTX1080TI-O11G-GAMING
Sound Card
Integrated
Monitor(s) Displays
2 x Samsung Odyssey G7 27"
Screen Resolution
2560x1440
Hard Drives
1TB Samsung 990 PRO M.2,
4TB Samsung 990 PRO PRO M.2,
TerraMaster F8 SSD Plus NAS
PSU
Seasonic Prime Titanium 850W
Case
Thermaltake Core P3
Cooling
Corsair Hydro H115i
Keyboard
Logitech wireless K800
Mouse
Logitech MX Master 4
Internet Speed
2 Gb/s Download and 100 Mb/s Upload
Antivirus
Malwarebyte Anti-Malware Premium
Browser
Google Chrome
Other Info
Logitech Z625 speaker system,
Logitech BRIO 4K Pro webcam,
HP Color LaserJet Pro MFP M477fdn,
APC SMART-UPS RT 1000 XL - SURT1000XLI,
Galaxy S23 Plus phone
The Boot Sector on my Win 7 C volume got clobbered. I got the dreaded File \Boot\BCD error (Couldn't read Boot Configuration Data). For 3 days I'd been trying all combinations of Startup Repair, /chkdsk, /fixboot, /fixmbr, /rebuildbcd, System Restore, etc. Nothing worked (do they ever?). I tried System Image Recovery (I've faithfully used the MS Backup System Image every 2 weeks), but it failed with a "corrupted file or directory" error. Using DOS 'list volume' cmd, I could see that all the other volumes on the HDD's were NTFS, except for the C (boot) volume which was RAW. By this time I was pretty much resigned to having to re-install Win 7. Then I found this tutorial. By going back into System Recovery Options -> System Image Recovery, selecting Format and Repartition Disk, BUT Excluding ALL the disks except the C drive, I got System Image Recovery to restore my Windows 7. AND IT BOOTED! :D My questions are: 1) Did it really format everything on HDD Disk 0, or did it just format the C partition on that HDD? The remaining space was free space on HDD Disk 0, so I have no way to tell. 2) Do you think I could have gotten away with Only Restore System Drives in this situation? Basically, is your use of "disk" synonymous with volume/partition, or HDD? The answers will determine whether I use the remainder of HDD Disk 0 for any important data in the future. Thanks again.
 
Last edited:

My Computer My Computer

At a glance

Windows 7 Home Premium 64-bit SP1AMD Phenom II X2 550 Callisto8.00GB Dual-Channel DDR3 @ 805MHz (9-9-9-24)MSI GT210
Computer type
PC/Desktop
Computer Manufacturer/Model Number
Custom Build
OS
Windows 7 Home Premium 64-bit SP1
CPU
AMD Phenom II X2 550 Callisto
Motherboard
MSI 970A-G46
Memory
8.00GB Dual-Channel DDR3 @ 805MHz (9-9-9-24)
Graphics Card(s)
MSI GT210
Monitor(s) Displays
Acer X193W+ (1680x1050@59Hz)
Screen Resolution
1680x1050 pixels
Hard Drives
298GB Seagate ST3320620AS ATA Device (SATA)
932GB Hitachi HDS721010CLA332 ATA Device (SATA)
932GB Seagate ST31000528AS ATA Device (SATA)
PSU
ANTEC|EA650 RT
Case
ANTEC|THREE HUNDRED BK
Antivirus
Avast
Browser
Chrome
Hello Bilvihur,

I'm happy to hear that you got it sorted out. :)

Q1) If you excluded all partitions and drives other than C, then it should have only formatted and restored on C and the "System Reserved" partition if one was there when the image was created. If you didn't exclude them, then they would have been deleted and only what was on the image restored.

Q2) It really depends on what the cause of the issue was, but a system restore may or may not have helped. Either way, it's a good idea to have good system image and restore point available to be safe.

Hope this helps,
Shawn
 

My Computer My Computer

At a glance

64-bit Windows 11 Pro for WorkstationsIntel i7-8700K OC'd to 5 GHz64 GB (4x16GB) G.SKILL TridentZ RGB DDR4 3600...ASUS ROG-STRIX-GTX1080TI-O11G-GAMING
Computer type
PC/Desktop
Computer Manufacturer/Model Number
Self built custom
OS
64-bit Windows 11 Pro for Workstations
CPU
Intel i7-8700K OC'd to 5 GHz
Motherboard
ASUS ROG Maximus XI Formula Z390
Memory
64 GB (4x16GB) G.SKILL TridentZ RGB DDR4 3600 MHz
Graphics Card(s)
ASUS ROG-STRIX-GTX1080TI-O11G-GAMING
Sound Card
Integrated
Monitor(s) Displays
2 x Samsung Odyssey G7 27"
Screen Resolution
2560x1440
Hard Drives
1TB Samsung 990 PRO M.2,
4TB Samsung 990 PRO PRO M.2,
TerraMaster F8 SSD Plus NAS
PSU
Seasonic Prime Titanium 850W
Case
Thermaltake Core P3
Cooling
Corsair Hydro H115i
Keyboard
Logitech wireless K800
Mouse
Logitech MX Master 4
Internet Speed
2 Gb/s Download and 100 Mb/s Upload
Antivirus
Malwarebyte Anti-Malware Premium
Browser
Google Chrome
Other Info
Logitech Z625 speaker system,
Logitech BRIO 4K Pro webcam,
HP Color LaserJet Pro MFP M477fdn,
APC SMART-UPS RT 1000 XL - SURT1000XLI,
Galaxy S23 Plus phone
Back
Top