Slipstream Windows 7 SP1 into a Installation DVD or ISO File

How to Slipstream Windows 7 SP1 and Updates to Create a Bootable USB, Installation DVD, or ISO File

   Information
This will show you how to slipstream Windows 7 SP1 with your retail or student copy of Windows 7 without SP1 to create a slipstream Windows 7 SP1 installation "DVD", a slipstream Windows 7 SP1 bootable "ISO file", or a slipstream Windows 7 SP1 bootable installation "USB flash drive".

This will also show you how to integrate Windows Updates into your new or previously created slipstream Windows 7 SP1 to create a new updated slipstream Windows 7 SP1 installation "DVD", a slipstream Windows 7 SP1 bootable "ISO file", or a slipstream Windows 7 SP1 bootable installation "USB flash drive".

   Warning

  • You can only do this tutorial while logged in as an administrator.
  • You can only use a retail copy or student copy of a Windows 7 installation DVD, bootable USB flash drive, or ISO file to create a slipstream Windows 7 SP1 with.
  • You can only use a previously created slipstream Windows 7 SP1 installation DVD, bootable USB flash drive, or ISO file using this tutorial to integrate new Windows Updates to create a new updated slipstream Windows 7 SP1 installation DVD, bootable USB flash drive, or ISO file with.
  • You can only create a 64-bit slipstreamed Windows 7 SP1 DVD or ISO if your current Windows 7 installation is also 64-bit.
  • You can create a 32-bit slipstreamed Windows 7 SP1 DVD or ISO if your current Windows 7 installation is 32-bit or 64-bit.
  • When you install Windows 7 SP1 using the slipstreamed Windows 7 SP1 DVD/ISO/USB created in this tutorial, you will not be able to uninstall SP1.
   Tip

  • You cannot use a slipstream Windows 7 installation disc to do a repair install with on a currently installed Windows 7 SP1.
  • You cannot use a slipstream Windows 7 installation disc to do a repair install with on a currently installed slipstream Windows 7 SP1.
  • You can use a Windows 7 with SP1 installation disc (ex: Technet, MSDN, or retail) to do a repair install with on a current slipstream Windows 7 SP1 installation.
   Note
This tutorial is designed to be followed like a flow chart to help make it easier to use and select the options (ex: DVD or ISO) you want.


Here's How: 1. If you have not already, then you will need download and install the free 32-bit (x86) or 64-bit (x64) RT Seven Lite "Beta 2.6.0" for your same 32-bit or 64-bit Windows 7 installation DVD or ISO file.
   Note
Alternative RT Seven Lite Beta download link: RT Seven Lite Download - Softpedia

Softpedia.jpg

   Warning
At the rt7lite.com site, you will need to scroll down a bit past the RC 1.7.0 build to see the Beta 2.6.0 build download links.

This tutorial will not work using the RC 1.7.0 build.

2. Click on the RT Seven Lite shortcut on your desktop or in the Start Menu to run the program. (see screenshot below) Step1.jpg
3. Do either step 4 or 5 for what you have to use to integrate the Windows 7 SP1 and/or Windows Updates into.

4. To Select and Use a Windows 7 Installation DVD or Bootable USB A) Insert your retail or previously slipstreamed Windows 7 installation DVD into the DVD drive and close it, OR plug in your Windows 7 bootable USB flash drive. If a AutoPlay pop-up opens, close it.

B) In RT Seven Lite, click on the Browse button, and select the Select OS path option. (see screenshot below)
NOTE: If you do not have much else running, then you may wish to change the Set priority setting to High first to help speed the slipstreaming process up some. DVD-1.jpg
C) Navigate to and select your DVD drive or bootable USB flash drive with Windows 7 on it from steps 4A, and click on OK. (see screeshow below) DVD-2.jpg
D) Click on OK. (see screenshot below) DVD-3.jpg
E) Select your Desktop, and click on the Make New Folder button. (see screenshot below) DVD-4.jpg
F) Select the New folder on the desktop, and click on OK. (see screenshot below) DVD-5.jpg
G) The contents of the Windows 7 installation DVD from steps 4A and 4C will now be copied into the New folder (step 4F) on the desktop. (see screenshot below)
NOTE: This may take a few minutes to complete. DVD-6.jpg
H) Go to step 6.
5. To Select and Use a Windows 7 ISO File

   Note
You could use a Windows 7 ISO file that you already created from say RT Seven Lite, or a Windows 7 w/SP1 U ISO downloaded from: Microsoft: Windows 7 Direct Download Links

A) In RT Seven Lite, click on the Browse button, and select the Select ISO file option. (see screenshot below)
NOTE: If you do not have much else running, then you may wish to change the Set priority setting to High first to help speed the slipstreaming process up some. ISO-1.jpg
B) Click on the Select a ISO button. (see screenshot below) ISO-2.jpg
C) Navigate to and select the Windows 7 ISO file, and click on Open. (see screenshot below) ISO-3.jpg
D) Select the Extract path button. (see screenshot below) ISO-4.jpg
E) Select your Desktop, and click on the Make New Folder button. (see screenshot below) ISO-5.jpg
F) Select the New folder on the desktop, and click on OK. (see screenshot below) ISO-6.jpg
G) Click on OK. (see screenshot below) ISO-7.jpg
H) The contents of the Windows 7 ISO file from step 5C will now be extracted and copied into the New folder (step 5F) on the desktop. (see screenshot below)
NOTE: This may take only a few minutes to complete. ISO-8.jpg
I) Continue on to step 6.
6. Do either step 7 or 8 below for what you want to do.

7. To Only Integrate New Windows Updates
NOTE: You would only select this option if used a previously created slipstream Windows 7 SP1 installation DVD, bootable USB flash drive, or ISO file using this tutorial in step 4 or 5 above, and only want to update it by integrating new Windows Updates. A) When finished, select (dot) the Windows 7 edition that you want to create a updated SP1 slipstream version of, and click on OK. (see screenshot below)
NOTE: When this window below opens it likes to hide behind another opened active window, so you may need to check behind them when the screenshot above (step 5H) shows it's "Status" as Loading Image.... and does not appear to be doing anything. Step2.jpg
B) Go to step 9.
8. To Slipstream SP1 and to be able to Integrate Windows Updates
NOTE: You would select this option if you used a retail copy or student copy of a Windows 7 installation DVD, bootable USB flash drive, or ISO file that did not have SP1 slipstreamed in it in step 4 or 5 above. A) If you have not already, then you will need to download the same 32-bit (x86) or 64-bit (x64) Windows 7 SP1 EXE installation file for your same 32-bit or 64-bit Windows 7 installation DVD or ISO file at the Microsoft link below, and save it to your Desktop. Download details: Windows 7 and Windows Server 2008 R2 Service Pack 1 (KB976932)

Download.jpg
B) Right click on the downloaded windows6.1-KB976932-X64.exe or windows6.1-KB976932-X86.exe file, click on Properties, click on the General tab, and click on Unblock.
NOTE: If you do not have a Unblock button under the General tab, then the SP1 exe file is already unblocked and you can continue on to step 8C.

C) When RT Seven Lite is finished from step 4G or 5H, select (dot) only the one Windows 7 edition that you want to create a slipstream SP1 version of, check the Slipstream Service Pack box, and click on OK. (see screenshot below) Step3.jpg
D) Click on the Browse button. (see screenshot below) Step4.jpg
E) Navigate to and select the Windows 7 SP1 EXE installation file on your desktop from step 1, and click on Open. (see screenshot below) Step5.jpg
F) Click on the Start button. (see screenshot below) Step6.jpg
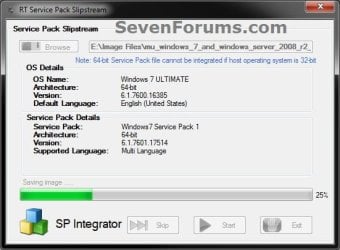
G) RT Seven Lite will now start preparing, integrating, and saving the SP1 (step 9) with the DVD (step 4) or ISO file (step 5). (see screenshots below)
NOTE: This will take a good while to complete depending on how fast your system is and what you have the priority level set as in step 4B. Step7.jpg

Step8.jpg

H) When finished, click on the Proceed button. (see screenshot below) Step10.jpg
I) RT Seven Lite will now start start loading the image. (see screenshot below)
NOTE: This will take a few minutes to complete. Step11.jpg
J) Continue on to step 9.
9. When finished, click on the Task tab in the left pane. (see screenshot below) Step12.jpg
10. Do either step 11 or 12 below for what you want to do.

11. To Only Slipstream SP1
NOTE: You would do this step if you did step 8 above and do not want to integrate any Windows Updates into the Slipstream Windows 7 SP1 installation DVD, bootable USB flash drive, or ISO file. A) In the Task tab, check the ISO Bootable box option, then click on the ISO-Bootable tab in the left pane. (see screenshot below)
Step13.jpg
B) Go to step 12F.
12. To Integrate Windows Updates and still be able to Slipstream SP1 (if not already)
NOTE: You would do this step if you did step 7 above and want to integrate Windows Updates into this new or previously created Slipstream Windows 7 SP1 installation DVD, bootable USB flash drive, or ISO file. A) If you have not already, then you will need to download the standalone MSU installation files for each Windows Update that you want to integrate into the slipstream, and save them to your Desktop.

B) In the Task tab in RT Seven Lite, check the Integration box and ISO Bootable box options, then click on the Integration tab in the left pane. (see screenshot below) Update-1.jpg
C) Under the Updates tab, click on the Add button. (see screenshot below) Update-2.jpg
D) Navigate to and select all of the Windows Update MSU files that you want to integrate, and click on Open. (see screenshot below)
NOTE: You can press and hold the CTRL key to select more than one random MSU file. Update-3.jpg
E) When finished adding MSU files, click on Apply. (see screenshot below) Update-4.jpg
F) Do either step 12G or 12H for what type of Slipstream Windows 7 SP1 you want.

G) To Create a Single Windows 7 SP1 Edition Slipstream

NOTE: This will create a Slipstream Windows 7 SP1 with only the one Windows 7 edition that you selected in step 7A or 8C.
  • Select High priority level, select (dot) Build current image only, and click on Commit. (see screenshot below)
Update-5-single.jpg

  • Go to step 12I
H) To Create a All-in-One Windows 7 SP1 Edition Slipstream
NOTE: This will create a Slipstream Windows 7 SP1 with all Windows 7 editions that will allow you to select which one to install during installation. (see screenshot below) All-in-one.jpg

  • Select High priority level, select (dot) Re-build all images, and click on Commit. (see screenshot below)
Update-5-all-in-one.jpg

  • Continue on to step 12I
I) RT Seven Lite will now start integrating the Windows Updates. (see screenshot below)
NOTE: This may take from a few minutes or longer depending on how many Windows Update MSU files you added. Update-6.jpg
J) When finished, click on the ISO-Bootable tab in the left pane. (see screenshot below) Update-7.jpg
K) Continue on to step 13.
13. Do either step 14, 15, or 16 for what you would like to have your Slipstreamed Windows 7 SP1 as.

14. To Burn a Slipstream Windows 7 SP1 Installation DVD A) Insert a blank DVD (ex: DVD-R) into the DVD drive and close it. If a AutoPlay pop-up opens, close it.

B) In RT Seven Lite, select the Direct Burn drop down menu option under Mode, select the drive letter used from step 14A under Device, then click on the Direct Burn button towards the bottom right. (see screenshot below) Step14-DVD.jpg
C) RT Seven Lite will now start creating the image. (see screenshot below)
NOTE: This will take a few minutes to complete. Step15-DVD.jpg
D) When finished, click on OK. If a AutoPlay pop-up opens, close it. (see screenshots below) Step16-DVD.jpg
E) You now have a slipstream Windows 7 SP1 installation DVD.

F) Go to step 17.
15. To Create a Slipstream Windows 7 SP1 ISO File A) In RT Seven Lite, select the Create Image drop down menu option under Mode, then click on the Make ISO button towards the bottom right. (see screenshot below) Step14-ISO.jpg
B) Navigate to and select your Desktop, type in a name that you want for the ISO file, then click on the Save button. (see screenshot below) Step15-ISO.jpg
C) When finished, click on OK. (see screenshot below) Step16-ISO.jpg
D) You now have a slipstream Windows 7 SP1 bootable ISO file.
   Note

  • You could also use this ISO file to burn and create a Slipstream Windows 7 SP1 installation DVD with.
  • You could also use this ISO file to create a Slipstream Windows 7 SP1 bootable installation USB flash drive with. For how, see part 2 here: Windows 7 USB/DVD Download Tool
  • You could also test or use this ISO file in a virtual machine if you like.

E) Go to step 17.
16. To Create a Slipstream Windows 7 SP1 Bootable Installation USB Flash Drive A) If you have not already, plug in your USB flash drive.
NOTE: You will need to have at least 4.5 GB free on the USB flash drive.

B) In RT Seven Lite, select the USB Bootable drop down menu option under Mode. (see screenshot below) USB-1.jpg
C) Select your USB flash drive from the drop down menu under USB Bootable. (see screenshot above)
NOTE: If there is not enough free space on the selected USB flash drive, you will get a notice telling you so. You will then need to select a larger USB flash drive. (see screenshot below) USB-Error.jpg
D) Click on the USB button towards the bottom right. (see screenshot below step 16B)

E) Click on OK to format the USB flash drive. (see screenshot below) USB-2.jpg
F) RT Seven Lite will now start formating the USB flash drive and copying the files to it. (see screenshot below)
NOTE: This will take a few minutes to complete. USB-3.jpg
G) When it's finished, click on OK. (see screenshot below) USB-4.jpg
H) You now have a slipstream Windows 7 SP1 bootable installation USB flash drive.

I) Continue on to step 17.
17. Close RT Seven Lite.

18. Click on Yes to confirm closing RT Seven Lite. (see screenshot below) Step17.jpg
19. RT Seven Lite will now clean up it's temp files before closing. (see screenshot below)
:warn:WARNING: Do not stop or interrupt RT Seven Lite from cleaning it's temp files to avoid getting this error here the next time you try and run RT Seven Lite. Step18.jpg
20. You can now delete the New folder from step 4E or 5E and it's contents on the desktop if you like.
   Tip
You can keep your newly created slipstream Windows 7 SP1 installation DVD, bootable USB flash drive, or ISO file updated by doing this tutorial again with steps 7 and 12 to integrate any new Windows Updates released afterwards into it.

When you install Windows 7 SP1 using the slipstream Windows 7 SP1 DVD/ISO/USB created in this tutorial, you will be able to use the Windows 7 SP1 Disk Cleanup Tool (OPTION THREE at link) to delete the SP1 backup files.


That's it,
Shawn


Attachments

  • Step9.jpg
    Step9.jpg
    33.4 KB · Views: 252
  • Disk_Cleanup-1.jpg
    Disk_Cleanup-1.jpg
    35.9 KB · Views: 262
  • Disk_Cleanup-2.jpg
    Disk_Cleanup-2.jpg
    31.9 KB · Views: 276
Last edited:
I suppose there's always the option to clone. :(
 

My Computer My Computer

At a glance

64-bit Windows 11 Pro for WorkstationsIntel i7-8700K OC'd to 5 GHz64 GB (4x16GB) G.SKILL TridentZ RGB DDR4 3600...ASUS ROG-STRIX-GTX1080TI-O11G-GAMING
Computer type
PC/Desktop
Computer Manufacturer/Model Number
Self built custom
OS
64-bit Windows 11 Pro for Workstations
CPU
Intel i7-8700K OC'd to 5 GHz
Motherboard
ASUS ROG Maximus XI Formula Z390
Memory
64 GB (4x16GB) G.SKILL TridentZ RGB DDR4 3600 MHz
Graphics Card(s)
ASUS ROG-STRIX-GTX1080TI-O11G-GAMING
Sound Card
Integrated
Monitor(s) Displays
2 x Samsung Odyssey G7 27"
Screen Resolution
2560x1440
Hard Drives
1TB Samsung 990 PRO M.2,
4TB Samsung 990 PRO PRO M.2,
TerraMaster F8 SSD Plus NAS
PSU
Seasonic Prime Titanium 850W
Case
Thermaltake Core P3
Cooling
Corsair Hydro H115i
Keyboard
Logitech wireless K800
Mouse
Logitech MX Master 4
Internet Speed
2 Gb/s Download and 100 Mb/s Upload
Antivirus
Malwarebyte Anti-Malware Premium
Browser
Google Chrome
Other Info
Logitech Z625 speaker system,
Logitech BRIO 4K Pro webcam,
HP Color LaserJet Pro MFP M477fdn,
APC SMART-UPS RT 1000 XL - SURT1000XLI,
Galaxy S23 Plus phone
I've hit what I think is a bug.

I've created a Windows 7 64 bit install using a multi-install disk, I've slipstreamed a bunch of updates into it, and removed a load of components. The problem is that when I'm finished, if I selected "HOME PREMIUM" as the one I wanted, the disk image that's created is a multi-install disk at abou 5GB. However if I select either Ultimate or Professional, it's a single-install disk, and is about half the size (2-3GB).

I've tried probably 10+ times now. No matter what I tweak (or don't tweak) or install (or don't install), or restart (or don't restart) Home Premium always results in a multi-install disk.
Seleting the "Build single image" or "rebuild all images" or "Optimise install.wim" doesn't seem to make a difference (I'd expect it to be the first).

Unfortunately, 5GB doesn't fit on my DVD. Any thoughts?
Using RT7Lite 2.6.0, with Dotnet 3.5

Any thoughts? Thanks
 

My Computer My Computer

At a glance

Windows 7 Home Premium 64bit
Computer type
PC/Desktop
OS
Windows 7 Home Premium 64bit
Help - SP1 not installed

I have a universal copy of Windows 7/64 (7600-16385 downloaded in 2012). I also have the win 7.1 update kb976932. I used rt7lite 2.6 and followed instructions on the tutorial (selecting Professional as that is the license I have). Slipstreaming took some time (noticed it stuck at around 60% for a while before moving right onto 70% and through to the finish.

Installed the resultant DVD onto a laptop where the system says win 7 64 home premium!!, not win 7.1 64 Pro, so I assume that the slipstreaming of sp1 failed, but no diagnostics to intimate that.

Any advice please?
 

My Computer My Computer

At a glance

XP Pro - Vista - windows 7 ultimate/64 - 8.1 ...q84004gbnvidia 7300
Computer type
PC/Desktop
Computer Manufacturer/Model Number
self build
OS
XP Pro - Vista - windows 7 ultimate/64 - 8.1 - 10
CPU
q8400
Motherboard
ga-ep35c-ds3r
Memory
4gb
Graphics Card(s)
nvidia 7300
Sound Card
integrated
Monitor(s) Displays
LG 206
Hard Drives
Samsung evo 500ssd
samsung 320gb sata
wd 160gb pata
PSU
hiper 580

My Computer My Computer

At a glance

Win-7-Pro64bit 7-H-Prem-64biti7-5930K 2nd i9-9940x both water blocked VRM'...Trident-z 3200C14 2nd Trident-z 3600C16EVGA 1080ti ftw3 2nd Titan Xp both water blocked
Computer type
PC/Desktop
Computer Manufacturer/Model Number
Custom assembled by me :}
OS
Win-7-Pro64bit 7-H-Prem-64bit
CPU
i7-5930K 2nd i9-9940x both water blocked VRM's too
Motherboard
ASUS SABERTOOTH X99 2nd ASUS x299 Apex
Memory
Trident-z 3200C14 2nd Trident-z 3600C16
Graphics Card(s)
EVGA 1080ti ftw3 2nd Titan Xp both water blocked
Sound Card
Built-in Realtek
Monitor(s) Displays
1-AOC G2460PG 24"G-Sync 144Hz/ 2nd 1-ASUS VG248QE 24" 144Hz
Screen Resolution
1920 x 1080 144Hz
Hard Drives
2-Samsung M.2 Evo & Evo Plus
2-Samsung 850 EVO 500GB SSD's/ 3-2.5 W.D. Black 1tb-&3-1tb/3-3.5 WD Black 1tb hdd's
PSU
EVGA SuperNOVA 1000-P2 2nd 1200-P2
Case
2-Corsair Obsidian Series 450D Black ATX Mid Tower
Cooling
Custom water loops
Keyboard
Logitech G710+/ 2nd Logitech G910
Mouse
2-RedDragon M901 Perdition 16400 dpi Gaming mouse = wired
Internet Speed
Comcast Ping 19ms 89.31mbps download speed 6.12mbps upload
Antivirus
Malwarebytes Pro/ Superantispyware Pro
Browser
FireFox & Pale moon
Other Info
2nd ASUS X299 Apex/Intel i9-9940x with Custom water loop/7H-Prem-x64/Corsair 450D case/Ram Trident-z 3600C16 4x8gb / Samsung970Evo plus 500gb SSD/Dual ssd EZ swap evo/PSU EVGA SuperNova 1200w-P2 80+Platinum/GPU Titan Xp /8-ML-140 on push-pull on 2-280GTX rads

My Computer My Computer

At a glance

windows 7 utlimatei7-5960Corsair 32G 3200mghz DominatorQuad x2= GTX Nvidia Titan Z
Computer type
PC/Desktop
Computer Manufacturer/Model Number
Custom- Case Alienware Area51 - R2
OS
windows 7 utlimate
CPU
i7-5960
Motherboard
Asus SaberTooth x99
Memory
Corsair 32G 3200mghz Dominator
Graphics Card(s)
Quad x2= GTX Nvidia Titan Z
Hard Drives
2 Samsumg SSDs
1 Samsung M2 950 Pro SSD
Slipstream Windows 7

Thanks for your answer to my question. I looked at the site you suggested, and it seems to be just what I'm looking for.
Again, thanks for the reply.
Massezac
 

My Computer My Computer

At a glance

W7 Home Prem., 64bit
Computer Manufacturer/Model Number
Gateway GT5678
OS
W7 Home Prem., 64bit
Hi, Brink,
I have some clarification.
I am having only windows 7 ultimate dvd.
Which exact points in your article, that i should follow, to slipstream windows service pack 1, and all wanted updates using rt seven lite.
Please just give the required serial nos. The tutorial is including all .
Please also say, whether a 8 gb pendrive is enough.
If i insert the usb, and do the things, then would i be able to copy the finished product and make it bootable.Please brink
 

My Computer My Computer

At a glance

Microsoft Windows 7 Ultimate 64-bit 7601 Mult...Intel(R) Core(TM)2 Duo CPU E7200 @ 2.53GHz4.00 GBNVIDIA GeForce 210
Computer type
PC/Desktop
Computer Manufacturer/Model Number
custom build
OS
Microsoft Windows 7 Ultimate 64-bit 7601 Multiprocessor Free Service Pack 1
CPU
Intel(R) Core(TM)2 Duo CPU E7200 @ 2.53GHz
Motherboard
To be filled by O.E.M. To be filled by O.E.M.
Memory
4.00 GB
Graphics Card(s)
NVIDIA GeForce 210
Sound Card
(1) NVIDIA High Definition Audio (2) Realtek High Definiti
Screen Resolution
1920 x 1080 x 32 bits (4294967296 colors) @ 60 Hz
Hard Drives
ST3500312CS ATA Device
Hello jrajue, :)

You would use steps 4, 8, 9, 12, and 16 onwards to slipstream and create a bootable installation USB.

8 GB should be plenty.
 

My Computer My Computer

At a glance

64-bit Windows 11 Pro for WorkstationsIntel i7-8700K OC'd to 5 GHz64 GB (4x16GB) G.SKILL TridentZ RGB DDR4 3600...ASUS ROG-STRIX-GTX1080TI-O11G-GAMING
Computer type
PC/Desktop
Computer Manufacturer/Model Number
Self built custom
OS
64-bit Windows 11 Pro for Workstations
CPU
Intel i7-8700K OC'd to 5 GHz
Motherboard
ASUS ROG Maximus XI Formula Z390
Memory
64 GB (4x16GB) G.SKILL TridentZ RGB DDR4 3600 MHz
Graphics Card(s)
ASUS ROG-STRIX-GTX1080TI-O11G-GAMING
Sound Card
Integrated
Monitor(s) Displays
2 x Samsung Odyssey G7 27"
Screen Resolution
2560x1440
Hard Drives
1TB Samsung 990 PRO M.2,
4TB Samsung 990 PRO PRO M.2,
TerraMaster F8 SSD Plus NAS
PSU
Seasonic Prime Titanium 850W
Case
Thermaltake Core P3
Cooling
Corsair Hydro H115i
Keyboard
Logitech wireless K800
Mouse
Logitech MX Master 4
Internet Speed
2 Gb/s Download and 100 Mb/s Upload
Antivirus
Malwarebyte Anti-Malware Premium
Browser
Google Chrome
Other Info
Logitech Z625 speaker system,
Logitech BRIO 4K Pro webcam,
HP Color LaserJet Pro MFP M477fdn,
APC SMART-UPS RT 1000 XL - SURT1000XLI,
Galaxy S23 Plus phone
HI, Brinks, i succeeded up to slipstream. I do not know , how to add the updates. I have gone through the instructions. But, when i click view update history, only limited updates are shown.
If i click , installed updates, there is no link provided there, onlyl uninstall option.
Did i miss anything in the instructions.
If i want particular updates to slipstream, then i do not know how to go to the link.
Please guide.
Moreover, can i continue with the updates part only or should i again has to to from initial stage from point 4? expecting your reply
I did not update ie. Anyhow, i tried to give the kb in microsoft update catelogue site, but failed to get the link.
please immediate reply, to all the points i raised
 

My Computer My Computer

At a glance

Microsoft Windows 7 Ultimate 64-bit 7601 Mult...Intel(R) Core(TM)2 Duo CPU E7200 @ 2.53GHz4.00 GBNVIDIA GeForce 210
Computer type
PC/Desktop
Computer Manufacturer/Model Number
custom build
OS
Microsoft Windows 7 Ultimate 64-bit 7601 Multiprocessor Free Service Pack 1
CPU
Intel(R) Core(TM)2 Duo CPU E7200 @ 2.53GHz
Motherboard
To be filled by O.E.M. To be filled by O.E.M.
Memory
4.00 GB
Graphics Card(s)
NVIDIA GeForce 210
Sound Card
(1) NVIDIA High Definition Audio (2) Realtek High Definiti
Screen Resolution
1920 x 1080 x 32 bits (4294967296 colors) @ 60 Hz
Hard Drives
ST3500312CS ATA Device
Check using the tutorial below to see if it may help to download the update, but some updates will not be available to manually download.

:ar: Windows Update - Download Standalone MSU Installer File - Windows 7 Help Forums

If you like, it may be easier to create a system image of a fully updated PC with something like Macrium Reflect. This will make it easy to just restore the image on the PC as needed.
 

My Computer My Computer

At a glance

64-bit Windows 11 Pro for WorkstationsIntel i7-8700K OC'd to 5 GHz64 GB (4x16GB) G.SKILL TridentZ RGB DDR4 3600...ASUS ROG-STRIX-GTX1080TI-O11G-GAMING
Computer type
PC/Desktop
Computer Manufacturer/Model Number
Self built custom
OS
64-bit Windows 11 Pro for Workstations
CPU
Intel i7-8700K OC'd to 5 GHz
Motherboard
ASUS ROG Maximus XI Formula Z390
Memory
64 GB (4x16GB) G.SKILL TridentZ RGB DDR4 3600 MHz
Graphics Card(s)
ASUS ROG-STRIX-GTX1080TI-O11G-GAMING
Sound Card
Integrated
Monitor(s) Displays
2 x Samsung Odyssey G7 27"
Screen Resolution
2560x1440
Hard Drives
1TB Samsung 990 PRO M.2,
4TB Samsung 990 PRO PRO M.2,
TerraMaster F8 SSD Plus NAS
PSU
Seasonic Prime Titanium 850W
Case
Thermaltake Core P3
Cooling
Corsair Hydro H115i
Keyboard
Logitech wireless K800
Mouse
Logitech MX Master 4
Internet Speed
2 Gb/s Download and 100 Mb/s Upload
Antivirus
Malwarebyte Anti-Malware Premium
Browser
Google Chrome
Other Info
Logitech Z625 speaker system,
Logitech BRIO 4K Pro webcam,
HP Color LaserJet Pro MFP M477fdn,
APC SMART-UPS RT 1000 XL - SURT1000XLI,
Galaxy S23 Plus phone
If suppose, i could click more and get the http: of installed updates, from installed updates, would it then possible to have those updates?
If i do the macrium kind of image backup, it will include all the PUPs or virus or any unwanted or trojan, that is present in the system at the time of copying the image as backup using macrium reflect?
I do not want the latest IE, as i do not find it as effective as other browsers.
Can i go the update link using other browsers,
 

My Computer My Computer

At a glance

Microsoft Windows 7 Ultimate 64-bit 7601 Mult...Intel(R) Core(TM)2 Duo CPU E7200 @ 2.53GHz4.00 GBNVIDIA GeForce 210
Computer type
PC/Desktop
Computer Manufacturer/Model Number
custom build
OS
Microsoft Windows 7 Ultimate 64-bit 7601 Multiprocessor Free Service Pack 1
CPU
Intel(R) Core(TM)2 Duo CPU E7200 @ 2.53GHz
Motherboard
To be filled by O.E.M. To be filled by O.E.M.
Memory
4.00 GB
Graphics Card(s)
NVIDIA GeForce 210
Sound Card
(1) NVIDIA High Definition Audio (2) Realtek High Definiti
Screen Resolution
1920 x 1080 x 32 bits (4294967296 colors) @ 60 Hz
Hard Drives
ST3500312CS ATA Device
You could try that for the updates.

You would only want to create a Macrium Image on a clean system.
 

My Computer My Computer

At a glance

64-bit Windows 11 Pro for WorkstationsIntel i7-8700K OC'd to 5 GHz64 GB (4x16GB) G.SKILL TridentZ RGB DDR4 3600...ASUS ROG-STRIX-GTX1080TI-O11G-GAMING
Computer type
PC/Desktop
Computer Manufacturer/Model Number
Self built custom
OS
64-bit Windows 11 Pro for Workstations
CPU
Intel i7-8700K OC'd to 5 GHz
Motherboard
ASUS ROG Maximus XI Formula Z390
Memory
64 GB (4x16GB) G.SKILL TridentZ RGB DDR4 3600 MHz
Graphics Card(s)
ASUS ROG-STRIX-GTX1080TI-O11G-GAMING
Sound Card
Integrated
Monitor(s) Displays
2 x Samsung Odyssey G7 27"
Screen Resolution
2560x1440
Hard Drives
1TB Samsung 990 PRO M.2,
4TB Samsung 990 PRO PRO M.2,
TerraMaster F8 SSD Plus NAS
PSU
Seasonic Prime Titanium 850W
Case
Thermaltake Core P3
Cooling
Corsair Hydro H115i
Keyboard
Logitech wireless K800
Mouse
Logitech MX Master 4
Internet Speed
2 Gb/s Download and 100 Mb/s Upload
Antivirus
Malwarebyte Anti-Malware Premium
Browser
Google Chrome
Other Info
Logitech Z625 speaker system,
Logitech BRIO 4K Pro webcam,
HP Color LaserJet Pro MFP M477fdn,
APC SMART-UPS RT 1000 XL - SURT1000XLI,
Galaxy S23 Plus phone
Hi, Brink, but those links when tried only goes to the general support page of msoft. I wish to state that all the updates shown a installed have support link, and only links are actually could not be accessed. Why?
I do know that the hdd had to be formatted for macrium reflect back up. What i meant was that the present system backup would include the traces of virus, trojans, etc, etc, when you just take a backup by macrium reflect
 

My Computer My Computer

At a glance

Microsoft Windows 7 Ultimate 64-bit 7601 Mult...Intel(R) Core(TM)2 Duo CPU E7200 @ 2.53GHz4.00 GBNVIDIA GeForce 210
Computer type
PC/Desktop
Computer Manufacturer/Model Number
custom build
OS
Microsoft Windows 7 Ultimate 64-bit 7601 Multiprocessor Free Service Pack 1
CPU
Intel(R) Core(TM)2 Duo CPU E7200 @ 2.53GHz
Motherboard
To be filled by O.E.M. To be filled by O.E.M.
Memory
4.00 GB
Graphics Card(s)
NVIDIA GeForce 210
Sound Card
(1) NVIDIA High Definition Audio (2) Realtek High Definiti
Screen Resolution
1920 x 1080 x 32 bits (4294967296 colors) @ 60 Hz
Hard Drives
ST3500312CS ATA Device
I'm not sure what else to suggest other than a clean install, update it fully, then create a Macrium image to have for the future. :(
 
Last edited:

My Computer My Computer

At a glance

64-bit Windows 11 Pro for WorkstationsIntel i7-8700K OC'd to 5 GHz64 GB (4x16GB) G.SKILL TridentZ RGB DDR4 3600...ASUS ROG-STRIX-GTX1080TI-O11G-GAMING
Computer type
PC/Desktop
Computer Manufacturer/Model Number
Self built custom
OS
64-bit Windows 11 Pro for Workstations
CPU
Intel i7-8700K OC'd to 5 GHz
Motherboard
ASUS ROG Maximus XI Formula Z390
Memory
64 GB (4x16GB) G.SKILL TridentZ RGB DDR4 3600 MHz
Graphics Card(s)
ASUS ROG-STRIX-GTX1080TI-O11G-GAMING
Sound Card
Integrated
Monitor(s) Displays
2 x Samsung Odyssey G7 27"
Screen Resolution
2560x1440
Hard Drives
1TB Samsung 990 PRO M.2,
4TB Samsung 990 PRO PRO M.2,
TerraMaster F8 SSD Plus NAS
PSU
Seasonic Prime Titanium 850W
Case
Thermaltake Core P3
Cooling
Corsair Hydro H115i
Keyboard
Logitech wireless K800
Mouse
Logitech MX Master 4
Internet Speed
2 Gb/s Download and 100 Mb/s Upload
Antivirus
Malwarebyte Anti-Malware Premium
Browser
Google Chrome
Other Info
Logitech Z625 speaker system,
Logitech BRIO 4K Pro webcam,
HP Color LaserJet Pro MFP M477fdn,
APC SMART-UPS RT 1000 XL - SURT1000XLI,
Galaxy S23 Plus phone
Hi, My OS is windows 7 ultimate. Do i have to change something in the detail. I never used vista
 

My Computer My Computer

At a glance

Microsoft Windows 7 Ultimate 64-bit 7601 Mult...Intel(R) Core(TM)2 Duo CPU E7200 @ 2.53GHz4.00 GBNVIDIA GeForce 210
Computer type
PC/Desktop
Computer Manufacturer/Model Number
custom build
OS
Microsoft Windows 7 Ultimate 64-bit 7601 Multiprocessor Free Service Pack 1
CPU
Intel(R) Core(TM)2 Duo CPU E7200 @ 2.53GHz
Motherboard
To be filled by O.E.M. To be filled by O.E.M.
Memory
4.00 GB
Graphics Card(s)
NVIDIA GeForce 210
Sound Card
(1) NVIDIA High Definition Audio (2) Realtek High Definiti
Screen Resolution
1920 x 1080 x 32 bits (4294967296 colors) @ 60 Hz
Hard Drives
ST3500312CS ATA Device
No. I was thinking of something else for Vista.
 

My Computer My Computer

At a glance

64-bit Windows 11 Pro for WorkstationsIntel i7-8700K OC'd to 5 GHz64 GB (4x16GB) G.SKILL TridentZ RGB DDR4 3600...ASUS ROG-STRIX-GTX1080TI-O11G-GAMING
Computer type
PC/Desktop
Computer Manufacturer/Model Number
Self built custom
OS
64-bit Windows 11 Pro for Workstations
CPU
Intel i7-8700K OC'd to 5 GHz
Motherboard
ASUS ROG Maximus XI Formula Z390
Memory
64 GB (4x16GB) G.SKILL TridentZ RGB DDR4 3600 MHz
Graphics Card(s)
ASUS ROG-STRIX-GTX1080TI-O11G-GAMING
Sound Card
Integrated
Monitor(s) Displays
2 x Samsung Odyssey G7 27"
Screen Resolution
2560x1440
Hard Drives
1TB Samsung 990 PRO M.2,
4TB Samsung 990 PRO PRO M.2,
TerraMaster F8 SSD Plus NAS
PSU
Seasonic Prime Titanium 850W
Case
Thermaltake Core P3
Cooling
Corsair Hydro H115i
Keyboard
Logitech wireless K800
Mouse
Logitech MX Master 4
Internet Speed
2 Gb/s Download and 100 Mb/s Upload
Antivirus
Malwarebyte Anti-Malware Premium
Browser
Google Chrome
Other Info
Logitech Z625 speaker system,
Logitech BRIO 4K Pro webcam,
HP Color LaserJet Pro MFP M477fdn,
APC SMART-UPS RT 1000 XL - SURT1000XLI,
Galaxy S23 Plus phone
Hi, brinK, I have used 2.06 version of the rt lite to slipstream service pack 1 and then I thought of integrating updates with wud given in this link raymondcc.
I have downloaded the updates by selecting the required updates and when I mounted the wim files and add the source directory, source directory being wud.exe, the download was successful for the selected updates, but i could not find where the downloaded files are gone.
Integrating updates via rt lite is some what tedious, as it was long ago abondoned.
where the downloaded updates files have gone.
Is there anyway to find those.
when I browse the folder from which I downloaded the updates, i could see the progress of the download from the server
brink, any clue
The link is here
Create An Integrated Up To Date Windows 7 Install Disc • Raymond.CC
 

My Computer My Computer

At a glance

Microsoft Windows 7 Ultimate 64-bit 7601 Mult...Intel(R) Core(TM)2 Duo CPU E7200 @ 2.53GHz4.00 GBNVIDIA GeForce 210
Computer type
PC/Desktop
Computer Manufacturer/Model Number
custom build
OS
Microsoft Windows 7 Ultimate 64-bit 7601 Multiprocessor Free Service Pack 1
CPU
Intel(R) Core(TM)2 Duo CPU E7200 @ 2.53GHz
Motherboard
To be filled by O.E.M. To be filled by O.E.M.
Memory
4.00 GB
Graphics Card(s)
NVIDIA GeForce 210
Sound Card
(1) NVIDIA High Definition Audio (2) Realtek High Definiti
Screen Resolution
1920 x 1080 x 32 bits (4294967296 colors) @ 60 Hz
Hard Drives
ST3500312CS ATA Device
Hi, Ok.Brink,
probably you may say, how do I update other window updates and integrate in to the windows installation media using the rtlilte after mounting
Your suggestion of going to view update history and clicking more and then click the interlink, does not work, as the pages are not available.
Please let me know, how to update the window update packages, if i have downloaded required updates in a separate folder.
Would you.

I'm not sure it's possible anymore with Windows 7 unless you can find an updated ISO instead. :(
 

My Computer My Computer

At a glance

64-bit Windows 11 Pro for WorkstationsIntel i7-8700K OC'd to 5 GHz64 GB (4x16GB) G.SKILL TridentZ RGB DDR4 3600...ASUS ROG-STRIX-GTX1080TI-O11G-GAMING
Computer type
PC/Desktop
Computer Manufacturer/Model Number
Self built custom
OS
64-bit Windows 11 Pro for Workstations
CPU
Intel i7-8700K OC'd to 5 GHz
Motherboard
ASUS ROG Maximus XI Formula Z390
Memory
64 GB (4x16GB) G.SKILL TridentZ RGB DDR4 3600 MHz
Graphics Card(s)
ASUS ROG-STRIX-GTX1080TI-O11G-GAMING
Sound Card
Integrated
Monitor(s) Displays
2 x Samsung Odyssey G7 27"
Screen Resolution
2560x1440
Hard Drives
1TB Samsung 990 PRO M.2,
4TB Samsung 990 PRO PRO M.2,
TerraMaster F8 SSD Plus NAS
PSU
Seasonic Prime Titanium 850W
Case
Thermaltake Core P3
Cooling
Corsair Hydro H115i
Keyboard
Logitech wireless K800
Mouse
Logitech MX Master 4
Internet Speed
2 Gb/s Download and 100 Mb/s Upload
Antivirus
Malwarebyte Anti-Malware Premium
Browser
Google Chrome
Other Info
Logitech Z625 speaker system,
Logitech BRIO 4K Pro webcam,
HP Color LaserJet Pro MFP M477fdn,
APC SMART-UPS RT 1000 XL - SURT1000XLI,
Galaxy S23 Plus phone
Hi, OK, brink, just say something on your tutorial. will try.
I have got some msu updates in different folders.
how do I arrange the order of updates so that there is no problem in integrating the list correctly when slipstreaming .
For example , I have security updates in a folder, optional updates in another folder and stack roll up updates in yet another folder. If suppose,I go to the msu files and select all of them, how then I maintain the order in which the updates were given. Then there is another list containing optional updates all folders in a single folder.
I could go to these folders and select all for integration.
But how do I maintain the order of updates. I mean the date of updates will be not the same for same set of files in the same folder or in the other folders.
how to go about it please
Is there no harm in selecting the updates and just click the integration tab
 

My Computer My Computer

At a glance

Microsoft Windows 7 Ultimate 64-bit 7601 Mult...Intel(R) Core(TM)2 Duo CPU E7200 @ 2.53GHz4.00 GBNVIDIA GeForce 210
Computer type
PC/Desktop
Computer Manufacturer/Model Number
custom build
OS
Microsoft Windows 7 Ultimate 64-bit 7601 Multiprocessor Free Service Pack 1
CPU
Intel(R) Core(TM)2 Duo CPU E7200 @ 2.53GHz
Motherboard
To be filled by O.E.M. To be filled by O.E.M.
Memory
4.00 GB
Graphics Card(s)
NVIDIA GeForce 210
Sound Card
(1) NVIDIA High Definition Audio (2) Realtek High Definiti
Screen Resolution
1920 x 1080 x 32 bits (4294967296 colors) @ 60 Hz
Hard Drives
ST3500312CS ATA Device
Back
Top