How to Customize Common Open File Dialog Box Places Bar in Windows
InformationWhen you save or open a file in an application that uses Windows common dialog box, the Places bar on the left side of the dialog box can help you navigate quicker to a location.
This will show you how to customize the list of items displayed in the Places Bar in the Windows XP style common open file dialog box (ex: Save As, Open) for all users in Vista, Windows 7, and Windows 8.
You can specify from 1 to 5 items to be displayed in the Places Bar.NoteThe valid items you may display in the Places Bar are:
1) Shortcuts (full path) to a local folder -- (ex. C:\Windows)
NOTE: Do not include full path in quotes.
2) Shortcuts (full path) to remote folders -- (\\server\share)
3) FTP folders
4) web folders
5) Shell Commands in Windows 7 or Windows 8 for locations
6) Common Shell folders -- (examples)
- MyComputerFolder
- MyDocuments
- MyFavorites
- MyMusic
- MyPictures
- MyNetworkPlaces
- MyFavorites
- CommonDocuments
- CommonMusic
- CommonPictures
- Desktop
- Printers
- ProgramFiles
- Recent
- shell:desktop
- shell:documentsLibrary
- shell:Libraries
- shell:MusicLibrary
- shell:PicturesLibrary
- shell:VideosLibrary
- shell:MyComputerFolder
EXAMPLE: Default and Custom Places Bar Items in Common Open File Dialog Box
NOTE: These will be the smaller Windows XP (ex: Browse type) common dialog box style windows that have shortcut icons (places) instead of the normal Navigation Pane that has a folder tree.
OPTION ONECustomize Places Bar using the Local Group Policy Editor
1. Open the all users, specific users or groups, or all users except administrators Local Group Policy Editor for how you want this policy applied.2. In the left pane, click/tap on to expand User Configuration, Administrative Templates, Windows Components, Windows Explorer (Vista and Windows 7) or File Explorer (Windows 8), and Common Open File Dialog. (see screenshot below)
3. In the right pane of Common Open File Dialog, double click/tap on Items displayed in Places Bar to edit it. (see screenshot above)
4. To Restore Default Items Displayed in the Places Bar
A) Select (dot) either Not Configured or Disabled. (see screenshot below step 6)B) Go to step 6.5. To Customize Items to be Displayed in the Places Bar
A) Select (dot) Enabled. (see screenshot below step 6)6. Click/tap on OK. (see screenshot below)
B) Under Options, you can type in up to 5 separate items (locations) for Places to display. (see screenshot below step 6)
NOTE: See the NOTE box at the top of the tutorial for more on valid items you may display in the Places Bar.
7. Close the Local Group Policy Editor window.
OPTION TWOTo Customize Places Bar Manually in Registry Editor
1. Press the Windows + R keys to open the Run dialog, type regedit, and press enter.That's it,
2. If prompted by UAC, click/tap on Yes (Windows 7/8) or Continue (Vista).
3. In regedit, navigate to the location below. (see screenshot below)
HKEY_CURRENT_USER\Software\Microsoft\Windows\CurrentVersion\Policies4. To Customize Items to be Displayed in the Places Bar
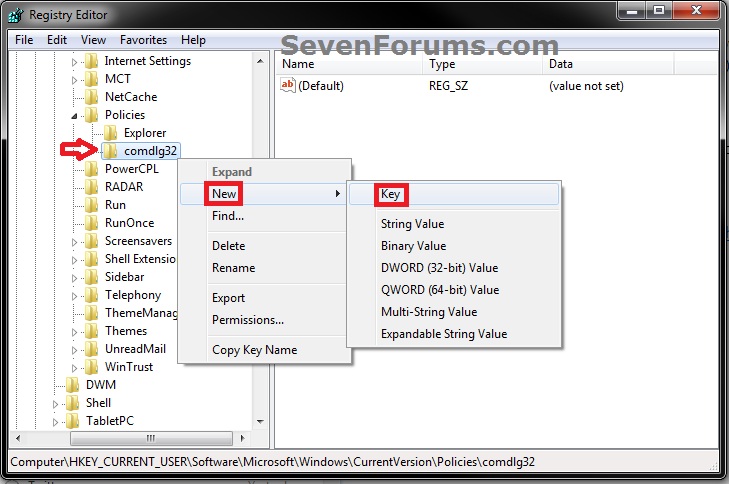
A) In the left pane, right click on Policies, and click/tap on New and Key. (see screenshot below)5. To Restore Default Items Displayed in the Places Bar
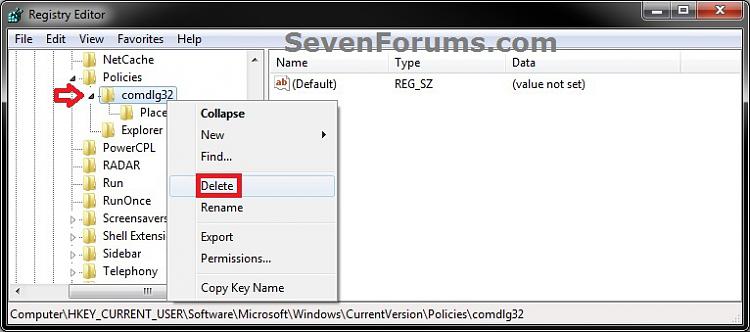
B) Type comdlg32, and press enter. Right click on comdlg32, and click/tap on New and Key. (see screenshot below)
NOTE: If you already have the comdlg32 key, then you can skip on to step 4C below.
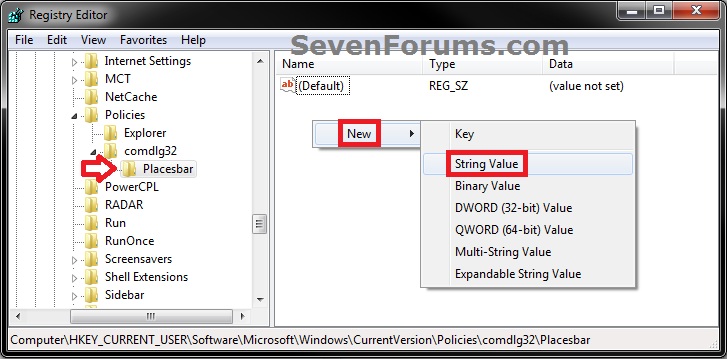
C) Type Placesbar, and press enter. (see screenshot below step 4D)
D) In the right pane of Placesbar, right click or press and hold on an empty space, and click/tap on New and String Value. (see screenshot below)
E) You can specify up to 5 places, so type Place0, Place1, Place2, Place3, or Place4 for each one you would like to customize, and press Enter. (see screenshot below)
F) Repeat steps 4D and 4E to add each Place# string value for how many custom places you wanted to be displayed as items in the Places Bar.
G) In the right pane, double click/tap on the Place# to modify it. Type in the item location that you want to have displayed in the Places Bar, and click/tap on OK. Repeat for each Place# that you have added in step 4E above. (see screenshot below)
NOTE: See the NOTE box at the top of the tutorial for more on valid items you may display in the Places Bar.
H) Go to step 6.
6. Close regedit.
Shawn
Common File Dialog Box - Customize Places Bar
-
New #1
Thank you Brink for this. Thanks for your time.
Been bashing my head trying to drag <places> into this pane...hard drive sizes these days have made filing and storage a little difficult to keep up with. This will definitely help.
Regards
-
-
New #3
Recent Items vs Recent Places
Hi, the note referred to says that you can have Recent Places. When I put that in there is nothing on the dialog box. 'Recent' gives you links to recent items which is not the same as recent places. I wouldn't mind both. For items 'recent' will do, but how do I get recent places?
Thanks.
-
New #4
Hello Deejay,
For Recent Places, you would use this path below. Substitute (user-name) for your actual user folder name though. :)
C:\Users\(user-name)\Links\RecentPlaces.lnk
Hope this helps,
ShawnLast edited by Brink; 16 Jun 2010 at 15:02.
-
New #5
Many thanks. I get a strange result. The Recent Places is there but clicking it doesn't take me anywhere. When the Recent Places is there from the Default option then it takes me to the Proper Recent Places folder.
-
New #6
Deejay,
I can't get it to do anything for "Recent Places" either when manually adding. Seems the only way to use "Recent Places" is to keep the default settings.
-
New #7
Thank you for this tutorial. I am building a new website for a client and am working with hundreds of photos in multiple folders. This allowed me to customize the dialog box for Photoshop and is saving me a LOT of time - it works perfectly!
-
New #8
You're most welcome Semperfi, and welcome to Seven Forums. I'm happy to hear that it was able to help you. :)
-
New #9
No Common Dialogue!
Brink, if you don't mind my asking here in this thread...
My problem is that on my office Win7 Pro 64 machine (with Office 2007) instead of getting the usual common dialogue box I simply get windows explorer. And its not just for Office but every single open/save action no matter which application.
On most other Win 7 installations I've done (most all Office 2003) I still get the usual common dialogue box.
In other words, on the problem office PC, in the open/save file dialogue box in the left pane I get the same structure as if I had opened Windows Explorer.
Any idea how to get back to the original common dialogue box?
Thanks for any help here!
CT

Common File Dialog Box - Customize Places Bar
How to Customize Common Open File Dialog Box Places Bar in WindowsPublished by Brink
Related Discussions


 Quote
Quote