New Installation: How to Create a General System Image in Audit Mode

   Note
Audit Mode is a very practical way to prepare a system image without any user specific information like usernames or computer name. With it you can create a General System Image that gives you always when used a fresh, clean Windows 7 setup as if it were a virgin, fresh install, only difference being your software, drivers and updates are already installed. Using System Image recovery is a much faster method to start fresh than reinstalling everything.

When recovering image created with this method, computer will start in so called First Run OOBE mode without any user accounts but all drivers, software and updates installed, stopping to ask for initial username, computer name, language (if additional languages installed), time zone, network and homegroup settings. An image includes no user accounts, no activation information and no SID so you always start fresh.


This tutorial takes you through following steps:
  1. Installing Windows 7 and entering Audit Mode during first boot after the installation
  2. Installing drivers, software, software updates and additional languages (Ultimate and Enterprise editions only)
  3. Creating a system image
  4. Booting to Windows Welcome (OOBE)

       Note
    Notice that Windows Update does not work in Audit Mode.

Step 1: Install Windows 7

  1. Beginn installation of Windows 7 as told in this tutorial
  2. When you reach step 11 in above mentioned installation tutorial, DO NOT ENTER USERNAME AND COMPUTER NAME! Instead press CTRL + SHIFT + F3:
    .
    183650d1321295239-windows-7-installation-prepare-pc-sold-audit_1.png

    .
  3. This reboots Windows 7 now in so called Audit Mode using built-in administrator profile. There's no need to set up user accounts for now
  4. Continue installation from installation tutorial's step 15
  5. Finally Windows 7 starts in Audit Mode. Click Cancel to close System Preparation Tool for now:
    .
    183652d1321295526-windows-7-installation-prepare-pc-sold-audit_3.png
Step 2: Install drivers, software and updates

  1. Install all third party drivers needed (audio, video etc.)
  2. If using Ultimate or Enterprise editions, install additional language packs if needed
  3. Install your software (third party browsers and mail clients, MsOffice, PhotoShop, Flash Player, PDF reader etc.)
  4. Install software updates
  5. If you want to change where all future User accounts will be located, you can relocate the main Users folder now as told in this tutorial: http://www.sevenforums.com/tutorial...reate-move-during-windows-7-installation.html
  6. When ready, continue from Step 3
Notice: Installing drivers, updates and software might cause your computer to reboot several times. As long as you have not selected to exit Audit Mode, Windows reboots always automatically back to Audit Mode. In this case just close the System Preparation Tool as told above in Step 1.5.

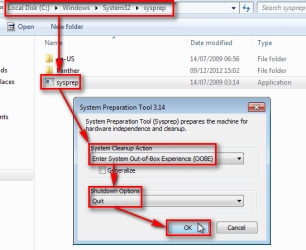
Step 3: Create a System Image

When you are ready with customization, close all open applications and Explorer windows, and open an elevated command prompt. Give the following command:
Code:
%windir%\system32\sysprep\sysprep.exe /oobe /shutdown
Windows will now run the System Preaparation Tool (sysprep) and shut down.

Now the only thing missing is creating the image. Boot the PC with the boot disk of your chosen imaging application and create the image. You can use any third party imaging application, my choice is the free edition of Macrium Reflect. Here you can find an easy to read, complete tutorial showing you how to do it with Macrium


Step 4: First boot (Welcome or OOBE boot)

When image is done, shut down the PC. Remove the boot disk of the imaging application, turn the PC on to start Windows . It will now boot to a so called First Run OOBE (Out-of-Box Experience) boot, stopping to ask initial user profile name and computer name as told in this tutorial, Step 11 and further. If language packs are installed (Ultimate or Enterprise only), initial first boot also asks user in what language he / she wants Windows to be set up.

Now you have your Windows 7 set up, with a System Image that you can use anytime you want to get fast back to fresh Windows.

Have Fun!

Kari


Attachments

  • 2012-12-09_175125.png
    2012-12-09_175125.png
    21.9 KB · Views: 21,304
Last edited:
As I have mentioned, the Sysprep is running all the time in the background [...] It works in Audit Mode when Sysprep is run and stopped with the Quit switch.

I completely understood what you said in your previous post itself. I just suggested that you include some form of that explanation in the tutorial so that others also can understand.

To put it very simple, there are basically only one major difference in using this method (create a vhd image) and creating an install.wim file: The vhd restores an image setting up a copy (image) of a previously installed Windows, whereas the install.wim setups Windows by doing a clean install. Other than that the result is the same. For home users I recommend the method told in this tutorial, the vhd image as it is a bit simpler and does not require non-native Windows tools to capture the image.

Kari

Well DISM can be used to capture WIM images of installations... right? And DISM is native to Windows. And would not the WIM images be much smaller in size?

As I see it, from a higher level view :
  • The system image tool tries to capture a working windows installation for drop-in replacement of the OS instance at any time.
  • Image capture modifies the installation image with updates and software, so that one can newly install with much more up-to-date components.

So when considering the array of options available to windows users today to rollback, the system image tool should be used to get back immediately to a known good working point, usually when the current system has failed somehow. While the custom install.wim should be used to do a fresh install, just with more updated components and some software. Perhaps DISM is better suited to add updates, while system image better for software. Perhaps DISM is better suited for a generalized always-updated OS installation DVD ISO for any system to start afresh, while system image for single system and very predictably similar HDD partition layout.

I hope I seem like I'm heading somewhere with this...?
 

My Computer My Computer

At a glance

Windows 7 Home Premium x64Intel Core 2 Quad Q6600 G0Transcend JM800QLU-2G x 2 (2x2GB)Sapphire Radeon HD6850 1GB
Computer type
PC/Desktop
Computer Manufacturer/Model Number
Custom
OS
Windows 7 Home Premium x64
CPU
Intel Core 2 Quad Q6600 G0
Motherboard
MSI P45 Platinum MS-7512
Memory
Transcend JM800QLU-2G x 2 (2x2GB)
Graphics Card(s)
Sapphire Radeon HD6850 1GB
Hard Drives
Seagate ST3360320AS in Transcend Storejet Ultra35 eSATA
Seagate ST31000524AS
PSU
Corsair GS600
Cooling
Stock
Mouse
Logitech Wired M500 USB
Internet Speed
15Mbps
Antivirus
Microsoft Security Essentials
Browser
Google Chrome
Well DISM can be used to capture WIM images of installations... right? And DISM is native to Windows. And would not the WIM images be much smaller in size?
Yes, DISM is a native Windows tool but not very easy for an average user to use. To keep instructions easy enough for an average user to understand them, to be sure that the procedure can be done without any deeper knowledge of Windows, this tutorial tries to offer an easy to do straight forward solution.

So when considering the array of options available to windows users today to rollback, the system image tool should be used to get back immediately to a known good working point, usually when the current system has failed somehow. While the custom install.wim should be used to do a fresh install, just with more updated components and some software. Perhaps DISM is better suited to add updates, while system image better for software. Perhaps DISM is better suited for a generalized always-updated OS installation DVD ISO for any system to start afresh, while system image for single system and very predictably similar HDD partition layout.
I disagree. Both methods can be used in exactly the same scenarios, either restoring a failed Windows setup or deploying Windows to a new computer.

From the end user's point of view there really is no difference between the two methods. Both methods allow you to customize the image, install applications, drivers and Windows updates and so on. When the system image, created as told in this tutorial is applied the result is exactly the same than when applying a captured install.wim image: a "virgin" (as in no existing user profiles) and fresh OOBE First Run boot.

If the goal is a hardware independent image which can be applied / deployed to any hardware capable to run Windows, both methods work even then exactly the same way: using the Generalize switch with Sysprep the hardware depended information is removed, SID reseted and a hardware independent image can be created.

More thorough walkthrough: http://www.sevenforums.com/tutorials/319903-windows-7-image-customize-audit-mode-sysprep.html

Kari
 

My Computer My Computer

At a glance

Windows 10 Pro x64 EN-GB1.6 GHz Intel Core i7-720QM Processor6 GBATI Mobility Radeon HD 5850 Graphics
Computer type
Laptop
Computer Manufacturer/Model Number
HP ENVY 17-1150eg
OS
Windows 10 Pro x64 EN-GB
CPU
1.6 GHz Intel Core i7-720QM Processor
Memory
6 GB
Graphics Card(s)
ATI Mobility Radeon HD 5850 Graphics
Sound Card
Beats sound system with integrated subwoofer
Monitor(s) Displays
17" laptop display, 22" LED and 32" Full HD TV through HDMI
Screen Resolution
1600*900 (1), 1920*1080 (2&3)
Hard Drives
Internal: 2 x 500 GB SATA Hard Disk Drive 7200 rpm
External: 2TB for backups, 3TB USB3 network drive for media
Cooling
As Envy runs a bit warm, I have it on a Cooler Master pad
Keyboard
Logitech diNovo Media Desktop Laser (bluetooth)
Mouse
Logitech Performance Mouse MX
Internet Speed
50/10 Mbps VDSL
Antivirus
Windows Defender 4.3.9431.0
Browser
Maxthon 3.5.2., IE11
  1. What is the main difference between this solution plus imaging with Macrium or the standard installation plus Macrium, no user profile?
  2. I'm tempted to use Windows' System Image and save the image in a hidden partition and so creating it, could anyone please link me to the right thread if any?
  3. Alternatively I'll image with Macrium, but I feel like with Windows' tool and the hidden image I won't need to burn DVDs plus the tutorial here on Sevenforums explains how to create multiple images which is a good option.
Thanks very much for useful tutorial!
 

My Computer My Computer

At a glance

Windows 7 Ultimate x64Intel i5-6600K 3.50GHzCorsair DDR4 2x8GBMSI GeForce GTX1070 Gaming X
Computer type
PC/Desktop
Computer Manufacturer/Model Number
Custom build
OS
Windows 7 Ultimate x64
CPU
Intel i5-6600K 3.50GHz
Motherboard
Asus Pro Z170 Gaming
Memory
Corsair DDR4 2x8GB
Graphics Card(s)
MSI GeForce GTX1070 Gaming X
Sound Card
On board Realtek
Monitor(s) Displays
Dell SP2309W
Screen Resolution
1920x1080
Hard Drives
OS Samsung 850 EVO 500GB SATA III SSD
2x Hitachi Deskstar 1GB SATA data drives
1x Western Digital Caviar Black 1TB SATA data drive
PSU
Corsair HX650W
Case
CoolerMaster CM 690 III
Cooling
Coolermaster Hyper 212 EVO 1x200mm 1x140mm 2x120mm case fan
Keyboard
Logitech usb keyboard
Mouse
Logitech G500 $27 bargain :)
Internet Speed
ADSL2
Antivirus
Microsoft Security Essential, MalwareBytes
Browser
SRWare Iron, Internet Explorer
Other Info
Very happy with this buid.
I struggled a lot to find all compatible parts since I wanted an Intel 1151 based motherboard so to be able to install Windows 7.
I chose this case because it has amazing air flow, it's sturdy and looks good.
The case included 1x 200mm front and 1x 120mm back fans, I added 1x 200mm on the top and 1x120 bottom fans and modded the panels with black stockings for women s
Hi, I'm in the process of following this tutorial for a clean install of Win 7 Pro x64. This one issue I'm having at the moment is that I can't check, download, or install Windows Updates. Is there a fix for that?

Thank you for your assistance.

Regards
 

My Computer My Computer

At a glance

Windows 7 Professional x64 SP1Intel i7-980x @ 3.6GHzCorsair 12GB DDR3 RAM (3x4GB)EVGA NVIDIA GeForce GTX 760 SC
Computer type
PC/Desktop
Computer Manufacturer/Model Number
Custom Build
OS
Windows 7 Professional x64 SP1
CPU
Intel i7-980x @ 3.6GHz
Motherboard
Intel DX58SO
Memory
Corsair 12GB DDR3 RAM (3x4GB)
Graphics Card(s)
EVGA NVIDIA GeForce GTX 760 SC
Sound Card
Intel High Definition 7.1 Audio Subsystem - Realtek ALC889
Monitor(s) Displays
Dual Display - LG Electronics Flatron L227WTG
Screen Resolution
1680 x 1050 60Hz 32-bit
Hard Drives
2 Seagate Constellation ST1000NM0033 1TB SATA 6Gb/s HDDs configured as Intel SATA Array 0, RST RAID 1, Vol. 0 (C:\) & Vol. 1 (D:\), & 2 Seagate Barracuda ST500DM002 500GB SATA 6Gb/s HDDs configured as Intel SATA Array 1 RST RAID 1, Vol. 0 (E:\)
PSU
Corsair HX850W
Case
Antec P182
Cooling
Stock Intel i7-980x Cooling Solution + 4 120mm Case Fans
Keyboard
Microsoft Wireless Multimedia Keyboard 1.1
Mouse
Microsoft Standard Wireless Optical Mouse
Internet Speed
DSL - 3.0 Mb/s download 768 Kb/s upload
Antivirus
ESET Smart Security 12, Defender & SuperAntiSpyware Pro
Browser
Firefox Quantum 64-bit
Other Info
Optical Drives: Pioneer DVR-216R & TSSTcorp SH-S223Q, Anker USB 3.0 PCI-E Card, Hauppauge WinTV-HVR 2250 Dual TV Tuner Board for Windows Media Center, Bose Companion 3 Series II multimedia speaker system, APC Smart-UPS SMT1500
Hi, I'm in the process of following this tutorial for a clean install of Win 7 Pro x64. This one issue I'm having at the moment is that I can't check, download, or install Windows Updates. Is there a fix for that?

Thank you for your assistance.

Regards


this may be an obvious question, but it has happened to me a few times :o
but, do you have your network driver installed?

if so, make sure you have connection to the internet.
 

My Computer My Computer

At a glance

Windows 7 Professional 32bit, 64 bit, Windows...Intel4GB-8GB
Computer type
PC/Desktop
Computer Manufacturer/Model Number
Dell Optiplex
OS
Windows 7 Professional 32bit, 64 bit, Windows XP Professional
CPU
Intel
Memory
4GB-8GB
Monitor(s) Displays
1-3
Hard Drives
80GB+
Keyboard
wired dell stock keyboard and wireless logitech
Mouse
wired dell stock mouse and wireless logitech
Antivirus
System Center 2012 Endpoint Protection
Browser
Internet Explorer 8/9, Firefox, Chrome
The network driver is installed. I did it in Audit Mode. I was a bit confused following the tutorial instructions. From what I can observe, I couldn't download any updates until I exited audit mode and entered the Win 7 software key. Now I get the indication that the system is checking for updates, but there is nothing downloading. I suspect there is a glitch somewhere and I might need to reload something.
 

My Computer My Computer

At a glance

Windows 7 Professional x64 SP1Intel i7-980x @ 3.6GHzCorsair 12GB DDR3 RAM (3x4GB)EVGA NVIDIA GeForce GTX 760 SC
Computer type
PC/Desktop
Computer Manufacturer/Model Number
Custom Build
OS
Windows 7 Professional x64 SP1
CPU
Intel i7-980x @ 3.6GHz
Motherboard
Intel DX58SO
Memory
Corsair 12GB DDR3 RAM (3x4GB)
Graphics Card(s)
EVGA NVIDIA GeForce GTX 760 SC
Sound Card
Intel High Definition 7.1 Audio Subsystem - Realtek ALC889
Monitor(s) Displays
Dual Display - LG Electronics Flatron L227WTG
Screen Resolution
1680 x 1050 60Hz 32-bit
Hard Drives
2 Seagate Constellation ST1000NM0033 1TB SATA 6Gb/s HDDs configured as Intel SATA Array 0, RST RAID 1, Vol. 0 (C:\) & Vol. 1 (D:\), & 2 Seagate Barracuda ST500DM002 500GB SATA 6Gb/s HDDs configured as Intel SATA Array 1 RST RAID 1, Vol. 0 (E:\)
PSU
Corsair HX850W
Case
Antec P182
Cooling
Stock Intel i7-980x Cooling Solution + 4 120mm Case Fans
Keyboard
Microsoft Wireless Multimedia Keyboard 1.1
Mouse
Microsoft Standard Wireless Optical Mouse
Internet Speed
DSL - 3.0 Mb/s download 768 Kb/s upload
Antivirus
ESET Smart Security 12, Defender & SuperAntiSpyware Pro
Browser
Firefox Quantum 64-bit
Other Info
Optical Drives: Pioneer DVR-216R & TSSTcorp SH-S223Q, Anker USB 3.0 PCI-E Card, Hauppauge WinTV-HVR 2250 Dual TV Tuner Board for Windows Media Center, Bose Companion 3 Series II multimedia speaker system, APC Smart-UPS SMT1500
I found this very useful.

Now, can you please tell me how I can use the image to restore? When I tried "Restore this computer to an ealier point in time" -> Advanced -> restart, I could not locate the last dvd.. in the list.
 

My Computer My Computer

At a glance

Win 7 pro x64
Computer type
PC/Desktop
OS
Win 7 pro x64
I found this very useful.

Now, can you please tell me how I can use the image to restore? When I tried "Restore this computer to an ealier point in time" -> Advanced -> restart, I could not locate the last dvd.. in the list.

Restoring the PC to an earlier point with System Restore has nothing to do with this tutorial, or the method told in this tutorial. A Windows system restore and an image restore are two different things. Of course the system restore wont recognize an image created with an imaging program.

In Step 3 of this tutorial you are told to boot the PC with the boot disk of your chosen imaging software and create the image. Whenever a restore is needed, you simply boot the PC again with the boot disk of your imaging software and restore the system image you created in Step 3.

Kari
 

My Computer My Computer

At a glance

Windows 10 Pro x64 EN-GB1.6 GHz Intel Core i7-720QM Processor6 GBATI Mobility Radeon HD 5850 Graphics
Computer type
Laptop
Computer Manufacturer/Model Number
HP ENVY 17-1150eg
OS
Windows 10 Pro x64 EN-GB
CPU
1.6 GHz Intel Core i7-720QM Processor
Memory
6 GB
Graphics Card(s)
ATI Mobility Radeon HD 5850 Graphics
Sound Card
Beats sound system with integrated subwoofer
Monitor(s) Displays
17" laptop display, 22" LED and 32" Full HD TV through HDMI
Screen Resolution
1600*900 (1), 1920*1080 (2&3)
Hard Drives
Internal: 2 x 500 GB SATA Hard Disk Drive 7200 rpm
External: 2TB for backups, 3TB USB3 network drive for media
Cooling
As Envy runs a bit warm, I have it on a Cooler Master pad
Keyboard
Logitech diNovo Media Desktop Laser (bluetooth)
Mouse
Logitech Performance Mouse MX
Internet Speed
50/10 Mbps VDSL
Antivirus
Windows Defender 4.3.9431.0
Browser
Maxthon 3.5.2., IE11
Well DISM can be used to capture WIM images of installations... right? And DISM is native to Windows. And would not the WIM images be much smaller in size?
Yes, DISM is a native Windows tool but not very easy for an average user to use. To keep instructions easy enough for an average user to understand them, to be sure that the procedure can be done without any deeper knowledge of Windows, this tutorial tries to offer an easy to do straight forward solution.

So when considering the array of options available to windows users today to rollback, the system image tool should be used to get back immediately to a known good working point, usually when the current system has failed somehow. While the custom install.wim should be used to do a fresh install, just with more updated components and some software. Perhaps DISM is better suited to add updates, while system image better for software. Perhaps DISM is better suited for a generalized always-updated OS installation DVD ISO for any system to start afresh, while system image for single system and very predictably similar HDD partition layout.
I disagree. Both methods can be used in exactly the same scenarios, either restoring a failed Windows setup or deploying Windows to a new computer.

From the end user's point of view there really is no difference between the two methods. Both methods allow you to customize the image, install applications, drivers and Windows updates and so on. When the system image, created as told in this tutorial is applied the result is exactly the same than when applying a captured install.wim image: a "virgin" (as in no existing user profiles) and fresh OOBE First Run boot.

If the goal is a hardware independent image which can be applied / deployed to any hardware capable to run Windows, both methods work even then exactly the same way: using the Generalize switch with Sysprep the hardware depended information is removed, SID reseted and a hardware independent image can be created.

More thorough walkthrough: http://www.sevenforums.com/tutorials/319903-windows-7-image-customize-audit-mode-sysprep.html

Kari
I think you're wrong. This does not seem HAL independent. Step 3 omits the /generalize switch. Meaning this will give a nice oobe image for people with the same or similar hardware. But change your laptop brand and the image won't work properly.
Audit mode =/= HAL independent
After skipping useroobe and installing windows, you locked your drivers. Using sysprep without /generalize means you don't revert that.
 

My Computer My Computer

At a glance

windows 7 Enterprise x64
Computer type
PC/Desktop
OS
windows 7 Enterprise x64
I think you're wrong. This does not seem HAL independent. Step 3 omits the /generalize switch. Meaning this will give a nice oobe image for people with the same or similar hardware. But change your laptop brand and the image won't work properly.
Audit mode =/= HAL independent
After skipping useroobe and installing windows, you locked your drivers. Using sysprep without /generalize means you don't revert that.

Hi Jiggunjer, welcome to the Seven Forums.

This tutorial is made for average Windows 7 users who want to create a system image for their specific machine, with everything already installed, allowing the user to apply this image to restore their system to pristine condition.

The discussion you quoted is a bit out of context here. Naturally this image cannot be used as such on another hardware. To do that the /generalize switch needs to be used.

This tutorial is for as I mentioned average users without no deeper knowledge of Windows. I have covered the process of creating a really hardware independent image in a much more advanced step-by-step walkthrough here: http://www.sevenforums.com/tutorials/319903-windows-7-image-customize-audit-mode-sysprep.html

In addition, if a user who has followed instructions in this tutorial wants to move the Windows installation to new hardware, I have written the instructions here: http://www.sevenforums.com/tutorials/135077-windows-7-installation-transfer-new-computer.html

Kari
 
Last edited:

My Computer My Computer

At a glance

Windows 10 Pro x64 EN-GB1.6 GHz Intel Core i7-720QM Processor6 GBATI Mobility Radeon HD 5850 Graphics
Computer type
Laptop
Computer Manufacturer/Model Number
HP ENVY 17-1150eg
OS
Windows 10 Pro x64 EN-GB
CPU
1.6 GHz Intel Core i7-720QM Processor
Memory
6 GB
Graphics Card(s)
ATI Mobility Radeon HD 5850 Graphics
Sound Card
Beats sound system with integrated subwoofer
Monitor(s) Displays
17" laptop display, 22" LED and 32" Full HD TV through HDMI
Screen Resolution
1600*900 (1), 1920*1080 (2&3)
Hard Drives
Internal: 2 x 500 GB SATA Hard Disk Drive 7200 rpm
External: 2TB for backups, 3TB USB3 network drive for media
Cooling
As Envy runs a bit warm, I have it on a Cooler Master pad
Keyboard
Logitech diNovo Media Desktop Laser (bluetooth)
Mouse
Logitech Performance Mouse MX
Internet Speed
50/10 Mbps VDSL
Antivirus
Windows Defender 4.3.9431.0
Browser
Maxthon 3.5.2., IE11
Computer Models

I completed this tutorial and it works great - thanks for that..

Now we have received some newer models and I do not want to create multiple images but use one for all computers, so when done imaging the system a bunch of drivers are missing.

I downloaded the driver package from the manufacturer but where do I copy these to on the image so when the computer loads it will detect and load all the drivers?
 

My Computer My Computer

At a glance

Win 7 Pro x64
Computer type
Laptop
OS
Win 7 Pro x64

My Computer My Computer

At a glance

Windows 10 Pro x64 EN-GB1.6 GHz Intel Core i7-720QM Processor6 GBATI Mobility Radeon HD 5850 Graphics
Computer type
Laptop
Computer Manufacturer/Model Number
HP ENVY 17-1150eg
OS
Windows 10 Pro x64 EN-GB
CPU
1.6 GHz Intel Core i7-720QM Processor
Memory
6 GB
Graphics Card(s)
ATI Mobility Radeon HD 5850 Graphics
Sound Card
Beats sound system with integrated subwoofer
Monitor(s) Displays
17" laptop display, 22" LED and 32" Full HD TV through HDMI
Screen Resolution
1600*900 (1), 1920*1080 (2&3)
Hard Drives
Internal: 2 x 500 GB SATA Hard Disk Drive 7200 rpm
External: 2TB for backups, 3TB USB3 network drive for media
Cooling
As Envy runs a bit warm, I have it on a Cooler Master pad
Keyboard
Logitech diNovo Media Desktop Laser (bluetooth)
Mouse
Logitech Performance Mouse MX
Internet Speed
50/10 Mbps VDSL
Antivirus
Windows Defender 4.3.9431.0
Browser
Maxthon 3.5.2., IE11
If I created an image like this on one W7 computer, could I use that same image on another W7 machine? Or is this similar to just using the built-in W7 "Create system image," but it is instead just creating an image before any user accounts are created? It seems like it's the latter if I'm understanding things correctly.

Thanks.
 

My Computer My Computer

At a glance

Windows 7 x64
Computer type
PC/Desktop
OS
Windows 7 x64
If I created an image like this on one W7 computer, could I use that same image on another W7 machine? Or is this similar to just using the built-in W7 "Create system image," but it is instead just creating an image before any user accounts are created? It seems like it's the latter if I'm understanding things correctly.

Thanks.

Hi Ahelton, welcome to the Seven Forums.

To create a hardware independent system image which can be used to deploy Windows 7 to any computer, simply add /generalize switch to sysprep command told in Step 3. In that case the command would be:

Code:
%windir%\system32\sysprep\sysprep.exe [hl]/generalize[/hl] /oobe /shutdown


Generalizing will remove all hardware related data and drivers from the image. When you then create the image and restore it to any machine Windows will install default device drivers used in normal clean install.

Kari
 

My Computer My Computer

At a glance

Windows 10 Pro x64 EN-GB1.6 GHz Intel Core i7-720QM Processor6 GBATI Mobility Radeon HD 5850 Graphics
Computer type
Laptop
Computer Manufacturer/Model Number
HP ENVY 17-1150eg
OS
Windows 10 Pro x64 EN-GB
CPU
1.6 GHz Intel Core i7-720QM Processor
Memory
6 GB
Graphics Card(s)
ATI Mobility Radeon HD 5850 Graphics
Sound Card
Beats sound system with integrated subwoofer
Monitor(s) Displays
17" laptop display, 22" LED and 32" Full HD TV through HDMI
Screen Resolution
1600*900 (1), 1920*1080 (2&3)
Hard Drives
Internal: 2 x 500 GB SATA Hard Disk Drive 7200 rpm
External: 2TB for backups, 3TB USB3 network drive for media
Cooling
As Envy runs a bit warm, I have it on a Cooler Master pad
Keyboard
Logitech diNovo Media Desktop Laser (bluetooth)
Mouse
Logitech Performance Mouse MX
Internet Speed
50/10 Mbps VDSL
Antivirus
Windows Defender 4.3.9431.0
Browser
Maxthon 3.5.2., IE11
To create a hardware independent system image which can be used to deploy Windows 7 to any computer, simply add /generalize switch to sysprep command told in Step 3. In that case the command would be:

Code:
%windir%\system32\sysprep\sysprep.exe [hl]/generalize[/hl] /oobe /shutdown


Generalizing will remove all hardware related data and drivers from the image. When you then create the image and restore it to any machine Windows will install default device drivers used in normal clean install.

Kari

Ah. Thanks, Kari. This is a great tutorial. I'm using your other tutorial on the System Prep Tool since I had already created user logins and such, but am going to store this one away for future use.
 

My Computer My Computer

At a glance

Windows 7 x64
Computer type
PC/Desktop
OS
Windows 7 x64
Superb tutorial. Thank you for the time you have put into this.

I only wish I'd have seen this before doing a clean install this morning (for the 4th/5th time). Been having random crashing issues from clean install.

For my future reference, does this and your other hardware independent tutorial work when clean install is performed from an upgrade disc?

I was searching for info on using Windows Create System Image option and ended up reading this post. So glad I did.

Brilliant, brilliant work!
 

My Computer My Computer

At a glance

Windows 7 Ultimate x64 SP1Intel Q9550 from memory8192MbMatrox Millenium
Computer type
PC/Desktop
Computer Manufacturer/Model Number
HP xw4600 Workstation
OS
Windows 7 Ultimate x64 SP1
CPU
Intel Q9550 from memory
Motherboard
HP
Memory
8192Mb
Graphics Card(s)
Matrox Millenium
Hard Drives
Western Digital WD5000-AAKS (Blue Caviar?)
Antivirus
None
Browser
Firefox 48
I think this answers my question.

Found on another tutorial:-


An upgraded Windows cannot be sysprepped. As this method is based in sysprepping, this tutorial is valid only for Windows setups which have not been upgraded.

This means that if you have for instance in-place upgraded Vista to Seven, you cannot sysprep. The same applies if you have upgraded from a lesser edition to a better edition, for instance from Windows 7 Home Premium to Professional.

Notice that a repair install is also an upgrade install, so if you have ever done a repair install (= in-place upgrade to same edition), you cannot sysprep.

In other words, when sysprepping an existing Windows setup it only works if the Windows was installed clean and has never been upgraded or repaired using repair install, or if it is the original pre-installed Windows.

Using this method causes Windows 7 to lose activation information, and it needs to be reactivated afterwards. If your Windows 7 is an OEM version, you might not be able to reactivate it, at least not without phone activation option.
 

My Computer My Computer

At a glance

Windows 7 Ultimate x64 SP1Intel Q9550 from memory8192MbMatrox Millenium
Computer type
PC/Desktop
Computer Manufacturer/Model Number
HP xw4600 Workstation
OS
Windows 7 Ultimate x64 SP1
CPU
Intel Q9550 from memory
Motherboard
HP
Memory
8192Mb
Graphics Card(s)
Matrox Millenium
Hard Drives
Western Digital WD5000-AAKS (Blue Caviar?)
Antivirus
None
Browser
Firefox 48
Back
Top