If you install XP fresh without the 7 drive plugged in that will set up the drive as a stand alone install rather then placing the XP boot files on the 7 host drive and replace the 7 boot entries in the master boot record(mbr). For a short time the XP drive will be the default hard drive.
Once the XP installation is complete and you know that is running normal without problems you can then shutdown and replug the 7 drive back in. This will prevent any changes to the 7 boot information. But you will then need to go into the bios setup when powering up again to see that reset or insure it is set as the first hard drive in the list of drives to insure it is the default in order to boot into 7.
Basically that's a fast trip to see that done in there and then simply choose the "exit and save" option if pressing the F10 doesn't save any change right away. From there once back in 7 you can copy the needed XP boot files over to the root of C on the W7 host drive now made the default boot device if you follow me so far.
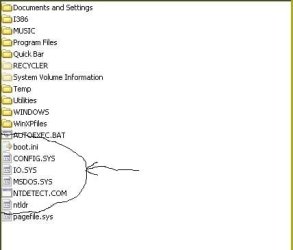
The next step as you will also see in the guide pointed to earlier is simply copying the XP boot files as shown in the attached image being the boot.ini file mentioned before and a few others being indicated in the screen below. NTLDR in lower case is required as well as the NTDETECT.COM, IO.SYS, MSDOS.SYS files while the CONFIG.SYS is simply mixed in there and won't do anything.
Once those are copied over you will need to download and install the latest 2.0.2 version of EasyBCD available free at
Download EasyBCD 2.0.2 - NeoSmart Technologies
Before you can add the new entry for XP however you first have to uncheck the "read only" box in the properties screen for the boot.ini file in order to be able to edit the copy you then have on the 7 drive. A fast edit when opened by a double click bringing up the NotePad window will allow you make a simple change to the "rddisk(0)partition 1" to "rdisk(1)partition 1) since XP is now on the second not first hard drive.
Once that change is seen to simply drop down the File menu and save as "all files" not txt for the NotePad default in order to see the change overwrite the copy of the file now present on the 7 drive. You don't want it saved in text file format but still see the .ini extension at the end.
The EasyBCD options are easy to follow as for adding the new entry in for XP. First however a quick trip into the 7 Disk Management to see what the drive letter is and even change it to another is seen to since that will be the drive letter selected when going to add the new boot entry into the 7 BCD store(boot loader info).
The things to remember of course if you are able to see a working install of XP going you first shutdown to replug the 7 back in and check to see which drive is set as default in the bios. If you install XP without unplugging the 7 drive 7 won't boot later since the XP installer would have replaced the 7 mbr entries requiring you boot up with the 7 dvd and use the startup repair or command prompt option to enter the "Fixmbr" and "Fixboot" commands until seeing the "boot sector successfully written" confirmation.
The unplug first step will see the XP drive made bootable while leaving the 7 drive plugged through all this would see the XP boot files placed on the 7 drive only plus the need for repairing the 7 boot problem you would see. The guide however is what to refer to there if you have any problems since that covers each step except for isolation of the 7 drive when XP is being installed.
 ).
).
