How to Remove and Restore Default "Send To" Context Menu Items in Windows 7 and Windows 8
Information
This will show you how to either remove or restore the default Send To context (right click) menu. This includes the Compressed (zipped) Folder, Desktop (create shortcut), Documents, Fax recipient, and Mail recipient menu items.
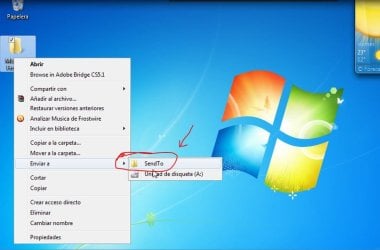
You can press and hold SHIFT + Right Click and release SHIFT on a item to see an expanded Sent To context menu.
You can press and hold SHIFT + Right Click and release SHIFT on a item to see an expanded Sent To context menu.
Note
The hidden SendTo system folder is located at the path below:
C:\Users\(user-name)\AppData\Roaming\Microsoft\Windows\SendTo
OR (shorter)
Shell:SendTo
C:\Users\(user-name)\AppData\Roaming\Microsoft\Windows\SendTo
OR (shorter)
Shell:SendTo
EXAMPLE: Default Send To Context Menu

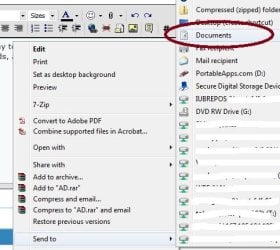
EXAMPLE: Expanded Send To Context Menu
NOTE: The expanded Send To context menu is opened by pressing and holding Shift before right clicking on the file or folder, then clicking on Send To.

OPTION ONE
To Manually Restore Send to Context Menu Items
1. Go to the hidden folder location below, and do step 2 or 3 below for what you would like to do.
C:\Users\Default\AppData\Roaming\Microsoft\Windows

2. To Restore SendTo Folder and All Send to Context Menu Items
A) Copy the SendTo folder.
B) Go to the hidden folder (shell:sendto) location below.
C:\Users\(your user-name)\AppData\Roaming\Microsoft\Windows
C) Paste the SendTo folder, and approve.
3. To Restore Specific Send to Context Menu Item(s)
A) Open the SendTo folder.
B) Copy the shortcuts that you want to restore.
C) Go to the hidden folder (shell:sendto) location below.
C:\Users\(your user-name)\AppData\Roaming\Microsoft\Windows\SendTo
D) Paste the shortcuts into your SendTo folder, and approve.

OPTION TWO
To Restore a Send to Context Menu Item with a Download
1. To Restore Compressed (zipped) Folder
A) Click on the download button below to download the Compressed_(zipped)_folder.zip file.
Download
2. To Restore Desktop (create shortcut)
A) Click/tap on the download button below to download the Desktop_(create shortcut).zip file.
Download
3. To Restore Documents
A) Click/tap on the download button below to download the Documents.zip file.
Download
4. To Restore Fax Recipient
A) Click/tap on the download button below to download the Fax_Recipient .zip file.
Download
5. To Restore Mail Recipient
A) Click/tap on the download button below to download the Mail_Recipient .zip file.
Download
6. Save the ZIP file to your Desktop.
7. Open the .zip file and extract (drag and drop) the shortcut file to your desktop.
8. Right click on the shortcut, then click/tap on Properties, General tab, and on the Unblock button. (see screenshot below)
NOTE: If you do not have a Unblock button under the General tab, then the shortcut is already unblocked and you can continue on to step 9.

9. Press the Windows + R keys to open the Run dialog, type shell:sendto, and press Enter.
10. Move the extracted shortcut(s) (step 7) into the SentTo folder. (see screenshot below)
NOTE: If you wanted to remove a Send To context menu item, then right click on a shortcut in the SendTo folder and click on Delete and Yes.
11. When done, close the SendTo folder and delete the ZIP file on the desktop if you would like to.
That's it,
Shawn
Related Tutorials
- How to Add or Remove "Send to" from Context Menu in Windows 7 and Windows 8
- How to Remove and Restore the Default Windows 7 New Context Menu Items
- Add "COPY TO FOLDER" and "MOVE TO FOLDER" to Context Menu in Windows 7 and Windows 8
- How to Customize the Send To Context Menu in Vista, Windows 7, and Windows 8
- How to Remove or Show Drives in "Send To" Context Menu in Vista, Windows 7, and Windows 8
- How to Add Quick Launch to the "Send to" Context Menu in Vista, Windows 7, and Windows 8
- How to Add Google Drive to "Send To" Context Menu in Windows
Attachments
Last edited:
")