Slipstream Windows 7 SP1 into a Installation DVD or ISO File

How to Slipstream Windows 7 SP1 and Updates to Create a Bootable USB, Installation DVD, or ISO File

   Information
This will show you how to slipstream Windows 7 SP1 with your retail or student copy of Windows 7 without SP1 to create a slipstream Windows 7 SP1 installation "DVD", a slipstream Windows 7 SP1 bootable "ISO file", or a slipstream Windows 7 SP1 bootable installation "USB flash drive".

This will also show you how to integrate Windows Updates into your new or previously created slipstream Windows 7 SP1 to create a new updated slipstream Windows 7 SP1 installation "DVD", a slipstream Windows 7 SP1 bootable "ISO file", or a slipstream Windows 7 SP1 bootable installation "USB flash drive".

   Warning

  • You can only do this tutorial while logged in as an administrator.
  • You can only use a retail copy or student copy of a Windows 7 installation DVD, bootable USB flash drive, or ISO file to create a slipstream Windows 7 SP1 with.
  • You can only use a previously created slipstream Windows 7 SP1 installation DVD, bootable USB flash drive, or ISO file using this tutorial to integrate new Windows Updates to create a new updated slipstream Windows 7 SP1 installation DVD, bootable USB flash drive, or ISO file with.
  • You can only create a 64-bit slipstreamed Windows 7 SP1 DVD or ISO if your current Windows 7 installation is also 64-bit.
  • You can create a 32-bit slipstreamed Windows 7 SP1 DVD or ISO if your current Windows 7 installation is 32-bit or 64-bit.
  • When you install Windows 7 SP1 using the slipstreamed Windows 7 SP1 DVD/ISO/USB created in this tutorial, you will not be able to uninstall SP1.
   Tip

  • You cannot use a slipstream Windows 7 installation disc to do a repair install with on a currently installed Windows 7 SP1.
  • You cannot use a slipstream Windows 7 installation disc to do a repair install with on a currently installed slipstream Windows 7 SP1.
  • You can use a Windows 7 with SP1 installation disc (ex: Technet, MSDN, or retail) to do a repair install with on a current slipstream Windows 7 SP1 installation.
   Note
This tutorial is designed to be followed like a flow chart to help make it easier to use and select the options (ex: DVD or ISO) you want.


Here's How: 1. If you have not already, then you will need download and install the free 32-bit (x86) or 64-bit (x64) RT Seven Lite "Beta 2.6.0" for your same 32-bit or 64-bit Windows 7 installation DVD or ISO file.
   Note
Alternative RT Seven Lite Beta download link: RT Seven Lite Download - Softpedia

Softpedia.jpg

   Warning
At the rt7lite.com site, you will need to scroll down a bit past the RC 1.7.0 build to see the Beta 2.6.0 build download links.

This tutorial will not work using the RC 1.7.0 build.

2. Click on the RT Seven Lite shortcut on your desktop or in the Start Menu to run the program. (see screenshot below) Step1.jpg
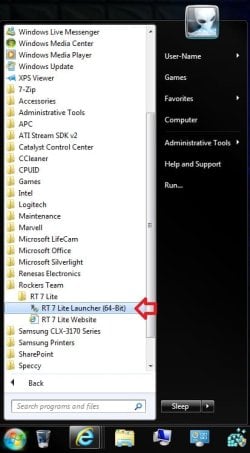
3. Do either step 4 or 5 for what you have to use to integrate the Windows 7 SP1 and/or Windows Updates into.

4. To Select and Use a Windows 7 Installation DVD or Bootable USB A) Insert your retail or previously slipstreamed Windows 7 installation DVD into the DVD drive and close it, OR plug in your Windows 7 bootable USB flash drive. If a AutoPlay pop-up opens, close it.

B) In RT Seven Lite, click on the Browse button, and select the Select OS path option. (see screenshot below)
NOTE: If you do not have much else running, then you may wish to change the Set priority setting to High first to help speed the slipstreaming process up some. DVD-1.jpg
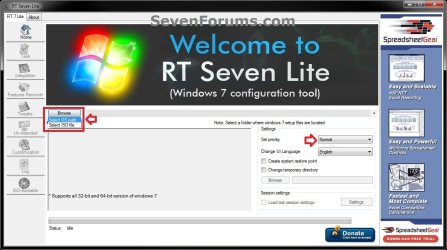
C) Navigate to and select your DVD drive or bootable USB flash drive with Windows 7 on it from steps 4A, and click on OK. (see screeshow below) DVD-2.jpg
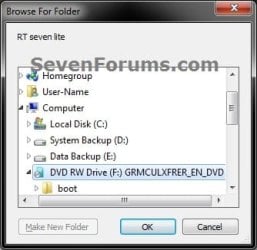
D) Click on OK. (see screenshot below) DVD-3.jpg
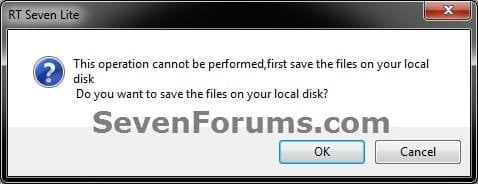
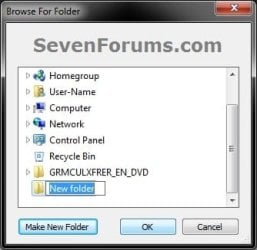
E) Select your Desktop, and click on the Make New Folder button. (see screenshot below) DVD-4.jpg
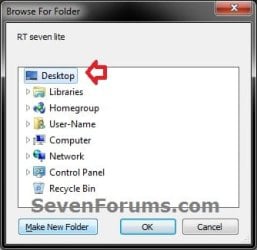
F) Select the New folder on the desktop, and click on OK. (see screenshot below) DVD-5.jpg
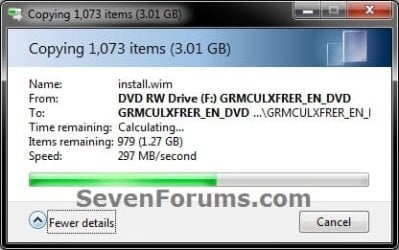
G) The contents of the Windows 7 installation DVD from steps 4A and 4C will now be copied into the New folder (step 4F) on the desktop. (see screenshot below)
NOTE: This may take a few minutes to complete. DVD-6.jpg
H) Go to step 6.
5. To Select and Use a Windows 7 ISO File

   Note
You could use a Windows 7 ISO file that you already created from say RT Seven Lite, or a Windows 7 w/SP1 U ISO downloaded from: Microsoft: Windows 7 Direct Download Links

A) In RT Seven Lite, click on the Browse button, and select the Select ISO file option. (see screenshot below)
NOTE: If you do not have much else running, then you may wish to change the Set priority setting to High first to help speed the slipstreaming process up some. ISO-1.jpg
B) Click on the Select a ISO button. (see screenshot below) ISO-2.jpg

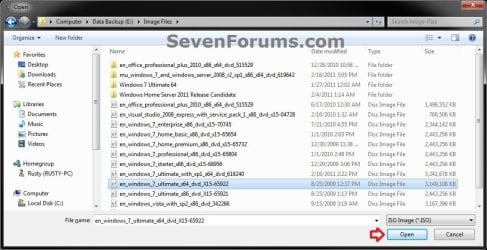
C) Navigate to and select the Windows 7 ISO file, and click on Open. (see screenshot below) ISO-3.jpg
D) Select the Extract path button. (see screenshot below) ISO-4.jpg
E) Select your Desktop, and click on the Make New Folder button. (see screenshot below) ISO-5.jpg
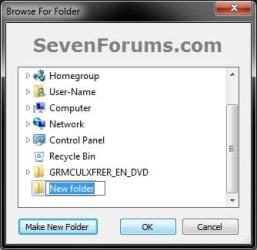
F) Select the New folder on the desktop, and click on OK. (see screenshot below) ISO-6.jpg
G) Click on OK. (see screenshot below) ISO-7.jpg
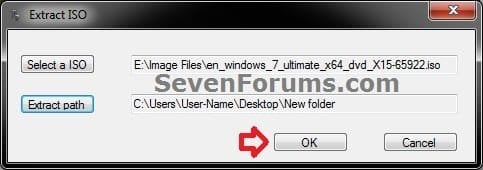
H) The contents of the Windows 7 ISO file from step 5C will now be extracted and copied into the New folder (step 5F) on the desktop. (see screenshot below)
NOTE: This may take only a few minutes to complete. ISO-8.jpg
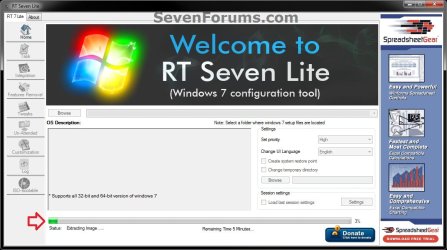
I) Continue on to step 6.
6. Do either step 7 or 8 below for what you want to do.

7. To Only Integrate New Windows Updates
NOTE: You would only select this option if used a previously created slipstream Windows 7 SP1 installation DVD, bootable USB flash drive, or ISO file using this tutorial in step 4 or 5 above, and only want to update it by integrating new Windows Updates. A) When finished, select (dot) the Windows 7 edition that you want to create a updated SP1 slipstream version of, and click on OK. (see screenshot below)
NOTE: When this window below opens it likes to hide behind another opened active window, so you may need to check behind them when the screenshot above (step 5H) shows it's "Status" as Loading Image.... and does not appear to be doing anything. Step2.jpg
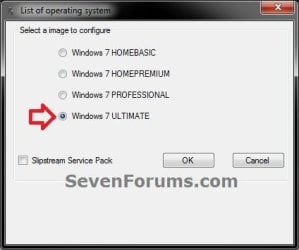
B) Go to step 9.
8. To Slipstream SP1 and to be able to Integrate Windows Updates
NOTE: You would select this option if you used a retail copy or student copy of a Windows 7 installation DVD, bootable USB flash drive, or ISO file that did not have SP1 slipstreamed in it in step 4 or 5 above. A) If you have not already, then you will need to download the same 32-bit (x86) or 64-bit (x64) Windows 7 SP1 EXE installation file for your same 32-bit or 64-bit Windows 7 installation DVD or ISO file at the Microsoft link below, and save it to your Desktop. Download details: Windows 7 and Windows Server 2008 R2 Service Pack 1 (KB976932)
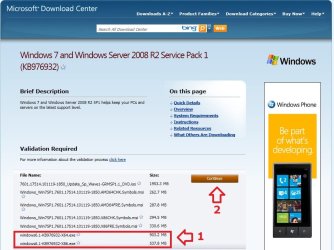
Download.jpg
B) Right click on the downloaded windows6.1-KB976932-X64.exe or windows6.1-KB976932-X86.exe file, click on Properties, click on the General tab, and click on Unblock.
NOTE: If you do not have a Unblock button under the General tab, then the SP1 exe file is already unblocked and you can continue on to step 8C.

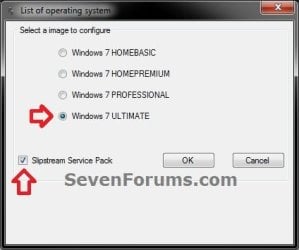
C) When RT Seven Lite is finished from step 4G or 5H, select (dot) only the one Windows 7 edition that you want to create a slipstream SP1 version of, check the Slipstream Service Pack box, and click on OK. (see screenshot below) Step3.jpg
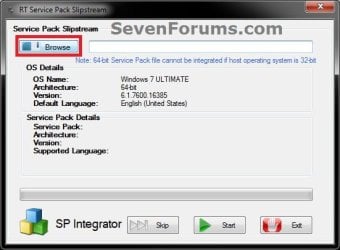
D) Click on the Browse button. (see screenshot below) Step4.jpg
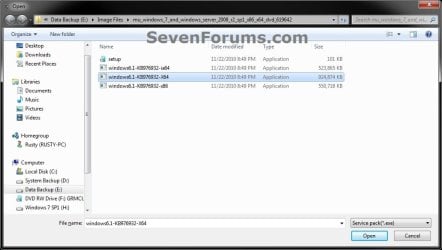
E) Navigate to and select the Windows 7 SP1 EXE installation file on your desktop from step 1, and click on Open. (see screenshot below) Step5.jpg
F) Click on the Start button. (see screenshot below) Step6.jpg
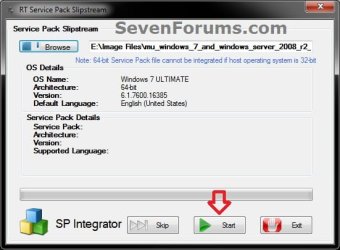
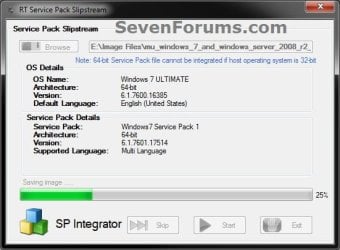
G) RT Seven Lite will now start preparing, integrating, and saving the SP1 (step 9) with the DVD (step 4) or ISO file (step 5). (see screenshots below)
NOTE: This will take a good while to complete depending on how fast your system is and what you have the priority level set as in step 4B. Step7.jpg

Step8.jpg

H) When finished, click on the Proceed button. (see screenshot below) Step10.jpg
I) RT Seven Lite will now start start loading the image. (see screenshot below)
NOTE: This will take a few minutes to complete. Step11.jpg
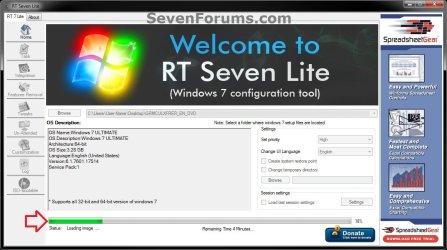
J) Continue on to step 9.
9. When finished, click on the Task tab in the left pane. (see screenshot below) Step12.jpg
10. Do either step 11 or 12 below for what you want to do.

11. To Only Slipstream SP1
NOTE: You would do this step if you did step 8 above and do not want to integrate any Windows Updates into the Slipstream Windows 7 SP1 installation DVD, bootable USB flash drive, or ISO file. A) In the Task tab, check the ISO Bootable box option, then click on the ISO-Bootable tab in the left pane. (see screenshot below)
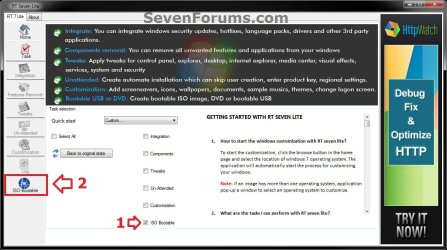
Step13.jpg
B) Go to step 12F.
12. To Integrate Windows Updates and still be able to Slipstream SP1 (if not already)
NOTE: You would do this step if you did step 7 above and want to integrate Windows Updates into this new or previously created Slipstream Windows 7 SP1 installation DVD, bootable USB flash drive, or ISO file. A) If you have not already, then you will need to download the standalone MSU installation files for each Windows Update that you want to integrate into the slipstream, and save them to your Desktop.

B) In the Task tab in RT Seven Lite, check the Integration box and ISO Bootable box options, then click on the Integration tab in the left pane. (see screenshot below) Update-1.jpg
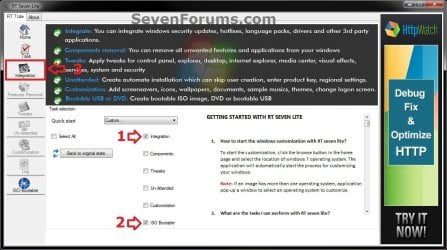
C) Under the Updates tab, click on the Add button. (see screenshot below) Update-2.jpg
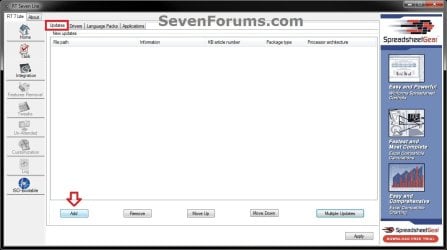
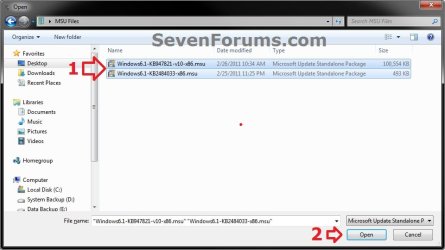
D) Navigate to and select all of the Windows Update MSU files that you want to integrate, and click on Open. (see screenshot below)
NOTE: You can press and hold the CTRL key to select more than one random MSU file. Update-3.jpg
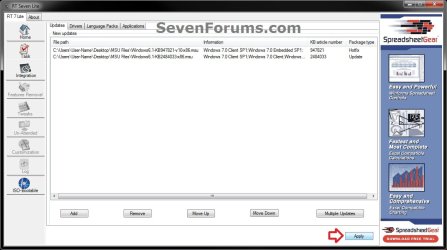
E) When finished adding MSU files, click on Apply. (see screenshot below) Update-4.jpg
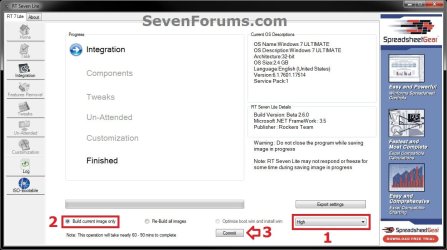
F) Do either step 12G or 12H for what type of Slipstream Windows 7 SP1 you want.

G) To Create a Single Windows 7 SP1 Edition Slipstream

NOTE: This will create a Slipstream Windows 7 SP1 with only the one Windows 7 edition that you selected in step 7A or 8C.
  • Select High priority level, select (dot) Build current image only, and click on Commit. (see screenshot below)
Update-5-single.jpg

  • Go to step 12I
H) To Create a All-in-One Windows 7 SP1 Edition Slipstream
NOTE: This will create a Slipstream Windows 7 SP1 with all Windows 7 editions that will allow you to select which one to install during installation. (see screenshot below) All-in-one.jpg
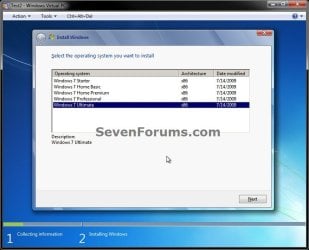
  • Select High priority level, select (dot) Re-build all images, and click on Commit. (see screenshot below)
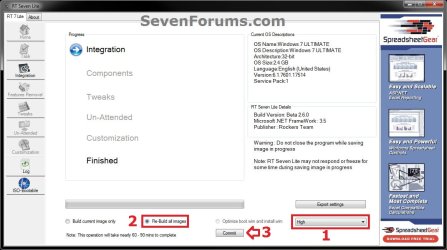
Update-5-all-in-one.jpg

  • Continue on to step 12I
I) RT Seven Lite will now start integrating the Windows Updates. (see screenshot below)
NOTE: This may take from a few minutes or longer depending on how many Windows Update MSU files you added. Update-6.jpg
J) When finished, click on the ISO-Bootable tab in the left pane. (see screenshot below) Update-7.jpg
K) Continue on to step 13.
13. Do either step 14, 15, or 16 for what you would like to have your Slipstreamed Windows 7 SP1 as.

14. To Burn a Slipstream Windows 7 SP1 Installation DVD A) Insert a blank DVD (ex: DVD-R) into the DVD drive and close it. If a AutoPlay pop-up opens, close it.

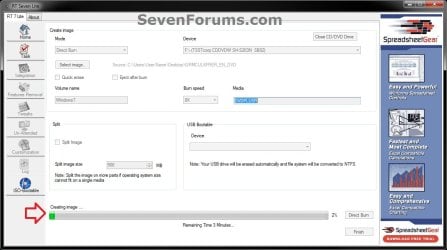
B) In RT Seven Lite, select the Direct Burn drop down menu option under Mode, select the drive letter used from step 14A under Device, then click on the Direct Burn button towards the bottom right. (see screenshot below) Step14-DVD.jpg
C) RT Seven Lite will now start creating the image. (see screenshot below)
NOTE: This will take a few minutes to complete. Step15-DVD.jpg
D) When finished, click on OK. If a AutoPlay pop-up opens, close it. (see screenshots below) Step16-DVD.jpg
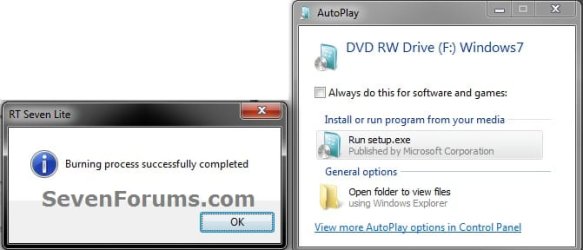
E) You now have a slipstream Windows 7 SP1 installation DVD.

F) Go to step 17.
15. To Create a Slipstream Windows 7 SP1 ISO File A) In RT Seven Lite, select the Create Image drop down menu option under Mode, then click on the Make ISO button towards the bottom right. (see screenshot below) Step14-ISO.jpg
B) Navigate to and select your Desktop, type in a name that you want for the ISO file, then click on the Save button. (see screenshot below) Step15-ISO.jpg
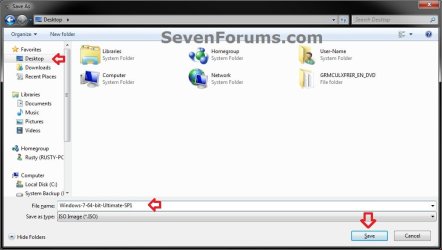
C) When finished, click on OK. (see screenshot below) Step16-ISO.jpg

D) You now have a slipstream Windows 7 SP1 bootable ISO file.
   Note

  • You could also use this ISO file to burn and create a Slipstream Windows 7 SP1 installation DVD with.
  • You could also use this ISO file to create a Slipstream Windows 7 SP1 bootable installation USB flash drive with. For how, see part 2 here: Windows 7 USB/DVD Download Tool
  • You could also test or use this ISO file in a virtual machine if you like.

E) Go to step 17.
16. To Create a Slipstream Windows 7 SP1 Bootable Installation USB Flash Drive A) If you have not already, plug in your USB flash drive.
NOTE: You will need to have at least 4.5 GB free on the USB flash drive.

B) In RT Seven Lite, select the USB Bootable drop down menu option under Mode. (see screenshot below) USB-1.jpg
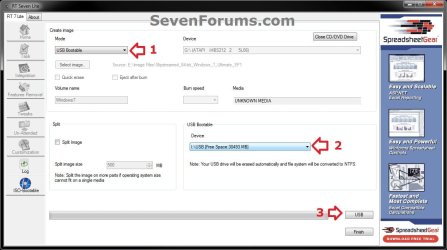
C) Select your USB flash drive from the drop down menu under USB Bootable. (see screenshot above)
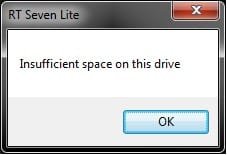
NOTE: If there is not enough free space on the selected USB flash drive, you will get a notice telling you so. You will then need to select a larger USB flash drive. (see screenshot below) USB-Error.jpg
D) Click on the USB button towards the bottom right. (see screenshot below step 16B)

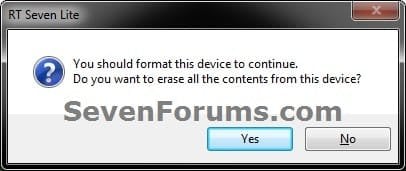
E) Click on OK to format the USB flash drive. (see screenshot below) USB-2.jpg
F) RT Seven Lite will now start formating the USB flash drive and copying the files to it. (see screenshot below)
NOTE: This will take a few minutes to complete. USB-3.jpg
G) When it's finished, click on OK. (see screenshot below) USB-4.jpg
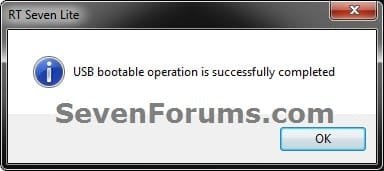
H) You now have a slipstream Windows 7 SP1 bootable installation USB flash drive.

I) Continue on to step 17.
17. Close RT Seven Lite.

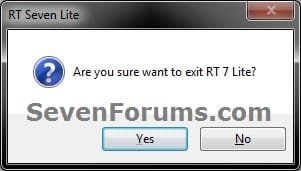
18. Click on Yes to confirm closing RT Seven Lite. (see screenshot below) Step17.jpg
19. RT Seven Lite will now clean up it's temp files before closing. (see screenshot below)
:warn:WARNING: Do not stop or interrupt RT Seven Lite from cleaning it's temp files to avoid getting this error here the next time you try and run RT Seven Lite. Step18.jpg

20. You can now delete the New folder from step 4E or 5E and it's contents on the desktop if you like.
   Tip
You can keep your newly created slipstream Windows 7 SP1 installation DVD, bootable USB flash drive, or ISO file updated by doing this tutorial again with steps 7 and 12 to integrate any new Windows Updates released afterwards into it.

When you install Windows 7 SP1 using the slipstream Windows 7 SP1 DVD/ISO/USB created in this tutorial, you will be able to use the Windows 7 SP1 Disk Cleanup Tool (OPTION THREE at link) to delete the SP1 backup files.


That's it,
Shawn


Attachments

  • Step9.jpg
    Step9.jpg
    33.4 KB · Views: 252
  • Disk_Cleanup-1.jpg
    Disk_Cleanup-1.jpg
    35.9 KB · Views: 262
  • Disk_Cleanup-2.jpg
    Disk_Cleanup-2.jpg
    31.9 KB · Views: 276
Last edited:

My Computer My Computer

At a glance

windows 7Intel® Core™ i3-330M (3M Cache, 2.13 GHz)4Gb DDR3ATI Mobility Radeon HD 5470
Computer Manufacturer/Model Number
DELL
OS
windows 7
CPU
Intel® Core™ i3-330M (3M Cache, 2.13 GHz)
Motherboard
dell inc .03C6YH
Memory
4Gb DDR3
Graphics Card(s)
ATI Mobility Radeon HD 5470
Sound Card
onboard
Monitor(s) Displays
pnp moniter
Hard Drives
samsun 300gb
Internet Speed
512kpbs
You're most welcome. :)
 

My Computer My Computer

At a glance

64-bit Windows 11 Pro for WorkstationsIntel i7-8700K OC'd to 5 GHz64 GB (4x16GB) G.SKILL TridentZ RGB DDR4 3600...ASUS ROG-STRIX-GTX1080TI-O11G-GAMING
Computer type
PC/Desktop
Computer Manufacturer/Model Number
Self built custom
OS
64-bit Windows 11 Pro for Workstations
CPU
Intel i7-8700K OC'd to 5 GHz
Motherboard
ASUS ROG Maximus XI Formula Z390
Memory
64 GB (4x16GB) G.SKILL TridentZ RGB DDR4 3600 MHz
Graphics Card(s)
ASUS ROG-STRIX-GTX1080TI-O11G-GAMING
Sound Card
Integrated
Monitor(s) Displays
2 x Samsung Odyssey G7 27"
Screen Resolution
2560x1440
Hard Drives
1TB Samsung 990 PRO M.2,
4TB Samsung 990 PRO PRO M.2,
TerraMaster F8 SSD Plus NAS
PSU
Seasonic Prime Titanium 850W
Case
Thermaltake Core P3
Cooling
Corsair Hydro H115i
Keyboard
Logitech wireless K800
Mouse
Logitech MX Master 4
Internet Speed
2 Gb/s Download and 100 Mb/s Upload
Antivirus
Malwarebyte Anti-Malware Premium
Browser
Google Chrome
Other Info
Logitech Z625 speaker system,
Logitech BRIO 4K Pro webcam,
HP Color LaserJet Pro MFP M477fdn,
APC SMART-UPS RT 1000 XL - SURT1000XLI,
Galaxy S23 Plus phone
Hi Brink

Just wanted to thank you for the great tutorial on how to slipstream Win 7 and SP1 and the little program RT Seven Lite 2.6.0. It all went together flawlessly, Great Work thanks again:D:D
 

My Computer My Computer

At a glance

Windows 7 Home Premium 64 bitIntel Core 2 quad Extreme Q9770 @ 3.2 GHz4x2 GB Muskin 1600 MHz ramNVidia GTX 250
Computer Manufacturer/Model Number
Dell XPS 730
OS
Windows 7 Home Premium 64 bit
CPU
Intel Core 2 quad Extreme Q9770 @ 3.2 GHz
Memory
4x2 GB Muskin 1600 MHz ram
Graphics Card(s)
NVidia GTX 250
Sound Card
Soundblaster X-Fi Fatality Champion
Monitor(s) Displays
2 Dell 2007WFP Ultrascans
Screen Resolution
3360 x 1050
Hard Drives
WD Black 1TB sata, 2-WD Black 500 sata, 2-Seagate 500 Go external
PSU
1000 Watt
Cooling
air
Keyboard
MS Natrual Keyboard Pro
Mouse
Logitech Wireless Trackball
Internet Speed
DSL Elite
Thank you Smitty. :)
 

My Computer My Computer

At a glance

64-bit Windows 11 Pro for WorkstationsIntel i7-8700K OC'd to 5 GHz64 GB (4x16GB) G.SKILL TridentZ RGB DDR4 3600...ASUS ROG-STRIX-GTX1080TI-O11G-GAMING
Computer type
PC/Desktop
Computer Manufacturer/Model Number
Self built custom
OS
64-bit Windows 11 Pro for Workstations
CPU
Intel i7-8700K OC'd to 5 GHz
Motherboard
ASUS ROG Maximus XI Formula Z390
Memory
64 GB (4x16GB) G.SKILL TridentZ RGB DDR4 3600 MHz
Graphics Card(s)
ASUS ROG-STRIX-GTX1080TI-O11G-GAMING
Sound Card
Integrated
Monitor(s) Displays
2 x Samsung Odyssey G7 27"
Screen Resolution
2560x1440
Hard Drives
1TB Samsung 990 PRO M.2,
4TB Samsung 990 PRO PRO M.2,
TerraMaster F8 SSD Plus NAS
PSU
Seasonic Prime Titanium 850W
Case
Thermaltake Core P3
Cooling
Corsair Hydro H115i
Keyboard
Logitech wireless K800
Mouse
Logitech MX Master 4
Internet Speed
2 Gb/s Download and 100 Mb/s Upload
Antivirus
Malwarebyte Anti-Malware Premium
Browser
Google Chrome
Other Info
Logitech Z625 speaker system,
Logitech BRIO 4K Pro webcam,
HP Color LaserJet Pro MFP M477fdn,
APC SMART-UPS RT 1000 XL - SURT1000XLI,
Galaxy S23 Plus phone
Can I perform a Windows upgrade repair from my slipstreamed Win7 SP1?

Hello. I have a question. This concerns the homemade slipstreamed Windows 7 SP1 and performing Windows upgrade repair when necessary on my already installed Windows 7 SP1 from my factory DVD copy of my Windows 7 that was later upgraded to SP1 from a Windows Update.

I am wondering if the slipstreamed Windows 7 SP1 can be used successfully as a Windows upgrade repair on an already installed Windows 7 (installed on a partition or hard drive from my purchased factory Windows 7 Retail DVD-ROM) that was afterwards updated to SP1 using Windows Update?

Obviously, trying to do a Windows upgrade repair from my purchased factory Windows 7 Retail DVD-ROM (NO SP1) to fix my Windows 7 SP1 (made by installing my purchased factory Windows 7 Retail DVD-ROM that was upgraded afterwards to SP1 using Windows Update) does NOT work. Reason: I trying to fix Windows 7 SP1 from Windows 7 SP0 -- can not happen.

Using my homemade previous slipstreamed Windows Vista and XP created DVDs to perform a repair upgrade of the already installed equivalent Windows operating system and service pack (from the prospective Windows factory DVD-ROM and updated service pack from Windows Update) has been a failed upgrade repair. What I get is during the Windows upgrade repair process is that the versions of Windows (even if I have the *same* Windows operating system and service pack) is NOT the same Windows version and the Windows upgrade repair process can not continue.

The only way I know to effectively do a Windows upgrade repair is to have to repurchase another factory copy of Windows 7 but this time having *WITH SP1* to fix my Windows 7 SP1 when Windows 7 has been upgraded to SP1 from a Windows Update.

I ‘assume’ this may work becuase it makes sense on paper: If you initially install Windows 7 SP1 to use for your computer from my homemade slipstreamed Windows 7 SP1 and if I need to do at some point a Windows upgrade repair using my slipstreamed Windows 7 SP1 — it ‘should work’ successfully?!?!?

Does anyone know why the Windows upgrade process to fix my system has issues as I have asked above?

Please reply.

Thanks!
 

My Computer My Computer

At a glance

Windows 7 Pro x64 SP1 & Windows 8 & 8.1 Pro x64
Computer type
PC/Desktop
OS
Windows 7 Pro x64 SP1 & Windows 8 & 8.1 Pro x64
Hello Montecarlo,

If you have say a retail copy of 32-bit Windows 7 Pro SP1 installed, then you should be able to use a slipstreamed 32-bit Windows Pro SP1 DVD if you created it from a retail 32-bit Windows 7 installation DVD or ISO to do a repair install with.

You will not be able to use say a retail version on a OEM factory installation though.

Windows Update may have made your current installation newer than what you had on the other slipstreamed Vista/XP discs, and could be why it failed with that error.

I'm going to create a slipstreamed copy for my current installation now, then test doing a repair install to see how it goes. I'll post back later with the results. :)
 

My Computer My Computer

At a glance

64-bit Windows 11 Pro for WorkstationsIntel i7-8700K OC'd to 5 GHz64 GB (4x16GB) G.SKILL TridentZ RGB DDR4 3600...ASUS ROG-STRIX-GTX1080TI-O11G-GAMING
Computer type
PC/Desktop
Computer Manufacturer/Model Number
Self built custom
OS
64-bit Windows 11 Pro for Workstations
CPU
Intel i7-8700K OC'd to 5 GHz
Motherboard
ASUS ROG Maximus XI Formula Z390
Memory
64 GB (4x16GB) G.SKILL TridentZ RGB DDR4 3600 MHz
Graphics Card(s)
ASUS ROG-STRIX-GTX1080TI-O11G-GAMING
Sound Card
Integrated
Monitor(s) Displays
2 x Samsung Odyssey G7 27"
Screen Resolution
2560x1440
Hard Drives
1TB Samsung 990 PRO M.2,
4TB Samsung 990 PRO PRO M.2,
TerraMaster F8 SSD Plus NAS
PSU
Seasonic Prime Titanium 850W
Case
Thermaltake Core P3
Cooling
Corsair Hydro H115i
Keyboard
Logitech wireless K800
Mouse
Logitech MX Master 4
Internet Speed
2 Gb/s Download and 100 Mb/s Upload
Antivirus
Malwarebyte Anti-Malware Premium
Browser
Google Chrome
Other Info
Logitech Z625 speaker system,
Logitech BRIO 4K Pro webcam,
HP Color LaserJet Pro MFP M477fdn,
APC SMART-UPS RT 1000 XL - SURT1000XLI,
Galaxy S23 Plus phone
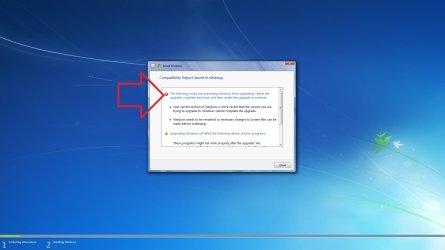
The slipstreamed installation ISO didn't work with my current installation either when trying to do a repair install. I suspect Windows Updates as being the culprit. :(

Nope.jpg
 

My Computer My Computer

At a glance

64-bit Windows 11 Pro for WorkstationsIntel i7-8700K OC'd to 5 GHz64 GB (4x16GB) G.SKILL TridentZ RGB DDR4 3600...ASUS ROG-STRIX-GTX1080TI-O11G-GAMING
Computer type
PC/Desktop
Computer Manufacturer/Model Number
Self built custom
OS
64-bit Windows 11 Pro for Workstations
CPU
Intel i7-8700K OC'd to 5 GHz
Motherboard
ASUS ROG Maximus XI Formula Z390
Memory
64 GB (4x16GB) G.SKILL TridentZ RGB DDR4 3600 MHz
Graphics Card(s)
ASUS ROG-STRIX-GTX1080TI-O11G-GAMING
Sound Card
Integrated
Monitor(s) Displays
2 x Samsung Odyssey G7 27"
Screen Resolution
2560x1440
Hard Drives
1TB Samsung 990 PRO M.2,
4TB Samsung 990 PRO PRO M.2,
TerraMaster F8 SSD Plus NAS
PSU
Seasonic Prime Titanium 850W
Case
Thermaltake Core P3
Cooling
Corsair Hydro H115i
Keyboard
Logitech wireless K800
Mouse
Logitech MX Master 4
Internet Speed
2 Gb/s Download and 100 Mb/s Upload
Antivirus
Malwarebyte Anti-Malware Premium
Browser
Google Chrome
Other Info
Logitech Z625 speaker system,
Logitech BRIO 4K Pro webcam,
HP Color LaserJet Pro MFP M477fdn,
APC SMART-UPS RT 1000 XL - SURT1000XLI,
Galaxy S23 Plus phone
I just finished--successfully, but with a signicant issue.

Everything was cool until step 16. Before that step, the only scare was a "not responding" issue from RT Lite at 58% through the "preparing" stage. But I still had a lot of hard drive activity, so I let it ride and it sobered up and completed in another 10 minutes or so.

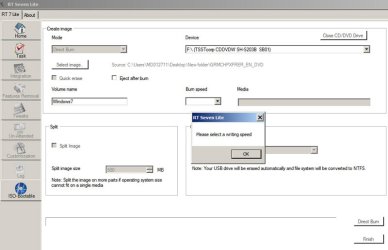
However, at step 16, I encountered the error shown below. I could not burn a disk because there were no burn speeds available to choose in the burn speed window. I could not proceed with burning.

So, instead, I jumped ahead to the ISO step and successfully created an ISO, which I was then able to burn to disc with my own burning app (ImgBurn).

And I could not simply close the app when I was finished. I was locked up and had to kill the process in task manager.

I don't know for a fact that the disc will work to conclusion, but I did boot from it to the first Windows screen and then cancelled out.

So, all in all, a successful outcome.
 

Attachments

  • Untitled-2.jpg
    Untitled-2.jpg
    47.5 KB · Views: 205

My Computer My Computer

At a glance

Windows 7 Home Premium SP1, 64-bitIntel Skylake i5-6600K, not overclocked8 GB HyperX DDR4-2666 (2 x 4 GB)none; graphics are integrated on CPU
Computer type
PC/Desktop
Computer Manufacturer/Model Number
Ignatz Special; 4 speed manual gearbox; factory air conditioning; one of one
OS
Windows 7 Home Premium SP1, 64-bit
CPU
Intel Skylake i5-6600K, not overclocked
Motherboard
AsRock Z170M Extreme 4, micro ATX
Memory
8 GB HyperX DDR4-2666 (2 x 4 GB)
Graphics Card(s)
none; graphics are integrated on CPU
Sound Card
onboard: Realtek ALC1150; external: USB Behringer UF0-202
Monitor(s) Displays
Dell S2340M 23 inch IPS
Screen Resolution
1600 x 900
Hard Drives
System: Crucial MX100 series SSD, 128 GB;
Data: Samsung Spinpoint 103SJ, 1 TB;
Backup: WD Caviar Green WD30EZRX-00D8PB0, 3 TB
PSU
Rosewill SilentNight 500 watt fanless, semi-modular
Case
Antec Solo II
Cooling
Noctua NH-U12S; Noctua F12 intake, Noctua S12A exhaust
Keyboard
Microsoft 200 6JH-00001 USB
Mouse
Dell or Microsoft optical wired; USB
Antivirus
Microsoft Security Essentials and Malwarebytes Premium
Browser
Pale Moon
Other Info
All fans PWM; speeds at idle: CPU circa 500 rpm; intake circa 600 rpm; exhaust circa 600 rpm; CPU temps 27 idle and 47 C load in a warm room (27 C/81 F) when running Intel Extreme Tuning Utility stress test.
Hi Brink!

Hello. Thank you for your reply! :)

All I can recall, and this is some time ago from some deductive reasoning after many hours of testing the older Windows operating systems (XP & Vista) is that the source you use to do a Windows repair upgrade *must be* "newer" (or I believe even "equal" too) to the installed Windows operating system that you have. Let me explain: I think that is reason or the bottom line why all this difficulty. It has to do with the version and build number of the Windows OS it checks against, especially the build number. That means the purchased copy of the Windows 7 factory DVD Windows OS you purchased is worthless (junk) to you as a repair source as newer service packs are released and installed from Microsoft. I think it is the Windows service pack installation (as far as I know) is the only way the Windows OS version and build number are changed within Windows OS to a higher version and build number.

If I look at the RT Seven Lite's Service Pack Slipstreaming window, it provides the details of Windows 7's versions and builds. My retail version of Windows 7 (SP0) I bought has a version and build of 6.1.7600.16385. Now the downloaded update of Windows 7 SP1 is 6.1.7601.17514. This means if I want to ever do a repair upgrade of my Windows 7 OS, I have to use a version and build of Windows 7 with SP1 and is *equal or greater than* 6.1.7601.17514 or the repair upgrade will not work. Right now, my purchased copy of the Windows 7 factory DVD is junk and worthless with my now Windows 7 SP1 upgraded on my computer.

Now, this can be a royal pain as it becomes a literal game to try to overcome the latest or highest Windows version and build you have installed so you can do something to your system if you need too!!! :( Once the first service pack is released for any major upgrade of Windows (XP, Vista, 7), the crap begins! This is what I am experiencing! The only 2 ways I can think that *may* work is to install the slipstreamed version of Windows 7 SP1 and use my slipstreamed version of Windows 7 SP1 as a source for fixing -or- buy another new factory copy from Microsoft or off your local Microsoft reseller WITH SP1 integrated into it when Windows 7 SP1 becomes available on the market as a source for fixing.

I understand that you can only use newer versions and builds of any Windows operating system (within your major upgrade version of Windows) as your source because they are corrected and fixed and improved than what you have installed -- makes absolute sense. BUT IT IS JUST A VICIOUS GAME!!! ...and the sad thing... ...it WILL COST YOU AND ME TO KEEP UP with newer versions and builds all the time!!!
 

My Computer My Computer

At a glance

Windows 7 Pro x64 SP1 & Windows 8 & 8.1 Pro x64
Computer type
PC/Desktop
OS
Windows 7 Pro x64 SP1 & Windows 8 & 8.1 Pro x64
Shawn,

Isn't it quicker and easier to do a reverse integration?
 

My Computers My Computers

  • At a glance

    7 X64i5 84002x8gb 3200mhz
    Computer type
    PC/Desktop
    OS
    7 X64
    CPU
    i5 8400
    Motherboard
    gigabyte b365m ds3h
    Memory
    2x8gb 3200mhz
    Hard Drives
    various
    PSU
    pure power 11 400w cm
    Case
    Coolermaster
    Cooling
    cryorig m9i
  • At a glance

    7x64g54008gb ddr4 2400
    Computer type
    PC/Desktop
    OS
    7x64
    CPU
    g5400
    Motherboard
    ga b365m ds3h
    Memory
    8gb ddr4 2400
    PSU
    xfx pro 450w
Very clear explaination of how it works, thanks Shaun.

I have done everything in the post and it does it job. No problems with creating the ISO file with SP1 integrated or installing Windows with the burned disks afterwards.

If I install W7 using the burned disks, (created out of the ISO file) the installation does it job and ends normally, however, when I check for Win updates it shows about 44 updates and after those the SP1 again. When checked in system after installing Windows, I it doesn't state it has SP1 installed with the ISO, only after I install it again using MS Update it does show.

I'm using an "All version" disk, directly from Microsoft, a separate x86 and separate x64 version. Localization is Dutch, but I think it shouldn't matter.
So I'm thinking it doesn't integrate the SP1 into the W7 install disks, but I didn't get any error message or anything. It just works fine.

Is there anything I'm doing wrong or does anyone has aditional advice for me please?

Regards,
SuP
 
Last edited:

My Computer My Computer

At a glance

W7 Prof x64, W7 Ult x64, W7 Prof x86
OS
W7 Prof x64, W7 Ult x64, W7 Prof x86
So even if you do get this program to work with bugging out / hanging, the disc it creates does not work?

The slipstreamed installation ISO didn't work with my current installation either when trying to do a repair install. I suspect Windows Updates as being the culprit. :(

View attachment 140322
 

My Computer My Computer

At a glance

Windows 7 Professional 64 Bit SP1INTEL DUAL CORE 2.1Ghz4GB DDR3INTEL
Computer Manufacturer/Model Number
HP DV6 1330sa
OS
Windows 7 Professional 64 Bit SP1
CPU
INTEL DUAL CORE 2.1Ghz
Motherboard
N/A
Memory
4GB DDR3
Graphics Card(s)
INTEL
Sound Card
LAPTOP
Monitor(s) Displays
2
Screen Resolution
3200x1080
Hard Drives
250GB
PSU
LAPTOP
Case
LAPTOP
Cooling
LAPTOP
Keyboard
SOLID YEAR 260U
Mouse
USB
Internet Speed
20 MB/S
As I have come to expect, great tutorial.
 

My Computer My Computer

At a glance

Windows 7 Profession 64-bitIntel Core i7-860 QuadMushkin 4x2Gb PC12800Gigabyte GTX260 896Mb
Computer Manufacturer/Model Number
BrightWorks Systems B4
OS
Windows 7 Profession 64-bit
CPU
Intel Core i7-860 Quad
Motherboard
Gigabyte P55-UD4P
Memory
Mushkin 4x2Gb PC12800
Graphics Card(s)
Gigabyte GTX260 896Mb
Sound Card
Integrated 7.1 HD Dolby
Monitor(s) Displays
2 Samsung 2220wm-HAS 22"
Screen Resolution
1680 x 1050 | 1680 x 1050
Hard Drives
WD HE 1Tb
PSU
Corsair TX-750W
Case
Ultra M998
Cooling
OEM
Keyboard
MS Wireless Comfort 5000
Mouse
MS Wireless 5000
Internet Speed
Cable and pretty darn fast
@ Montecarlo
I usually give up at that point and just keep good system images at different good working stages of the installed OS. This way I can just do a system image recovery in about 10 minutes to back at that point again if it all goes.

Shawn,

Isn't it quicker and easier to do a reverse integration?

Interesting, but I never tried it since I always had the two separate ISO files anyway.


As I have come to expect, great tutorial.

Thank you Bill. :)


So even if you do get this program to work with bugging out / hanging, the disc it creates does not work?

The slipstreamed installation ISO didn't work with my current installation either when trying to do a repair install. I suspect Windows Updates as being the culprit. :(

View attachment 140322

This may have been that I installed my current OS with a Windows 7 installation DVD without SP1 and installed SP1 separately, or Windows Update made the installed version newer than the slipstreamed installation DVD.

Personally, I think the slipstream is great to use for a clean install, and to just keep good system images and backups to recover with instead. They are much more reliable to use since you never know when a Windows Update will make your system newer than your installation DVD rendering a repair install almost impossible to do anymore.
 

My Computer My Computer

At a glance

64-bit Windows 11 Pro for WorkstationsIntel i7-8700K OC'd to 5 GHz64 GB (4x16GB) G.SKILL TridentZ RGB DDR4 3600...ASUS ROG-STRIX-GTX1080TI-O11G-GAMING
Computer type
PC/Desktop
Computer Manufacturer/Model Number
Self built custom
OS
64-bit Windows 11 Pro for Workstations
CPU
Intel i7-8700K OC'd to 5 GHz
Motherboard
ASUS ROG Maximus XI Formula Z390
Memory
64 GB (4x16GB) G.SKILL TridentZ RGB DDR4 3600 MHz
Graphics Card(s)
ASUS ROG-STRIX-GTX1080TI-O11G-GAMING
Sound Card
Integrated
Monitor(s) Displays
2 x Samsung Odyssey G7 27"
Screen Resolution
2560x1440
Hard Drives
1TB Samsung 990 PRO M.2,
4TB Samsung 990 PRO PRO M.2,
TerraMaster F8 SSD Plus NAS
PSU
Seasonic Prime Titanium 850W
Case
Thermaltake Core P3
Cooling
Corsair Hydro H115i
Keyboard
Logitech wireless K800
Mouse
Logitech MX Master 4
Internet Speed
2 Gb/s Download and 100 Mb/s Upload
Antivirus
Malwarebyte Anti-Malware Premium
Browser
Google Chrome
Other Info
Logitech Z625 speaker system,
Logitech BRIO 4K Pro webcam,
HP Color LaserJet Pro MFP M477fdn,
APC SMART-UPS RT 1000 XL - SURT1000XLI,
Galaxy S23 Plus phone
Very clear explaination of how it works, thanks Shaun.

I have done everything in the post and it does it job. No problems with creating the ISO file with SP1 integrated or installing Windows with the burned disks afterwards.

If I install W7 using the burned disks, (created out of the ISO file) the installation does it job and ends normally, however, when I check for Win updates it shows about 44 updates and after those the SP1 again. When checked in system after installing Windows, I it doesn't state it has SP1 installed with the ISO, only after I install it again using MS Update it does show.

I'm using an "All version" disk, directly from Microsoft, a separate x86 and separate x64 version. Localization is Dutch, but I think it shouldn't matter.
So I'm thinking it doesn't integrate the SP1 into the W7 install disks, but I didn't get any error message or anything. It just works fine.

Is there anything I'm doing wrong or does anyone has aditional advice for me please?

Regards,
SuP

Hello SuP, and welcome to Seven Forums.

It doesn't sound like the SP1 was integrated at all for you. After I installed with the created slipstream, it showed SP1 in system.

What did you use for the SP1 at step 9?

I used a single edition ISO instead of a "All version" disk. Perhaps something may be different with the "All verion" one.

You might give it a try again with a single edition ISO or disc to see if that may work better.
 

My Computer My Computer

At a glance

64-bit Windows 11 Pro for WorkstationsIntel i7-8700K OC'd to 5 GHz64 GB (4x16GB) G.SKILL TridentZ RGB DDR4 3600...ASUS ROG-STRIX-GTX1080TI-O11G-GAMING
Computer type
PC/Desktop
Computer Manufacturer/Model Number
Self built custom
OS
64-bit Windows 11 Pro for Workstations
CPU
Intel i7-8700K OC'd to 5 GHz
Motherboard
ASUS ROG Maximus XI Formula Z390
Memory
64 GB (4x16GB) G.SKILL TridentZ RGB DDR4 3600 MHz
Graphics Card(s)
ASUS ROG-STRIX-GTX1080TI-O11G-GAMING
Sound Card
Integrated
Monitor(s) Displays
2 x Samsung Odyssey G7 27"
Screen Resolution
2560x1440
Hard Drives
1TB Samsung 990 PRO M.2,
4TB Samsung 990 PRO PRO M.2,
TerraMaster F8 SSD Plus NAS
PSU
Seasonic Prime Titanium 850W
Case
Thermaltake Core P3
Cooling
Corsair Hydro H115i
Keyboard
Logitech wireless K800
Mouse
Logitech MX Master 4
Internet Speed
2 Gb/s Download and 100 Mb/s Upload
Antivirus
Malwarebyte Anti-Malware Premium
Browser
Google Chrome
Other Info
Logitech Z625 speaker system,
Logitech BRIO 4K Pro webcam,
HP Color LaserJet Pro MFP M477fdn,
APC SMART-UPS RT 1000 XL - SURT1000XLI,
Galaxy S23 Plus phone
"@ Montecarlo
I usually give up at that point and just keep good system images at different good working stages of the installed OS. This way I can just do a system image recovery in about 10 minutes to back at that point again if it all goes." per Brink.

Yes, that's true Brink! THAT WOULD work! The most recent system backup(s) seem to be the solution (maybe ONLY) if one experiences OS hardships once a user installs SP1 or for that matter, really for ANY first service pack installed into any major Windows upgrade.

I guess the only thing I could think of that I didn't include in my last post is that the Microsoft factory copy of the Windows 7 retail DVD can still be used for its utilities like Windows startup repair and the like, but that is about it --other than that, the original Windows 7 DVD retail (SP0) is a dud. (Then again, your newly created slipstreamed Windows 7 SP1 can do that too!)
 

My Computer My Computer

At a glance

Windows 7 Pro x64 SP1 & Windows 8 & 8.1 Pro x64
Computer type
PC/Desktop
OS
Windows 7 Pro x64 SP1 & Windows 8 & 8.1 Pro x64
Shawn like you i made the slipstream version for when i want to clean install as it will save time by already having most of the updates, except what we get moving forward. I alway keep a fresh backup image for a quick install if needed.
 

My Computer My Computer

At a glance

Windows 7 Home Premium 64 bitIntel Core 2 quad Extreme Q9770 @ 3.2 GHz4x2 GB Muskin 1600 MHz ramNVidia GTX 250
Computer Manufacturer/Model Number
Dell XPS 730
OS
Windows 7 Home Premium 64 bit
CPU
Intel Core 2 quad Extreme Q9770 @ 3.2 GHz
Memory
4x2 GB Muskin 1600 MHz ram
Graphics Card(s)
NVidia GTX 250
Sound Card
Soundblaster X-Fi Fatality Champion
Monitor(s) Displays
2 Dell 2007WFP Ultrascans
Screen Resolution
3360 x 1050
Hard Drives
WD Black 1TB sata, 2-WD Black 500 sata, 2-Seagate 500 Go external
PSU
1000 Watt
Cooling
air
Keyboard
MS Natrual Keyboard Pro
Mouse
Logitech Wireless Trackball
Internet Speed
DSL Elite
"@ Montecarlo
I usually give up at that point and just keep good system images at different good working stages of the installed OS. This way I can just do a system image recovery in about 10 minutes to back at that point again if it all goes." per Brink.

Yes, that's true Brink! THAT WOULD work! The most recent system backup(s) seem to be the solution (maybe ONLY) if one experiences OS hardships once a user installs SP1 or for that matter, really for ANY first service pack installed into any major Windows upgrade.

I guess the only thing I could think of that I didn't include in my last post is that the Microsoft factory copy of the Windows 7 retail DVD can still be used for its utilities like Windows startup repair and the like, but that is about it --other than that, the original Windows 7 DVD retail (SP0) is a dud. (Then again, your newly created slipstreamed Windows 7 SP1 can do that too!)

I suppose another option would be to manually download the MSU files for any new Windows Update after the SP1, then also check the "Integration" option in step 15 to integrate them along with the SP1 and Windows 7 to keep a current slipstreamed installation DVD as the installed OS.

This would be a lot of work to have to create a new slipstream installation ISO or DVD with integrated Windows Updates everytime any important or critical Windows Update comes out. I think using a system image would still work better and be more reliable though.
 
Last edited:

My Computer My Computer

At a glance

64-bit Windows 11 Pro for WorkstationsIntel i7-8700K OC'd to 5 GHz64 GB (4x16GB) G.SKILL TridentZ RGB DDR4 3600...ASUS ROG-STRIX-GTX1080TI-O11G-GAMING
Computer type
PC/Desktop
Computer Manufacturer/Model Number
Self built custom
OS
64-bit Windows 11 Pro for Workstations
CPU
Intel i7-8700K OC'd to 5 GHz
Motherboard
ASUS ROG Maximus XI Formula Z390
Memory
64 GB (4x16GB) G.SKILL TridentZ RGB DDR4 3600 MHz
Graphics Card(s)
ASUS ROG-STRIX-GTX1080TI-O11G-GAMING
Sound Card
Integrated
Monitor(s) Displays
2 x Samsung Odyssey G7 27"
Screen Resolution
2560x1440
Hard Drives
1TB Samsung 990 PRO M.2,
4TB Samsung 990 PRO PRO M.2,
TerraMaster F8 SSD Plus NAS
PSU
Seasonic Prime Titanium 850W
Case
Thermaltake Core P3
Cooling
Corsair Hydro H115i
Keyboard
Logitech wireless K800
Mouse
Logitech MX Master 4
Internet Speed
2 Gb/s Download and 100 Mb/s Upload
Antivirus
Malwarebyte Anti-Malware Premium
Browser
Google Chrome
Other Info
Logitech Z625 speaker system,
Logitech BRIO 4K Pro webcam,
HP Color LaserJet Pro MFP M477fdn,
APC SMART-UPS RT 1000 XL - SURT1000XLI,
Galaxy S23 Plus phone
I suppose another option would be to manually download the MSU files for any new Windows Update after the SP1, then use the "Integration" option in the RT Seven Lite program to integrate them along with the SP1 and Windows 7 to keep a current slipstreamed installation DVD as the installed OS.

This would be a lot of work to have to create a new slipstream installation ISO or DVD with integrated Windows Updates everytime any important or critical Windows Update comes out. I think using a system image would still work better and be more reliable though.

Yes, Brink! That may work. It is a strong possibility! I get a little more free time I have to attempt that and see what happens! I agree, using a system backup(s) files or images would be *MUCH* easier.

I apologize, I should of said this much earlier... ...your slipstreaming tutorial is excellent! :D Yours is most detailed I have seen yet and there is a few already now on the web to do this since the final release of Windows 7 SP1 a few days ago.

I am wondering how I can use RT Seven Lite (really, an awesome little utility) if I want to add (integrate) all my motherboard drivers and even some thrid party software as part of the full install slipstreamed Windows 7 SP1? What are the steps or to make it even easier -- what added, removed, or modified steps from your tutorial would I need to perform for:

1. integrate motherboard drivers?
2. integrate third party software?

I am not familiar or savvy with the functions and operations of RT Seven Lite.


Please reply.

Thanks!!! :)
 

My Computer My Computer

At a glance

Windows 7 Pro x64 SP1 & Windows 8 & 8.1 Pro x64
Computer type
PC/Desktop
OS
Windows 7 Pro x64 SP1 & Windows 8 & 8.1 Pro x64
Thank you ManteCarlo.

1. integrate motherboard drivers?
2. integrate third party software?

There's no point in integrating programs, since all it will do is have them install at the startup of Windows 7 the first time after installation. You might as well just install the programs yourself.

That's going to have to be something for separate tutorials as it's pretty involved, and may not be worth doing since you would have to keep doing it for every new Windows Update you want included.

UPDATE:
Now included. :)
http://www.sevenforums.com/tutorial...-installation-dvd-iso-file-9.html#post1262450
 
Last edited:

My Computer My Computer

At a glance

64-bit Windows 11 Pro for WorkstationsIntel i7-8700K OC'd to 5 GHz64 GB (4x16GB) G.SKILL TridentZ RGB DDR4 3600...ASUS ROG-STRIX-GTX1080TI-O11G-GAMING
Computer type
PC/Desktop
Computer Manufacturer/Model Number
Self built custom
OS
64-bit Windows 11 Pro for Workstations
CPU
Intel i7-8700K OC'd to 5 GHz
Motherboard
ASUS ROG Maximus XI Formula Z390
Memory
64 GB (4x16GB) G.SKILL TridentZ RGB DDR4 3600 MHz
Graphics Card(s)
ASUS ROG-STRIX-GTX1080TI-O11G-GAMING
Sound Card
Integrated
Monitor(s) Displays
2 x Samsung Odyssey G7 27"
Screen Resolution
2560x1440
Hard Drives
1TB Samsung 990 PRO M.2,
4TB Samsung 990 PRO PRO M.2,
TerraMaster F8 SSD Plus NAS
PSU
Seasonic Prime Titanium 850W
Case
Thermaltake Core P3
Cooling
Corsair Hydro H115i
Keyboard
Logitech wireless K800
Mouse
Logitech MX Master 4
Internet Speed
2 Gb/s Download and 100 Mb/s Upload
Antivirus
Malwarebyte Anti-Malware Premium
Browser
Google Chrome
Other Info
Logitech Z625 speaker system,
Logitech BRIO 4K Pro webcam,
HP Color LaserJet Pro MFP M477fdn,
APC SMART-UPS RT 1000 XL - SURT1000XLI,
Galaxy S23 Plus phone
Back
Top