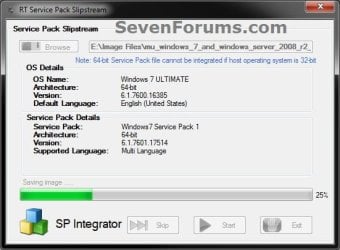
Slipstream Windows 7 SP1 into a Installation DVD or ISO File

How to Slipstream Windows 7 SP1 and Updates to Create a Bootable USB, Installation DVD, or ISO File

   Information
This will show you how to slipstream Windows 7 SP1 with your retail or student copy of Windows 7 without SP1 to create a slipstream Windows 7 SP1 installation "DVD", a slipstream Windows 7 SP1 bootable "ISO file", or a slipstream Windows 7 SP1 bootable installation "USB flash drive".

This will also show you how to integrate Windows Updates into your new or previously created slipstream Windows 7 SP1 to create a new updated slipstream Windows 7 SP1 installation "DVD", a slipstream Windows 7 SP1 bootable "ISO file", or a slipstream Windows 7 SP1 bootable installation "USB flash drive".

   Warning

  • You can only do this tutorial while logged in as an administrator.
  • You can only use a retail copy or student copy of a Windows 7 installation DVD, bootable USB flash drive, or ISO file to create a slipstream Windows 7 SP1 with.
  • You can only use a previously created slipstream Windows 7 SP1 installation DVD, bootable USB flash drive, or ISO file using this tutorial to integrate new Windows Updates to create a new updated slipstream Windows 7 SP1 installation DVD, bootable USB flash drive, or ISO file with.
  • You can only create a 64-bit slipstreamed Windows 7 SP1 DVD or ISO if your current Windows 7 installation is also 64-bit.
  • You can create a 32-bit slipstreamed Windows 7 SP1 DVD or ISO if your current Windows 7 installation is 32-bit or 64-bit.
  • When you install Windows 7 SP1 using the slipstreamed Windows 7 SP1 DVD/ISO/USB created in this tutorial, you will not be able to uninstall SP1.
   Tip

  • You cannot use a slipstream Windows 7 installation disc to do a repair install with on a currently installed Windows 7 SP1.
  • You cannot use a slipstream Windows 7 installation disc to do a repair install with on a currently installed slipstream Windows 7 SP1.
  • You can use a Windows 7 with SP1 installation disc (ex: Technet, MSDN, or retail) to do a repair install with on a current slipstream Windows 7 SP1 installation.
   Note
This tutorial is designed to be followed like a flow chart to help make it easier to use and select the options (ex: DVD or ISO) you want.


Here's How: 1. If you have not already, then you will need download and install the free 32-bit (x86) or 64-bit (x64) RT Seven Lite "Beta 2.6.0" for your same 32-bit or 64-bit Windows 7 installation DVD or ISO file.
   Note
Alternative RT Seven Lite Beta download link: RT Seven Lite Download - Softpedia

Softpedia.jpg

   Warning
At the rt7lite.com site, you will need to scroll down a bit past the RC 1.7.0 build to see the Beta 2.6.0 build download links.

This tutorial will not work using the RC 1.7.0 build.

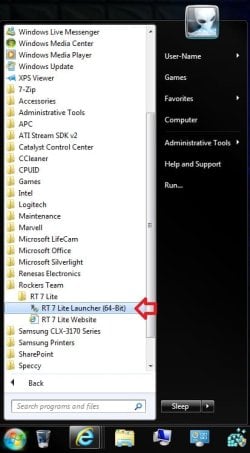
2. Click on the RT Seven Lite shortcut on your desktop or in the Start Menu to run the program. (see screenshot below) Step1.jpg
3. Do either step 4 or 5 for what you have to use to integrate the Windows 7 SP1 and/or Windows Updates into.

4. To Select and Use a Windows 7 Installation DVD or Bootable USB A) Insert your retail or previously slipstreamed Windows 7 installation DVD into the DVD drive and close it, OR plug in your Windows 7 bootable USB flash drive. If a AutoPlay pop-up opens, close it.

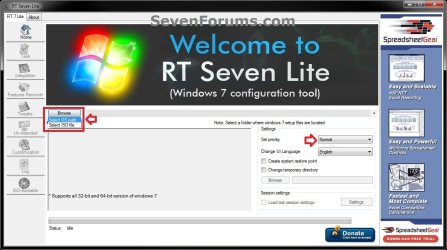
B) In RT Seven Lite, click on the Browse button, and select the Select OS path option. (see screenshot below)
NOTE: If you do not have much else running, then you may wish to change the Set priority setting to High first to help speed the slipstreaming process up some. DVD-1.jpg
C) Navigate to and select your DVD drive or bootable USB flash drive with Windows 7 on it from steps 4A, and click on OK. (see screeshow below) DVD-2.jpg
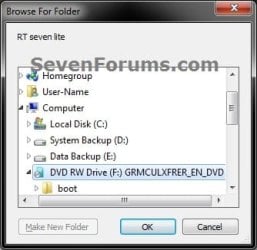
D) Click on OK. (see screenshot below) DVD-3.jpg
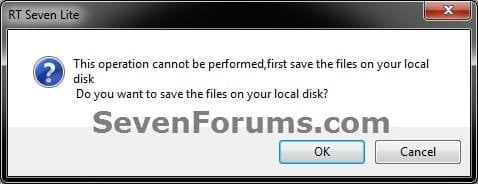
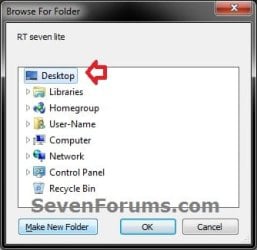
E) Select your Desktop, and click on the Make New Folder button. (see screenshot below) DVD-4.jpg
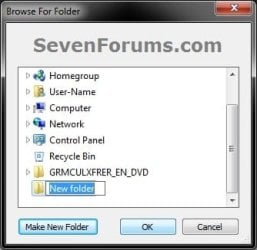
F) Select the New folder on the desktop, and click on OK. (see screenshot below) DVD-5.jpg
G) The contents of the Windows 7 installation DVD from steps 4A and 4C will now be copied into the New folder (step 4F) on the desktop. (see screenshot below)
NOTE: This may take a few minutes to complete. DVD-6.jpg
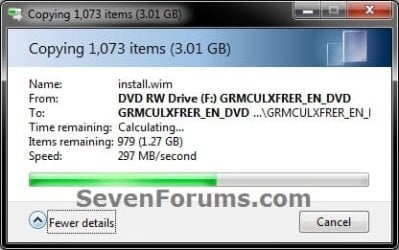
H) Go to step 6.
5. To Select and Use a Windows 7 ISO File

   Note
You could use a Windows 7 ISO file that you already created from say RT Seven Lite, or a Windows 7 w/SP1 U ISO downloaded from: Microsoft: Windows 7 Direct Download Links

A) In RT Seven Lite, click on the Browse button, and select the Select ISO file option. (see screenshot below)
NOTE: If you do not have much else running, then you may wish to change the Set priority setting to High first to help speed the slipstreaming process up some. ISO-1.jpg
B) Click on the Select a ISO button. (see screenshot below) ISO-2.jpg
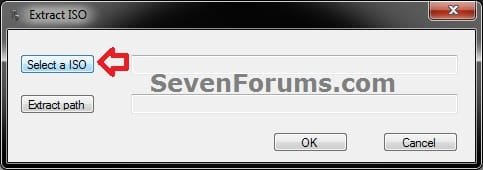
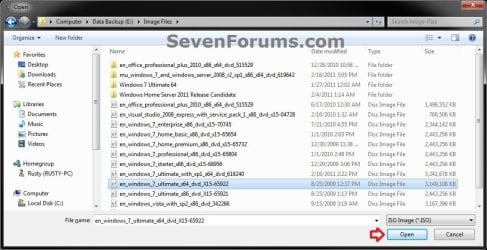
C) Navigate to and select the Windows 7 ISO file, and click on Open. (see screenshot below) ISO-3.jpg
D) Select the Extract path button. (see screenshot below) ISO-4.jpg
E) Select your Desktop, and click on the Make New Folder button. (see screenshot below) ISO-5.jpg
F) Select the New folder on the desktop, and click on OK. (see screenshot below) ISO-6.jpg
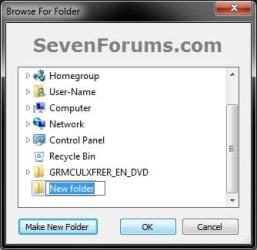
G) Click on OK. (see screenshot below) ISO-7.jpg
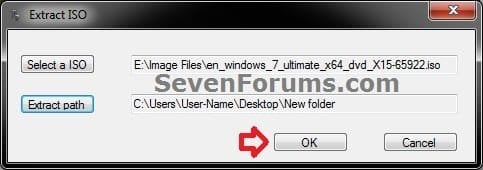
H) The contents of the Windows 7 ISO file from step 5C will now be extracted and copied into the New folder (step 5F) on the desktop. (see screenshot below)
NOTE: This may take only a few minutes to complete. ISO-8.jpg
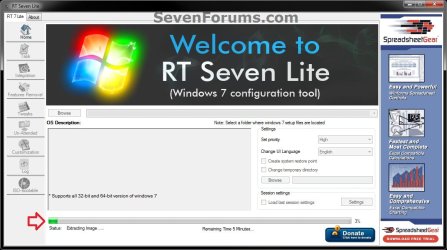
I) Continue on to step 6.
6. Do either step 7 or 8 below for what you want to do.

7. To Only Integrate New Windows Updates
NOTE: You would only select this option if used a previously created slipstream Windows 7 SP1 installation DVD, bootable USB flash drive, or ISO file using this tutorial in step 4 or 5 above, and only want to update it by integrating new Windows Updates. A) When finished, select (dot) the Windows 7 edition that you want to create a updated SP1 slipstream version of, and click on OK. (see screenshot below)
NOTE: When this window below opens it likes to hide behind another opened active window, so you may need to check behind them when the screenshot above (step 5H) shows it's "Status" as Loading Image.... and does not appear to be doing anything. Step2.jpg
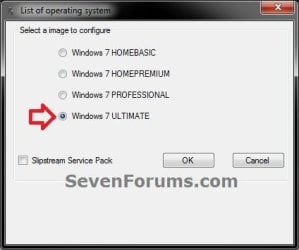
B) Go to step 9.
8. To Slipstream SP1 and to be able to Integrate Windows Updates
NOTE: You would select this option if you used a retail copy or student copy of a Windows 7 installation DVD, bootable USB flash drive, or ISO file that did not have SP1 slipstreamed in it in step 4 or 5 above. A) If you have not already, then you will need to download the same 32-bit (x86) or 64-bit (x64) Windows 7 SP1 EXE installation file for your same 32-bit or 64-bit Windows 7 installation DVD or ISO file at the Microsoft link below, and save it to your Desktop. Download details: Windows 7 and Windows Server 2008 R2 Service Pack 1 (KB976932)
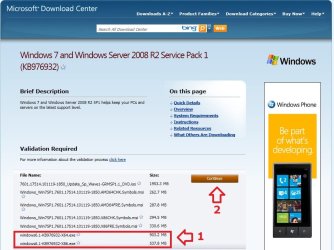
Download.jpg
B) Right click on the downloaded windows6.1-KB976932-X64.exe or windows6.1-KB976932-X86.exe file, click on Properties, click on the General tab, and click on Unblock.
NOTE: If you do not have a Unblock button under the General tab, then the SP1 exe file is already unblocked and you can continue on to step 8C.

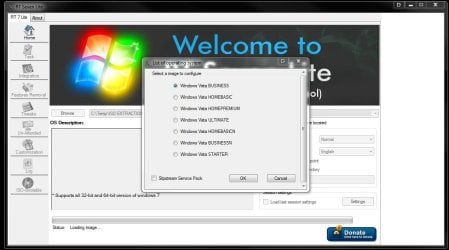
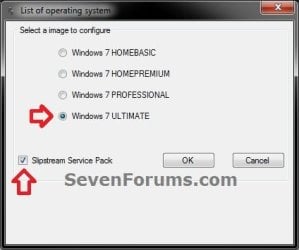
C) When RT Seven Lite is finished from step 4G or 5H, select (dot) only the one Windows 7 edition that you want to create a slipstream SP1 version of, check the Slipstream Service Pack box, and click on OK. (see screenshot below) Step3.jpg
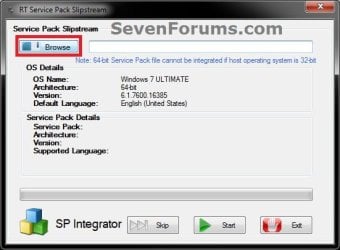
D) Click on the Browse button. (see screenshot below) Step4.jpg
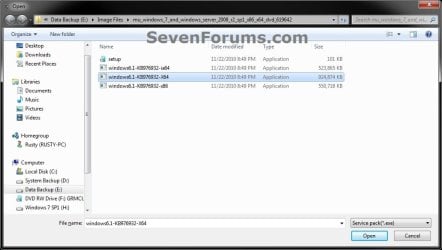
E) Navigate to and select the Windows 7 SP1 EXE installation file on your desktop from step 1, and click on Open. (see screenshot below) Step5.jpg
F) Click on the Start button. (see screenshot below) Step6.jpg
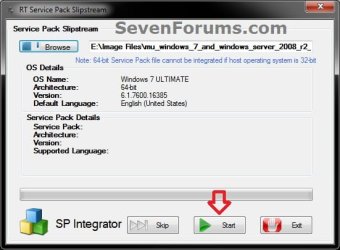
G) RT Seven Lite will now start preparing, integrating, and saving the SP1 (step 9) with the DVD (step 4) or ISO file (step 5). (see screenshots below)
NOTE: This will take a good while to complete depending on how fast your system is and what you have the priority level set as in step 4B. Step7.jpg

Step8.jpg

H) When finished, click on the Proceed button. (see screenshot below) Step10.jpg
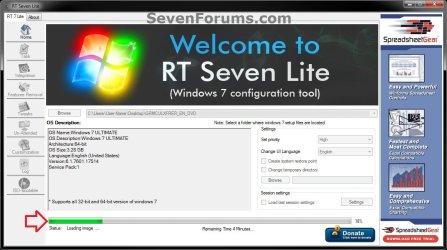
I) RT Seven Lite will now start start loading the image. (see screenshot below)
NOTE: This will take a few minutes to complete. Step11.jpg
J) Continue on to step 9.
9. When finished, click on the Task tab in the left pane. (see screenshot below) Step12.jpg
10. Do either step 11 or 12 below for what you want to do.

11. To Only Slipstream SP1
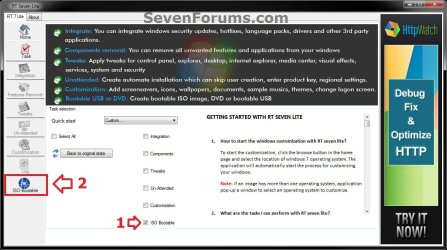
NOTE: You would do this step if you did step 8 above and do not want to integrate any Windows Updates into the Slipstream Windows 7 SP1 installation DVD, bootable USB flash drive, or ISO file. A) In the Task tab, check the ISO Bootable box option, then click on the ISO-Bootable tab in the left pane. (see screenshot below)
Step13.jpg
B) Go to step 12F.
12. To Integrate Windows Updates and still be able to Slipstream SP1 (if not already)
NOTE: You would do this step if you did step 7 above and want to integrate Windows Updates into this new or previously created Slipstream Windows 7 SP1 installation DVD, bootable USB flash drive, or ISO file. A) If you have not already, then you will need to download the standalone MSU installation files for each Windows Update that you want to integrate into the slipstream, and save them to your Desktop.

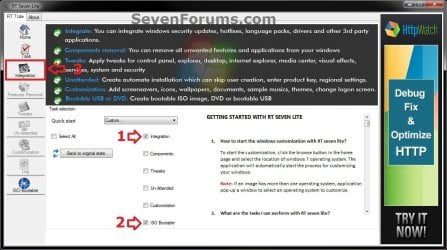
B) In the Task tab in RT Seven Lite, check the Integration box and ISO Bootable box options, then click on the Integration tab in the left pane. (see screenshot below) Update-1.jpg
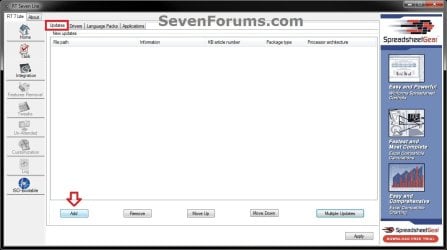
C) Under the Updates tab, click on the Add button. (see screenshot below) Update-2.jpg
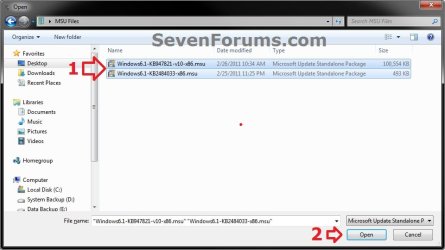
D) Navigate to and select all of the Windows Update MSU files that you want to integrate, and click on Open. (see screenshot below)
NOTE: You can press and hold the CTRL key to select more than one random MSU file. Update-3.jpg
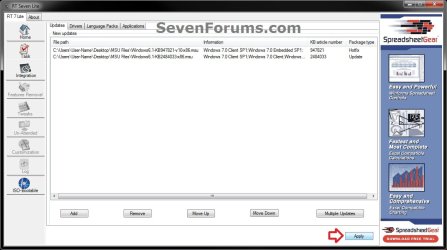
E) When finished adding MSU files, click on Apply. (see screenshot below) Update-4.jpg
F) Do either step 12G or 12H for what type of Slipstream Windows 7 SP1 you want.

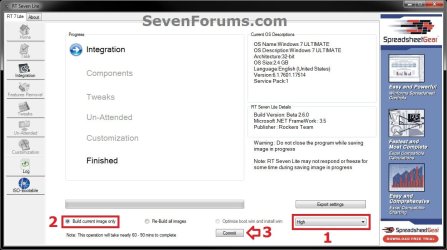
G) To Create a Single Windows 7 SP1 Edition Slipstream

NOTE: This will create a Slipstream Windows 7 SP1 with only the one Windows 7 edition that you selected in step 7A or 8C.
  • Select High priority level, select (dot) Build current image only, and click on Commit. (see screenshot below)
Update-5-single.jpg

  • Go to step 12I
H) To Create a All-in-One Windows 7 SP1 Edition Slipstream
NOTE: This will create a Slipstream Windows 7 SP1 with all Windows 7 editions that will allow you to select which one to install during installation. (see screenshot below) All-in-one.jpg
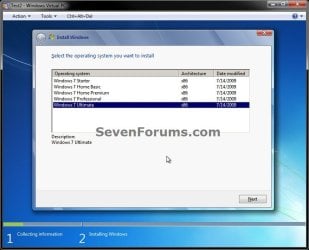
  • Select High priority level, select (dot) Re-build all images, and click on Commit. (see screenshot below)
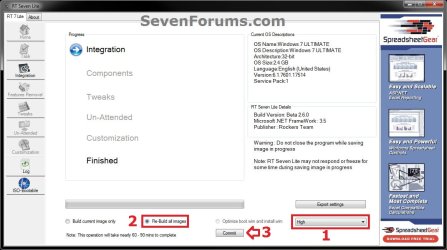
Update-5-all-in-one.jpg

  • Continue on to step 12I
I) RT Seven Lite will now start integrating the Windows Updates. (see screenshot below)
NOTE: This may take from a few minutes or longer depending on how many Windows Update MSU files you added. Update-6.jpg
J) When finished, click on the ISO-Bootable tab in the left pane. (see screenshot below) Update-7.jpg
K) Continue on to step 13.
13. Do either step 14, 15, or 16 for what you would like to have your Slipstreamed Windows 7 SP1 as.

14. To Burn a Slipstream Windows 7 SP1 Installation DVD A) Insert a blank DVD (ex: DVD-R) into the DVD drive and close it. If a AutoPlay pop-up opens, close it.

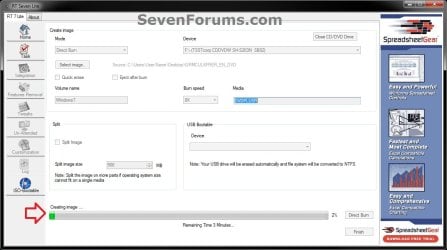
B) In RT Seven Lite, select the Direct Burn drop down menu option under Mode, select the drive letter used from step 14A under Device, then click on the Direct Burn button towards the bottom right. (see screenshot below) Step14-DVD.jpg
C) RT Seven Lite will now start creating the image. (see screenshot below)
NOTE: This will take a few minutes to complete. Step15-DVD.jpg
D) When finished, click on OK. If a AutoPlay pop-up opens, close it. (see screenshots below) Step16-DVD.jpg
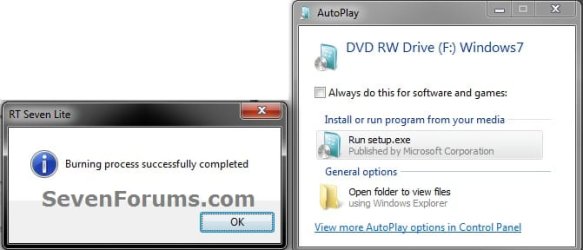
E) You now have a slipstream Windows 7 SP1 installation DVD.

F) Go to step 17.
15. To Create a Slipstream Windows 7 SP1 ISO File A) In RT Seven Lite, select the Create Image drop down menu option under Mode, then click on the Make ISO button towards the bottom right. (see screenshot below) Step14-ISO.jpg
B) Navigate to and select your Desktop, type in a name that you want for the ISO file, then click on the Save button. (see screenshot below) Step15-ISO.jpg
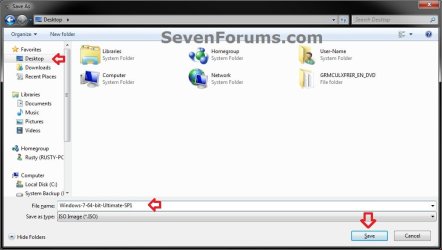
C) When finished, click on OK. (see screenshot below) Step16-ISO.jpg

D) You now have a slipstream Windows 7 SP1 bootable ISO file.
   Note

  • You could also use this ISO file to burn and create a Slipstream Windows 7 SP1 installation DVD with.
  • You could also use this ISO file to create a Slipstream Windows 7 SP1 bootable installation USB flash drive with. For how, see part 2 here: Windows 7 USB/DVD Download Tool
  • You could also test or use this ISO file in a virtual machine if you like.

E) Go to step 17.
16. To Create a Slipstream Windows 7 SP1 Bootable Installation USB Flash Drive A) If you have not already, plug in your USB flash drive.
NOTE: You will need to have at least 4.5 GB free on the USB flash drive.

B) In RT Seven Lite, select the USB Bootable drop down menu option under Mode. (see screenshot below) USB-1.jpg
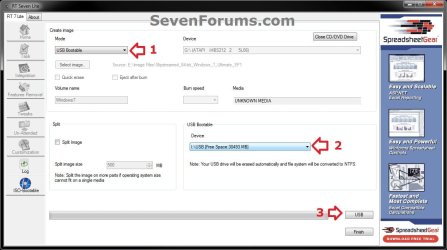
C) Select your USB flash drive from the drop down menu under USB Bootable. (see screenshot above)
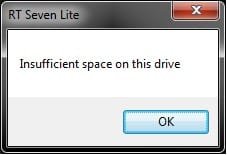
NOTE: If there is not enough free space on the selected USB flash drive, you will get a notice telling you so. You will then need to select a larger USB flash drive. (see screenshot below) USB-Error.jpg
D) Click on the USB button towards the bottom right. (see screenshot below step 16B)

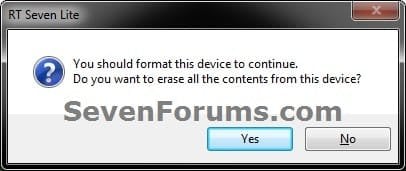
E) Click on OK to format the USB flash drive. (see screenshot below) USB-2.jpg
F) RT Seven Lite will now start formating the USB flash drive and copying the files to it. (see screenshot below)
NOTE: This will take a few minutes to complete. USB-3.jpg
G) When it's finished, click on OK. (see screenshot below) USB-4.jpg
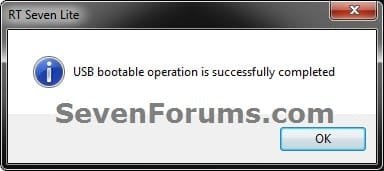
H) You now have a slipstream Windows 7 SP1 bootable installation USB flash drive.

I) Continue on to step 17.
17. Close RT Seven Lite.

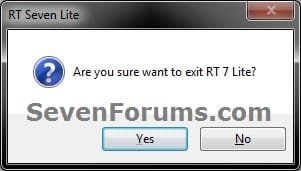
18. Click on Yes to confirm closing RT Seven Lite. (see screenshot below) Step17.jpg
19. RT Seven Lite will now clean up it's temp files before closing. (see screenshot below)
:warn:WARNING: Do not stop or interrupt RT Seven Lite from cleaning it's temp files to avoid getting this error here the next time you try and run RT Seven Lite. Step18.jpg

20. You can now delete the New folder from step 4E or 5E and it's contents on the desktop if you like.
   Tip
You can keep your newly created slipstream Windows 7 SP1 installation DVD, bootable USB flash drive, or ISO file updated by doing this tutorial again with steps 7 and 12 to integrate any new Windows Updates released afterwards into it.

When you install Windows 7 SP1 using the slipstream Windows 7 SP1 DVD/ISO/USB created in this tutorial, you will be able to use the Windows 7 SP1 Disk Cleanup Tool (OPTION THREE at link) to delete the SP1 backup files.


That's it,
Shawn


Attachments

  • Step9.jpg
    Step9.jpg
    33.4 KB · Views: 252
  • Disk_Cleanup-1.jpg
    Disk_Cleanup-1.jpg
    35.9 KB · Views: 262
  • Disk_Cleanup-2.jpg
    Disk_Cleanup-2.jpg
    31.9 KB · Views: 276
Last edited:
I'm really looking forward to see your WAIK tutorial for slipstreaming SP1 into Windows 7. Could you also tell whether is it possible or not to slipstream the SP1 into Windows 7 All-in-one DVD (32-bit and 64-bit editions) by using WAIK method so that all those Windows 7 editions have the SP1 integrated?

If you have already unlocked all editions on your installation DVD, then it should work just fine. The WAIK will add SP1 to whatever installation DVD you use while creating the slipstreamed ISO. Albeit, I have not tested that. However, each edition has it's own set of valid product keys. That will not change under any circumstances. You must enter the correct product key for whatever edition your installing.

As far as architecture is concerned, I believe you would have to make one DVD for x86, and one for x64. At least, that's what I'm thinking. The reason I say this is because there are two different WAIK's available for download. One for x86, and one for x64. That is beyond the scope of the tutorial I'm creating though.

And does the WAIK method leave any SP1 backup files behind (for system restore) like this GUI slipstream method seems to do?
Yes, it does. However, you can choose to remove them if you wish. It's up to the individual creating the slipstreamed ISO.

Anyway, I'm sure there's a lot of people who will appreciate a proper WAIK tutorial so keep on working for it :)
I'm getting there. It's almost finished. Capturing all the images took like two days...LOL
 

My Computer My Computer

At a glance

Windows 7 Ultimate SP1 x64 RTMAMD Athlon 64x2 3800+ Dual CoreOCZ Platinum Dual Channel 4x1GBPNY NVIDIA GeForce 9800 GT 1024MB DDR3 256 Bit
Computer Manufacturer/Model Number
NVIDIA
OS
Windows 7 Ultimate SP1 x64 RTM
CPU
AMD Athlon 64x2 3800+ Dual Core
Motherboard
NVIDIA GeForce 6100-M9
Memory
OCZ Platinum Dual Channel 4x1GB
Graphics Card(s)
PNY NVIDIA GeForce 9800 GT 1024MB DDR3 256 Bit
Sound Card
Creative Sound Blaster Audigy 24Bit
Monitor(s) Displays
Compaq 7500
Screen Resolution
1024x768
Hard Drives
C: 250GB Seagate Barracuda 7200.12 SATA-300
D: 500GB Seagate Barracuda 7200.12 SATA-300
PSU
OCZ 650Watt Dual 12-Volt Rails
Case
Thermaltake
Cooling
Fans, fans, and more fans
Keyboard
Logitech
Mouse
Logitech PS2
Internet Speed
300MBps
Other Info
LG CD-RW [IDE]
Pioneer DVD-RW [SATA-II]
You would have to see an x86 dvd for the 32bit and x64 dvd for the 64bit. I just saw a 64bit unlocked dvd made up for looking after two 7 machines one running the 64bit Home Premium edition. Generally I wouldn't have to worry about a need for a clean install but still wanted an updated universal disk onhand.
 

My Computers My Computers

  • At a glance

    W7 Ultimate x64/W10 Pro x64/W11 Pro Triple Bo...AMD Phenom II X4 975 Deneb 3.6ghz - 965 2nd r...Kingston Hyper X DDR3 1600 1.5v 16gb - Hyper ...MSI HD Radeon 5750 1gb - MSI HD Radeon 6450 o...
    Computer type
    PC/Desktop
    Computer Manufacturer/Model Number
    Custom builds = 2
    OS
    W7 Ultimate x64/W10 Pro x64/W11 Pro Triple Boot - Main PC W7 Remote PC Micro ATX W7 Pro x64/W11 Pro
    CPU
    AMD Phenom II X4 975 Deneb 3.6ghz - 965 2nd remote pc
    Motherboard
    Gigabyte GA-790XTA-UD4-Gigabyte GA-880GM-D2H remote pc
    Memory
    Kingston Hyper X DDR3 1600 1.5v 16gb - Hyper X Fury 8gb 2nd
    Graphics Card(s)
    MSI HD Radeon 5750 1gb - MSI HD Radeon 6450 on mini tower
    Sound Card
    Creative Labs X-Fi Xtreme Audio P - Realtek onooard 2nd case
    Monitor(s) Displays
    ASUS VW199T-P 19" HP 2082a Main-HP 2082a 20" remote pc
    Screen Resolution
    Asus 1440x900 - HP 1600x900
    Hard Drives
    WD Black 1TB HD per OS W7, W10, and pending W11 presently on 500gb OS Drive - Pending Triple 1TB HDs for Spanned Storage/backup volume
    Single 2TB external USB enclosure, single 1TB System 7 Host/Boot drive, Pending 8TB external HD for system image b
    PSU
    Corsair 750TX - primary / Corsair CX600 - second
    Case
    Antec 900-2 - SSD compatible / NZXT Vulcan mini tower
    Cooling
    Zalman CNPS9900A
    Keyboard
    AZIO L70 Backlit Letters Gaming - ONN Cordless/USB
    Mouse
    MSI DS200 Programmable, Logitech Cordless
    Internet Speed
    30mbps upgrade - primary hard wired - mini tower usb WiFi
    Antivirus
    GFI VIPRE Internet Security 2014 on W7 2016 beta on W10,
    Browser
    Cyberfox, WaterFox 64bit FF variants, FireFox x64, Pale Moon
    Other Info
    Accomdata fan cooled usb 2.0 PIDE/Sata II, III external enclosure.
    Sambient usb/eSata PATA/Sata II, III external enclosure.
  • At a glance

    W7 Pro x64/W11 ProAMD Deneb 3.6ghz - 965Kingston Hyper X Fury 8gbMSI HD Radeon 6450 DVI Output
    Computer type
    PC/Desktop
    System Manufacturer/Model Number
    CUSTOM ASSEMBLY
    OS
    W7 Pro x64/W11 Pro
    CPU
    AMD Deneb 3.6ghz - 965
    Motherboard
    Gigabyte GA-880GM-D2H remote pc
    Memory
    Kingston Hyper X Fury 8gb
    Graphics Card(s)
    MSI HD Radeon 6450 DVI Output
    Sound Card
    Realtek onooard Creative or Other separate PENDING
    Monitor(s) Displays
    VIZIO 32" LCD TV Separate LCD Pending
    Screen Resolution
    1600x1080
    Hard Drives
    WD 500GB OS Host/Boot WD Green 1TB Storage/Backup
    PSU
    Corsair 600W - THERMALTAKE 600W spare case
    Case
    NZXT Vulcan mini tower
    Cooling
    Twin 120mm Top Fans - 240mm Side Cover
    Keyboard
    ONN Cordless/USB Logitech Cordless
    Mouse
    ONN USB/Cordless - Logitech Cordless
    Internet Speed
    DSL 5G
    Browser
    MS Edge, FireFox, WaterFox x64, FireFox Nightly
    Other Info
    OS Testing-Remote Access to Main TeamViewer
To correct myself, it's not the WAIK that has separate downloads for x86 & x64, it's the sevice pack that has seperate downloads. I guess I wasn't thinking. :o

Also, I know that most leaked versions of Windows 7 have the separate editions unlocked on a single ISO image. I will NOT be providing ANY support for pirated software. Just thought I would make that clear right now. I'm not making any accusations though.
 

My Computer My Computer

At a glance

Windows 7 Ultimate SP1 x64 RTMAMD Athlon 64x2 3800+ Dual CoreOCZ Platinum Dual Channel 4x1GBPNY NVIDIA GeForce 9800 GT 1024MB DDR3 256 Bit
Computer Manufacturer/Model Number
NVIDIA
OS
Windows 7 Ultimate SP1 x64 RTM
CPU
AMD Athlon 64x2 3800+ Dual Core
Motherboard
NVIDIA GeForce 6100-M9
Memory
OCZ Platinum Dual Channel 4x1GB
Graphics Card(s)
PNY NVIDIA GeForce 9800 GT 1024MB DDR3 256 Bit
Sound Card
Creative Sound Blaster Audigy 24Bit
Monitor(s) Displays
Compaq 7500
Screen Resolution
1024x768
Hard Drives
C: 250GB Seagate Barracuda 7200.12 SATA-300
D: 500GB Seagate Barracuda 7200.12 SATA-300
PSU
OCZ 650Watt Dual 12-Volt Rails
Case
Thermaltake
Cooling
Fans, fans, and more fans
Keyboard
Logitech
Mouse
Logitech PS2
Internet Speed
300MBps
Other Info
LG CD-RW [IDE]
Pioneer DVD-RW [SATA-II]
I wouldn't either! Those often were inbetween developer builds and stuffed with malwares at times!

The idea here however since I have a container of "not so quality" blank dvd-rs I can make coasters out of and even toss later is simply running different tests to what does work and what could cause problems as well as noting any errors found.

So far when it goes to work on one step of another it has been found reliable. If you should close it up too fast where the cleanup isn't complete where it won't load on the next session the RT_Mount folder will be found with 4 folders for the 64bit, 3 for the 32bit 7.

If you see the ? file must be unmounted error the solution is:

1) download and install the TakeOwnership addon for the right click menu
2)go to the RT_mount sub folder under "C:\users\user account name\Local\Temp" and open the RT_mount folder.
3)When going to right click on each since those will be large in size(Program Files, Program Files(x86), ProgramData, Windows) to select the takeownership option you right click on the folder you are trying to remove a second time to bring up the properties screen right away.

Why? As explorer is counting the sub folders and files in each the Takeownership is doing that for eveyone of them being counted. Once done right click and select delete to see the newly owned folders removed and RT7Lite will automatically remove the RT_Mount folder for you.

One thing I forgot to mention was the test to see if this would work for slipstreaming the SPs for Vista as well as for 7 since this is less complicated then the need for the WAIK for the previous version when going to use the program pointed to there.

Note the guide seen over at VF. http://www.vistax64.com/tutorials/151606-vista-sp1-slipstream-installation-dvd.html

A second guide for SP2 was also made up and can be seen at http://www.vistax64.com/tutorials/230249-sliptream-vista-sp2.html

Note the results in the two screens here that someone had been thinking about Vista support or two different programs but eventually they went with the RT Seven Lite alone. This would have been a large help for one Vista laptop I worked on since that was sold before those SPs were available. :(
 

Attachments

  • RT7Lite Takes on Vista.jpg
    RT7Lite Takes on Vista.jpg
    76.9 KB · Views: 723
  • RT7Lite wont Take on Vista.jpg
    RT7Lite wont Take on Vista.jpg
    73.7 KB · Views: 350
Last edited:

My Computers My Computers

  • At a glance

    W7 Ultimate x64/W10 Pro x64/W11 Pro Triple Bo...AMD Phenom II X4 975 Deneb 3.6ghz - 965 2nd r...Kingston Hyper X DDR3 1600 1.5v 16gb - Hyper ...MSI HD Radeon 5750 1gb - MSI HD Radeon 6450 o...
    Computer type
    PC/Desktop
    Computer Manufacturer/Model Number
    Custom builds = 2
    OS
    W7 Ultimate x64/W10 Pro x64/W11 Pro Triple Boot - Main PC W7 Remote PC Micro ATX W7 Pro x64/W11 Pro
    CPU
    AMD Phenom II X4 975 Deneb 3.6ghz - 965 2nd remote pc
    Motherboard
    Gigabyte GA-790XTA-UD4-Gigabyte GA-880GM-D2H remote pc
    Memory
    Kingston Hyper X DDR3 1600 1.5v 16gb - Hyper X Fury 8gb 2nd
    Graphics Card(s)
    MSI HD Radeon 5750 1gb - MSI HD Radeon 6450 on mini tower
    Sound Card
    Creative Labs X-Fi Xtreme Audio P - Realtek onooard 2nd case
    Monitor(s) Displays
    ASUS VW199T-P 19" HP 2082a Main-HP 2082a 20" remote pc
    Screen Resolution
    Asus 1440x900 - HP 1600x900
    Hard Drives
    WD Black 1TB HD per OS W7, W10, and pending W11 presently on 500gb OS Drive - Pending Triple 1TB HDs for Spanned Storage/backup volume
    Single 2TB external USB enclosure, single 1TB System 7 Host/Boot drive, Pending 8TB external HD for system image b
    PSU
    Corsair 750TX - primary / Corsair CX600 - second
    Case
    Antec 900-2 - SSD compatible / NZXT Vulcan mini tower
    Cooling
    Zalman CNPS9900A
    Keyboard
    AZIO L70 Backlit Letters Gaming - ONN Cordless/USB
    Mouse
    MSI DS200 Programmable, Logitech Cordless
    Internet Speed
    30mbps upgrade - primary hard wired - mini tower usb WiFi
    Antivirus
    GFI VIPRE Internet Security 2014 on W7 2016 beta on W10,
    Browser
    Cyberfox, WaterFox 64bit FF variants, FireFox x64, Pale Moon
    Other Info
    Accomdata fan cooled usb 2.0 PIDE/Sata II, III external enclosure.
    Sambient usb/eSata PATA/Sata II, III external enclosure.
  • At a glance

    W7 Pro x64/W11 ProAMD Deneb 3.6ghz - 965Kingston Hyper X Fury 8gbMSI HD Radeon 6450 DVI Output
    Computer type
    PC/Desktop
    System Manufacturer/Model Number
    CUSTOM ASSEMBLY
    OS
    W7 Pro x64/W11 Pro
    CPU
    AMD Deneb 3.6ghz - 965
    Motherboard
    Gigabyte GA-880GM-D2H remote pc
    Memory
    Kingston Hyper X Fury 8gb
    Graphics Card(s)
    MSI HD Radeon 6450 DVI Output
    Sound Card
    Realtek onooard Creative or Other separate PENDING
    Monitor(s) Displays
    VIZIO 32" LCD TV Separate LCD Pending
    Screen Resolution
    1600x1080
    Hard Drives
    WD 500GB OS Host/Boot WD Green 1TB Storage/Backup
    PSU
    Corsair 600W - THERMALTAKE 600W spare case
    Case
    NZXT Vulcan mini tower
    Cooling
    Twin 120mm Top Fans - 240mm Side Cover
    Keyboard
    ONN Cordless/USB Logitech Cordless
    Mouse
    ONN USB/Cordless - Logitech Cordless
    Internet Speed
    DSL 5G
    Browser
    MS Edge, FireFox, WaterFox x64, FireFox Nightly
    Other Info
    OS Testing-Remote Access to Main TeamViewer
Awesome tutorial Brink!~

Just when I need it... here it is! And you included a section for those of us with a multiversion install dvd! THANKS!:D
 

My Computer My Computer

At a glance

Windows 7 Ultimate 64 bit Steve Ballmer Signa...Intel Core 2 Quad - Q9550 - 2.83GHz stock - O...4GB DDR2 800MHz (PC6400) OCZ ReaperNvidia GE Force 8800 GTS
Computer Manufacturer/Model Number
Homebrew PC - "Alpha_Dawg"
OS
Windows 7 Ultimate 64 bit Steve Ballmer Signature Edition
CPU
Intel Core 2 Quad - Q9550 - 2.83GHz stock - OC'd to 3.6GHz
Motherboard
Gigabyte EP45-UD3P
Memory
4GB DDR2 800MHz (PC6400) OCZ Reaper
Graphics Card(s)
Nvidia GE Force 8800 GTS
Sound Card
Asus Xonar DX
Monitor(s) Displays
Samsung SyncMaster 2333HD
Screen Resolution
1920 x 1080
Hard Drives
WD Caviar Black 750GB - 7200RPM - 32MB cache
WD Caviar Green 1.5TB - 5400RPM - 64MB cache
WD Caviar Green 2.0TB - 5400RPM - 64MB cache
PSU
PC Power & Cooling Silencer 750
Case
Gigabyte 3D Aurora
Cooling
Case is Air - 5ea. 120mm fans (mix of Arctic and Xigmatec)
Keyboard
MS Natural Wireless KB
Mouse
MS Wireless Mouse
Internet Speed
50 mbps down/5 mbps up
Other Info
AVerMedia - AVerTVHD G2 Dual Tuner Card
LOL, you're most welcome Darryl. :)
 

My Computer My Computer

At a glance

64-bit Windows 11 Pro for WorkstationsIntel i7-8700K OC'd to 5 GHz64 GB (4x16GB) G.SKILL TridentZ RGB DDR4 3600...ASUS ROG-STRIX-GTX1080TI-O11G-GAMING
Computer type
PC/Desktop
Computer Manufacturer/Model Number
Self built custom
OS
64-bit Windows 11 Pro for Workstations
CPU
Intel i7-8700K OC'd to 5 GHz
Motherboard
ASUS ROG Maximus XI Formula Z390
Memory
64 GB (4x16GB) G.SKILL TridentZ RGB DDR4 3600 MHz
Graphics Card(s)
ASUS ROG-STRIX-GTX1080TI-O11G-GAMING
Sound Card
Integrated
Monitor(s) Displays
2 x Samsung Odyssey G7 27"
Screen Resolution
2560x1440
Hard Drives
1TB Samsung 990 PRO M.2,
4TB Samsung 990 PRO PRO M.2,
TerraMaster F8 SSD Plus NAS
PSU
Seasonic Prime Titanium 850W
Case
Thermaltake Core P3
Cooling
Corsair Hydro H115i
Keyboard
Logitech wireless K800
Mouse
Logitech MX Master 4
Internet Speed
2 Gb/s Download and 100 Mb/s Upload
Antivirus
Malwarebyte Anti-Malware Premium
Browser
Google Chrome
Other Info
Logitech Z625 speaker system,
Logitech BRIO 4K Pro webcam,
HP Color LaserJet Pro MFP M477fdn,
APC SMART-UPS RT 1000 XL - SURT1000XLI,
Galaxy S23 Plus phone
Shawn,

Did you try running the dism sp cleanup command against the installed drive from within booted pe ?
 

My Computers My Computers

  • At a glance

    7 X64i5 84002x8gb 3200mhz
    Computer type
    PC/Desktop
    OS
    7 X64
    CPU
    i5 8400
    Motherboard
    gigabyte b365m ds3h
    Memory
    2x8gb 3200mhz
    Hard Drives
    various
    PSU
    pure power 11 400w cm
    Case
    Coolermaster
    Cooling
    cryorig m9i
  • At a glance

    7x64g54008gb ddr4 2400
    Computer type
    PC/Desktop
    OS
    7x64
    CPU
    g5400
    Motherboard
    ga b365m ds3h
    Memory
    8gb ddr4 2400
    PSU
    xfx pro 450w
Hmmmmmm.... what if we have a DVD or usb with both the 32 and 64 bit installs... do we use RT 7 32 or 64... or can we slipstream if we currently have both bit versions residing on the same media?
 

My Computer My Computer

At a glance

Windows 7 Ultimate 64 bit Steve Ballmer Signa...Intel Core 2 Quad - Q9550 - 2.83GHz stock - O...4GB DDR2 800MHz (PC6400) OCZ ReaperNvidia GE Force 8800 GTS
Computer Manufacturer/Model Number
Homebrew PC - "Alpha_Dawg"
OS
Windows 7 Ultimate 64 bit Steve Ballmer Signature Edition
CPU
Intel Core 2 Quad - Q9550 - 2.83GHz stock - OC'd to 3.6GHz
Motherboard
Gigabyte EP45-UD3P
Memory
4GB DDR2 800MHz (PC6400) OCZ Reaper
Graphics Card(s)
Nvidia GE Force 8800 GTS
Sound Card
Asus Xonar DX
Monitor(s) Displays
Samsung SyncMaster 2333HD
Screen Resolution
1920 x 1080
Hard Drives
WD Caviar Black 750GB - 7200RPM - 32MB cache
WD Caviar Green 1.5TB - 5400RPM - 64MB cache
WD Caviar Green 2.0TB - 5400RPM - 64MB cache
PSU
PC Power & Cooling Silencer 750
Case
Gigabyte 3D Aurora
Cooling
Case is Air - 5ea. 120mm fans (mix of Arctic and Xigmatec)
Keyboard
MS Natural Wireless KB
Mouse
MS Wireless Mouse
Internet Speed
50 mbps down/5 mbps up
Other Info
AVerMedia - AVerTVHD G2 Dual Tuner Card
I figured out why the Vista editions screen appeared on the 2.6 version. Apparently when going to add the SP slipstream option when first working on the 2.6 since the 1.7 lacked that option they used Vista since the previous version already saw SPs available for internal testing purposes.

Once the beta SP1 for 7 became available they could then lock the feature for use with 7 only while the program readily identifies Vista from the early development stages. Someone on their support forum also had asked about a Vista lite and was pointed to the program mentioned in the VF guide you wrote for Vista's SP1 as still being recommended.

I thought I would get back in here and clear that one up. Well once I get the old case running again now that some hardwares were replaced I will just have to see those SPs installed the hard way one at a time. :cry:

No biggie however since I've done that on a few VMs i had on briefly. The previous version's WAIK was also found when going to download that again and the prompt to overwrite came up. I still store some old XP and Vista files in case the need comes up.

And as far as dvds or slipstreamed isos for flash drives you have to have one for each. You can't have a universal 32/64bit install combined together. You would be trying to run the 64bit SP1 install with the 32bit 7 install or vice versa and not going anywhere with that.
 

My Computers My Computers

  • At a glance

    W7 Ultimate x64/W10 Pro x64/W11 Pro Triple Bo...AMD Phenom II X4 975 Deneb 3.6ghz - 965 2nd r...Kingston Hyper X DDR3 1600 1.5v 16gb - Hyper ...MSI HD Radeon 5750 1gb - MSI HD Radeon 6450 o...
    Computer type
    PC/Desktop
    Computer Manufacturer/Model Number
    Custom builds = 2
    OS
    W7 Ultimate x64/W10 Pro x64/W11 Pro Triple Boot - Main PC W7 Remote PC Micro ATX W7 Pro x64/W11 Pro
    CPU
    AMD Phenom II X4 975 Deneb 3.6ghz - 965 2nd remote pc
    Motherboard
    Gigabyte GA-790XTA-UD4-Gigabyte GA-880GM-D2H remote pc
    Memory
    Kingston Hyper X DDR3 1600 1.5v 16gb - Hyper X Fury 8gb 2nd
    Graphics Card(s)
    MSI HD Radeon 5750 1gb - MSI HD Radeon 6450 on mini tower
    Sound Card
    Creative Labs X-Fi Xtreme Audio P - Realtek onooard 2nd case
    Monitor(s) Displays
    ASUS VW199T-P 19" HP 2082a Main-HP 2082a 20" remote pc
    Screen Resolution
    Asus 1440x900 - HP 1600x900
    Hard Drives
    WD Black 1TB HD per OS W7, W10, and pending W11 presently on 500gb OS Drive - Pending Triple 1TB HDs for Spanned Storage/backup volume
    Single 2TB external USB enclosure, single 1TB System 7 Host/Boot drive, Pending 8TB external HD for system image b
    PSU
    Corsair 750TX - primary / Corsair CX600 - second
    Case
    Antec 900-2 - SSD compatible / NZXT Vulcan mini tower
    Cooling
    Zalman CNPS9900A
    Keyboard
    AZIO L70 Backlit Letters Gaming - ONN Cordless/USB
    Mouse
    MSI DS200 Programmable, Logitech Cordless
    Internet Speed
    30mbps upgrade - primary hard wired - mini tower usb WiFi
    Antivirus
    GFI VIPRE Internet Security 2014 on W7 2016 beta on W10,
    Browser
    Cyberfox, WaterFox 64bit FF variants, FireFox x64, Pale Moon
    Other Info
    Accomdata fan cooled usb 2.0 PIDE/Sata II, III external enclosure.
    Sambient usb/eSata PATA/Sata II, III external enclosure.
  • At a glance

    W7 Pro x64/W11 ProAMD Deneb 3.6ghz - 965Kingston Hyper X Fury 8gbMSI HD Radeon 6450 DVI Output
    Computer type
    PC/Desktop
    System Manufacturer/Model Number
    CUSTOM ASSEMBLY
    OS
    W7 Pro x64/W11 Pro
    CPU
    AMD Deneb 3.6ghz - 965
    Motherboard
    Gigabyte GA-880GM-D2H remote pc
    Memory
    Kingston Hyper X Fury 8gb
    Graphics Card(s)
    MSI HD Radeon 6450 DVI Output
    Sound Card
    Realtek onooard Creative or Other separate PENDING
    Monitor(s) Displays
    VIZIO 32" LCD TV Separate LCD Pending
    Screen Resolution
    1600x1080
    Hard Drives
    WD 500GB OS Host/Boot WD Green 1TB Storage/Backup
    PSU
    Corsair 600W - THERMALTAKE 600W spare case
    Case
    NZXT Vulcan mini tower
    Cooling
    Twin 120mm Top Fans - 240mm Side Cover
    Keyboard
    ONN Cordless/USB Logitech Cordless
    Mouse
    ONN USB/Cordless - Logitech Cordless
    Internet Speed
    DSL 5G
    Browser
    MS Edge, FireFox, WaterFox x64, FireFox Nightly
    Other Info
    OS Testing-Remote Access to Main TeamViewer
Hmmmmmm.... what if we have a DVD or usb with both the 32 and 64 bit installs... do we use RT 7 32 or 64... or can we slipstream if we currently have both bit versions residing on the same media?

Hello Darryl,

RT Seven Light will allow you to create a universal Windows 7 SP1 all editions installation DVD/ISO/USB after creating the original slipstream, then going back and adding a Windows Update to it. This is where it will allow you to create the all editions versions.

However, you will only be able to create either a 32-bit or 64-bit all edition slipstream version. It will not create a 32-bit and 64-bit combined one. :(
 

My Computer My Computer

At a glance

64-bit Windows 11 Pro for WorkstationsIntel i7-8700K OC'd to 5 GHz64 GB (4x16GB) G.SKILL TridentZ RGB DDR4 3600...ASUS ROG-STRIX-GTX1080TI-O11G-GAMING
Computer type
PC/Desktop
Computer Manufacturer/Model Number
Self built custom
OS
64-bit Windows 11 Pro for Workstations
CPU
Intel i7-8700K OC'd to 5 GHz
Motherboard
ASUS ROG Maximus XI Formula Z390
Memory
64 GB (4x16GB) G.SKILL TridentZ RGB DDR4 3600 MHz
Graphics Card(s)
ASUS ROG-STRIX-GTX1080TI-O11G-GAMING
Sound Card
Integrated
Monitor(s) Displays
2 x Samsung Odyssey G7 27"
Screen Resolution
2560x1440
Hard Drives
1TB Samsung 990 PRO M.2,
4TB Samsung 990 PRO PRO M.2,
TerraMaster F8 SSD Plus NAS
PSU
Seasonic Prime Titanium 850W
Case
Thermaltake Core P3
Cooling
Corsair Hydro H115i
Keyboard
Logitech wireless K800
Mouse
Logitech MX Master 4
Internet Speed
2 Gb/s Download and 100 Mb/s Upload
Antivirus
Malwarebyte Anti-Malware Premium
Browser
Google Chrome
Other Info
Logitech Z625 speaker system,
Logitech BRIO 4K Pro webcam,
HP Color LaserJet Pro MFP M477fdn,
APC SMART-UPS RT 1000 XL - SURT1000XLI,
Galaxy S23 Plus phone
Shawn,

Did you try running the dism sp cleanup command against the installed drive from within booted pe ?

Hello Simon,

No I haven't tried that yet. I shall start creating one now and test it to see how it does, then post back later with the results.

Good idea. :)
 

My Computer My Computer

At a glance

64-bit Windows 11 Pro for WorkstationsIntel i7-8700K OC'd to 5 GHz64 GB (4x16GB) G.SKILL TridentZ RGB DDR4 3600...ASUS ROG-STRIX-GTX1080TI-O11G-GAMING
Computer type
PC/Desktop
Computer Manufacturer/Model Number
Self built custom
OS
64-bit Windows 11 Pro for Workstations
CPU
Intel i7-8700K OC'd to 5 GHz
Motherboard
ASUS ROG Maximus XI Formula Z390
Memory
64 GB (4x16GB) G.SKILL TridentZ RGB DDR4 3600 MHz
Graphics Card(s)
ASUS ROG-STRIX-GTX1080TI-O11G-GAMING
Sound Card
Integrated
Monitor(s) Displays
2 x Samsung Odyssey G7 27"
Screen Resolution
2560x1440
Hard Drives
1TB Samsung 990 PRO M.2,
4TB Samsung 990 PRO PRO M.2,
TerraMaster F8 SSD Plus NAS
PSU
Seasonic Prime Titanium 850W
Case
Thermaltake Core P3
Cooling
Corsair Hydro H115i
Keyboard
Logitech wireless K800
Mouse
Logitech MX Master 4
Internet Speed
2 Gb/s Download and 100 Mb/s Upload
Antivirus
Malwarebyte Anti-Malware Premium
Browser
Google Chrome
Other Info
Logitech Z625 speaker system,
Logitech BRIO 4K Pro webcam,
HP Color LaserJet Pro MFP M477fdn,
APC SMART-UPS RT 1000 XL - SURT1000XLI,
Galaxy S23 Plus phone
Shawn,

Did you try running the dism sp cleanup command against the installed drive from within booted pe ?

Hello Simon,

No I haven't tried that yet. I shall start creating one now and test it to see how it does, then post back later with the results.

Good idea. :)

It took a liitle bit of working with it, but you can now use OPTION THREE in the tutorial below to remove the Windows 7 SP1 backup files from a installed slipstream Windows 7 SP1 installation. :party:

http://www.sevenforums.com/tutorials/122262-windows-7-sp1-disk-cleanup-tool.html
 

My Computer My Computer

At a glance

64-bit Windows 11 Pro for WorkstationsIntel i7-8700K OC'd to 5 GHz64 GB (4x16GB) G.SKILL TridentZ RGB DDR4 3600...ASUS ROG-STRIX-GTX1080TI-O11G-GAMING
Computer type
PC/Desktop
Computer Manufacturer/Model Number
Self built custom
OS
64-bit Windows 11 Pro for Workstations
CPU
Intel i7-8700K OC'd to 5 GHz
Motherboard
ASUS ROG Maximus XI Formula Z390
Memory
64 GB (4x16GB) G.SKILL TridentZ RGB DDR4 3600 MHz
Graphics Card(s)
ASUS ROG-STRIX-GTX1080TI-O11G-GAMING
Sound Card
Integrated
Monitor(s) Displays
2 x Samsung Odyssey G7 27"
Screen Resolution
2560x1440
Hard Drives
1TB Samsung 990 PRO M.2,
4TB Samsung 990 PRO PRO M.2,
TerraMaster F8 SSD Plus NAS
PSU
Seasonic Prime Titanium 850W
Case
Thermaltake Core P3
Cooling
Corsair Hydro H115i
Keyboard
Logitech wireless K800
Mouse
Logitech MX Master 4
Internet Speed
2 Gb/s Download and 100 Mb/s Upload
Antivirus
Malwarebyte Anti-Malware Premium
Browser
Google Chrome
Other Info
Logitech Z625 speaker system,
Logitech BRIO 4K Pro webcam,
HP Color LaserJet Pro MFP M477fdn,
APC SMART-UPS RT 1000 XL - SURT1000XLI,
Galaxy S23 Plus phone
Shawn,

Did you try running the dism sp cleanup command against the installed drive from within booted pe ?

Hello Simon,

No I haven't tried that yet. I shall start creating one now and test it to see how it does, then post back later with the results.

Good idea. :)

Shawn,

Did you try running the dism sp cleanup command against the installed drive from within booted pe ?

Hello Simon,

No I haven't tried that yet. I shall start creating one now and test it to see how it does, then post back later with the results.

Good idea. :)

It took a liitle bit of working with it, but you can now use OPTION THREE in the tutorial below to remove the Windows 7 SP1 backup files from a installed slipstream Windows 7 SP1 installation. :party:

http://www.sevenforums.com/tutorials/122262-windows-7-sp1-disk-cleanup-tool.html


Well done guys.Just what a few of us have been waiting for.

Danny
 

My Computer My Computer

At a glance

Windows 7 Home Premium x64 SP1intel(R)core(TM)2 duo CPU T6600 @ 2.20GHz3 gb ddr3ati radeon hd4570/512mb
Computer Manufacturer/Model Number
acer aspire 5935g
OS
Windows 7 Home Premium x64 SP1
CPU
intel(R)core(TM)2 duo CPU T6600 @ 2.20GHz
Motherboard
intel gm45/gm47 revision 07
Memory
3 gb ddr3
Graphics Card(s)
ati radeon hd4570/512mb
Monitor(s) Displays
lop156wh2-tle1 15.3 flat
Screen Resolution
1366x768
Hard Drives
OCZ-Agility3 60gig ssd
320gig external hdd
500gig external hdd
Mouse
Optical
Internet Speed
30Mbps Down/30Mbps Up
There you go. ;)

It works if you do exactly that when you have slipstreamed manually ( you don't need rt7 lite, or waik - tho. it's easier to use rt7lite. )

Unfortunately, you do get the backup files left - running the command from pe works - so I figured it would also work if you had used rt7lite.
 

My Computers My Computers

  • At a glance

    7 X64i5 84002x8gb 3200mhz
    Computer type
    PC/Desktop
    OS
    7 X64
    CPU
    i5 8400
    Motherboard
    gigabyte b365m ds3h
    Memory
    2x8gb 3200mhz
    Hard Drives
    various
    PSU
    pure power 11 400w cm
    Case
    Coolermaster
    Cooling
    cryorig m9i
  • At a glance

    7x64g54008gb ddr4 2400
    Computer type
    PC/Desktop
    OS
    7x64
    CPU
    g5400
    Motherboard
    ga b365m ds3h
    Memory
    8gb ddr4 2400
    PSU
    xfx pro 450w
( you don't need rt7 lite, or waik )
How can you slipstream Windows 7 service pack 1 without using the WAIK, or the tools provided in it?
 

My Computer My Computer

At a glance

Windows 7 Ultimate SP1 x64 RTMAMD Athlon 64x2 3800+ Dual CoreOCZ Platinum Dual Channel 4x1GBPNY NVIDIA GeForce 9800 GT 1024MB DDR3 256 Bit
Computer Manufacturer/Model Number
NVIDIA
OS
Windows 7 Ultimate SP1 x64 RTM
CPU
AMD Athlon 64x2 3800+ Dual Core
Motherboard
NVIDIA GeForce 6100-M9
Memory
OCZ Platinum Dual Channel 4x1GB
Graphics Card(s)
PNY NVIDIA GeForce 9800 GT 1024MB DDR3 256 Bit
Sound Card
Creative Sound Blaster Audigy 24Bit
Monitor(s) Displays
Compaq 7500
Screen Resolution
1024x768
Hard Drives
C: 250GB Seagate Barracuda 7200.12 SATA-300
D: 500GB Seagate Barracuda 7200.12 SATA-300
PSU
OCZ 650Watt Dual 12-Volt Rails
Case
Thermaltake
Cooling
Fans, fans, and more fans
Keyboard
Logitech
Mouse
Logitech PS2
Internet Speed
300MBps
Other Info
LG CD-RW [IDE]
Pioneer DVD-RW [SATA-II]
I don't know, but I would think it would be much easier and less problematic to use RT7 Litealong with the tutorial on the first page of this thread.
 

My Computer My Computer

At a glance

64-bit Windows 11 Pro for WorkstationsIntel i7-8700K OC'd to 5 GHz64 GB (4x16GB) G.SKILL TridentZ RGB DDR4 3600...ASUS ROG-STRIX-GTX1080TI-O11G-GAMING
Computer type
PC/Desktop
Computer Manufacturer/Model Number
Self built custom
OS
64-bit Windows 11 Pro for Workstations
CPU
Intel i7-8700K OC'd to 5 GHz
Motherboard
ASUS ROG Maximus XI Formula Z390
Memory
64 GB (4x16GB) G.SKILL TridentZ RGB DDR4 3600 MHz
Graphics Card(s)
ASUS ROG-STRIX-GTX1080TI-O11G-GAMING
Sound Card
Integrated
Monitor(s) Displays
2 x Samsung Odyssey G7 27"
Screen Resolution
2560x1440
Hard Drives
1TB Samsung 990 PRO M.2,
4TB Samsung 990 PRO PRO M.2,
TerraMaster F8 SSD Plus NAS
PSU
Seasonic Prime Titanium 850W
Case
Thermaltake Core P3
Cooling
Corsair Hydro H115i
Keyboard
Logitech wireless K800
Mouse
Logitech MX Master 4
Internet Speed
2 Gb/s Download and 100 Mb/s Upload
Antivirus
Malwarebyte Anti-Malware Premium
Browser
Google Chrome
Other Info
Logitech Z625 speaker system,
Logitech BRIO 4K Pro webcam,
HP Color LaserJet Pro MFP M477fdn,
APC SMART-UPS RT 1000 XL - SURT1000XLI,
Galaxy S23 Plus phone
However, you will only be able to create either a 32-bit or 64-bit all edition slipstream version. It will not create a 32-bit and 64-bit combined one. :(
Honestly, I don't think that's possible Bro. I haven't looked into it, but I've given it some thought. I just don't see it happening. It's easy to unloack all editions on a finished slipstream disc, but having both architectures on a single slipstreamed disc doesn't seem possible. I wouldn't be able to test it anyway, because all my Windows 7 installation DVD's are from TechNet, and they don't offer a download with both architectures on a single DVD. They have one for Office though.

But if is possible somehow, you will definately have to do it on a x64 machine. There's no way you could get a x64 disc built properly on a x86 machine.
 

My Computer My Computer

At a glance

Windows 7 Ultimate SP1 x64 RTMAMD Athlon 64x2 3800+ Dual CoreOCZ Platinum Dual Channel 4x1GBPNY NVIDIA GeForce 9800 GT 1024MB DDR3 256 Bit
Computer Manufacturer/Model Number
NVIDIA
OS
Windows 7 Ultimate SP1 x64 RTM
CPU
AMD Athlon 64x2 3800+ Dual Core
Motherboard
NVIDIA GeForce 6100-M9
Memory
OCZ Platinum Dual Channel 4x1GB
Graphics Card(s)
PNY NVIDIA GeForce 9800 GT 1024MB DDR3 256 Bit
Sound Card
Creative Sound Blaster Audigy 24Bit
Monitor(s) Displays
Compaq 7500
Screen Resolution
1024x768
Hard Drives
C: 250GB Seagate Barracuda 7200.12 SATA-300
D: 500GB Seagate Barracuda 7200.12 SATA-300
PSU
OCZ 650Watt Dual 12-Volt Rails
Case
Thermaltake
Cooling
Fans, fans, and more fans
Keyboard
Logitech
Mouse
Logitech PS2
Internet Speed
300MBps
Other Info
LG CD-RW [IDE]
Pioneer DVD-RW [SATA-II]
I don't think it may be possible either. At least not using the program in this tutorial. It will only create a all editions one for either or, but not both.
 

My Computer My Computer

At a glance

64-bit Windows 11 Pro for WorkstationsIntel i7-8700K OC'd to 5 GHz64 GB (4x16GB) G.SKILL TridentZ RGB DDR4 3600...ASUS ROG-STRIX-GTX1080TI-O11G-GAMING
Computer type
PC/Desktop
Computer Manufacturer/Model Number
Self built custom
OS
64-bit Windows 11 Pro for Workstations
CPU
Intel i7-8700K OC'd to 5 GHz
Motherboard
ASUS ROG Maximus XI Formula Z390
Memory
64 GB (4x16GB) G.SKILL TridentZ RGB DDR4 3600 MHz
Graphics Card(s)
ASUS ROG-STRIX-GTX1080TI-O11G-GAMING
Sound Card
Integrated
Monitor(s) Displays
2 x Samsung Odyssey G7 27"
Screen Resolution
2560x1440
Hard Drives
1TB Samsung 990 PRO M.2,
4TB Samsung 990 PRO PRO M.2,
TerraMaster F8 SSD Plus NAS
PSU
Seasonic Prime Titanium 850W
Case
Thermaltake Core P3
Cooling
Corsair Hydro H115i
Keyboard
Logitech wireless K800
Mouse
Logitech MX Master 4
Internet Speed
2 Gb/s Download and 100 Mb/s Upload
Antivirus
Malwarebyte Anti-Malware Premium
Browser
Google Chrome
Other Info
Logitech Z625 speaker system,
Logitech BRIO 4K Pro webcam,
HP Color LaserJet Pro MFP M477fdn,
APC SMART-UPS RT 1000 XL - SURT1000XLI,
Galaxy S23 Plus phone
By the way, I hope I'm not irritating you with discussing alternative methods in this thread. I'm not trying to hijack it or anything, just letting people know that there are other methods available. Whichever method they choose, is entirely up to them. ;)
 

My Computer My Computer

At a glance

Windows 7 Ultimate SP1 x64 RTMAMD Athlon 64x2 3800+ Dual CoreOCZ Platinum Dual Channel 4x1GBPNY NVIDIA GeForce 9800 GT 1024MB DDR3 256 Bit
Computer Manufacturer/Model Number
NVIDIA
OS
Windows 7 Ultimate SP1 x64 RTM
CPU
AMD Athlon 64x2 3800+ Dual Core
Motherboard
NVIDIA GeForce 6100-M9
Memory
OCZ Platinum Dual Channel 4x1GB
Graphics Card(s)
PNY NVIDIA GeForce 9800 GT 1024MB DDR3 256 Bit
Sound Card
Creative Sound Blaster Audigy 24Bit
Monitor(s) Displays
Compaq 7500
Screen Resolution
1024x768
Hard Drives
C: 250GB Seagate Barracuda 7200.12 SATA-300
D: 500GB Seagate Barracuda 7200.12 SATA-300
PSU
OCZ 650Watt Dual 12-Volt Rails
Case
Thermaltake
Cooling
Fans, fans, and more fans
Keyboard
Logitech
Mouse
Logitech PS2
Internet Speed
300MBps
Other Info
LG CD-RW [IDE]
Pioneer DVD-RW [SATA-II]
That's fine since it's on topic of the tutorial. :)
 

My Computer My Computer

At a glance

64-bit Windows 11 Pro for WorkstationsIntel i7-8700K OC'd to 5 GHz64 GB (4x16GB) G.SKILL TridentZ RGB DDR4 3600...ASUS ROG-STRIX-GTX1080TI-O11G-GAMING
Computer type
PC/Desktop
Computer Manufacturer/Model Number
Self built custom
OS
64-bit Windows 11 Pro for Workstations
CPU
Intel i7-8700K OC'd to 5 GHz
Motherboard
ASUS ROG Maximus XI Formula Z390
Memory
64 GB (4x16GB) G.SKILL TridentZ RGB DDR4 3600 MHz
Graphics Card(s)
ASUS ROG-STRIX-GTX1080TI-O11G-GAMING
Sound Card
Integrated
Monitor(s) Displays
2 x Samsung Odyssey G7 27"
Screen Resolution
2560x1440
Hard Drives
1TB Samsung 990 PRO M.2,
4TB Samsung 990 PRO PRO M.2,
TerraMaster F8 SSD Plus NAS
PSU
Seasonic Prime Titanium 850W
Case
Thermaltake Core P3
Cooling
Corsair Hydro H115i
Keyboard
Logitech wireless K800
Mouse
Logitech MX Master 4
Internet Speed
2 Gb/s Download and 100 Mb/s Upload
Antivirus
Malwarebyte Anti-Malware Premium
Browser
Google Chrome
Other Info
Logitech Z625 speaker system,
Logitech BRIO 4K Pro webcam,
HP Color LaserJet Pro MFP M477fdn,
APC SMART-UPS RT 1000 XL - SURT1000XLI,
Galaxy S23 Plus phone
Back
Top