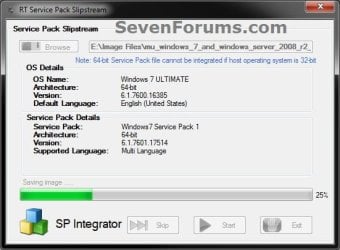
Slipstream Windows 7 SP1 into a Installation DVD or ISO File

How to Slipstream Windows 7 SP1 and Updates to Create a Bootable USB, Installation DVD, or ISO File

   Information
This will show you how to slipstream Windows 7 SP1 with your retail or student copy of Windows 7 without SP1 to create a slipstream Windows 7 SP1 installation "DVD", a slipstream Windows 7 SP1 bootable "ISO file", or a slipstream Windows 7 SP1 bootable installation "USB flash drive".

This will also show you how to integrate Windows Updates into your new or previously created slipstream Windows 7 SP1 to create a new updated slipstream Windows 7 SP1 installation "DVD", a slipstream Windows 7 SP1 bootable "ISO file", or a slipstream Windows 7 SP1 bootable installation "USB flash drive".

   Warning

  • You can only do this tutorial while logged in as an administrator.
  • You can only use a retail copy or student copy of a Windows 7 installation DVD, bootable USB flash drive, or ISO file to create a slipstream Windows 7 SP1 with.
  • You can only use a previously created slipstream Windows 7 SP1 installation DVD, bootable USB flash drive, or ISO file using this tutorial to integrate new Windows Updates to create a new updated slipstream Windows 7 SP1 installation DVD, bootable USB flash drive, or ISO file with.
  • You can only create a 64-bit slipstreamed Windows 7 SP1 DVD or ISO if your current Windows 7 installation is also 64-bit.
  • You can create a 32-bit slipstreamed Windows 7 SP1 DVD or ISO if your current Windows 7 installation is 32-bit or 64-bit.
  • When you install Windows 7 SP1 using the slipstreamed Windows 7 SP1 DVD/ISO/USB created in this tutorial, you will not be able to uninstall SP1.
   Tip

  • You cannot use a slipstream Windows 7 installation disc to do a repair install with on a currently installed Windows 7 SP1.
  • You cannot use a slipstream Windows 7 installation disc to do a repair install with on a currently installed slipstream Windows 7 SP1.
  • You can use a Windows 7 with SP1 installation disc (ex: Technet, MSDN, or retail) to do a repair install with on a current slipstream Windows 7 SP1 installation.
   Note
This tutorial is designed to be followed like a flow chart to help make it easier to use and select the options (ex: DVD or ISO) you want.


Here's How: 1. If you have not already, then you will need download and install the free 32-bit (x86) or 64-bit (x64) RT Seven Lite "Beta 2.6.0" for your same 32-bit or 64-bit Windows 7 installation DVD or ISO file.
   Note
Alternative RT Seven Lite Beta download link: RT Seven Lite Download - Softpedia

Softpedia.jpg

   Warning
At the rt7lite.com site, you will need to scroll down a bit past the RC 1.7.0 build to see the Beta 2.6.0 build download links.

This tutorial will not work using the RC 1.7.0 build.

2. Click on the RT Seven Lite shortcut on your desktop or in the Start Menu to run the program. (see screenshot below) Step1.jpg
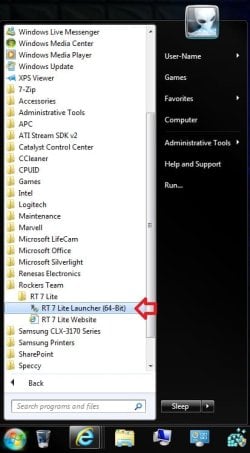
3. Do either step 4 or 5 for what you have to use to integrate the Windows 7 SP1 and/or Windows Updates into.

4. To Select and Use a Windows 7 Installation DVD or Bootable USB A) Insert your retail or previously slipstreamed Windows 7 installation DVD into the DVD drive and close it, OR plug in your Windows 7 bootable USB flash drive. If a AutoPlay pop-up opens, close it.

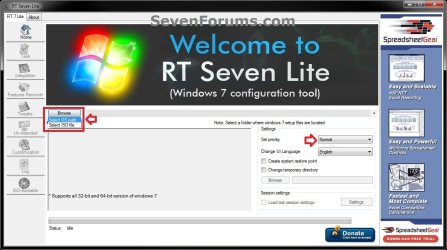
B) In RT Seven Lite, click on the Browse button, and select the Select OS path option. (see screenshot below)
NOTE: If you do not have much else running, then you may wish to change the Set priority setting to High first to help speed the slipstreaming process up some. DVD-1.jpg
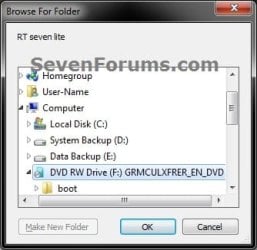
C) Navigate to and select your DVD drive or bootable USB flash drive with Windows 7 on it from steps 4A, and click on OK. (see screeshow below) DVD-2.jpg
D) Click on OK. (see screenshot below) DVD-3.jpg
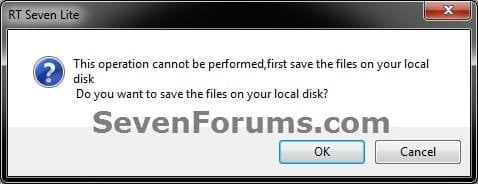
E) Select your Desktop, and click on the Make New Folder button. (see screenshot below) DVD-4.jpg
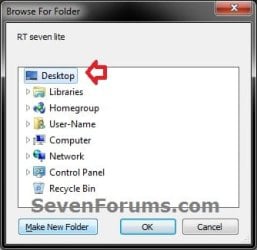
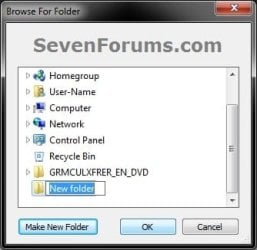
F) Select the New folder on the desktop, and click on OK. (see screenshot below) DVD-5.jpg
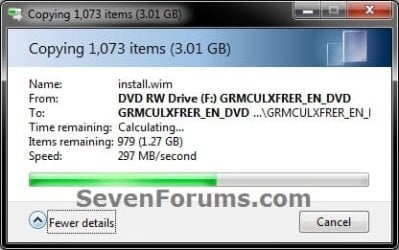
G) The contents of the Windows 7 installation DVD from steps 4A and 4C will now be copied into the New folder (step 4F) on the desktop. (see screenshot below)
NOTE: This may take a few minutes to complete. DVD-6.jpg
H) Go to step 6.
5. To Select and Use a Windows 7 ISO File

   Note
You could use a Windows 7 ISO file that you already created from say RT Seven Lite, or a Windows 7 w/SP1 U ISO downloaded from: Microsoft: Windows 7 Direct Download Links

A) In RT Seven Lite, click on the Browse button, and select the Select ISO file option. (see screenshot below)
NOTE: If you do not have much else running, then you may wish to change the Set priority setting to High first to help speed the slipstreaming process up some. ISO-1.jpg
B) Click on the Select a ISO button. (see screenshot below) ISO-2.jpg
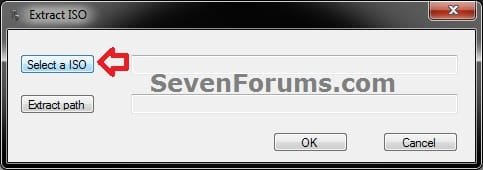
C) Navigate to and select the Windows 7 ISO file, and click on Open. (see screenshot below) ISO-3.jpg
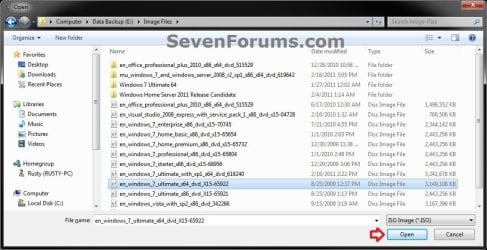
D) Select the Extract path button. (see screenshot below) ISO-4.jpg
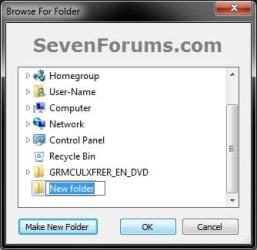
E) Select your Desktop, and click on the Make New Folder button. (see screenshot below) ISO-5.jpg
F) Select the New folder on the desktop, and click on OK. (see screenshot below) ISO-6.jpg
G) Click on OK. (see screenshot below) ISO-7.jpg
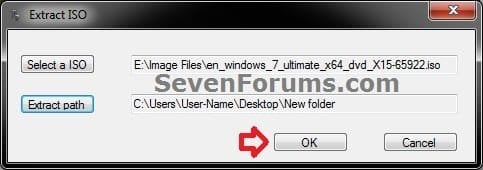
H) The contents of the Windows 7 ISO file from step 5C will now be extracted and copied into the New folder (step 5F) on the desktop. (see screenshot below)
NOTE: This may take only a few minutes to complete. ISO-8.jpg
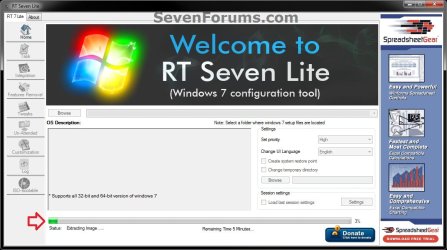
I) Continue on to step 6.
6. Do either step 7 or 8 below for what you want to do.

7. To Only Integrate New Windows Updates
NOTE: You would only select this option if used a previously created slipstream Windows 7 SP1 installation DVD, bootable USB flash drive, or ISO file using this tutorial in step 4 or 5 above, and only want to update it by integrating new Windows Updates. A) When finished, select (dot) the Windows 7 edition that you want to create a updated SP1 slipstream version of, and click on OK. (see screenshot below)
NOTE: When this window below opens it likes to hide behind another opened active window, so you may need to check behind them when the screenshot above (step 5H) shows it's "Status" as Loading Image.... and does not appear to be doing anything. Step2.jpg
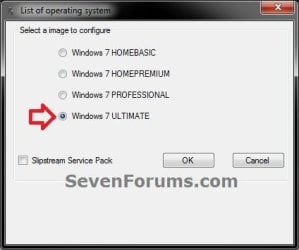
B) Go to step 9.
8. To Slipstream SP1 and to be able to Integrate Windows Updates
NOTE: You would select this option if you used a retail copy or student copy of a Windows 7 installation DVD, bootable USB flash drive, or ISO file that did not have SP1 slipstreamed in it in step 4 or 5 above. A) If you have not already, then you will need to download the same 32-bit (x86) or 64-bit (x64) Windows 7 SP1 EXE installation file for your same 32-bit or 64-bit Windows 7 installation DVD or ISO file at the Microsoft link below, and save it to your Desktop. Download details: Windows 7 and Windows Server 2008 R2 Service Pack 1 (KB976932)
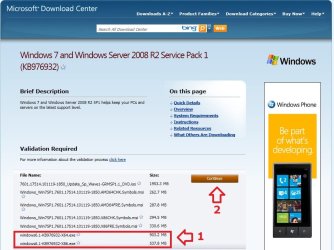
Download.jpg
B) Right click on the downloaded windows6.1-KB976932-X64.exe or windows6.1-KB976932-X86.exe file, click on Properties, click on the General tab, and click on Unblock.
NOTE: If you do not have a Unblock button under the General tab, then the SP1 exe file is already unblocked and you can continue on to step 8C.

C) When RT Seven Lite is finished from step 4G or 5H, select (dot) only the one Windows 7 edition that you want to create a slipstream SP1 version of, check the Slipstream Service Pack box, and click on OK. (see screenshot below) Step3.jpg
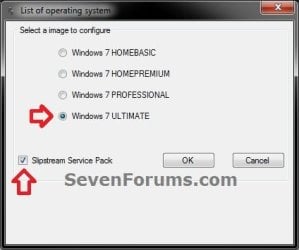
D) Click on the Browse button. (see screenshot below) Step4.jpg
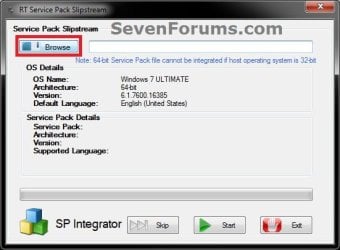
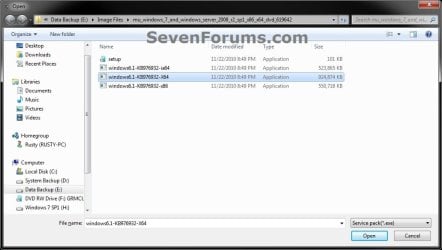
E) Navigate to and select the Windows 7 SP1 EXE installation file on your desktop from step 1, and click on Open. (see screenshot below) Step5.jpg
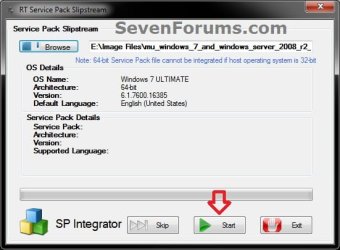
F) Click on the Start button. (see screenshot below) Step6.jpg
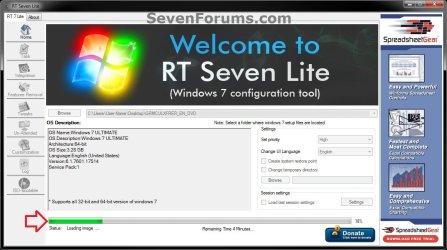
G) RT Seven Lite will now start preparing, integrating, and saving the SP1 (step 9) with the DVD (step 4) or ISO file (step 5). (see screenshots below)
NOTE: This will take a good while to complete depending on how fast your system is and what you have the priority level set as in step 4B. Step7.jpg

Step8.jpg

H) When finished, click on the Proceed button. (see screenshot below) Step10.jpg
I) RT Seven Lite will now start start loading the image. (see screenshot below)
NOTE: This will take a few minutes to complete. Step11.jpg
J) Continue on to step 9.
9. When finished, click on the Task tab in the left pane. (see screenshot below) Step12.jpg
10. Do either step 11 or 12 below for what you want to do.

11. To Only Slipstream SP1
NOTE: You would do this step if you did step 8 above and do not want to integrate any Windows Updates into the Slipstream Windows 7 SP1 installation DVD, bootable USB flash drive, or ISO file. A) In the Task tab, check the ISO Bootable box option, then click on the ISO-Bootable tab in the left pane. (see screenshot below)
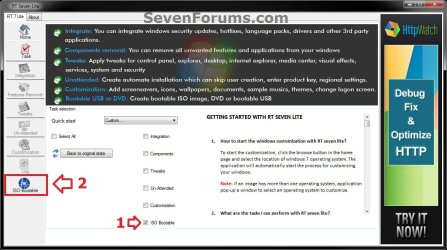
Step13.jpg
B) Go to step 12F.
12. To Integrate Windows Updates and still be able to Slipstream SP1 (if not already)
NOTE: You would do this step if you did step 7 above and want to integrate Windows Updates into this new or previously created Slipstream Windows 7 SP1 installation DVD, bootable USB flash drive, or ISO file. A) If you have not already, then you will need to download the standalone MSU installation files for each Windows Update that you want to integrate into the slipstream, and save them to your Desktop.

B) In the Task tab in RT Seven Lite, check the Integration box and ISO Bootable box options, then click on the Integration tab in the left pane. (see screenshot below) Update-1.jpg
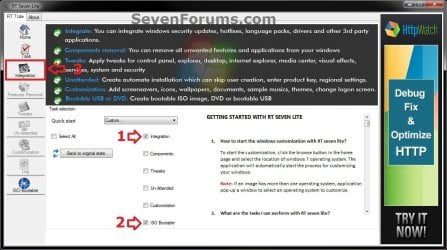
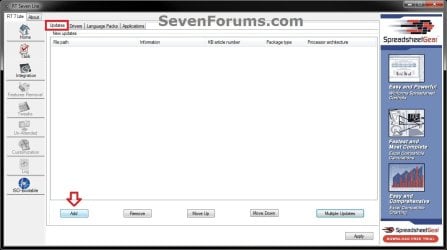
C) Under the Updates tab, click on the Add button. (see screenshot below) Update-2.jpg
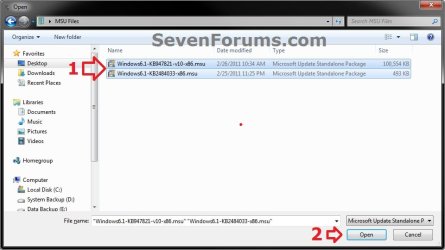
D) Navigate to and select all of the Windows Update MSU files that you want to integrate, and click on Open. (see screenshot below)
NOTE: You can press and hold the CTRL key to select more than one random MSU file. Update-3.jpg
E) When finished adding MSU files, click on Apply. (see screenshot below) Update-4.jpg
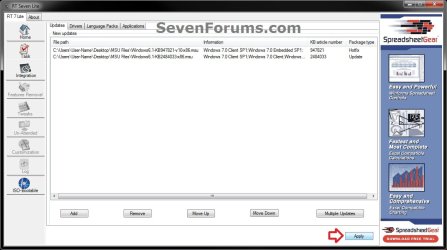
F) Do either step 12G or 12H for what type of Slipstream Windows 7 SP1 you want.

G) To Create a Single Windows 7 SP1 Edition Slipstream

NOTE: This will create a Slipstream Windows 7 SP1 with only the one Windows 7 edition that you selected in step 7A or 8C.
  • Select High priority level, select (dot) Build current image only, and click on Commit. (see screenshot below)
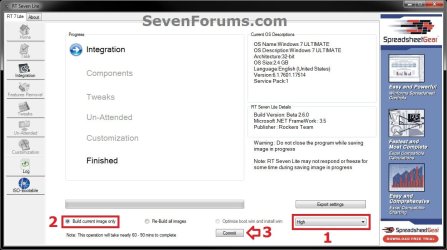
Update-5-single.jpg

  • Go to step 12I
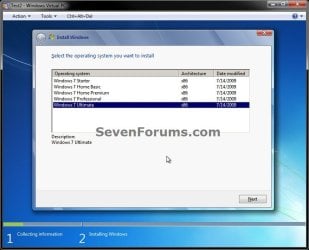
H) To Create a All-in-One Windows 7 SP1 Edition Slipstream
NOTE: This will create a Slipstream Windows 7 SP1 with all Windows 7 editions that will allow you to select which one to install during installation. (see screenshot below) All-in-one.jpg
  • Select High priority level, select (dot) Re-build all images, and click on Commit. (see screenshot below)
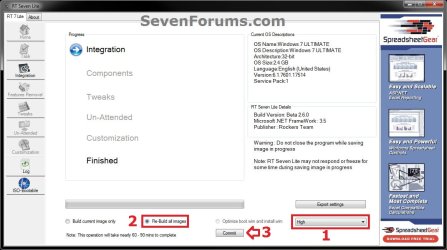
Update-5-all-in-one.jpg

  • Continue on to step 12I
I) RT Seven Lite will now start integrating the Windows Updates. (see screenshot below)
NOTE: This may take from a few minutes or longer depending on how many Windows Update MSU files you added. Update-6.jpg
J) When finished, click on the ISO-Bootable tab in the left pane. (see screenshot below) Update-7.jpg
K) Continue on to step 13.
13. Do either step 14, 15, or 16 for what you would like to have your Slipstreamed Windows 7 SP1 as.

14. To Burn a Slipstream Windows 7 SP1 Installation DVD A) Insert a blank DVD (ex: DVD-R) into the DVD drive and close it. If a AutoPlay pop-up opens, close it.

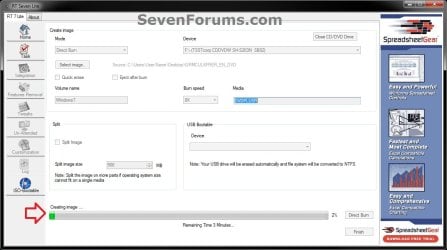
B) In RT Seven Lite, select the Direct Burn drop down menu option under Mode, select the drive letter used from step 14A under Device, then click on the Direct Burn button towards the bottom right. (see screenshot below) Step14-DVD.jpg
C) RT Seven Lite will now start creating the image. (see screenshot below)
NOTE: This will take a few minutes to complete. Step15-DVD.jpg
D) When finished, click on OK. If a AutoPlay pop-up opens, close it. (see screenshots below) Step16-DVD.jpg
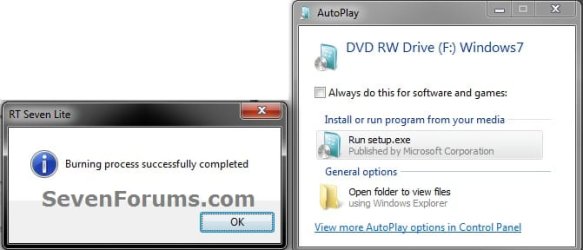
E) You now have a slipstream Windows 7 SP1 installation DVD.

F) Go to step 17.
15. To Create a Slipstream Windows 7 SP1 ISO File A) In RT Seven Lite, select the Create Image drop down menu option under Mode, then click on the Make ISO button towards the bottom right. (see screenshot below) Step14-ISO.jpg
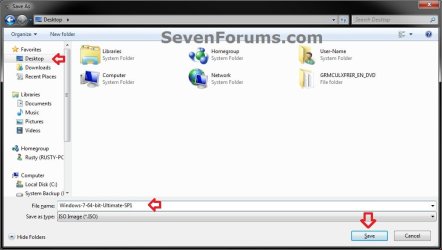
B) Navigate to and select your Desktop, type in a name that you want for the ISO file, then click on the Save button. (see screenshot below) Step15-ISO.jpg
C) When finished, click on OK. (see screenshot below) Step16-ISO.jpg

D) You now have a slipstream Windows 7 SP1 bootable ISO file.
   Note

  • You could also use this ISO file to burn and create a Slipstream Windows 7 SP1 installation DVD with.
  • You could also use this ISO file to create a Slipstream Windows 7 SP1 bootable installation USB flash drive with. For how, see part 2 here: Windows 7 USB/DVD Download Tool
  • You could also test or use this ISO file in a virtual machine if you like.

E) Go to step 17.
16. To Create a Slipstream Windows 7 SP1 Bootable Installation USB Flash Drive A) If you have not already, plug in your USB flash drive.
NOTE: You will need to have at least 4.5 GB free on the USB flash drive.

B) In RT Seven Lite, select the USB Bootable drop down menu option under Mode. (see screenshot below) USB-1.jpg
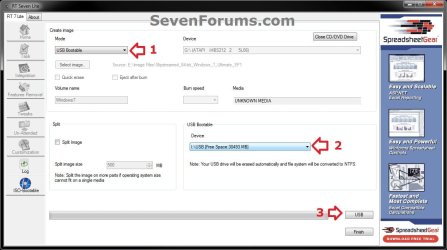
C) Select your USB flash drive from the drop down menu under USB Bootable. (see screenshot above)
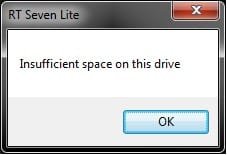
NOTE: If there is not enough free space on the selected USB flash drive, you will get a notice telling you so. You will then need to select a larger USB flash drive. (see screenshot below) USB-Error.jpg
D) Click on the USB button towards the bottom right. (see screenshot below step 16B)

E) Click on OK to format the USB flash drive. (see screenshot below) USB-2.jpg
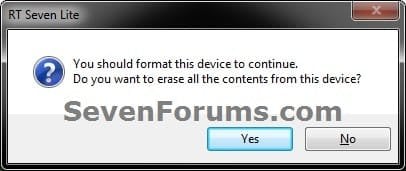
F) RT Seven Lite will now start formating the USB flash drive and copying the files to it. (see screenshot below)
NOTE: This will take a few minutes to complete. USB-3.jpg
G) When it's finished, click on OK. (see screenshot below) USB-4.jpg
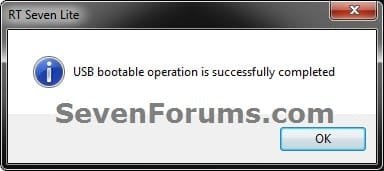
H) You now have a slipstream Windows 7 SP1 bootable installation USB flash drive.

I) Continue on to step 17.
17. Close RT Seven Lite.

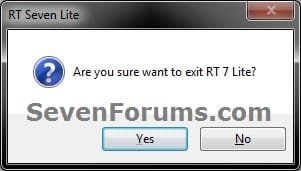
18. Click on Yes to confirm closing RT Seven Lite. (see screenshot below) Step17.jpg
19. RT Seven Lite will now clean up it's temp files before closing. (see screenshot below)
:warn:WARNING: Do not stop or interrupt RT Seven Lite from cleaning it's temp files to avoid getting this error here the next time you try and run RT Seven Lite. Step18.jpg

20. You can now delete the New folder from step 4E or 5E and it's contents on the desktop if you like.
   Tip
You can keep your newly created slipstream Windows 7 SP1 installation DVD, bootable USB flash drive, or ISO file updated by doing this tutorial again with steps 7 and 12 to integrate any new Windows Updates released afterwards into it.

When you install Windows 7 SP1 using the slipstream Windows 7 SP1 DVD/ISO/USB created in this tutorial, you will be able to use the Windows 7 SP1 Disk Cleanup Tool (OPTION THREE at link) to delete the SP1 backup files.


That's it,
Shawn


Attachments

  • Step9.jpg
    Step9.jpg
    33.4 KB · Views: 252
  • Disk_Cleanup-1.jpg
    Disk_Cleanup-1.jpg
    35.9 KB · Views: 262
  • Disk_Cleanup-2.jpg
    Disk_Cleanup-2.jpg
    31.9 KB · Views: 276
Last edited:

My Computer My Computer

At a glance

64-bit Windows 11 Pro for WorkstationsIntel i7-8700K OC'd to 5 GHz64 GB (4x16GB) G.SKILL TridentZ RGB DDR4 3600...ASUS ROG-STRIX-GTX1080TI-O11G-GAMING
Computer type
PC/Desktop
Computer Manufacturer/Model Number
Self built custom
OS
64-bit Windows 11 Pro for Workstations
CPU
Intel i7-8700K OC'd to 5 GHz
Motherboard
ASUS ROG Maximus XI Formula Z390
Memory
64 GB (4x16GB) G.SKILL TridentZ RGB DDR4 3600 MHz
Graphics Card(s)
ASUS ROG-STRIX-GTX1080TI-O11G-GAMING
Sound Card
Integrated
Monitor(s) Displays
2 x Samsung Odyssey G7 27"
Screen Resolution
2560x1440
Hard Drives
1TB Samsung 990 PRO M.2,
4TB Samsung 990 PRO PRO M.2,
TerraMaster F8 SSD Plus NAS
PSU
Seasonic Prime Titanium 850W
Case
Thermaltake Core P3
Cooling
Corsair Hydro H115i
Keyboard
Logitech wireless K800
Mouse
Logitech MX Master 4
Internet Speed
2 Gb/s Download and 100 Mb/s Upload
Antivirus
Malwarebyte Anti-Malware Premium
Browser
Google Chrome
Other Info
Logitech Z625 speaker system,
Logitech BRIO 4K Pro webcam,
HP Color LaserJet Pro MFP M477fdn,
APC SMART-UPS RT 1000 XL - SURT1000XLI,
Galaxy S23 Plus phone
Ahh I see, so if I wanted to have Windows 7 Starter/HP/Pro/Ult I'd need separate ISO's made for each? Well looks like I can put one of my 32GB Sticks to use and put each version on, but regardless thanks for the guide! It's helping out at work tremendously as it cuts down on the 90 to 120 minute install of updates since there is no SP2 for W7 yet. I usually use Acronis and image machines that we get in bulk but for customer machines that need reload I've been trying to find a way to speed up the update process a bit, me and my other co-worker did make a decent universal image using SysPrep and Acronis but we have still yet to test it on more then a couple computers so far.
 

My Computer My Computer

At a glance

Windows 7 Ultimate x64
Computer type
PC/Desktop
OS
Windows 7 Ultimate x64

My Computer My Computer

At a glance

64-bit Windows 11 Pro for WorkstationsIntel i7-8700K OC'd to 5 GHz64 GB (4x16GB) G.SKILL TridentZ RGB DDR4 3600...ASUS ROG-STRIX-GTX1080TI-O11G-GAMING
Computer type
PC/Desktop
Computer Manufacturer/Model Number
Self built custom
OS
64-bit Windows 11 Pro for Workstations
CPU
Intel i7-8700K OC'd to 5 GHz
Motherboard
ASUS ROG Maximus XI Formula Z390
Memory
64 GB (4x16GB) G.SKILL TridentZ RGB DDR4 3600 MHz
Graphics Card(s)
ASUS ROG-STRIX-GTX1080TI-O11G-GAMING
Sound Card
Integrated
Monitor(s) Displays
2 x Samsung Odyssey G7 27"
Screen Resolution
2560x1440
Hard Drives
1TB Samsung 990 PRO M.2,
4TB Samsung 990 PRO PRO M.2,
TerraMaster F8 SSD Plus NAS
PSU
Seasonic Prime Titanium 850W
Case
Thermaltake Core P3
Cooling
Corsair Hydro H115i
Keyboard
Logitech wireless K800
Mouse
Logitech MX Master 4
Internet Speed
2 Gb/s Download and 100 Mb/s Upload
Antivirus
Malwarebyte Anti-Malware Premium
Browser
Google Chrome
Other Info
Logitech Z625 speaker system,
Logitech BRIO 4K Pro webcam,
HP Color LaserJet Pro MFP M477fdn,
APC SMART-UPS RT 1000 XL - SURT1000XLI,
Galaxy S23 Plus phone
Alright thanks for the info, I made a Home Premium and Pro disk in case I need them at work! But also I found a way to make universal images using sysprep and Acronis to image the system, so we got all windows 7 images needed at work now! Thanks for the great guide sir :)
 

My Computer My Computer

At a glance

Windows 7 Ultimate x64
Computer type
PC/Desktop
OS
Windows 7 Ultimate x64
You're most welcome Iamanerd. I'm glad it was helpful. :)
 

My Computer My Computer

At a glance

64-bit Windows 11 Pro for WorkstationsIntel i7-8700K OC'd to 5 GHz64 GB (4x16GB) G.SKILL TridentZ RGB DDR4 3600...ASUS ROG-STRIX-GTX1080TI-O11G-GAMING
Computer type
PC/Desktop
Computer Manufacturer/Model Number
Self built custom
OS
64-bit Windows 11 Pro for Workstations
CPU
Intel i7-8700K OC'd to 5 GHz
Motherboard
ASUS ROG Maximus XI Formula Z390
Memory
64 GB (4x16GB) G.SKILL TridentZ RGB DDR4 3600 MHz
Graphics Card(s)
ASUS ROG-STRIX-GTX1080TI-O11G-GAMING
Sound Card
Integrated
Monitor(s) Displays
2 x Samsung Odyssey G7 27"
Screen Resolution
2560x1440
Hard Drives
1TB Samsung 990 PRO M.2,
4TB Samsung 990 PRO PRO M.2,
TerraMaster F8 SSD Plus NAS
PSU
Seasonic Prime Titanium 850W
Case
Thermaltake Core P3
Cooling
Corsair Hydro H115i
Keyboard
Logitech wireless K800
Mouse
Logitech MX Master 4
Internet Speed
2 Gb/s Download and 100 Mb/s Upload
Antivirus
Malwarebyte Anti-Malware Premium
Browser
Google Chrome
Other Info
Logitech Z625 speaker system,
Logitech BRIO 4K Pro webcam,
HP Color LaserJet Pro MFP M477fdn,
APC SMART-UPS RT 1000 XL - SURT1000XLI,
Galaxy S23 Plus phone
2 1/2 years after this thread started and that program is still the same Beta version. Seems the author has not even bothered to get the program out of Beta. Makes one wonder about it a little (does me anyway).

I just found the WUD (Windows Update Downloader) which will download all Updates at once. Very nice program.
 
Last edited:

My Computer My Computer

At a glance

Windows 7 Pro, x64I7 3770k @ 4.4 Gigs16 (2x8) Gigs Corsair DDR3 1600EVGA GTX 680 Signature 2
Computer type
PC/Desktop
Computer Manufacturer/Model Number
Built By Mike
OS
Windows 7 Pro, x64
CPU
I7 3770k @ 4.4 Gigs
Motherboard
AsRock Z77 Extreme6
Memory
16 (2x8) Gigs Corsair DDR3 1600
Graphics Card(s)
EVGA GTX 680 Signature 2
Sound Card
X-Fi Xtreme Gamer Pro, Logitech Z-5500 5.1 Speaker System
Monitor(s) Displays
Acer P236H 23"
Screen Resolution
1920x1080
Hard Drives
Crucial M500 120 GB SSD, 2 WD 640 Gig Black, WD 1 TB Black, WD 2 TB Black (eSata)
PSU
Corsair TX750w
Case
HSPC Top Deck Tech Station
Cooling
Noctua NH-U14S Heatsink with dual Noctua fans
Keyboard
Deck Lighted
Mouse
Roccat Kone Pure
Internet Speed
Cable
Antivirus
AVG
Other Info
2 DVD SATA R/W Drives
2 1/2 years after this thread started and that program is still the same Beta version. Seems the author has not even bothered to get the program out of Beta. Makes one wonder about it a little (does me anyway).

What I want to do is keep an updated Windows 7 SP1 disk with all Windows Updates in it. Since SP1 there is like 300 or so updates after. Is there any way to get those Updates all at once instead of having to download them one at a time?

Have a look at this thread,

http://www.sevenforums.com/installation-setup/282232-test-update-7-installation-media.html
 

My Computer My Computer

At a glance

Win 10 Pro x64Intel I5-2500K @3.3GHz16GB G.Skill Ripjaws X (4x4GB)EVGA GeForce 750 Ti SC 2GB
Computer type
PC/Desktop
Computer Manufacturer/Model Number
Self Built
OS
Win 10 Pro x64
CPU
Intel I5-2500K @3.3GHz
Motherboard
Asrock P67 Extreme4
Memory
16GB G.Skill Ripjaws X (4x4GB)
Graphics Card(s)
EVGA GeForce 750 Ti SC 2GB
Sound Card
ASUS Xonar DG 5.1 Channels 24-bit 96KHz PCI Interface Sound
Monitor(s) Displays
auria eq2367
Screen Resolution
1920 x 1080
Hard Drives
250GB Samsung 850 EVO SSD
1TB WD Blue
1TB Hitachi
PSU
SeaSonic X 650W 80 Plus Gold
Case
Corsair Obsidian 750D
Cooling
Corsair H60, Three 140mm case fans
Keyboard
Logitech Wireless Keyboard K520
Mouse
Logitech Wireless Mouse M310
Internet Speed
Wave Broadband ~ 100 dn 5 up
Antivirus
Windows Defender, Malwarebytes Premium
Browser
Edge, IE11, Chrome
Other Info
Laptop specs: HP g7-1365dx /
CPU: AMD A6-3420M APU with Radeon(tm) HD Graphics /
RAM: Crucial 8Gb (2x4Gb) /
SSD: Crucial M4-CT128M4SSD2 ATA Device/ FW 000F /
GFX: AMD Radeon HD 6520G /
OS: Windows 10 Pro x64
LOL. Beat me to it.
 

My Computers My Computers

  • At a glance

    7 X64i5 84002x8gb 3200mhz
    Computer type
    PC/Desktop
    OS
    7 X64
    CPU
    i5 8400
    Motherboard
    gigabyte b365m ds3h
    Memory
    2x8gb 3200mhz
    Hard Drives
    various
    PSU
    pure power 11 400w cm
    Case
    Coolermaster
    Cooling
    cryorig m9i
  • At a glance

    7x64g54008gb ddr4 2400
    Computer type
    PC/Desktop
    OS
    7x64
    CPU
    g5400
    Motherboard
    ga b365m ds3h
    Memory
    8gb ddr4 2400
    PSU
    xfx pro 450w
Thanks a lot for that link. That method worked perfectly. RT7 Lite still works but now when opening it, a script error pops up with a blank page about sponsors. Have to click to stull use scripts for the program to work. Must be remnants of when this now defunct program phoned home.
 

My Computer My Computer

At a glance

Windows 7 Pro, x64I7 3770k @ 4.4 Gigs16 (2x8) Gigs Corsair DDR3 1600EVGA GTX 680 Signature 2
Computer type
PC/Desktop
Computer Manufacturer/Model Number
Built By Mike
OS
Windows 7 Pro, x64
CPU
I7 3770k @ 4.4 Gigs
Motherboard
AsRock Z77 Extreme6
Memory
16 (2x8) Gigs Corsair DDR3 1600
Graphics Card(s)
EVGA GTX 680 Signature 2
Sound Card
X-Fi Xtreme Gamer Pro, Logitech Z-5500 5.1 Speaker System
Monitor(s) Displays
Acer P236H 23"
Screen Resolution
1920x1080
Hard Drives
Crucial M500 120 GB SSD, 2 WD 640 Gig Black, WD 1 TB Black, WD 2 TB Black (eSata)
PSU
Corsair TX750w
Case
HSPC Top Deck Tech Station
Cooling
Noctua NH-U14S Heatsink with dual Noctua fans
Keyboard
Deck Lighted
Mouse
Roccat Kone Pure
Internet Speed
Cable
Antivirus
AVG
Other Info
2 DVD SATA R/W Drives
why am i getting this error:

windows could not configure one or more system components windows 7?
 

My Computer My Computer

At a glance

all of them, Windows XP Home and Pro, Windows...
Computer type
PC/Desktop
OS
all of them, Windows XP Home and Pro, Windows Vista Pre 32bit, Windows 7 Home edition 32 & 64bit
why am i getting this error:

windows could not configure one or more system components windows 7?


Hello Stillwolf, and welcome to Seven Forums.

Could you give more details on what this is from and when you get it? :)
 

My Computer My Computer

At a glance

64-bit Windows 11 Pro for WorkstationsIntel i7-8700K OC'd to 5 GHz64 GB (4x16GB) G.SKILL TridentZ RGB DDR4 3600...ASUS ROG-STRIX-GTX1080TI-O11G-GAMING
Computer type
PC/Desktop
Computer Manufacturer/Model Number
Self built custom
OS
64-bit Windows 11 Pro for Workstations
CPU
Intel i7-8700K OC'd to 5 GHz
Motherboard
ASUS ROG Maximus XI Formula Z390
Memory
64 GB (4x16GB) G.SKILL TridentZ RGB DDR4 3600 MHz
Graphics Card(s)
ASUS ROG-STRIX-GTX1080TI-O11G-GAMING
Sound Card
Integrated
Monitor(s) Displays
2 x Samsung Odyssey G7 27"
Screen Resolution
2560x1440
Hard Drives
1TB Samsung 990 PRO M.2,
4TB Samsung 990 PRO PRO M.2,
TerraMaster F8 SSD Plus NAS
PSU
Seasonic Prime Titanium 850W
Case
Thermaltake Core P3
Cooling
Corsair Hydro H115i
Keyboard
Logitech wireless K800
Mouse
Logitech MX Master 4
Internet Speed
2 Gb/s Download and 100 Mb/s Upload
Antivirus
Malwarebyte Anti-Malware Premium
Browser
Google Chrome
Other Info
Logitech Z625 speaker system,
Logitech BRIO 4K Pro webcam,
HP Color LaserJet Pro MFP M477fdn,
APC SMART-UPS RT 1000 XL - SURT1000XLI,
Galaxy S23 Plus phone
Hello its an error after Slipstream Windows updates (using Windows Updates Downloader) into a windows 7 home premium edition 64 bit with SP1 (which I know is working fine)
 

My Computer My Computer

At a glance

all of them, Windows XP Home and Pro, Windows...
Computer type
PC/Desktop
OS
all of them, Windows XP Home and Pro, Windows Vista Pre 32bit, Windows 7 Home edition 32 & 64bit

My Computer My Computer

At a glance

64-bit Windows 11 Pro for WorkstationsIntel i7-8700K OC'd to 5 GHz64 GB (4x16GB) G.SKILL TridentZ RGB DDR4 3600...ASUS ROG-STRIX-GTX1080TI-O11G-GAMING
Computer type
PC/Desktop
Computer Manufacturer/Model Number
Self built custom
OS
64-bit Windows 11 Pro for Workstations
CPU
Intel i7-8700K OC'd to 5 GHz
Motherboard
ASUS ROG Maximus XI Formula Z390
Memory
64 GB (4x16GB) G.SKILL TridentZ RGB DDR4 3600 MHz
Graphics Card(s)
ASUS ROG-STRIX-GTX1080TI-O11G-GAMING
Sound Card
Integrated
Monitor(s) Displays
2 x Samsung Odyssey G7 27"
Screen Resolution
2560x1440
Hard Drives
1TB Samsung 990 PRO M.2,
4TB Samsung 990 PRO PRO M.2,
TerraMaster F8 SSD Plus NAS
PSU
Seasonic Prime Titanium 850W
Case
Thermaltake Core P3
Cooling
Corsair Hydro H115i
Keyboard
Logitech wireless K800
Mouse
Logitech MX Master 4
Internet Speed
2 Gb/s Download and 100 Mb/s Upload
Antivirus
Malwarebyte Anti-Malware Premium
Browser
Google Chrome
Other Info
Logitech Z625 speaker system,
Logitech BRIO 4K Pro webcam,
HP Color LaserJet Pro MFP M477fdn,
APC SMART-UPS RT 1000 XL - SURT1000XLI,
Galaxy S23 Plus phone
I have a 3 users licenced Win 7 "Upgrade" disk. Can I slipstream SP1 into it? Will my Product Key still be good after slipstreaming?
 

My Computer My Computer

At a glance

windows 7 Prof
Computer type
PC/Desktop
OS
windows 7 Prof

My Computer My Computer

At a glance

64-bit Windows 11 Pro for WorkstationsIntel i7-8700K OC'd to 5 GHz64 GB (4x16GB) G.SKILL TridentZ RGB DDR4 3600...ASUS ROG-STRIX-GTX1080TI-O11G-GAMING
Computer type
PC/Desktop
Computer Manufacturer/Model Number
Self built custom
OS
64-bit Windows 11 Pro for Workstations
CPU
Intel i7-8700K OC'd to 5 GHz
Motherboard
ASUS ROG Maximus XI Formula Z390
Memory
64 GB (4x16GB) G.SKILL TridentZ RGB DDR4 3600 MHz
Graphics Card(s)
ASUS ROG-STRIX-GTX1080TI-O11G-GAMING
Sound Card
Integrated
Monitor(s) Displays
2 x Samsung Odyssey G7 27"
Screen Resolution
2560x1440
Hard Drives
1TB Samsung 990 PRO M.2,
4TB Samsung 990 PRO PRO M.2,
TerraMaster F8 SSD Plus NAS
PSU
Seasonic Prime Titanium 850W
Case
Thermaltake Core P3
Cooling
Corsair Hydro H115i
Keyboard
Logitech wireless K800
Mouse
Logitech MX Master 4
Internet Speed
2 Gb/s Download and 100 Mb/s Upload
Antivirus
Malwarebyte Anti-Malware Premium
Browser
Google Chrome
Other Info
Logitech Z625 speaker system,
Logitech BRIO 4K Pro webcam,
HP Color LaserJet Pro MFP M477fdn,
APC SMART-UPS RT 1000 XL - SURT1000XLI,
Galaxy S23 Plus phone
Thanks Shawn.

Unfortunately, I have encountered the same error as "stiffwolf" reported above (i.e. windows could not configure one or more system components windows 7). To confirm where the problem was caused by the "updates" downloaded from "Windows Updates Downloader", I manually download the updates again directly from Microsoft and then integrate them into a ISO.

The same error still appears.

Any advice would be welcome.
 

My Computer My Computer

At a glance

windows 7 Prof
Computer type
PC/Desktop
OS
windows 7 Prof
Wotg,

I'm not sure what would be causing the issue. If you like, try creating a slipstream with only a few updates, then see if you could use step 12 to integrate a few more at a time to the slipstream.
 

My Computer My Computer

At a glance

64-bit Windows 11 Pro for WorkstationsIntel i7-8700K OC'd to 5 GHz64 GB (4x16GB) G.SKILL TridentZ RGB DDR4 3600...ASUS ROG-STRIX-GTX1080TI-O11G-GAMING
Computer type
PC/Desktop
Computer Manufacturer/Model Number
Self built custom
OS
64-bit Windows 11 Pro for Workstations
CPU
Intel i7-8700K OC'd to 5 GHz
Motherboard
ASUS ROG Maximus XI Formula Z390
Memory
64 GB (4x16GB) G.SKILL TridentZ RGB DDR4 3600 MHz
Graphics Card(s)
ASUS ROG-STRIX-GTX1080TI-O11G-GAMING
Sound Card
Integrated
Monitor(s) Displays
2 x Samsung Odyssey G7 27"
Screen Resolution
2560x1440
Hard Drives
1TB Samsung 990 PRO M.2,
4TB Samsung 990 PRO PRO M.2,
TerraMaster F8 SSD Plus NAS
PSU
Seasonic Prime Titanium 850W
Case
Thermaltake Core P3
Cooling
Corsair Hydro H115i
Keyboard
Logitech wireless K800
Mouse
Logitech MX Master 4
Internet Speed
2 Gb/s Download and 100 Mb/s Upload
Antivirus
Malwarebyte Anti-Malware Premium
Browser
Google Chrome
Other Info
Logitech Z625 speaker system,
Logitech BRIO 4K Pro webcam,
HP Color LaserJet Pro MFP M477fdn,
APC SMART-UPS RT 1000 XL - SURT1000XLI,
Galaxy S23 Plus phone
Hiya, a small question.
What experience do you guys have in regards to performance on slipstreaming? I merged a W7 with SP1 and then with updates (some 150) and it has been running for 36 hours or more. I t is on one comp with a dual core cpu and one hdd so it is not the fastest comp, but adecuate.
 

My Computer My Computer

At a glance

W10 ProAMD Ryzen 5 2600X32 GB DDR4AMD Radeon RX 5600 XT
Computer type
PC/Desktop
Computer Manufacturer/Model Number
Main WKS/Gaming Sloth
OS
W10 Pro
CPU
AMD Ryzen 5 2600X
Motherboard
Asus TUF B450M-PRO-GAMING
Memory
32 GB DDR4
Graphics Card(s)
AMD Radeon RX 5600 XT
Sound Card
Generic Motherboard
Monitor(s) Displays
2 x Dell 24" LED P2415Q
Screen Resolution
2 x 3840 x 2160
Hard Drives
Samsung NVME
PSU
750 W
Case
Fractal Design
Cooling
Fractal Design
Keyboard
Roccat Horde AIMO
Mouse
Logitech G703
Internet Speed
ADSL 30 MBit
Antivirus
Bitdefender
Browser
Firefox
Ok, it has been hung on 65% for at least 12 hours so I am removing the SP1 merge by getting an SP1 image, and implementing only the updates. Also switching comp to an 8 core Dual CPU with 32GBRAM and fast SATA drives. Jeez...
 

My Computer My Computer

At a glance

W10 ProAMD Ryzen 5 2600X32 GB DDR4AMD Radeon RX 5600 XT
Computer type
PC/Desktop
Computer Manufacturer/Model Number
Main WKS/Gaming Sloth
OS
W10 Pro
CPU
AMD Ryzen 5 2600X
Motherboard
Asus TUF B450M-PRO-GAMING
Memory
32 GB DDR4
Graphics Card(s)
AMD Radeon RX 5600 XT
Sound Card
Generic Motherboard
Monitor(s) Displays
2 x Dell 24" LED P2415Q
Screen Resolution
2 x 3840 x 2160
Hard Drives
Samsung NVME
PSU
750 W
Case
Fractal Design
Cooling
Fractal Design
Keyboard
Roccat Horde AIMO
Mouse
Logitech G703
Internet Speed
ADSL 30 MBit
Antivirus
Bitdefender
Browser
Firefox
Kaboom... the resulting iso did not work. During setup of W7U in a VM it goes through nicely but after reboot I get a general error about something missing (damn, should have made a note of it) with no specific error code, telling me to restart the installation. Which I don't. Of course.

Something went wrong when slipping in the 153 updates. Grrr.
 

My Computer My Computer

At a glance

W10 ProAMD Ryzen 5 2600X32 GB DDR4AMD Radeon RX 5600 XT
Computer type
PC/Desktop
Computer Manufacturer/Model Number
Main WKS/Gaming Sloth
OS
W10 Pro
CPU
AMD Ryzen 5 2600X
Motherboard
Asus TUF B450M-PRO-GAMING
Memory
32 GB DDR4
Graphics Card(s)
AMD Radeon RX 5600 XT
Sound Card
Generic Motherboard
Monitor(s) Displays
2 x Dell 24" LED P2415Q
Screen Resolution
2 x 3840 x 2160
Hard Drives
Samsung NVME
PSU
750 W
Case
Fractal Design
Cooling
Fractal Design
Keyboard
Roccat Horde AIMO
Mouse
Logitech G703
Internet Speed
ADSL 30 MBit
Antivirus
Bitdefender
Browser
Firefox
Back
Top