Startup Repair Infinite Loop Recovery

How to Recover from an Infinitely Looping Startup Repair Loop without Reinstalling Windows

If you've ever experienced a Startup Repair that continously loops and fails to fix the problem of not being able to load windows, even in safe mode, then you'll know that usually the only way to recover from this when System Restore does not work is to do a clean install of Windows.

Until now.

This tutorial will show you how to use the System Recovery Options provided by Windows to recover your system to a working state so that you don't have to risk losing data by performing a clean install.

   Warning
The instructions presented withing this tutorial must be followed correctly, or you can damage your Windows 7 installation even further. This tutorial is designed to help recover from a bad registry that is causing the startup repair loop. You should note that there may still be some issues remaining that cannot be fixed by manually restoring the registry.


Recovering Your System
  1. Boot to the System Recovery Options screen.
    • If Windows automatically opens Startup Repair, and subsequently fails to fix a problem, you can skip ahead to step 4 below.
  2. In the System Recovery Options screen, click Startup Repair:
    Image05_startuprepair.jpg


  3. Windows will search for an attempt to repair startup problems:
    Image06_searching.jpg


  4. If startup problems could not be repaired, you will receive the message Windows cannot repair this computer automatically. Click View advanced options for system recovery and support:
    Image07_cannotfix.jpg


  5. Click View advanced options for system recovery and support, which which bring you back to the main System Recovery Options screen.
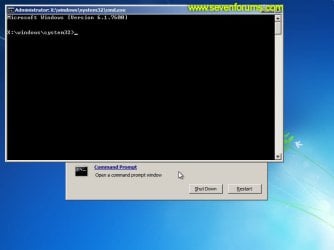
  6. Click Command Prompt:
    Image08_clickcommand.jpg


  7. Command Prompt should open to X:, which is an internal ram disk use by System Repair:
    Image10_changedrive.jpg


  8. Now you need to find your system drive. Depending on how your system is setup, this could be either C: or D:.
    • Type C: and press <ENTER>.
    • Verify that this is your system drive by typing DIR and pressing <ENTER>. If you see the Program Files, Users and Windows folders, then you have found your system drive, and can continue to step 9 below.
    • If the drive is not your system drive, repeat steps I and II above, changing the drive letter to D, E or some other letter until the system drive is located.
      Image11_chdir_config.jpg

  9. When you have located your Windows system drive, type CD \windows\system32\config and press <ENTER>:
  10. Type DIR and press <ENTER>, and verify that the following files and folders exist in the config folder:
    • RegBack (which is a folder)
    • DEFAULT
    • SAM
    • SECURITY
    • SOFTWARE
    • SYSTEM
      Image11_chdir_config.jpg

  11. Type MD mybackup and press <ENTER> to create a backup folder that you can use incase this procedure does not work as expected.
  12. Type copy *.* mybackup and press <ENTER>.
    • If you are prompted to overwrite existing files, press A to allow all backups to be overwritten.
      Image12_mybackup.jpg

  13. Now you need to check if you can use the automatic Windows backups to restore your registry:
    • Type CD RegBack and press <ENTER> to go to the RegBack folder.
    • Type DIR and press <ENTER> to view the contents of the folder. All the following files must exist:
      • The DEFAULT, SAM and SECURITY files should each be about 262,000 bytes in size.
      • The SOFTWARE file should be about 26,000,000 bytes.
      • The SYSTEM file should be about 9,900,000 bytes.
      • The file sizes presented here are approximate estimations, and may vary depending on your system. If any one of them are 0 bytes, then you should stop what you're doing now and seek an alternative method of recovering your system, because Windows cannot function with a 0-byte size registry hive.
    • If the hive files listed in RegBack are ok, then proceed to step 14 of the tutorial.
      Image13_checkregback.jpg


  14. Type copy *.* .. and press <ENTER> to copy the backup hive files to \Windows\System32\config.
    • If you are prompted to overwrite existing files, press A to allow all file to be overwritten.
      Image14_copyregback.jpg

  15. Type exit and press <ENTER> to close the command prompt.
    Image15_exit.jpg


  16. Click the Restart button to reboot your computer. If all goes well, your system will boot normally.
    Image16_restart.jpg
    Image17_working.jpg


Reference Information
This tutorial was made possible after learning how to manualy replace the Windows 7 Registry Hives after reading the Recovering Windows 7 Registry Hives/Files article on Microsoft Technet.


Attachments

  • Image09_commandprompt.jpg
    Image09_commandprompt.jpg
    26.1 KB · Views: 373
Last edited by a moderator:
Uh, question?

Ok, so I'm new to this forum and not all that computer smart. I can get around pretty well, but when it comes to the really technical stuff like this I'm totally lost D:
So here's my question: This doesn't completely reset your computer/laptop to factory defaults, does it? I have some important files on my laptop that I haven't gotten the chance to backup yet, and my laptop got stuck in this startup repair loop and I'm worried I'll lose my files if I try to fix it.
 

My Computer My Computer

At a glance

Windows 7
Computer type
Laptop
Computer Manufacturer/Model Number
Dell
OS
Windows 7
Hello Max, and welcome to Seven Forums.

No worries. This will not delete or reset Windows or your files. :)
 

My Computer My Computer

At a glance

64-bit Windows 11 Pro for WorkstationsIntel i7-8700K OC'd to 5 GHz64 GB (4x16GB) G.SKILL TridentZ RGB DDR4 3600...ASUS ROG-STRIX-GTX1080TI-O11G-GAMING
Computer type
PC/Desktop
Computer Manufacturer/Model Number
Self built custom
OS
64-bit Windows 11 Pro for Workstations
CPU
Intel i7-8700K OC'd to 5 GHz
Motherboard
ASUS ROG Maximus XI Formula Z390
Memory
64 GB (4x16GB) G.SKILL TridentZ RGB DDR4 3600 MHz
Graphics Card(s)
ASUS ROG-STRIX-GTX1080TI-O11G-GAMING
Sound Card
Integrated
Monitor(s) Displays
2 x Samsung Odyssey G7 27"
Screen Resolution
2560x1440
Hard Drives
1TB Samsung 990 PRO M.2,
4TB Samsung 990 PRO PRO M.2,
TerraMaster F8 SSD Plus NAS
PSU
Seasonic Prime Titanium 850W
Case
Thermaltake Core P3
Cooling
Corsair Hydro H115i
Keyboard
Logitech wireless K800
Mouse
Logitech MX Master 4
Internet Speed
2 Gb/s Download and 100 Mb/s Upload
Antivirus
Malwarebyte Anti-Malware Premium
Browser
Google Chrome
Other Info
Logitech Z625 speaker system,
Logitech BRIO 4K Pro webcam,
HP Color LaserJet Pro MFP M477fdn,
APC SMART-UPS RT 1000 XL - SURT1000XLI,
Galaxy S23 Plus phone
Ok thank you so much!
 

My Computer My Computer

At a glance

Windows 7
Computer type
Laptop
Computer Manufacturer/Model Number
Dell
OS
Windows 7
You're welcome. :)
 

My Computer My Computer

At a glance

64-bit Windows 11 Pro for WorkstationsIntel i7-8700K OC'd to 5 GHz64 GB (4x16GB) G.SKILL TridentZ RGB DDR4 3600...ASUS ROG-STRIX-GTX1080TI-O11G-GAMING
Computer type
PC/Desktop
Computer Manufacturer/Model Number
Self built custom
OS
64-bit Windows 11 Pro for Workstations
CPU
Intel i7-8700K OC'd to 5 GHz
Motherboard
ASUS ROG Maximus XI Formula Z390
Memory
64 GB (4x16GB) G.SKILL TridentZ RGB DDR4 3600 MHz
Graphics Card(s)
ASUS ROG-STRIX-GTX1080TI-O11G-GAMING
Sound Card
Integrated
Monitor(s) Displays
2 x Samsung Odyssey G7 27"
Screen Resolution
2560x1440
Hard Drives
1TB Samsung 990 PRO M.2,
4TB Samsung 990 PRO PRO M.2,
TerraMaster F8 SSD Plus NAS
PSU
Seasonic Prime Titanium 850W
Case
Thermaltake Core P3
Cooling
Corsair Hydro H115i
Keyboard
Logitech wireless K800
Mouse
Logitech MX Master 4
Internet Speed
2 Gb/s Download and 100 Mb/s Upload
Antivirus
Malwarebyte Anti-Malware Premium
Browser
Google Chrome
Other Info
Logitech Z625 speaker system,
Logitech BRIO 4K Pro webcam,
HP Color LaserJet Pro MFP M477fdn,
APC SMART-UPS RT 1000 XL - SURT1000XLI,
Galaxy S23 Plus phone
Ok so I followed the steps but when I clicked "restart" it was like nothing happened! The computer looped back into startup repair and failed again. Is there something I'm missing? Do you have to repeat the process multiple times?
Sorry if I'm being annoying
 

My Computer My Computer

At a glance

Windows 7
Computer type
Laptop
Computer Manufacturer/Model Number
Dell
OS
Windows 7
maxwolfwing

Run the tool below . Once done create a new thread inside System Security and upload the FRST.txt file and the Addition.txt

   Warning
You will need a USB FLASH DRIVE


   Tip
Download the Tool from a non infected PC


Download Farbar Recovery Scan Tool

Choose one that goes with your OS bit version Save the file to the Flash drive

32-bit Version OS :ar: Farbar Recovery Scan Tool

64-Bit Version OS :ar: Farbar Recovery Scan Tool x64


   Note
Click the :orb: button and right-click Computer .Select Properties . Look for System Type: which will say 32-bit Operating System or 64-bit Operating System


Plug the flash drive into the infected PC.

Enter System Recovery Options.

:ar: To enter System Recovery Options from the Advanced Boot Options:
Restart the computer.
As soon as the BIOS is loaded begin tapping the F8 key until Advanced Boot Options appears.
Use the arrow keys to select the Repair your computer menu item.
Select US as the keyboard language settings, and then click Next.
Select the operating system you want to repair, and then click Next.
Select your user account an click Next.

:ar: To enter System Recovery Options by using Windows installation disc:
Insert the installation disc.
Restart your computer.
If prompted, press any key to start Windows from the installation disc. If your computer is not configured to start from a CD or DVD, check your BIOS settings.
Click Repair your computer.
Select US as the keyboard language settings, and then click Next.
Select the operating system you want to repair, and then click Next.
Select your user account and click Next.

:ar: On the System Recovery Options menu you will get the following options:
Startup Repair

System Restore

Windows Complete PC Restore

Windows Memory Diagnostic Tool

Command Prompt

Select Command Prompt

In the command window type X:\FRST.exe (for x64 bit version type X:\FRST64.exe) and press Enter
   Note
Replace letter X with the drive letter of your flash drive.

   Tip
Type the commands below to see what your letter is for the USB drive and press ENTER after each command

Code:
Diskpart
List volume
The tool will start to run.
When the tool opens click Yes to disclaimer.
Press Scan button.
FRST will let you know when the scan is complete and has written the FRST.txt to file
Please copy and paste both logs in your reply.(FRST.txt and Addition.txt)
 

My Computer My Computer

At a glance

Windows 7 Ultimate 32-Bit & Windows 7 Ultimat...Intel Core i7 CPU 950 @ 3.07GHzOCZ 6GB (3 x 2GB) 240-Pin DDR3 SDRAM DDR3 160...ATI Radeon HD 5700 Series
Computer Manufacturer/Model Number
Custom Built
OS
Windows 7 Ultimate 32-Bit & Windows 7 Ultimate 64-Bit
CPU
Intel Core i7 CPU 950 @ 3.07GHz
Motherboard
ASUS P6T DELUXE V2
Memory
OCZ 6GB (3 x 2GB) 240-Pin DDR3 SDRAM DDR3 1600 OCZ3X1600R2
Graphics Card(s)
ATI Radeon HD 5700 Series
Sound Card
OnBoard
Hard Drives
WD6400AACS-00M3B0 (640GB SATA )
PSU
CORSAIR 850w
Case
NZXT LEXA
Cooling
Intel Stock Heatsink Fan
Keyboard
Microsoft Wireless Laser Keyboard 7000
Mouse
Microsoft Wireless Laser Mouse 7000
Help?

In the Regback file i think it was called...
i couldn't find the hive programs which worries me. When i tried the next step i couldn't
Please help?
 

My Computer My Computer

At a glance

Windows 7 not sure how to find the bit
Computer type
Laptop
OS
Windows 7 not sure how to find the bit
Khanh welcome to SevenForums

See if you could do Post 286 .

Upload those two files that will be inside the flash Drive after you run the Farbar Recovery Scan Tool .

Files : FRST.txt and Addition.txt
 

My Computer My Computer

At a glance

Windows 7 Ultimate 32-Bit & Windows 7 Ultimat...Intel Core i7 CPU 950 @ 3.07GHzOCZ 6GB (3 x 2GB) 240-Pin DDR3 SDRAM DDR3 160...ATI Radeon HD 5700 Series
Computer Manufacturer/Model Number
Custom Built
OS
Windows 7 Ultimate 32-Bit & Windows 7 Ultimate 64-Bit
CPU
Intel Core i7 CPU 950 @ 3.07GHz
Motherboard
ASUS P6T DELUXE V2
Memory
OCZ 6GB (3 x 2GB) 240-Pin DDR3 SDRAM DDR3 1600 OCZ3X1600R2
Graphics Card(s)
ATI Radeon HD 5700 Series
Sound Card
OnBoard
Hard Drives
WD6400AACS-00M3B0 (640GB SATA )
PSU
CORSAIR 850w
Case
NZXT LEXA
Cooling
Intel Stock Heatsink Fan
Keyboard
Microsoft Wireless Laser Keyboard 7000
Mouse
Microsoft Wireless Laser Mouse 7000
When i insert the flashdrive and go to command prompt i type in F:\FRST but it replies "the device is not ready."
 

My Computer My Computer

At a glance

Windows 7 not sure how to find the bit
Computer type
Laptop
OS
Windows 7 not sure how to find the bit
Basic Input/Output System is where you could change the settings of varies hardware . Like boot options , memory settings , over click a CPU and memory .

If you could get Repair Your Computer when you press F8 you don't need the BIOS .
 

My Computer My Computer

At a glance

Windows 7 Ultimate 32-Bit & Windows 7 Ultimat...Intel Core i7 CPU 950 @ 3.07GHzOCZ 6GB (3 x 2GB) 240-Pin DDR3 SDRAM DDR3 160...ATI Radeon HD 5700 Series
Computer Manufacturer/Model Number
Custom Built
OS
Windows 7 Ultimate 32-Bit & Windows 7 Ultimate 64-Bit
CPU
Intel Core i7 CPU 950 @ 3.07GHz
Motherboard
ASUS P6T DELUXE V2
Memory
OCZ 6GB (3 x 2GB) 240-Pin DDR3 SDRAM DDR3 1600 OCZ3X1600R2
Graphics Card(s)
ATI Radeon HD 5700 Series
Sound Card
OnBoard
Hard Drives
WD6400AACS-00M3B0 (640GB SATA )
PSU
CORSAIR 850w
Case
NZXT LEXA
Cooling
Intel Stock Heatsink Fan
Keyboard
Microsoft Wireless Laser Keyboard 7000
Mouse
Microsoft Wireless Laser Mouse 7000
I fixed the problem whole device is not ready but now it says " F:\FRST.exe is not recognizable as an internal or external command, operable program or batch file"
 

My Computer My Computer

At a glance

Windows 7 not sure how to find the bit
Computer type
Laptop
OS
Windows 7 not sure how to find the bit
When you're booting up the PC . Tap on the F8 key . On the Advanced Boot Options menu choose Repair Your Computer .

Choose your user name and input the password if you have one if you don't just leave the Password box blank and press [enter]

On the System Recovery Options window click on Command Prompt

Inside Command Prompt type in the commands below

Diskpart


Press [ENTER]

list volume


Press [enter]

Take note of the drive letter of your flash drive . Once you know the USB drive letter type the command below

exit
press [ENTER]

Now type in this below

X:\FRST64.exe
press [enter]

   Note
Change X:\ to your USB drive letter
 

My Computer My Computer

At a glance

Windows 7 Ultimate 32-Bit & Windows 7 Ultimat...Intel Core i7 CPU 950 @ 3.07GHzOCZ 6GB (3 x 2GB) 240-Pin DDR3 SDRAM DDR3 160...ATI Radeon HD 5700 Series
Computer Manufacturer/Model Number
Custom Built
OS
Windows 7 Ultimate 32-Bit & Windows 7 Ultimate 64-Bit
CPU
Intel Core i7 CPU 950 @ 3.07GHz
Motherboard
ASUS P6T DELUXE V2
Memory
OCZ 6GB (3 x 2GB) 240-Pin DDR3 SDRAM DDR3 1600 OCZ3X1600R2
Graphics Card(s)
ATI Radeon HD 5700 Series
Sound Card
OnBoard
Hard Drives
WD6400AACS-00M3B0 (640GB SATA )
PSU
CORSAIR 850w
Case
NZXT LEXA
Cooling
Intel Stock Heatsink Fan
Keyboard
Microsoft Wireless Laser Keyboard 7000
Mouse
Microsoft Wireless Laser Mouse 7000
Thank you for the reply
I already knew what letter my usb drive was
The problem is that when i type in X:\FRST.exe
it says 'X:\FRST.exe' is not recognized as an internal or external command, operable program or batch file
 

My Computer My Computer

At a glance

Windows 7 not sure how to find the bit
Computer type
Laptop
OS
Windows 7 not sure how to find the bit
Change the X to your actual USB drive letter . It will be different then X . To verify your USB drive letter . Use Diskpart to view the letters .

Diskpart
Press ENTER

List volume
press [ENTER]
 

My Computer My Computer

At a glance

Windows 7 Ultimate 32-Bit & Windows 7 Ultimat...Intel Core i7 CPU 950 @ 3.07GHzOCZ 6GB (3 x 2GB) 240-Pin DDR3 SDRAM DDR3 160...ATI Radeon HD 5700 Series
Computer Manufacturer/Model Number
Custom Built
OS
Windows 7 Ultimate 32-Bit & Windows 7 Ultimate 64-Bit
CPU
Intel Core i7 CPU 950 @ 3.07GHz
Motherboard
ASUS P6T DELUXE V2
Memory
OCZ 6GB (3 x 2GB) 240-Pin DDR3 SDRAM DDR3 1600 OCZ3X1600R2
Graphics Card(s)
ATI Radeon HD 5700 Series
Sound Card
OnBoard
Hard Drives
WD6400AACS-00M3B0 (640GB SATA )
PSU
CORSAIR 850w
Case
NZXT LEXA
Cooling
Intel Stock Heatsink Fan
Keyboard
Microsoft Wireless Laser Keyboard 7000
Mouse
Microsoft Wireless Laser Mouse 7000
I did
it didn't work
it said the does not recognize thing again
 

My Computer My Computer

At a glance

Windows 7 not sure how to find the bit
Computer type
Laptop
OS
Windows 7 not sure how to find the bit
If you downloaded the 64-bit version

Type : X:\FRST64.exe

If you downloaded the 32-bit version

Type : X:\FRST.exe

Change X: to your actual drive letter
 

My Computer My Computer

At a glance

Windows 7 Ultimate 32-Bit & Windows 7 Ultimat...Intel Core i7 CPU 950 @ 3.07GHzOCZ 6GB (3 x 2GB) 240-Pin DDR3 SDRAM DDR3 160...ATI Radeon HD 5700 Series
Computer Manufacturer/Model Number
Custom Built
OS
Windows 7 Ultimate 32-Bit & Windows 7 Ultimate 64-Bit
CPU
Intel Core i7 CPU 950 @ 3.07GHz
Motherboard
ASUS P6T DELUXE V2
Memory
OCZ 6GB (3 x 2GB) 240-Pin DDR3 SDRAM DDR3 1600 OCZ3X1600R2
Graphics Card(s)
ATI Radeon HD 5700 Series
Sound Card
OnBoard
Hard Drives
WD6400AACS-00M3B0 (640GB SATA )
PSU
CORSAIR 850w
Case
NZXT LEXA
Cooling
Intel Stock Heatsink Fan
Keyboard
Microsoft Wireless Laser Keyboard 7000
Mouse
Microsoft Wireless Laser Mouse 7000
I am having a problem with step 3. The startup repair has be going on for just under 24 hours now. I am not sure if it is supposed to take this long. Also, when I click cancel, it says that the current repair operation cannot be cancelled. Please help, thanks.
 

My Computer My Computer

At a glance

64
Computer type
Laptop
Computer Manufacturer/Model Number
Advent
OS
64
I have done all the steps and did not miss anything, but when I restarted my laptop it still goes to the start up repair window. What should I do? Please help. I tried tapping on the F8 button repeatedly on the boot screen (black screen) and it only makes a beeping sound and goes straight to startup repair.

Thanks so much!
 
Last edited by a moderator:

My Computer My Computer

At a glance

Windows 7 Home Premium x64
Computer type
Laptop
OS
Windows 7 Home Premium x64
I have something like this I guess. Need a way to get out the startup repair loop on my windows 7 laptop. I skipped to Step 4 but theres no options for Advanced details and etc. What should I do?
 

My Computer My Computer

At a glance

Windows 7 Home Premium 64-bit
OS
Windows 7 Home Premium 64-bit
I have something like this I guess. Need a way to get out the startup repair loop on my windows 7 laptop. I skipped to Step 4 but theres no options for Advanced details and etc. What should I do?


Hello Pradatorius,

You might see if you are able to boot from either your System Repair Disc or retail Windows 7 installation media (DVD/USB) to the System Recovery Options screen, then pick up at step 5 in the tutorial.

Hope this helps, :)
Shawn
 

My Computer My Computer

At a glance

64-bit Windows 11 Pro for WorkstationsIntel i7-8700K OC'd to 5 GHz64 GB (4x16GB) G.SKILL TridentZ RGB DDR4 3600...ASUS ROG-STRIX-GTX1080TI-O11G-GAMING
Computer type
PC/Desktop
Computer Manufacturer/Model Number
Self built custom
OS
64-bit Windows 11 Pro for Workstations
CPU
Intel i7-8700K OC'd to 5 GHz
Motherboard
ASUS ROG Maximus XI Formula Z390
Memory
64 GB (4x16GB) G.SKILL TridentZ RGB DDR4 3600 MHz
Graphics Card(s)
ASUS ROG-STRIX-GTX1080TI-O11G-GAMING
Sound Card
Integrated
Monitor(s) Displays
2 x Samsung Odyssey G7 27"
Screen Resolution
2560x1440
Hard Drives
1TB Samsung 990 PRO M.2,
4TB Samsung 990 PRO PRO M.2,
TerraMaster F8 SSD Plus NAS
PSU
Seasonic Prime Titanium 850W
Case
Thermaltake Core P3
Cooling
Corsair Hydro H115i
Keyboard
Logitech wireless K800
Mouse
Logitech MX Master 4
Internet Speed
2 Gb/s Download and 100 Mb/s Upload
Antivirus
Malwarebyte Anti-Malware Premium
Browser
Google Chrome
Other Info
Logitech Z625 speaker system,
Logitech BRIO 4K Pro webcam,
HP Color LaserJet Pro MFP M477fdn,
APC SMART-UPS RT 1000 XL - SURT1000XLI,
Galaxy S23 Plus phone
Back
Top