How to Enable or Disable Transparency in Windows 7
Information
This will show you how to enable or disable tranparency for windows, the Start Menu, and the taskbar in Windows 7.
The Windows 7 Starter and Home Basic editions do not have Aero Transparency included in them.
The Windows 7 Starter and Home Basic editions do not have Aero Transparency included in them.
Warning
You will not have the Transparency option if you have a Basic and High Contrast Theme instead of a Aero Theme.
Aero Requirements to be Enabled in Windows 7
NOTE: If Aero is not enabled, then Transparency will not work even when enabled.
Aero Requirements to be Enabled in Windows 7
NOTE: If Aero is not enabled, then Transparency will not work even when enabled.
- 1 GHz 32-bit or 64-bit processor
- 1 GB of system memory
- A graphics card with support for DirectX 9 graphics with at least 128 MB of memory.
- The graphics card must support Pixel Shader 2.0 and the Windows Display Driver Model (WDDM).
- You must be have True Color (32 bit) set instead of High Color (16 bit).
- Be sure to have the correct Windows 7 driver version installed for your graphics card/chip.
- The desktop composition and Animate controls and elements inside windows options enabled in Visual Effects.
- Refresh or update your WEI score.
- The Desktop Window Manager Session Manager and Themes Services need to be set to Start and Automatic.
OPTION ONE
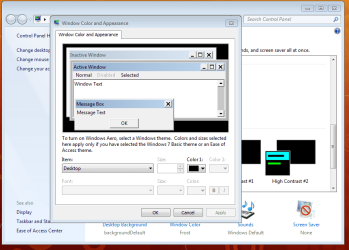
To Enable or Disable Transparency in Personalization

2. Click on the Window Color link at the bottom of the window. (See screenshot below)
NOTE: The name in gray under Windows Color is the current color selected.

3. To Enable Transparency A) Check the Enable transparency box. (See screenshot below step 5)
B) Adjust your Color intensity slider for how transparent you want it.
- Slide LEFT = More transparent
- Slide RIGHT = Less to not transparent
4. To Disable Transparency A) Uncheck the Enable transparency box. (See screenshot below)
5. Click on Save changes.

OPTION TWO
To Enable or Disable Transparency in Visual Effects
2. To Enable Transparency A) Check the Enable transparent glass box, and click on OK. (see screenshot below)

B) Go to step 4.
3. To Disable Transparency A) Uncheck the Enable transparent glass box, and click on OK. (see screenshot above)
OPTION THREE
Using a REG File Download
NOTE: This is the default setting. A) Click on the download button below to download the file below. Enable_Transparent_Glass.reg
Download
B) Go to step 3.
2. To Disable Transparency A) Click on the download button below to download the file below.
Disable_Transparent_Glass.reg
Download
3. Save the .reg file to the Desktop.
4. Right click on the downloaded .reg file, and click on Merge.
5. Click on Run, Yes (Windows 7) or Continue (Vista), Yes, and OK when prompted.
6. Log off and log on, or restart the computer to apply the changes.
7. When done, you can delete the downloaded .reg file if you like.
OPTION FOUR
To Enable or Disable Transparency in Registry Editor
2. If prompted by UAC, then click on Yes (Windows 7) or Continue (Vista).
3. In regedit, navigate to the location below. (see screenshot below) HKEY_CURRENT_USER\Software\Microsoft\Windows\DWM

4. In the right pane, double click on ColorizationOpaqueBlend. (see screenshot above)
5. To Enable Transparency A) Type in 0, and click on OK. (see screenshot below)
NOTE: This is the default setting.

B) Go to step 7.
6. To Disable Transparency A) Type in 1, and click on OK. (see screenshot above)
7. Close regedit.
8. Log off and log on, or restart the computer to apply the changes.
That's it,
Shawn
Attachments
Last edited:


")