Windows 7 Universal Installation Disc - Create

How to Create a Windows 7 Universal Installation Disc

Introduction

For Windows users who installed or upgraded Windows Vista, there is one big difference that will be immediately noticed when installing or upgrading to Windows 7: The Windows 7 installation wizard no longer prompts, or asks, for the user to select which edition of the operating system to install. Instead, each Windows 7 DVD disc will automatically install the specific edition which it’s limited to. So a Windows 7 Home Premium disc will only install Windows 7 HP, a Pro disc will only install Pro, etc.

Although Microsoft does not provide any such universal Windows 7 installation media, the function is indeed feasible. (see Screenshot below) A disc such as this can be especially helpful to PC technicians, IT staff, and the like who need to reinstall Win7 frequently. Remember you will still need a valid license key specific to the version you are installing. In addition, Microsoft has eliminated the differences between the retail and OEM install discs with Windows 7, so this disc can be used to reinstall Win7 on PC’s where the owner has lost, or is unable to find, the OEM restore discs. In order to create such a disc; just delete and remove the ei.cfg from any Windows 7 ISO to convert that image into a universal disc for all editions of Windows 7.

Win7 Universal Install Disc SS.PNG


STAGE 1 UNIVERSAL DVD - ALL 32 OR 64 BIT ON 1 DVD

For any user who has the Windows 7 install DVD or ISO and wishes to make a universal installer disc now there is an easier way to modify the ISO. Normally this was accomplished by manually unpacking and extracting the contents of the ISO image (or copying files from DVD to HDD), deleting the ei.cfg and then repacking the installation files back into an ISO to burn. Users can now eliminate these tedious procedures by making use of the “ei.cfg Removal Utility”.

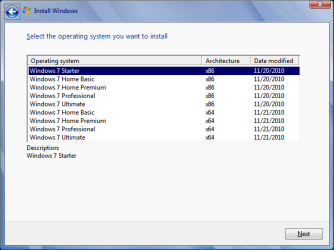
The ei.cfg Removal Utility is a simple tool that will disable the ei.cfg from any Windows 7 ISO disc image, thereby converting the image into a “universal disc” that will prompt the user to select their preferred edition during setup. The ei.cfg Removal Utility works directly to patch the ISO image, by toggling the deletion bit in the UDF file table to instruct the operating system to ignore and remove ei.cfg, or treat it as if it does not exist. Best of all, the ei.cfg Removal Utility can reverse the patching to restore the ISO disc image to its original state when the tool is been used to apply on a disc image that previously been patched by the utility.

The ei.cfg Removal Utility is a standalone portable app, and requires no installation. In fact, the program does not have much of a user interface at all. Simply selecting the target Windows 7 ISO, and the disc image (ISO) will be patched right away. So make sure a backup copy of your ISO is created beforehand.

Download the ei.cfg Removal Utility here:eicfg_removal_utility.zip


STAGE 2 UNIVERSAL DVD - ALL 32 AND ALL 64 BIT ON 1 DVD

I was amazed at how easy it is to merge Win7 x86 and Win7 x64 editions (DVDs) in a single DVD or 4GB USB. The process is pretty simple, you need a copy of both any 32 bit and any 64 bit Windows 7 install DVD or ISO. Either copy the DVD's contents to a folder on a HDD, or extract the ISO's contents to a folder. Run 4 commands from the prompt, then create and burn your new Universal install DVD/USB.


Requirements:

  1. WAIK (Windows Automation Installation Kit) Download WAIK
  2. Windows Win7 x86 and Windows Win7 x64 DVDs.
  3. An application that can extract the files from an ISO (if using a downloaded ISO). I use WinRAR, but many apps can do this extraction.
  4. An application that allows you to build a new iso or create a bootable DVD/USB. I use UltraISO for this.
  5. Single Layer DVD, compatible DVD Burner and, of course DVD burning software… or a 4GB USB flash drive.
We will merge the four Windows 7 x64 editions into the Win7 x86 DVD contents, because Win7 x64 DVD has 64-bit content that can’t run some of the Win32 installation components.


Getting Started


1. Install WAIK in your Windows (doesn’t matter you are running Win7 or Windows XP)

2. Make two folders, in my examples I use Win7_64 and Win7_32. Now copy both Windows 7 x64 and x86 DVDs contents into their respective folders. Or extract your downloaded ISO’s into their respective folder.

   Note
If copying files over from a DVD to the above folders, you actually only need the Sources\install.wim file from the Windows 7 x64 DVD.


3. Run WAIK command prompt (Run as Administrator if UAC enabled):
Start à All Programs àWindows AIK àWindows AIK and PE Command Prompt

4. Each and every Win7 edition has an index no. in the install.wim (WIM file), you can check using the following command:
Code:
Imagex/info G:\Win7_32\Sources\install.wim
   Note
Where G:\Win7_32 represents the location of your 32 bit DVD files


Win7 Universal Install Disc cmd 1.PNG

The results will look something like above.
This shows that INDEX=1 denotes Windows 7 Starter and so on… (you may have to scroll down to observe these entries)

5. We will use the Imagex /export command to move our x64 WIM entries into the x86 wim file.
   Note
The syntax for this command is:
   Note

imagex /export src_file src_number src_name dest_file dest_name


Now execute the following commands with appropriate INDEX no. to export a copy of the specified image to the Windows 7 32bit (x86) WIM file.

For Win7 Home Basic x64:
Code:
Imagex/export G:\Win7_64\Sources\install.wim 1 G:\Win7_32\Sources\install.wim "Windows 7 Home Basic (x64)"
For Win7 Home Premium x64:
Code:
Imagex/export G:\Win7_64\Sources\install.wim 2 G:\Win7_32\Sources\install.wim "Windows 7 Home Premium (x64)"
For Win7 Professional x64:
Code:
Imagex/export G:\Win7_64\Sources\install.wim 3 G:\Win7_32\Sources\install.wim "Windows 7 Professional (x64)"
For Win7 Ultimate x64:
Code:
Imagex /export G:\Win7_64\Sources\install.wim 4 G:\Win7_32\Sources\install.wim "Windows 7 Ultimate (x64)"
6. After execution of above commands Win7_32's WIM file will be the universal WIM file that contains all version of Win7. You can export only desired versions into the image. For example you could make a Win7 DVD, which includes Win7 Ultimate x86 and x64 version only.

7. Now to make bootable DVD image...


Last edited by a moderator:
Tonpumper,

You will need to slipstream each image you want to use - could take quite a while.
So I can't have a universal copy with SP1?
 

My Computer

Computer type
PC/Desktop
Computer Manufacturer/Model Number
Custom Build
OS
Microsoft Windows 7 64-bit Service Pack 1
CPU
Intel Core i7-4790K Devil's Canyon Quad-Core 4.0 GHz
Motherboard
GIGABYTE GA-Z97X-SLI LGA 1150
Memory
16.00 GB
Graphics Card(s)
NVIDIA GeForce GTX 950
Monitor(s) Displays
AOC 2050W
Screen Resolution
1920 x 1080
Hard Drives
ST1000DL002-9TT153 ATA Device
Seagate 2TB FireCuda Gaming SSHD (Solid State Hybrid Drive) - 7200 RPM SATA 6Gb/s 64MB Cache 3.5-Inch Hard Drive
Samsung 850 EVO - 250GB - 2.5-Inch SATA III Internal SSD
PSU
CORSAIR CX-M Series CX750M 750W ATX12V & EPS12V Semi-modular
Case
Lian Li PC-7H
Browser
Firefox
You can - but if you are starting with the RTM iso's ( without sp1 included already ) you need to slipstream sp1 into any image you may want to use.

If you only slipstream it into x64 PRO - then that is the only one that will have sp1 when you come to install it.

If you want all of them - you have to do slipstream into starter first, then homebasic, then homepremium, etc..


If you got hold of the 64 bit and 32 bit iso's with SP1 already integrated - then it's easy - create the all in one in the normal way.
 

My Computers

System One System Two

  • Computer type
    PC/Desktop
    OS
    7 X64
    CPU
    i5 8400
    Motherboard
    gigabyte b365m ds3h
    Memory
    2x8gb 3200mhz
    Hard Drives
    various
    PSU
    pure power 11 400w cm
    Case
    Coolermaster
    Cooling
    cryorig m9i
  • Computer type
    PC/Desktop
    OS
    7x64
    CPU
    g5400
    Motherboard
    ga b365m ds3h
    Memory
    8gb ddr4 2400
    PSU
    xfx pro 450w
I just tried to make one .. and in my BAT file I had "Windows 7 Home Basic (x64)" .. etc now my x64 listings all say Home Basic

do I need to delete the INSTALL.WIM and start over? .. and of course remove the ()'s in the BAT file ..

I started from scratch .. and I still am only getting "Home Basic" in my x64 listings

addx64.bat
Code:
imagex /export E:\W7x64SP1\sources\install.wim 1 E:\W7x86SP1\sources\install.wim "Windows 7 Home Basic x64"
imagex /export E:\W7x64SP1\sources\install.wim 1 E:\W7x86SP1\sources\install.wim "Windows 7 Home Premium x64"
imagex /export E:\W7x64SP1\sources\install.wim 1 E:\W7x86SP1\sources\install.wim "Windows 7 Professional x64"
imagex /export E:\W7x64SP1\sources\install.wim 1 E:\W7x86SP1\sources\install.wim "Windows 7 Ultimate x64"
imagex info
Code:
ImageX Tool for Windows
Copyright (C) Microsoft Corp. All rights reserved.
Version: 6.1.7600.16385

WIM Information:
----------------
Path:        E:\W7x86SP1\sources\install.wim
GUID:        {fc6bdde9-e3c3-48e8-a774-4a8b7bb2a9e9}
Image Count: 9
Compression: LZX
Part Number: 1/1
Attributes:  0x8
             Relative path junction


Available Image Choices:
------------------------
<WIM>
  <TOTALBYTES>3590991830</TOTALBYTES>
  <IMAGE INDEX="1">
    <DIRCOUNT>9105</DIRCOUNT>
    <FILECOUNT>46887</FILECOUNT>
    <TOTALBYTES>8072604598</TOTALBYTES>
    <CREATIONTIME>
      <HIGHPART>0x01CB8901</HIGHPART>
      <LOWPART>0xEF63352E</LOWPART>
    </CREATIONTIME>
    <LASTMODIFICATIONTIME>
      <HIGHPART>0x01CB8919</HIGHPART>
      <LOWPART>0xB178780B</LOWPART>
    </LASTMODIFICATIONTIME>
    <WINDOWS>
      <ARCH>0</ARCH>
      <PRODUCTNAME>Microsoft® Windows® Operating System</PRODUCTNAME>
      <EDITIONID>Starter</EDITIONID>
      <INSTALLATIONTYPE>Client</INSTALLATIONTYPE>
      <HAL>acpiapic</HAL>
      <PRODUCTTYPE>WinNT</PRODUCTTYPE>
      <PRODUCTSUITE>Terminal Server</PRODUCTSUITE>
      <LANGUAGES>
        <LANGUAGE>en-US</LANGUAGE>
        <DEFAULT>en-US</DEFAULT>
      </LANGUAGES>
      <VERSION>
        <MAJOR>6</MAJOR>
        <MINOR>1</MINOR>
        <BUILD>7601</BUILD>
        <SPBUILD>17514</SPBUILD>
        <SPLEVEL>1</SPLEVEL>
      </VERSION>
      <SYSTEMROOT>WINDOWS</SYSTEMROOT>
    </WINDOWS>
    <NAME>Windows 7 STARTER</NAME>
    <DESCRIPTION>Windows 7 STARTER</DESCRIPTION>
    <FLAGS>Starter</FLAGS>
    <HARDLINKBYTES>3037806302</HARDLINKBYTES>
    <DISPLAYNAME>Windows 7 Starter</DISPLAYNAME>
    <DISPLAYDESCRIPTION>Windows 7 Starter</DISPLAYDESCRIPTION>
  </IMAGE>
  <IMAGE INDEX="2">
    <DIRCOUNT>9138</DIRCOUNT>
    <FILECOUNT>47090</FILECOUNT>
    <TOTALBYTES>8125226573</TOTALBYTES>
    <CREATIONTIME>
      <HIGHPART>0x01CB8901</HIGHPART>
      <LOWPART>0xEF63352E</LOWPART>
    </CREATIONTIME>
    <LASTMODIFICATIONTIME>
      <HIGHPART>0x01CB8919</HIGHPART>
      <LOWPART>0xCBDB155A</LOWPART>
    </LASTMODIFICATIONTIME>
    <WINDOWS>
      <ARCH>0</ARCH>
      <PRODUCTNAME>Microsoft® Windows® Operating System</PRODUCTNAME>
      <EDITIONID>HomeBasic</EDITIONID>
      <INSTALLATIONTYPE>Client</INSTALLATIONTYPE>
      <HAL>acpiapic</HAL>
      <PRODUCTTYPE>WinNT</PRODUCTTYPE>
      <PRODUCTSUITE>Terminal Server</PRODUCTSUITE>
      <LANGUAGES>
        <LANGUAGE>en-US</LANGUAGE>
        <DEFAULT>en-US</DEFAULT>
      </LANGUAGES>
      <VERSION>
        <MAJOR>6</MAJOR>
        <MINOR>1</MINOR>
        <BUILD>7601</BUILD>
        <SPBUILD>17514</SPBUILD>
        <SPLEVEL>1</SPLEVEL>
      </VERSION>
      <SYSTEMROOT>WINDOWS</SYSTEMROOT>
    </WINDOWS>
    <NAME>Windows 7 HOMEBASIC</NAME>
    <DESCRIPTION>Windows 7 HOMEBASIC</DESCRIPTION>
    <FLAGS>HomeBasic</FLAGS>
    <HARDLINKBYTES>3069177344</HARDLINKBYTES>
    <DISPLAYNAME>Windows 7 Home Basic</DISPLAYNAME>
    <DISPLAYDESCRIPTION>Windows 7 Home Basic</DISPLAYDESCRIPTION>
  </IMAGE>
  <IMAGE INDEX="3">
    <DIRCOUNT>9355</DIRCOUNT>
    <FILECOUNT>48099</FILECOUNT>
    <TOTALBYTES>8566642846</TOTALBYTES>
    <CREATIONTIME>
      <HIGHPART>0x01CB8901</HIGHPART>
      <LOWPART>0xEF63352E</LOWPART>
    </CREATIONTIME>
    <LASTMODIFICATIONTIME>
      <HIGHPART>0x01CB8919</HIGHPART>
      <LOWPART>0xE4E1987B</LOWPART>
    </LASTMODIFICATIONTIME>
    <WINDOWS>
      <ARCH>0</ARCH>
      <PRODUCTNAME>Microsoft® Windows® Operating System</PRODUCTNAME>
      <EDITIONID>HomePremium</EDITIONID>
      <INSTALLATIONTYPE>Client</INSTALLATIONTYPE>
      <HAL>acpiapic</HAL>
      <PRODUCTTYPE>WinNT</PRODUCTTYPE>
      <PRODUCTSUITE>Terminal Server</PRODUCTSUITE>
      <LANGUAGES>
        <LANGUAGE>en-US</LANGUAGE>
        <DEFAULT>en-US</DEFAULT>
      </LANGUAGES>
      <VERSION>
        <MAJOR>6</MAJOR>
        <MINOR>1</MINOR>
        <BUILD>7601</BUILD>
        <SPBUILD>17514</SPBUILD>
        <SPLEVEL>1</SPLEVEL>
      </VERSION>
      <SYSTEMROOT>WINDOWS</SYSTEMROOT>
    </WINDOWS>
    <NAME>Windows 7 HOMEPREMIUM</NAME>
    <DESCRIPTION>Windows 7 HOMEPREMIUM</DESCRIPTION>
    <FLAGS>HomePremium</FLAGS>
    <HARDLINKBYTES>3448347246</HARDLINKBYTES>
    <DISPLAYNAME>Windows 7 Home Premium</DISPLAYNAME>
    <DISPLAYDESCRIPTION>Windows 7 Home Premium</DISPLAYDESCRIPTION>
  </IMAGE>
  <IMAGE INDEX="4">
    <DIRCOUNT>9412</DIRCOUNT>
    <FILECOUNT>48542</FILECOUNT>
    <TOTALBYTES>8447825392</TOTALBYTES>
    <CREATIONTIME>
      <HIGHPART>0x01CB8901</HIGHPART>
      <LOWPART>0xEF63352E</LOWPART>
    </CREATIONTIME>
    <LASTMODIFICATIONTIME>
      <HIGHPART>0x01CB8919</HIGHPART>
      <LOWPART>0xF8BCD7A7</LOWPART>
    </LASTMODIFICATIONTIME>
    <WINDOWS>
      <ARCH>0</ARCH>
      <PRODUCTNAME>Microsoft® Windows® Operating System</PRODUCTNAME>
      <EDITIONID>Professional</EDITIONID>
      <INSTALLATIONTYPE>Client</INSTALLATIONTYPE>
      <HAL>acpiapic</HAL>
      <PRODUCTTYPE>WinNT</PRODUCTTYPE>
      <PRODUCTSUITE>Terminal Server</PRODUCTSUITE>
      <LANGUAGES>
        <LANGUAGE>en-US</LANGUAGE>
        <DEFAULT>en-US</DEFAULT>
      </LANGUAGES>
      <VERSION>
        <MAJOR>6</MAJOR>
        <MINOR>1</MINOR>
        <BUILD>7601</BUILD>
        <SPBUILD>17514</SPBUILD>
        <SPLEVEL>1</SPLEVEL>
      </VERSION>
      <SYSTEMROOT>WINDOWS</SYSTEMROOT>
    </WINDOWS>
    <NAME>Windows 7 PROFESSIONAL</NAME>
    <DESCRIPTION>Windows 7 PROFESSIONAL</DESCRIPTION>
    <FLAGS>Professional</FLAGS>
    <HARDLINKBYTES>3314667745</HARDLINKBYTES>
    <DISPLAYNAME>Windows 7 Professional</DISPLAYNAME>
    <DISPLAYDESCRIPTION>Windows 7 Professional</DISPLAYDESCRIPTION>
  </IMAGE>
  <IMAGE INDEX="5">
    <DIRCOUNT>9448</DIRCOUNT>
    <FILECOUNT>48718</FILECOUNT>
    <TOTALBYTES>8607765255</TOTALBYTES>
    <CREATIONTIME>
      <HIGHPART>0x01CB8901</HIGHPART>
      <LOWPART>0xEF63352E</LOWPART>
    </CREATIONTIME>
    <LASTMODIFICATIONTIME>
      <HIGHPART>0x01CB891A</HIGHPART>
      <LOWPART>0x144BDFB8</LOWPART>
    </LASTMODIFICATIONTIME>
    <WINDOWS>
      <ARCH>0</ARCH>
      <PRODUCTNAME>Microsoft® Windows® Operating System</PRODUCTNAME>
      <EDITIONID>Ultimate</EDITIONID>
      <INSTALLATIONTYPE>Client</INSTALLATIONTYPE>
      <HAL>acpiapic</HAL>
      <PRODUCTTYPE>WinNT</PRODUCTTYPE>
      <PRODUCTSUITE>Terminal Server</PRODUCTSUITE>
      <LANGUAGES>
        <LANGUAGE>en-US</LANGUAGE>
        <DEFAULT>en-US</DEFAULT>
      </LANGUAGES>
      <VERSION>
        <MAJOR>6</MAJOR>
        <MINOR>1</MINOR>
        <BUILD>7601</BUILD>
        <SPBUILD>17514</SPBUILD>
        <SPLEVEL>1</SPLEVEL>
      </VERSION>
      <SYSTEMROOT>WINDOWS</SYSTEMROOT>
    </WINDOWS>
    <NAME>Windows 7 ULTIMATE</NAME>
    <DESCRIPTION>Windows 7 ULTIMATE</DESCRIPTION>
    <FLAGS>Ultimate</FLAGS>
    <HARDLINKBYTES>3473147759</HARDLINKBYTES>
    <DISPLAYNAME>Windows 7 Ultimate</DISPLAYNAME>
    <DISPLAYDESCRIPTION>Windows 7 Ultimate</DISPLAYDESCRIPTION>
  </IMAGE>
  <IMAGE INDEX="6">
    <DIRCOUNT>13363</DIRCOUNT>
    <FILECOUNT>64267</FILECOUNT>
    <TOTALBYTES>11707704502</TOTALBYTES>
    <CREATIONTIME>
      <HIGHPART>0x01CB8936</HIGHPART>
      <LOWPART>0x131F339A</LOWPART>
    </CREATIONTIME>
    <LASTMODIFICATIONTIME>
      <HIGHPART>0x01CBE5B3</HIGHPART>
      <LOWPART>0x1689D6F0</LOWPART>
    </LASTMODIFICATIONTIME>
    <WINDOWS>
      <ARCH>9</ARCH>
      <PRODUCTNAME>Microsoft® Windows® Operating System</PRODUCTNAME>
      <EDITIONID>HomeBasic</EDITIONID>
      <INSTALLATIONTYPE>Client</INSTALLATIONTYPE>
      <HAL>acpiapic</HAL>
      <PRODUCTTYPE>WinNT</PRODUCTTYPE>
      <PRODUCTSUITE>Terminal Server</PRODUCTSUITE>
      <LANGUAGES>
        <LANGUAGE>en-US</LANGUAGE>
        <DEFAULT>en-US</DEFAULT>
      </LANGUAGES>
      <VERSION>
        <MAJOR>6</MAJOR>
        <MINOR>1</MINOR>
        <BUILD>7601</BUILD>
        <SPBUILD>17514</SPBUILD>
        <SPLEVEL>1</SPLEVEL>
      </VERSION>
      <SYSTEMROOT>WINDOWS</SYSTEMROOT>
    </WINDOWS>
    <NAME>Windows 7 Home Basic x64</NAME>
    <DESCRIPTION>Windows 7 HOMEBASIC</DESCRIPTION>
    <FLAGS>HomeBasic</FLAGS>
    <HARDLINKBYTES>4497873056</HARDLINKBYTES>
    <DISPLAYNAME>Windows 7 Home Basic</DISPLAYNAME>
    <DISPLAYDESCRIPTION>Windows 7 Home Basic</DISPLAYDESCRIPTION>
  </IMAGE>
  <IMAGE INDEX="7">
    <DIRCOUNT>13363</DIRCOUNT>
    <FILECOUNT>64267</FILECOUNT>
    <TOTALBYTES>11707704502</TOTALBYTES>
    <CREATIONTIME>
      <HIGHPART>0x01CB8936</HIGHPART>
      <LOWPART>0x131F339A</LOWPART>
    </CREATIONTIME>
    <LASTMODIFICATIONTIME>
      <HIGHPART>0x01CBE5B3</HIGHPART>
      <LOWPART>0x1786AD80</LOWPART>
    </LASTMODIFICATIONTIME>
    <WINDOWS>
      <ARCH>9</ARCH>
      <PRODUCTNAME>Microsoft® Windows® Operating System</PRODUCTNAME>
      <EDITIONID>HomeBasic</EDITIONID>
      <INSTALLATIONTYPE>Client</INSTALLATIONTYPE>
      <HAL>acpiapic</HAL>
      <PRODUCTTYPE>WinNT</PRODUCTTYPE>
      <PRODUCTSUITE>Terminal Server</PRODUCTSUITE>
      <LANGUAGES>
        <LANGUAGE>en-US</LANGUAGE>
        <DEFAULT>en-US</DEFAULT>
      </LANGUAGES>
      <VERSION>
        <MAJOR>6</MAJOR>
        <MINOR>1</MINOR>
        <BUILD>7601</BUILD>
        <SPBUILD>17514</SPBUILD>
        <SPLEVEL>1</SPLEVEL>
      </VERSION>
      <SYSTEMROOT>WINDOWS</SYSTEMROOT>
    </WINDOWS>
    <NAME>Windows 7 Home Premium x64</NAME>
    <DESCRIPTION>Windows 7 HOMEBASIC</DESCRIPTION>
    <FLAGS>HomeBasic</FLAGS>
    <HARDLINKBYTES>4497873056</HARDLINKBYTES>
    <DISPLAYNAME>Windows 7 Home Basic</DISPLAYNAME>
    <DISPLAYDESCRIPTION>Windows 7 Home Basic</DISPLAYDESCRIPTION>
  </IMAGE>
  <IMAGE INDEX="8">
    <DIRCOUNT>13363</DIRCOUNT>
    <FILECOUNT>64267</FILECOUNT>
    <TOTALBYTES>11707704502</TOTALBYTES>
    <CREATIONTIME>
      <HIGHPART>0x01CB8936</HIGHPART>
      <LOWPART>0x131F339A</LOWPART>
    </CREATIONTIME>
    <LASTMODIFICATIONTIME>
      <HIGHPART>0x01CBE5B3</HIGHPART>
      <LOWPART>0x184394E0</LOWPART>
    </LASTMODIFICATIONTIME>
    <WINDOWS>
      <ARCH>9</ARCH>
      <PRODUCTNAME>Microsoft® Windows® Operating System</PRODUCTNAME>
      <EDITIONID>HomeBasic</EDITIONID>
      <INSTALLATIONTYPE>Client</INSTALLATIONTYPE>
      <HAL>acpiapic</HAL>
      <PRODUCTTYPE>WinNT</PRODUCTTYPE>
      <PRODUCTSUITE>Terminal Server</PRODUCTSUITE>
      <LANGUAGES>
        <LANGUAGE>en-US</LANGUAGE>
        <DEFAULT>en-US</DEFAULT>
      </LANGUAGES>
      <VERSION>
        <MAJOR>6</MAJOR>
        <MINOR>1</MINOR>
        <BUILD>7601</BUILD>
        <SPBUILD>17514</SPBUILD>
        <SPLEVEL>1</SPLEVEL>
      </VERSION>
      <SYSTEMROOT>WINDOWS</SYSTEMROOT>
    </WINDOWS>
    <NAME>Windows 7 Professional x64</NAME>
    <DESCRIPTION>Windows 7 HOMEBASIC</DESCRIPTION>
    <FLAGS>HomeBasic</FLAGS>
    <HARDLINKBYTES>4497873056</HARDLINKBYTES>
    <DISPLAYNAME>Windows 7 Home Basic</DISPLAYNAME>
    <DISPLAYDESCRIPTION>Windows 7 Home Basic</DISPLAYDESCRIPTION>
  </IMAGE>
  <IMAGE INDEX="9">
    <DIRCOUNT>13363</DIRCOUNT>
    <FILECOUNT>64267</FILECOUNT>
    <TOTALBYTES>11707704502</TOTALBYTES>
    <CREATIONTIME>
      <HIGHPART>0x01CB8936</HIGHPART>
      <LOWPART>0x131F339A</LOWPART>
    </CREATIONTIME>
    <LASTMODIFICATIONTIME>
      <HIGHPART>0x01CBE5B3</HIGHPART>
      <LOWPART>0x19005530</LOWPART>
    </LASTMODIFICATIONTIME>
    <WINDOWS>
      <ARCH>9</ARCH>
      <PRODUCTNAME>Microsoft® Windows® Operating System</PRODUCTNAME>
      <EDITIONID>HomeBasic</EDITIONID>
      <INSTALLATIONTYPE>Client</INSTALLATIONTYPE>
      <HAL>acpiapic</HAL>
      <PRODUCTTYPE>WinNT</PRODUCTTYPE>
      <PRODUCTSUITE>Terminal Server</PRODUCTSUITE>
      <LANGUAGES>
        <LANGUAGE>en-US</LANGUAGE>
        <DEFAULT>en-US</DEFAULT>
      </LANGUAGES>
      <VERSION>
        <MAJOR>6</MAJOR>
        <MINOR>1</MINOR>
        <BUILD>7601</BUILD>
        <SPBUILD>17514</SPBUILD>
        <SPLEVEL>1</SPLEVEL>
      </VERSION>
      <SYSTEMROOT>WINDOWS</SYSTEMROOT>
    </WINDOWS>
    <NAME>Windows 7 Ultimate x64</NAME>
    <DESCRIPTION>Windows 7 HOMEBASIC</DESCRIPTION>
    <FLAGS>HomeBasic</FLAGS>
    <HARDLINKBYTES>4497873056</HARDLINKBYTES>
    <DISPLAYNAME>Windows 7 Home Basic</DISPLAYNAME>
    <DISPLAYDESCRIPTION>Windows 7 Home Basic</DISPLAYDESCRIPTION>
  </IMAGE>
</WIM>


I just figured out that the '1' in the BAT file tells imagex to add image index 1 .. I need to change that # for each index.
 
Last edited:

My Computer

Computer Manufacturer/Model Number
Asus V2-M3M8200 Barebones
OS
Windows 7 Professional x64
CPU
AMD Phenom II X4 925
Motherboard
V2-M3M8200 (basically a M3N78-VM)
Memory
4x1024mb Kingston HyperX DDR2-1066 KHX8500D2/1G
Graphics Card(s)
Asus GTS 450 OC
Sound Card
Creative Sound Blaster X-Fi Titanium PCIe
Monitor(s) Displays
Asus 24" LCD VH242H
Screen Resolution
1920x1080
Hard Drives
WDC WD5000AAKS
WDC WD5002ABYS
Seagate ST325062 USB-to-IDE
Fujitsu 160GB Pocket USB HDD
PSU
Antec Earthwatts EA-430D
Case
Asus V2-M3M8200
Cooling
120mm side fan & 80mm front & 92mm rear fan
Keyboard
Dell USB mini Multimedia
Mouse
Logitech MX518
Internet Speed
Comcast Xfinity
Other Info
Logitech Webcam Pro 9000
Accurian 40-1462 Speakers
little dot MKII Headphone Amp
No, you can use the .wim you have. Delete the x64 images , then Export into it again.


Your bat should read :

imagex /export E:\W7x64SP1\sources\install.wim 1 E:\W7x86SP1\sources\install.wim "Windows 7 Home Basic x64"
imagex /export E:\W7x64SP1\sources\install.wim 2 E:\W7x86SP1\sources\install.wim "Windows 7 Home Premium x64"
imagex /export E:\W7x64SP1\sources\install.wim 3 E:\W7x86SP1\sources\install.wim "Windows 7 Professional x64"
imagex /export E:\W7x64SP1\sources\install.wim 4 E:\W7x86SP1\sources\install.wim "Windows 7 Ultimate x64"
 

My Computers

System One System Two

  • Computer type
    PC/Desktop
    OS
    7 X64
    CPU
    i5 8400
    Motherboard
    gigabyte b365m ds3h
    Memory
    2x8gb 3200mhz
    Hard Drives
    various
    PSU
    pure power 11 400w cm
    Case
    Coolermaster
    Cooling
    cryorig m9i
  • Computer type
    PC/Desktop
    OS
    7x64
    CPU
    g5400
    Motherboard
    ga b365m ds3h
    Memory
    8gb ddr4 2400
    PSU
    xfx pro 450w
Yeah, I just figured that out .. :o
 

My Computer

Computer Manufacturer/Model Number
Asus V2-M3M8200 Barebones
OS
Windows 7 Professional x64
CPU
AMD Phenom II X4 925
Motherboard
V2-M3M8200 (basically a M3N78-VM)
Memory
4x1024mb Kingston HyperX DDR2-1066 KHX8500D2/1G
Graphics Card(s)
Asus GTS 450 OC
Sound Card
Creative Sound Blaster X-Fi Titanium PCIe
Monitor(s) Displays
Asus 24" LCD VH242H
Screen Resolution
1920x1080
Hard Drives
WDC WD5000AAKS
WDC WD5002ABYS
Seagate ST325062 USB-to-IDE
Fujitsu 160GB Pocket USB HDD
PSU
Antec Earthwatts EA-430D
Case
Asus V2-M3M8200
Cooling
120mm side fan & 80mm front & 92mm rear fan
Keyboard
Dell USB mini Multimedia
Mouse
Logitech MX518
Internet Speed
Comcast Xfinity
Other Info
Logitech Webcam Pro 9000
Accurian 40-1462 Speakers
little dot MKII Headphone Amp
LOL.

Try this:


start /wait imagex /delete E:\W7x86SP1\sources\install.wim 7

start /wait imagex /delete E:\W7x86SP1\sources\install.wim 8

start /wait imagex /delete E:\W7x86SP1\sources\install.wim 9

start /wait imagex /export E:\W7x64SP1\sources\install.wim 2 E:\W7x86SP1\sources\install.wim "Windows 7 Home Premium x64"
start /wait imagex /export E:\W7x64SP1\sources\install.wim 3 E:\W7x86SP1\sources\install.wim "Windows 7 Professional x64"
start /wait imagex /export E:\W7x64SP1\sources\install.wim 4 E:\W7x86SP1\sources\install.wim "Windows 7 Ultimate x64"


Actually the images to delete will be 7 , 8 and 9 as you already have the 5 x86 images in there - might as well leave image 6 ( that should be x64 Home Basic)
 

My Computers

System One System Two

  • Computer type
    PC/Desktop
    OS
    7 X64
    CPU
    i5 8400
    Motherboard
    gigabyte b365m ds3h
    Memory
    2x8gb 3200mhz
    Hard Drives
    various
    PSU
    pure power 11 400w cm
    Case
    Coolermaster
    Cooling
    cryorig m9i
  • Computer type
    PC/Desktop
    OS
    7x64
    CPU
    g5400
    Motherboard
    ga b365m ds3h
    Memory
    8gb ddr4 2400
    PSU
    xfx pro 450w
w00t working now :geek:
 

Attachments

  • w7sp1.png
    w7sp1.png
    63.6 KB · Views: 512

My Computer

Computer Manufacturer/Model Number
Asus V2-M3M8200 Barebones
OS
Windows 7 Professional x64
CPU
AMD Phenom II X4 925
Motherboard
V2-M3M8200 (basically a M3N78-VM)
Memory
4x1024mb Kingston HyperX DDR2-1066 KHX8500D2/1G
Graphics Card(s)
Asus GTS 450 OC
Sound Card
Creative Sound Blaster X-Fi Titanium PCIe
Monitor(s) Displays
Asus 24" LCD VH242H
Screen Resolution
1920x1080
Hard Drives
WDC WD5000AAKS
WDC WD5002ABYS
Seagate ST325062 USB-to-IDE
Fujitsu 160GB Pocket USB HDD
PSU
Antec Earthwatts EA-430D
Case
Asus V2-M3M8200
Cooling
120mm side fan & 80mm front & 92mm rear fan
Keyboard
Dell USB mini Multimedia
Mouse
Logitech MX518
Internet Speed
Comcast Xfinity
Other Info
Logitech Webcam Pro 9000
Accurian 40-1462 Speakers
little dot MKII Headphone Amp
Great.

Now how about making one with x64 recovery options - and x64 repair install?
 

My Computers

System One System Two

  • Computer type
    PC/Desktop
    OS
    7 X64
    CPU
    i5 8400
    Motherboard
    gigabyte b365m ds3h
    Memory
    2x8gb 3200mhz
    Hard Drives
    various
    PSU
    pure power 11 400w cm
    Case
    Coolermaster
    Cooling
    cryorig m9i
  • Computer type
    PC/Desktop
    OS
    7x64
    CPU
    g5400
    Motherboard
    ga b365m ds3h
    Memory
    8gb ddr4 2400
    PSU
    xfx pro 450w
Great.

Now how about making one with x64 recovery options - and x64 repair install?

I tried that from, I think your info? But it didn't work.
I lost the link, can you repost it?
 

My Computer

Computer Manufacturer/Model Number
Self Built
OS
Win 7 Ultimate 32bit
CPU
C2D E6600 2.4Ghz
Motherboard
Intel D965WH
Memory
4G Kingston KHX5400D2
Graphics Card(s)
EVGA GTX 570 HD SC (012-P3-1573-KR)
Sound Card
On-Board
Monitor(s) Displays
Samsung 226BW
Screen Resolution
1680 x 1050
Hard Drives
2 x 250 Seagate Barracuda
2 x 500 Seagate Barracuda (Raid1)
PSU
Corsair TX750W
Case
In-Win C589
Cooling
Stock Intel Cooling
If I just want a x64 DVD am I write in thinking I only have to make an ISO of my disc (using ISODisk for example) then use the eicfg_remoaval_utility and finally burn the ISO to disc?

This seems to easy lol
 

My Computer

Computer Manufacturer/Model Number
Something I threw together
OS
Windows 7 Ultimate x64
CPU
Intel Core i7-2600K
Motherboard
Asus P8P67
Memory
16 GB G Skill F3-10666 CL9D-4GBRL
Graphics Card(s)
ATI Radeon HD 6870
Sound Card
ATI Radeon HDMI / Realtek ALC892
Monitor(s) Displays
2 x 22" standard monitors / LG32LC56v TV to watch films
Screen Resolution
1920 x1080
Hard Drives
2 x OCZ Vertex2 111.79GB
3 x Samsung103SJ
1 x Samsung103UJ
1 x WD3200BEVT
1 x Hitachi5K320-160
PSU
Thermaltake Toughpower Cable Management 750W
Case
Antec 300
Cooling
Noctua NH-U12P SE2 and 5 120mm Case fans
Keyboard
Microsoft Comfort Curve Keyboard 2000
Mouse
Hama M3110 / Logitech M305
Internet Speed
16000
Other Info
I have also used Fedora, Suse, Ubuntu Linux
And all other Windows from 95 to date except ME
If I just want a x64 DVD am I write in thinking I only have to make an ISO of my disc (using ISODisk for example) then use the eicfg_remoaval_utility and finally burn the ISO to disc?

This seems to easy lol


Hello mate, yes that's correct.
 

My Computer

Computer Manufacturer/Model Number
* BFK Customs *
OS
W 7 64-bit Ultimate
CPU
Intel Q9550 Yorkfield
Motherboard
ASUS P5Q Pro
Memory
8GB Dominator 8500C5D
Graphics Card(s)
ATI : XFX 5870
Sound Card
Realtek HD Audio 7-1
Monitor(s) Displays
1x 47" LCD HDMI & 3x 26" LCD HDMI
Screen Resolution
1920x1080P & 1920x1200
Hard Drives
1x 80GB Intel X25-M G2 SSD : 1x 500GB & 1x 640GB WD Caviar Black(s)
PSU
Corsair 620HX
Case
Cooler Master RC-690
Cooling
Tuniq Tower 120, 2x 140mm and 3x 120mm case fans
Keyboard
Microsoft 500
Mouse
Razer Diamondback 3G
Internet Speed
14 Mb/s
Other Info
1x Koutech 3Gb/s SATA HDD Hot Swap Rack
If I just want a x64 DVD am I write in thinking I only have to make an ISO of my disc (using ISODisk for example) then use the eicfg_remoaval_utility and finally burn the ISO to disc?

This seems to easy lol


Hello mate, yes that's correct.
Amazing!! thanks Ted :D

I have another question as well ......er..........ok maybe not the ISO just finished. Time to work the magic and burn
 

My Computer

Computer Manufacturer/Model Number
Something I threw together
OS
Windows 7 Ultimate x64
CPU
Intel Core i7-2600K
Motherboard
Asus P8P67
Memory
16 GB G Skill F3-10666 CL9D-4GBRL
Graphics Card(s)
ATI Radeon HD 6870
Sound Card
ATI Radeon HDMI / Realtek ALC892
Monitor(s) Displays
2 x 22" standard monitors / LG32LC56v TV to watch films
Screen Resolution
1920 x1080
Hard Drives
2 x OCZ Vertex2 111.79GB
3 x Samsung103SJ
1 x Samsung103UJ
1 x WD3200BEVT
1 x Hitachi5K320-160
PSU
Thermaltake Toughpower Cable Management 750W
Case
Antec 300
Cooling
Noctua NH-U12P SE2 and 5 120mm Case fans
Keyboard
Microsoft Comfort Curve Keyboard 2000
Mouse
Hama M3110 / Logitech M305
Internet Speed
16000
Other Info
I have also used Fedora, Suse, Ubuntu Linux
And all other Windows from 95 to date except ME
Wondering if there are any links to where I can download the various install.wim files?

I have Win7 Pro (retail) box/package which comes with both the 32-bit and 64-bit DVD's, and I'll be trying making a single 32+64 disc of course, but to make a "universal" install disk as described in this thread where can I get the wim's for Home Premium, Ultimate etc?

Am I reading this thread correctly in that my "Pro" discs have the other versions on them, and only need to be unlocked with the wims to be able to install the other versions?
(with an appropriate lic key for the version too of course)
 

My Computer

OS
Windows 7 Home Premium
If you read the tutorial - you will see the images for all the editions are already on the dvd's you already have.

That is why there are several imagex commands - each command exports a different image from the 64 bit install.wim ( which you already have) into the 32 bit install ( which you also already have).

It also explains deleting the ei.cfg file.

You have everything you need - you are good to go:)

You might find this link easier to follow
 

My Computers

System One System Two

  • Computer type
    PC/Desktop
    OS
    7 X64
    CPU
    i5 8400
    Motherboard
    gigabyte b365m ds3h
    Memory
    2x8gb 3200mhz
    Hard Drives
    various
    PSU
    pure power 11 400w cm
    Case
    Coolermaster
    Cooling
    cryorig m9i
  • Computer type
    PC/Desktop
    OS
    7x64
    CPU
    g5400
    Motherboard
    ga b365m ds3h
    Memory
    8gb ddr4 2400
    PSU
    xfx pro 450w
If you read the tutorial - you will see the images for all the editions are already on the dvd's you already have.

That is why there are several imagex commands - each command exports a different image from the 64 bit install.wim ( which you already have) into the 32 bit install ( which you also already have).

It also explains deleting the ei.cfg file.

You have everything you need - you are good to go:)

You might find this link easier to follow

Thanks.

That's just it, I've been reading though this thread and some folks are downloading additional versions and pointing to their wim's when doing the imagex thing, so I wanted confirmation that my DVD has all I need, again thanks.

I have made a disk and have yet to try it out. Any way of trying it before actually installing? maybe mounting the iso or something?
 

My Computer

OS
Windows 7 Home Premium
Hello Redhouse, welcome to Seven Forums!

You can run the DVD within Windows, just X out and don't go further than this dialog box.

I use just the ISOs to install to VirtualBox.
click to enlarge


My Computer

Computer Manufacturer/Model Number
* BFK Customs *
OS
W 7 64-bit Ultimate
CPU
Intel Q9550 Yorkfield
Motherboard
ASUS P5Q Pro
Memory
8GB Dominator 8500C5D
Graphics Card(s)
ATI : XFX 5870
Sound Card
Realtek HD Audio 7-1
Monitor(s) Displays
1x 47" LCD HDMI & 3x 26" LCD HDMI
Screen Resolution
1920x1080P & 1920x1200
Hard Drives
1x 80GB Intel X25-M G2 SSD : 1x 500GB & 1x 640GB WD Caviar Black(s)
PSU
Corsair 620HX
Case
Cooler Master RC-690
Cooling
Tuniq Tower 120, 2x 140mm and 3x 120mm case fans
Keyboard
Microsoft 500
Mouse
Razer Diamondback 3G
Internet Speed
14 Mb/s
Other Info
1x Koutech 3Gb/s SATA HDD Hot Swap Rack
Hello Redhouse, welcome to Seven Forums!

You can run the DVD within Windows, just X out and don't go further than this dialog box.

I use just the ISOs to install to VirtualBox.click to enlarge

You mean the ISO itself, or the setup.exe from the folder I make my iso in?
 

My Computer

OS
Windows 7 Home Premium
I undersood you to say you have created an AIO DVD correct?

While in Windows put the DVD in ther drive and run the setup.exe from the autoplay.

or you should be able to just run the setup.exe from the folder.
click to enlarge
321.PNG
 

My Computer

Computer Manufacturer/Model Number
* BFK Customs *
OS
W 7 64-bit Ultimate
CPU
Intel Q9550 Yorkfield
Motherboard
ASUS P5Q Pro
Memory
8GB Dominator 8500C5D
Graphics Card(s)
ATI : XFX 5870
Sound Card
Realtek HD Audio 7-1
Monitor(s) Displays
1x 47" LCD HDMI & 3x 26" LCD HDMI
Screen Resolution
1920x1080P & 1920x1200
Hard Drives
1x 80GB Intel X25-M G2 SSD : 1x 500GB & 1x 640GB WD Caviar Black(s)
PSU
Corsair 620HX
Case
Cooler Master RC-690
Cooling
Tuniq Tower 120, 2x 140mm and 3x 120mm case fans
Keyboard
Microsoft 500
Mouse
Razer Diamondback 3G
Internet Speed
14 Mb/s
Other Info
1x Koutech 3Gb/s SATA HDD Hot Swap Rack
You mean the ISO itself, or the setup.exe from the folder I make my iso in?
Either way, you should see weather or not Setup lists all versions. I just ran the Setup from the folder and it's showing all versions =) That's how I tested mine before I burned it to DVD, or created a install USB stick.
 

My Computer

Computer Manufacturer/Model Number
Asus V2-M3M8200 Barebones
OS
Windows 7 Professional x64
CPU
AMD Phenom II X4 925
Motherboard
V2-M3M8200 (basically a M3N78-VM)
Memory
4x1024mb Kingston HyperX DDR2-1066 KHX8500D2/1G
Graphics Card(s)
Asus GTS 450 OC
Sound Card
Creative Sound Blaster X-Fi Titanium PCIe
Monitor(s) Displays
Asus 24" LCD VH242H
Screen Resolution
1920x1080
Hard Drives
WDC WD5000AAKS
WDC WD5002ABYS
Seagate ST325062 USB-to-IDE
Fujitsu 160GB Pocket USB HDD
PSU
Antec Earthwatts EA-430D
Case
Asus V2-M3M8200
Cooling
120mm side fan & 80mm front & 92mm rear fan
Keyboard
Dell USB mini Multimedia
Mouse
Logitech MX518
Internet Speed
Comcast Xfinity
Other Info
Logitech Webcam Pro 9000
Accurian 40-1462 Speakers
little dot MKII Headphone Amp
pparks1, why isn't it 3.88GB like the screenshot several posts back?

It is, sorry doing 2 things at once. it's 3.88gb, and comes out to 4,075,968KB.
DRAT .. I think my OCZ Rally2 Turbo USB drive is 3.82 GB :mad: .. I was really wanting a all-in-one USB flash installer
I got my AIO USB .. but had to remove some files in order for it to work. I deleted the UPGRADE folder, which only had .NET installers
 

My Computer

Computer Manufacturer/Model Number
Asus V2-M3M8200 Barebones
OS
Windows 7 Professional x64
CPU
AMD Phenom II X4 925
Motherboard
V2-M3M8200 (basically a M3N78-VM)
Memory
4x1024mb Kingston HyperX DDR2-1066 KHX8500D2/1G
Graphics Card(s)
Asus GTS 450 OC
Sound Card
Creative Sound Blaster X-Fi Titanium PCIe
Monitor(s) Displays
Asus 24" LCD VH242H
Screen Resolution
1920x1080
Hard Drives
WDC WD5000AAKS
WDC WD5002ABYS
Seagate ST325062 USB-to-IDE
Fujitsu 160GB Pocket USB HDD
PSU
Antec Earthwatts EA-430D
Case
Asus V2-M3M8200
Cooling
120mm side fan & 80mm front & 92mm rear fan
Keyboard
Dell USB mini Multimedia
Mouse
Logitech MX518
Internet Speed
Comcast Xfinity
Other Info
Logitech Webcam Pro 9000
Accurian 40-1462 Speakers
little dot MKII Headphone Amp
Back
Top