

How to Do a Clean Installation with Windows 7
InformationThis will show you how to do a clean installation with a retail Windows 7. A OEM Windows 7 may have a few different screens than below, but basically the same.
Yes, you can do a clean install from a upgrade Windows 7 version. :)
NOTE: See this tutorial for how: Clean Install with a Upgrade Windows 7 Version
NoteDo a Clean Installation if:
- Your computer has no operating system installed, or its running a version of Windows prior to Windows Vista with Service Pack 1 (including Windows XP).
- You do NOT want to preserve your data, programs, or system drivers.
- You want to delete your current operating system and replace it with Windows 7.
- You want to create a multiboot system by installing Windows 7 on a separate hard disk partition.
Tip
- Sometimes you may have a problem with installing Windows 7 with more than 2 GB of RAM installed on some older motherboards. If you have this problem, then you should install Windows 7 with a maximum of 2GB of RAM installed and add the rest of the RAM after Windows 7 is fully installed. You may need to flash your motherboard BIOS with the latest version to support more RAM like this. (WARNING - DO NOT FLASH THE BIOS if you do not know what you are doing. Please ask for help instead. One mistake can kill your motherboard permanently.)
- Before doing this clean install, you should download and save all of your device drivers to a USB flash drive, DVD, another HDD, or some other media to have them handy to make setting Windows 7 up easier when finished installing Windows 7. For example, having the network driver available in case you cannot connect to the internet until it's installed.
WarningWindows 7 Minimum Hardware Requirements:
NOTE: For more information on this, see: Windows 7 system requirements
- 1 GHz 32-bit or 64-bit processor
- 1 GB RAM for 32-bit Windows 7 OR 2 GB RAM for 64-bit Windows 7
- 16 GB available hard disk space for 32-bit Windows 7 OR 20 GB for 64-bit Windows 7
- Graphics card or chip that supports DirectX 9 with 128 MB memory (to have Aero theme enabled)
- DVD-R/W drive, or bootable USB 2.0 port with Windows 7 USB flash drive
- Internet or phone access to activate Windows 7.
Here's How:1. Boot the computer from your Windows 7 installation DVD/USB.
NOTE: Make sure that the CD/DVD drive is selected first and your HDD second in the boot priority order in your BIOS settings. Usually it is by default.
WarningIf you want to install Windows 7 using UEFI instead of BIOS, then see this below first.
How to Install Windows 7 Using "Unified Extensible Firmware Interface" (UEFI)
NoteIf you do not have a Windows 7 with SP1 installation DVD/USB, then you can download the latest official Windows 7 with SP1 ISO file at the links below.
Microsoft Software Recovery
You can use Windows 7 USB-DVD Download Tool to create a bootable DVD or USB flash drive with the ISO to do the clean install with.
2. If using a DVD, then when prompted, press any key to boot from the installation DVD. (See screenshot below)
NOTE: You will only have about 8 seconds to press this key. If you miss it, you will have to restart the computer.3. Set up your language preferences, and click on the Next button. (See screeshot below). 4. Click on the Install Now button to start the installation. (See screenshot below)
 5. Check the I accept the license terms box, and click on Next. (See screenshot below)
 6. Click on the Custom (advanced) option. (See screenshot below)
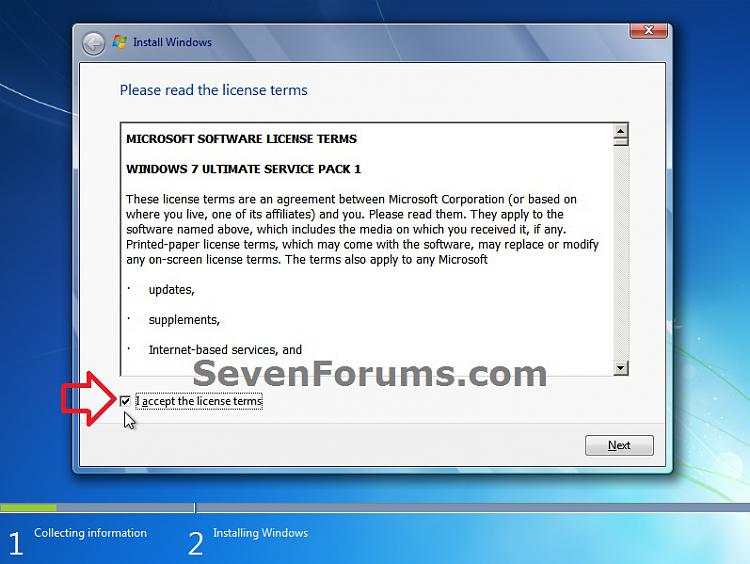 7. Select the hard drive or partition that you want to install Windows 7 on, and click on the Drive Options (advanced) link. (See screenshot below)
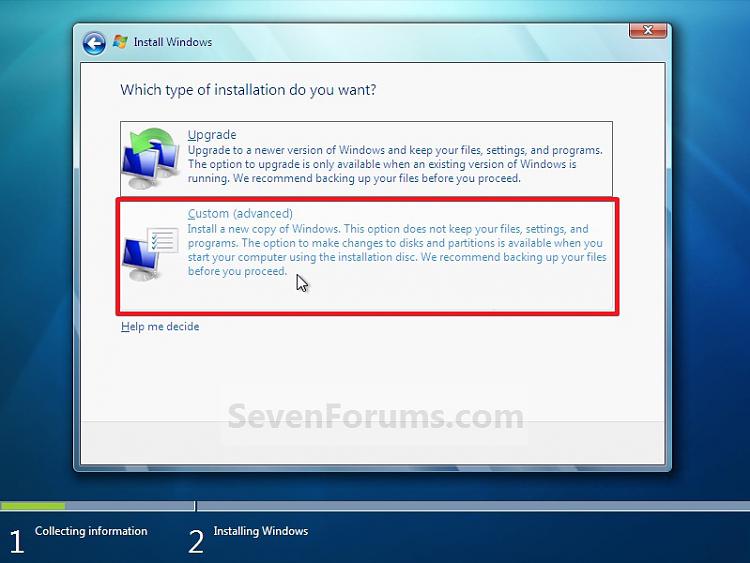
NOTE: If the hard drive or partition that you have selected is unallocated, then you can just click on the Next button instead and go to step 9 since it is already empty.
WARNING: You may not have the Drive options (advanced) option unless the installation is done at boot, and not running the installation from within your current OS.8. Select a hard drive or partition that you want to do a clean install of Windows 7 on, do what Drive options (advanced) you want if any, and click on the Next button when finished. (See screenshot below)
NOTE: If you have your hard drives in a RAID setup, then connect your USB key with the RAID drivers on it, click on Load Driver, select the folder on the USB key that contains the RAID drivers to install them. Afterwards, your RAID drives will be available to select from to install Windows 7 on.
TipDrive options (advanced)
- If you have more than one partition for a disk # (hard drive) and want to get rid of them to make that disk # one partition drive again, then select a partition with that disk # and click on the Delete option for each partition with the same disk # until there is only one "unallocated space" with that disk # left as in the screenshot below.
- To shrink an existing partition to create another partition to install Windows 7 on instead, select the partition you want shrink and click on the Extend option. Type in how much in MB (1 GB = 1024 MB) that you want to shrink it by. Now select the new extended partition.
NoteThe 100 MB System Reserved partition is used for the Boot Manager code, BCD (Boot Configuration Database), System Recovery Options (Windows RE), and start up files for BitLocker (if turned on).
- If you want to have the 100 MB System Reserved partition in addition to the Windows 7 C: partition on a HDD or SSD after installation, then you would need to make sure that all partitions on the drive have been deleted until it is only unallocated space. Next, select the unallocated drive to install Windows 7 on. If there are no partitions on the disk, you will get the 100 MB System Reserved.
- If you do not want to have the 100 MB System Reserved partition and only the Windows 7 C: partition on a HDD or SSD after installation, then select a formatted partition or drive to install Windows 7 on. If there are any partitions on the disk, you won't get the 100 MB System Reserved.
9. The installation of Windows 7 will now begin. (See screenshot below)
NOTE: During the installation process, your screen may flash and computer will restart a few times.10. After the final restart, you will see this screen for a moment. (See screenshot below) 11. Type in any user name that you want for your default administrator account and any computer name, then click on the Next button. (See screenshot below)
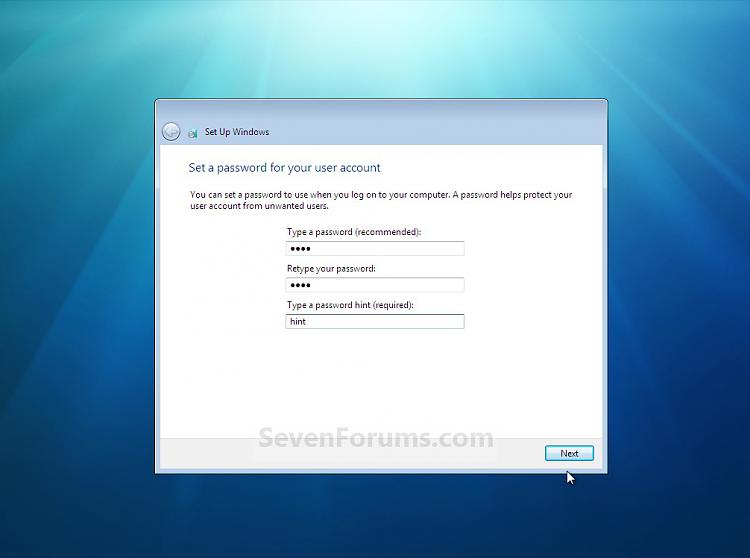
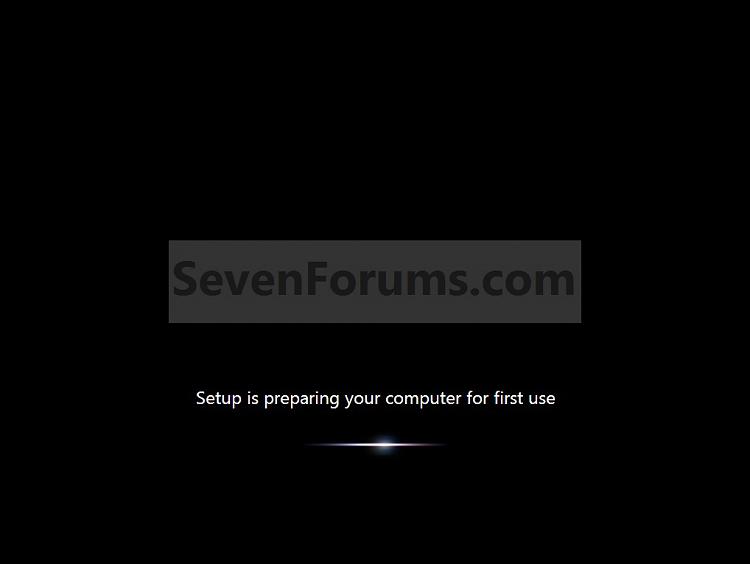 12. Type in a password you want for your default administrator account. Type it in again to confirm it, then type in a hint for your password. Click on the Next button. (See screenshots below)
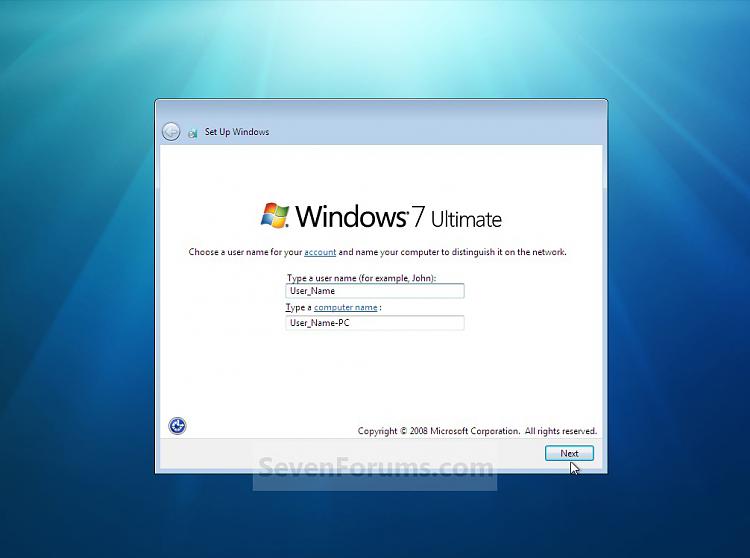
WARNING: The password will be case sensitive. The hint will be seen by all users on the computer, so do not type your password as the hint.
NOTE: If you do not want your your user account password protected at this time or do not want to have to type in a hint, then leave this blank and click on the Next button. You can create a password later for your user account in the Control Panel User Accounts after installing Windows 7 without having to type in a hint.13. Type in your Windows 7 product key number. (See screenshot below step 14)
14. Uncheck the Automatically activate Windows when I'm online box, then click on the Next button. (See screenshot below)
NOTE: You can activate Windows 7 later after you make sure it is running properly. (See step 21 below)
If you chose to automatically activate Windows 7 online when you set up your computer, automatic activation begins trying to activate your copy of Windows three days after you log on for the first time.15. Click on Use recommended settings to allow automatic Windows Updates and proper security settings. (See screenshot below)
NOTE: For more information about these recommended settings, click on the Learn more about each option link in this window.16. Select your time zone and set your time and date settings, then click on the Next button. (See screenshot below) 17. Click on your computer's correct network location type location to select it and have the settings for that location automatically applied. (See screenshot below)
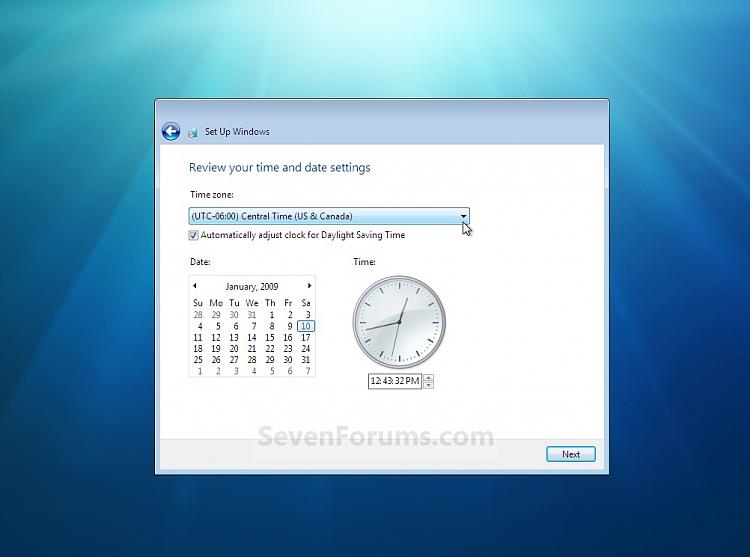 18. Windows 7 will now prepare your desktop to startup. (See screenshots below)
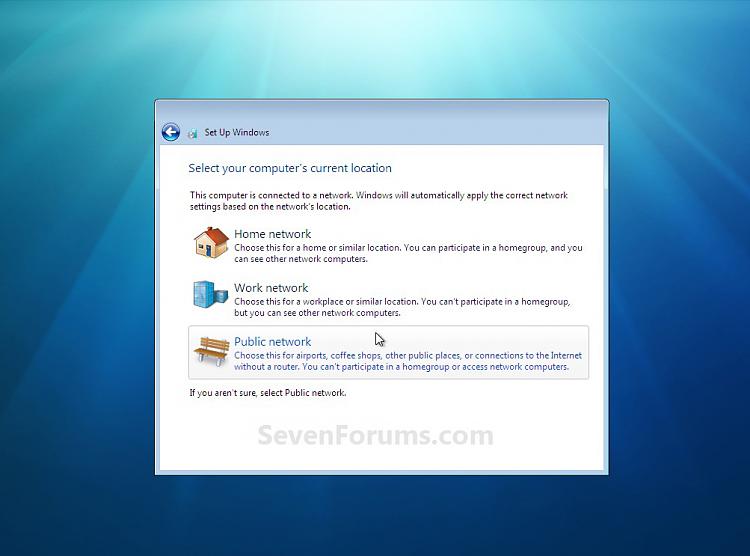 19. When it's finished and you are at your desktop, you can now remove or disconnect your installation DVD/USB from step 1 above.

20. Install all of your device drivers, then Windows Updates.
21. Refresh your Windows Experience Index (WEI) score.
22. When finished, all you will need to do is to activate Windows 7. (See screenshot below)
TipIf you are dual booting with another OS (ex: Vista), then that OS partition may not show up in Computer with a driver letter in Windows 7. You will need to add a drive letter to the OS (ex: Vista) partition in Windows 7 Disk Management for it to show up in Computer with a driver letter.
That's it,
Shawn
Related Tutorials
- How to Downgrade Windows 8 to Windows 7
- How to Do a Clean Install with a Upgrade Windows 7 Version
- How to Use Windows 7 Upgrade Advisor
- How to Do a Upgrade Installation with Windows 7
- How to Setup Windows 7 to Boot from a VHD (Virtual Hard Disk)
- How to Create a Windows 7 VHD at Boot to Start with from Boot
- How to Do a Repair Install to Fix Windows 7
- How to Activate Windows 7 Online
- How to Extend the Windows 7 Activation Trial Period Up to 120 Days
- How to Change the Default Operating System to Start in Windows 7
- How to Change Time to Display Operating Systems at Boot in Windows 7
- How to Delete an Operating System Listed in Windows Boot Manager
- How to Create a Windows 7 Installation USB Key
- How to Install Windows 7 from USB Pen Drive Using Grub4Dos
- How to Create a New Partition or Volume in Windows 7
- How to Fix Missing Vista Hard Disk Partition Letter in Windows 7
- How to Setup a Dual Boot Installation with Windows 7 and Vista
- How to Setup a Dual Boot Installation with Windows 7 and XP
- How to Install Windows 7 FAST without a DVD or USB Device
- Install Windows 7 Without Using Any External Device
- How to Do a Custom Installation of Windows 7
- How to Partition the Hard Drive in a Windows 7 Install
- How to Install Windows 7 on Computer with Less than 512MB RAM
- Slipstream Windows 7 SP1 and Updates to Create a Bootable USB, Installation DVD, or ISO File
- How to Do a Clean Install of Windows 7 from the Windows 7 Desktop
- How to Do a Clean Install of Windows 7 from the Windows XP Desktop
- How to Install Windows 7 Using "Unified Extensible Firmware Interface" (UEFI)
- How to Clean Reinstall a Factory OEM Windows 7
- New Installation: How to Create a General System Image in Audit Mode
- How to Clean Install Windows on a MSATA (SSD) Drive
Clean Install Windows 7
-
New #1
Thats great info. It seems similar to that of windows vista though. but i did not want to take a chance and mess up with my data on the other partitions. so your tutorial has helped me. Thanks.
-
-
New #3
Thank you very much.
-
-
New #5
Does W7 RC require a signon id and password? Or can I simply by-pass the sign-on? I will be othe only one using my machine at my house...
-
New #6
yep just click on next and go on but why would you not want a password? You can always use( autologin ) so that you don't need to login everytime you start.
-
New #7
Good - I was hoping it wasn't a mandated thing. You ask why would I want to bypass? Well... I suppose I could turn that around. Why would I want to have a password protected system? This way, you turn it on and just get to work.
Now if I was traveling with this beast of a machine, or if it was a laptop things would be different. But this will be sitting in the corner of my kitchen until it's demise more likely than not.
So simply clicking on NEXT will bypass the whole sign in window and autologin? I am going to be installing the RC on a clean drive and am looking for simplicity
-
New #8
Right when it asks for a password just click next. however it is like a security thing for networks and sounds like you will be on a network there at home. So what I do is I download a program called autologin and run it it puts a reg edit in your reg and then it logs on for you. but say someone try to access your pc thru your wireless internet and didn't know your password just a little more secure is all.

-
New #9
Hell Tang,
It best to have a password for better security to help prevent someone from being able to log on to your computer via a network. Instead of using a 3rd party program to automatcally log on to your computer when you have a password, you can set it within Windows 7 instead.
Log On Automatically at Startup
Hope this helps,
Shawn


 Quote
Quote
Related Discussions