How to Delete an Operating System Listed in Windows Boot Manager
InformationThis will show you how to delete a non-default operating system in Vista, Windows 7, or Windows 8 from the list in Windows Boot Manager or Startup Options (Windows 8) that allows you to select a OS to run at startup.
You must be logged in as an administrator to be able to do the steps in this tutorial.
EXAMPLE: Windows Boot Manager or "Startup Options" (Windows 8)
NOTE: This is the boot screen where you select what operating system that you would like to start. By default, you have 30 seconds to choose another operating system before the default operating system will start automatically.

OPTION ONEThrough System Configuration
1. Press the Windows + R keys to open the Run dialog, type msconfig, and press Enter.
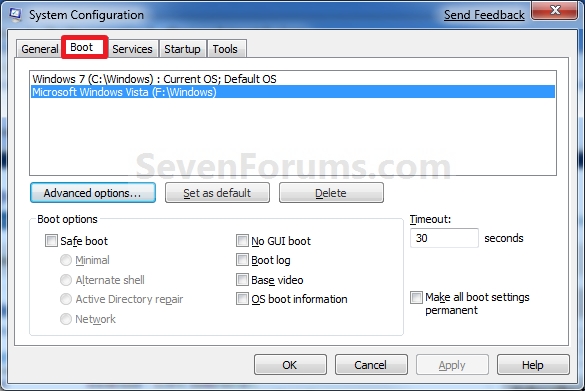
2. Click/tap on the Boot tab. (see screenshot below)
3. Select the operating system you want to delete that is not set as the Default OS, and click/tap on Delete. (see screenshot above)
NOTE: If the OS you want to delete from the list is the Default OS, then you will need to change the default operating system to another listed OS first.
4. Check the Make all boot settings permanent box, and click/tap on OK. (see screenshot below step 2)
5. Click/tap on Yes to confirm. (see screenshot below)
6. Click/tap on the Restart button. (see screenshot below)
WARNING: This will restart the computer immediately. Make sure you save and close anything open that you do not want to lose first.
OPTION TWOUsing the bcdedit Command
1. Open an elevated command prompt or a command prompt at boot.
NOTE: If you have a RAID setup or a PCI-E SSD as your boot drive and want to open a command prompt at boot, then you may need to use the Load Drivers option in the System Recovery Options screen to load it's drivers first before Windows will see the boot drive to be able to use the bcdedit command on it.
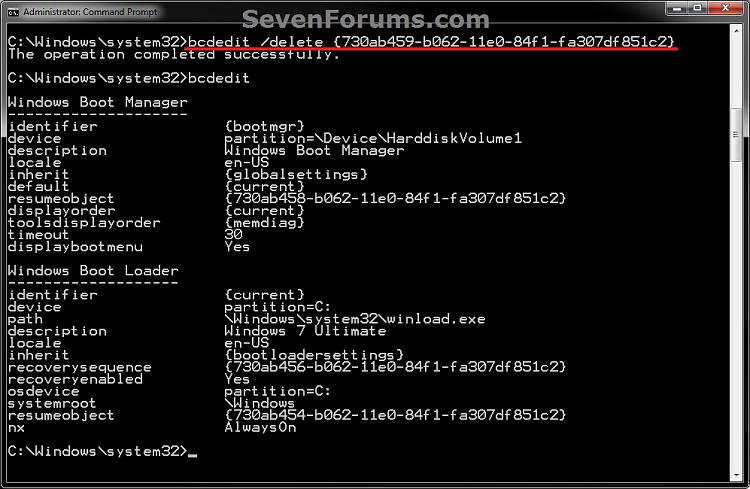
2. In the elevated command prompt, type bcdedit and press enter. (see screenshot below)
NOTE: This will let you see what OS is the default to start under the Windows Boot Manager section, and to see the description (name) and identifier of the operating system(s) listed in Windows Boot Manager are under the Windows Boot Loader section(s). For example, Microsoft Windows Vista (description) as {730ab458-b062-11e0-84f1-fa307df851c2} (identifier).
3. In the elevated command prompt, type the command below for a listed OS that you want to delete, and press Enter. (see screenshot below)
NOTE: If the OS you want to delete from the list is the Default OS, then you will need to change the default operating system to another listed OS first.
bcdedit /delete {identifier}4. In the elevated command prompt, type bcdedit and press enter. (see screenshot below step 3)
For example: If I wanted to delete Microsoft Windows Vista (description) as {730ab458-b062-11e0-84f1-fa307df851c2} (identifier), I would type this below and press Enter.
bcdedit /delete {730ab459-b062-11e0-84f1-fa307df851c2}
NOTE: This will let you see and verify that the OS has been deleted.
5. When finished, close the elevated command prompt.
OPTION THREEUsing the "EasyBCD" Program
NoteNote provided by Ray.
If you use EasyBCD in Windows 8, EasyBCD will use the Windows 7 Boot Loader.
If you would like to use the Windows 8 Boot Loader, refresh Windows 8.
After doing a refresh, you will be using the Windows 8 Boot Loader. Refresh will also delete the EasyBCD program.
1. Download and install a free version of the EasyBCD program, then run it.
NOTE: You can click on the "Download" button at the bottom to download the free version. Registration is not required to download.
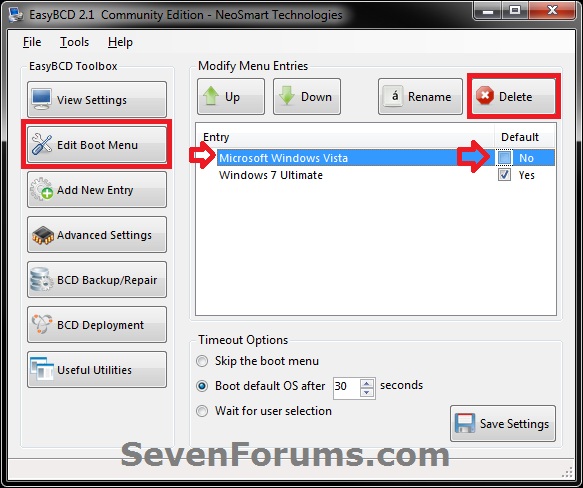
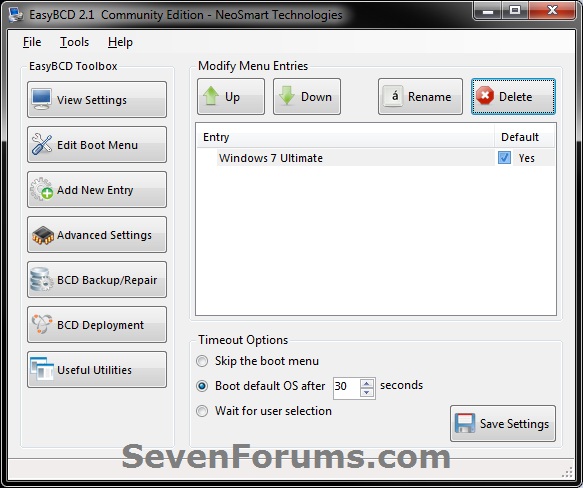
2. Click on the Edit Boot Menu button, select the OS (ex: Microsoft Windows Vista) that you want to delete, and click on the Delete button. (see screenshot below)
NOTE: If the OS you want to delete from the list is the Default OS, then you will need to change the default operating system to another listed OS first.
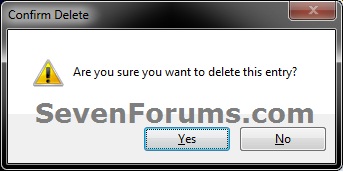
3. Click/tap on Yes to confirm deletion. (see screenshot below)
4. The OS (ex: Microsoft Windows Vista) is now deleted. (see screenshot below)
5. When finished, close EasyBCD.
That's it,
Shawn
Related Tutorials
- How to Change the OS Name in Windows Boot Manager
- How to Change Time to Display Operating Systems at Boot in Windows 7
- How to Change the Default Operating System to Start in Windows 7
- How to Do a Upgrade Installation with Windows 7
- How to Do a Clean Installation with Windows 7
- How to Setup a Dual Boot Installation with Windows 7 and Vista
- How to Setup a Dual Boot Installation with Windows 7 and XP
- How to Properly Delete a OS in a Dual Boot
- How to Add Windows 7 "Safe Mode" to Windows Boot Manager Screen
- How to Add Windows 7 "Safe Mode with Command Prompt" to Windows Boot Manager Screen
- How to Add Windows 7 "Safe Mode with Networking" to Windows Boot Manager Screen
- How to Change the Listed OS Arrangement Order in Windows Boot Manager Screen
Windows Boot Manager - Delete a Listed Operating System
-
New #1
thanks Shawn........
i've had a rouge W7 boot option ever since 6801 & now i can remove it....
:)SK
-
-
New #3
I have Window XP Pro 32bit and had installed Windows 7 64bit RC1 on a sperate hard drive. I have since formatted the drive with Windows 7 on it and still have the dual boot manager. Unless I am there to choose the XP the system will try to boot to Windows 7 that isn't there anymore. How can I get rid of the dual boot manager and automatilly boot to XP? Thanks for your help in advance.
-
New #4
Hello WildCard, and welcome to Seven Forums.
You can use EasyBCD in the Add/Remove Entries section to remove the Windows 7 boot entry from with XP. You will also need to install .Net Framework 2.0 for EasyBCD to work in XP though.
Hope this helps,
Shawn
-
New #5
Thank You so much Brink! I had just about given up hope. I had tried some other things but was having no luck and your solution worked like a charm. Took me less than five minutes and the problem was solved. Thanks again for the help.
-
-
New #7
Thanks
You would think that after dual booting the last 3 operating systems on
more than 1 computer a person would remember these things. Alas no.
Thanks for jogging my memory, Doug
-
New #8
You're welcome Doug. We have so much to remember, that it's not hard to forget something every now and then. :)
-
New #9
To stop dual booting, you should be able to use this method within Vista or Windows 7 and then extend that "C" partition into the one created for the dual boot. Will this work as long as the default is to the left on the "disk management" screen?
Windows Boot Manager - Delete a Listed Operating System
How to Delete an Operating System Listed in Windows Boot ManagerPublished by Brink
Related Discussions





 Quote
Quote