
You are using an out of date browser. It may not display this or other websites correctly.
You should upgrade or use an alternative browser.
You should upgrade or use an alternative browser.
Tutorials
Windows 7 tutorials, tricks, tips, and guides.
Filters
Show only:
Loading…
This list compiles useful Troubleshooting Steps for performance issues with Win7. It will show you how to test hardware, utilize built-in System resources to find solutions to problems, access and interpret the logs, use various tools and fixes.
While General Troubleshooting is useful for serious problems, when a Blue Screen occurs it is best to also post for analysis in our Crashes forum using this tool:
Blue Screen of Death (BSOD) Posting Instructions - Windows 7 Forums.
When Win7 fails to boot then start with the steps given here: Troubleshooting Windows 7 Failure to Boot - Windows 7 Forums
To find a location (e.g. Event Viewer, msconfig) type it in Start :orb: Search box.
The steps begin with checking over the hardware...
How to Show or Hide All Hidden Files, Folders, and Drives in Vista, Windows 7, and Windows 8
This tutorial will show you how to have all hidden files, folders, and drives to show or don't show in Windows 7. These are set to be hidden by default in Vista, Windows 7, and Windows 8. When you have these hidden files, folders, and drives set to show, the icon shows as transparent to indicate that they are set as hidden.
EXAMPLE: A Hidden and Normal Folder
EXAMPLE: A Hidden Protected Operating System File
To Hide or Show Hidden Files using Folder Options
NOTE: This option only affects the current user. 1. Open Folder Options.
2. To Show Hidden Files, Folders, and Drives
NOTE: This will also allow hidden drives to show despite if Hide...
File and Folder - Add "Hide" and "Unhide" to Context Menu
How to Add "Hide" and "Unhide" to File and Folder Context Menu in Vista, Windows 7, and Windows 8
This will add Hidden File Attributes and Hidden Folder Attributes to the context menu of files and folders for all users to be able to hide or unhide one or more selected file(s), folder(s), and/or folder(s) contents in Vista, Windows 7, and Windows 8.
You must be logged in as an administrator to be able to add or remove this from the context menu. All users will be able to use the context menu though.
This context menu will only set the attribute of only the selected file(s) and/or folder(s) to either be hidden or unhidden, or only the "subfolders and files" of the selected...
How to Remove the 100MB "System Reserved" Partition in Windows 7
The 100 MB System Reserved partition is included when doing a clean install of Windows 7 on an unallocated disk. The System Reserved partition serves two functions. First, it holds the Boot Manager code and the Boot Configuration Database. Second, it reserves space for the startup files required by the BitLocker Drive Encryption feature. If you ever decide to encrypt your system drive using BitLocker, you won’t have to repartition your system drive to make it possible.
This tutorial will show you how to delete the 100MB System Reserved partition created during the installation of Windows 7.
This involves deleting the boot partition, then repairing. Failure to...
How to Disable "Do you want to scan and fix Removable Drive" Prompt in Windows
This will show you how to permanently stop getting prompted by the "Do you want to scan and fix Removable Drive" dialog when connecting a removable storage device in Windows.
The "Do you want to scan and fix....?" prompt is caused by Windows detecting errors in the file system of the removable drive, or the drive was not removed (unmounted) properly. To help prevent getting this prompt, make sure to use the Safely Remove Hardware option to safely eject the removable drive before disconnecting or pulling it out.
Normally, you would run the Scan and fix option when prompted to have check disk run and attempt to fix any bad sectors and/or file system...
How to Install a Font in Windows 7 and Windows 8
This tutorial will show you how to install a font that you have downloaded in Windows 7 and Windows 8.
For a list of all default fonts that come supplied with Windows 7, see: Fonts supplied with Windows 7
For a list of all default fonts that come supplied with Windows 8, see: Fonts supplied with Windows 8
Windows comes with TrueType fonts and OpenType fonts. They work with a variety of computers, printers, and programs.
TrueType fonts (.ttf/.ttc) can be scaled to any size and are clear and readable in all sizes. They can be sent to any printer or other output device supported by Windows.
OpenType fonts (.otf) are related to TrueType fonts, but typically incorporate a greater...
How to "Pin to Taskbar" Transparent Invisible Icons for Programs in Windows 7
This will show you how to have a transparent invisible icon for any installed program of your choice pinned to the taskbar in Windows 7.
This way you could have hidden pinned programs on your taskbar.
Here's How:
1. Either create a new shortcut or copy a shortcut of the program (ex: CCleaner) that you want to pin to the taskbar to your desktop.
NOTE: If you already have this program pinned to the taskbar, then you will need to unpin it before doing step 2.
2. Right click on the new shortcut (ex: CCleaner) on the desktop, and click on Properties. (see screenshot below)
3. In the Shortcut tab, click on the Change Icon button. (see screenshot...
How to Enable or Disable Windows 7 Taskbar Pinned Programs
This will allow you to enable and disable the ability for specific or all users to pin a program to the taskbar, and allow or prevent pinned programs from being shown on the taskbar for all users in Windows 7. Pin to Taskbar and pinned programs is enable by default in Windows 7.
EXAMPLE: Taskbar with Pinned Programs Enable and Disabled
NOTE: Top screenshot is enabled, and bottom screenshot is disabled.
Using a REG File Download
1. To Enable Taskbar Pinned Programs for Only Current User
A) Click on the Download button below to download the file below.
Enable_Taskbar_Pinned_Programs.reg...
How to Hide or Show Known File Type Extensions in Windows 7
A file name extension is a set of characters added to the end of a file name that identifies the file type or format that determines what default program should open it. This will show you how to have Windows 7 hide or show known file type extensions. By default in Windows 7, known file types are set to hide.
EXAMPLE: Files Type Extensions Set to Show and Hide
Hide or Show Known File Extensions in Folder Options
1. Open Folder Options, and click on the View tab. (See screenshot below)
2. To Hide Known File Type Extensions
A) Check the Hide extensions for known file types box, then click on OK. (see screenshot above)
NOTE: This is the default setting.
3. To Show Known...
How to Add or Remove "All Tasks" (God Mode) from Control Panel in Windows
This will show you how to add All Tasks (God Mode) to the Control Panel for all users in Vista, Windows 7, and Windows 8.
EXAMPLE: "All Tasks" (God Mode) added to Control Panel
NOTE: This is the Control Panel icons and category view.
EXAMPLE: Control Panel "All Tasks" List
NOTE: This will show you every task available in the Control Panel listed by category. Some of these are not normally displayed in the Control Panel.
Here's How:
1. To Remove "All Tasks" from Control Panel
NOTE: This is the default setting.
A) Click/tap on the Download button below to download the file below.
Remove_All_Tasks_from_Control Panel.reg...
How to Change "JavaScript Timer Frequency" Power Option Setting for Internet Explorer
This tutorial will show you how to change the setting for the JavaScript Timer Frequency power option for IE9, IE10, and IE11 in Windows 7, Windows 8, and Windows 10.
There have been a very few reports of some users having possible increased battery drain or sleep issues with the Maximum and Power Saving settings enabled, respectively. These may or may not be mis-identified issues, but you may want to test out the different settings from the default if they apply to you.
IE9, IE10, and IE11 has a power setting in Windows 7 and Windows 8 Power Options, called JavaScript Timer Frequency. This is tied in with the IE9, IE10, and IE11 javaScript...
How to Change the Default "Libraries" Folder Icon in Windows 7
This will show you how to change the main default Libraries icon to any custom icon that you want instead in Windows 7.
You can only do this while logged into an administrator account.
This will affect all user account's Libraries icon on the computer.
EXAMPLE: Libraries Icon
NOTE: This is the default (left screenshot) and custom (right screenshot) Libraries icon.
Here's How:
1. Open the Start Menu and type regedit.exe in the search line, then press enter.
2. If prompted by UAC, then click on Yes.
3. In Regedit, go to the location below: (See screenshot below step 4)
HKEY_CLASSES_ROOT\CLSID\{031E4825-7B94-4dc3-B131-E946B44C8DD5}\DefaultIcon
4. In the left...
How to Pin or Unpin Items in Windows 7 Jump Lists
Jump Lists are lists of recent items, such as files, folders, or websites, organized by the program that you use to open them. In addition to being able to open recent and frequent items using a Jump List, you can also pin favorites to a Jump List, so you can quickly get to the items that you use every day.
This will show you how to pin or unpin items such as recent and frequent items, files, folders, and websites to your Jump Lists in the Start Menu and taskbar in Windows 7.
The same items appear in a program's Jump List on the Start menu and on the taskbar.
On a computer that is running Windows 7 or Windows Server 2008 R2, the Jump List of an application may disappear...
How to Enable or Disable Shut Down without Having to Log On
This will show you how to enable or disable all users to be able to shut down the computer without having to log on in Windows 7. This will add or remove the red shut down menu box in all Log on and Switch user screens.
You will need to be logged in as an administrator to be able to do this tutorial.
EXAMPLE: Log On Screen with Shut Down Enabled and Disabled
Using a REG File Download 1. To Enable Shut Down without Having to Log On
NOTE: This is the default setting. A) Click on the Download button below to download the file below. Enable_Shutdown_without_Logon.reg
http://www.sevenforums.com/attachment.php?attachmentid=93828&stc=1&d=1283021089
B) Go to step 3.
2...
How to Remove or Restore the "Shortcut" Name Extension in Windows 7 and Windows 8
This tutorial will show you how to remove or restore the "- Shortcut" extension from a shortcut file name when any new shortcut is created in Windows 7 and Windows 8.
This will only remove or restore the "shortcut" name extension for newly created shortcuts afterwards, not for previously existing shortcuts.
EXAMPLE: A New Folder with the New Folder Shortcut
NOTE: When you create a new shortcut or New Folder, by default, it will add the Shortcut extenstion to the file name. The last icon is an example of when you create a shortcut of New Folder with the Shortcut extension set to be removed.
To Add or Remove "Shortcut" Name Extension using a REG File...
PowerPoint – Embed MP3 files
The problem
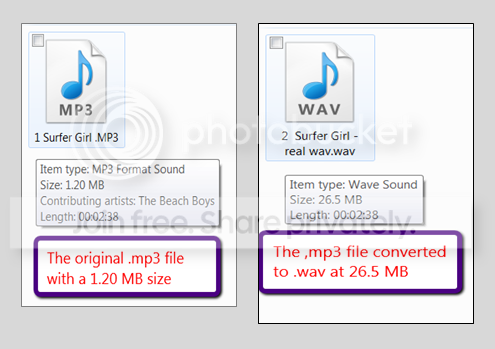
If you create a Power Point show and want to embed sound, you need to provide a .wav file for PP to accept it. Unfortunately .wav files are very large – as much as 10 times and more larger than e.g. .mp3 files. This will bloat your PP show significantly and makes it lengthy to upload and certainly impossible to attach to an Email.
Example
Compare the original .mp3 file on the left to the same file converted to .wav. The .wav file is nearly 25 times larger than the .mp3 file.
The Solution
The solution is a tweak that puts a .wav header in front of the .mp3 file to make PP believe that it is dealing with an actual .wav file. As you can see, the same file appears as .wav but retains...
How to Copy a Virtual XP Machine in Windows 7
Notice please:
This tutorial was written when we were still using first beta versions of Virtual PC and XP mode. This method to copy a VPC virtual machine was the most practical at that time. It still is a fully working and secure way to copy a virtual machine.
Today, with the current version of VPC and XP Mode, copying a virtual machine is much easier. Basically, all you have to do is to copy a vhd-file to another location on same computer and create a new virtual machine using an existing vhd as told here.
Kari
November 2010
This tutorial will show how to make a working copy of a Virtual XP Machine. Same priciple can also be used to make a copy of any Virtual PC virtual hard...
How to Set or Unset Bing Homepage Image in Bing Desktop as Desktop Background in Windows 7
Bing Desktop is available for computers that are running XP, Vista, Windows 7, and Windows 8, as well as Windows Server 2008 and 2012, and is available in English (US), English (UK), French, German, Chinese (Simplified), and Japanese.
Bing Desktop can be installed from the optional updates section in Windows Update, or directly Microsoft Bing desktop. Bing Desktop provides an automatic update of the Windows Desktop Background image to the Bing home page image each day.
For more information about Bing Desktop, see: Bing Desktop is available for Windows 7
This tutorial will show you how to turn on or off in Bing Desktop to make the Bing...
How to Slipstream Office 2010 with Service Pack 1 (SP1)
By default the Office 2010 RTM installation DVD can be installed on both the 32-bit (x86) and 64-bit (x64) Windows.
This will show you how to slipstream Office 2010 and both the 32-bit (x86) and 64-bit (x64) Service Pack 1 (SP1) to be able to create a Office 2010 with SP1 installation DVD or USB that will also install on either a 32-bit or 64-bit Windows.
You will need to be logged in as an administrator to be able to do this tutorial.
Here's What You Need
Office 2010 RTM installation DVD or EXE file
Office 2010 Service Pack 1 32-Bit (x86) (361MB)
Office 2010 Service Pack 1 64-Bit (x64) (439MB)
If you have a Office 2010 RTM Installation DVD
NOTE: You would want to use...