Slipstream Windows 7 SP1 into a Installation DVD or ISO File

How to Slipstream Windows 7 SP1 and Updates to Create a Bootable USB, Installation DVD, or ISO File

   Information
This will show you how to slipstream Windows 7 SP1 with your retail or student copy of Windows 7 without SP1 to create a slipstream Windows 7 SP1 installation "DVD", a slipstream Windows 7 SP1 bootable "ISO file", or a slipstream Windows 7 SP1 bootable installation "USB flash drive".

This will also show you how to integrate Windows Updates into your new or previously created slipstream Windows 7 SP1 to create a new updated slipstream Windows 7 SP1 installation "DVD", a slipstream Windows 7 SP1 bootable "ISO file", or a slipstream Windows 7 SP1 bootable installation "USB flash drive".

   Warning

  • You can only do this tutorial while logged in as an administrator.
  • You can only use a retail copy or student copy of a Windows 7 installation DVD, bootable USB flash drive, or ISO file to create a slipstream Windows 7 SP1 with.
  • You can only use a previously created slipstream Windows 7 SP1 installation DVD, bootable USB flash drive, or ISO file using this tutorial to integrate new Windows Updates to create a new updated slipstream Windows 7 SP1 installation DVD, bootable USB flash drive, or ISO file with.
  • You can only create a 64-bit slipstreamed Windows 7 SP1 DVD or ISO if your current Windows 7 installation is also 64-bit.
  • You can create a 32-bit slipstreamed Windows 7 SP1 DVD or ISO if your current Windows 7 installation is 32-bit or 64-bit.
  • When you install Windows 7 SP1 using the slipstreamed Windows 7 SP1 DVD/ISO/USB created in this tutorial, you will not be able to uninstall SP1.
   Tip

  • You cannot use a slipstream Windows 7 installation disc to do a repair install with on a currently installed Windows 7 SP1.
  • You cannot use a slipstream Windows 7 installation disc to do a repair install with on a currently installed slipstream Windows 7 SP1.
  • You can use a Windows 7 with SP1 installation disc (ex: Technet, MSDN, or retail) to do a repair install with on a current slipstream Windows 7 SP1 installation.
   Note
This tutorial is designed to be followed like a flow chart to help make it easier to use and select the options (ex: DVD or ISO) you want.


Here's How: 1. If you have not already, then you will need download and install the free 32-bit (x86) or 64-bit (x64) RT Seven Lite "Beta 2.6.0" for your same 32-bit or 64-bit Windows 7 installation DVD or ISO file.
   Note
Alternative RT Seven Lite Beta download link: RT Seven Lite Download - Softpedia

Softpedia.jpg

   Warning
At the rt7lite.com site, you will need to scroll down a bit past the RC 1.7.0 build to see the Beta 2.6.0 build download links.

This tutorial will not work using the RC 1.7.0 build.

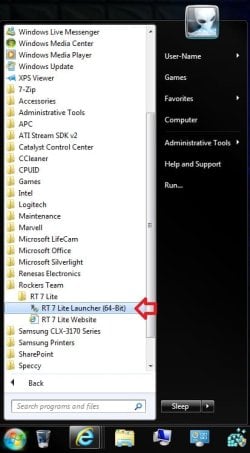
2. Click on the RT Seven Lite shortcut on your desktop or in the Start Menu to run the program. (see screenshot below) Step1.jpg
3. Do either step 4 or 5 for what you have to use to integrate the Windows 7 SP1 and/or Windows Updates into.

4. To Select and Use a Windows 7 Installation DVD or Bootable USB A) Insert your retail or previously slipstreamed Windows 7 installation DVD into the DVD drive and close it, OR plug in your Windows 7 bootable USB flash drive. If a AutoPlay pop-up opens, close it.

B) In RT Seven Lite, click on the Browse button, and select the Select OS path option. (see screenshot below)
NOTE: If you do not have much else running, then you may wish to change the Set priority setting to High first to help speed the slipstreaming process up some. DVD-1.jpg
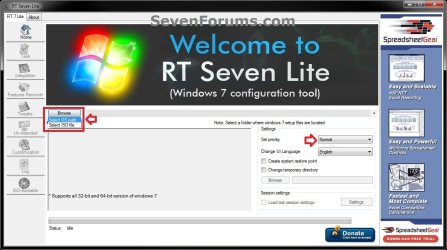
C) Navigate to and select your DVD drive or bootable USB flash drive with Windows 7 on it from steps 4A, and click on OK. (see screeshow below) DVD-2.jpg
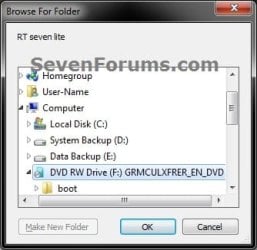
D) Click on OK. (see screenshot below) DVD-3.jpg

E) Select your Desktop, and click on the Make New Folder button. (see screenshot below) DVD-4.jpg
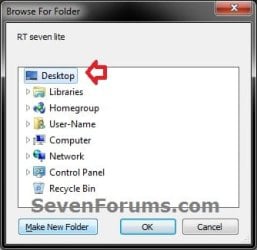
F) Select the New folder on the desktop, and click on OK. (see screenshot below) DVD-5.jpg
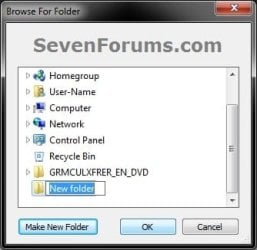
G) The contents of the Windows 7 installation DVD from steps 4A and 4C will now be copied into the New folder (step 4F) on the desktop. (see screenshot below)
NOTE: This may take a few minutes to complete. DVD-6.jpg
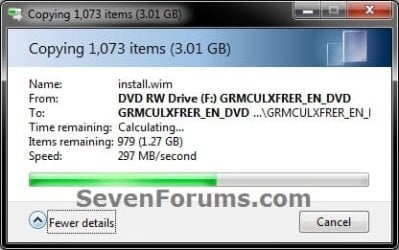
H) Go to step 6.
5. To Select and Use a Windows 7 ISO File

   Note
You could use a Windows 7 ISO file that you already created from say RT Seven Lite, or a Windows 7 w/SP1 U ISO downloaded from: Microsoft: Windows 7 Direct Download Links

A) In RT Seven Lite, click on the Browse button, and select the Select ISO file option. (see screenshot below)
NOTE: If you do not have much else running, then you may wish to change the Set priority setting to High first to help speed the slipstreaming process up some. ISO-1.jpg
B) Click on the Select a ISO button. (see screenshot below) ISO-2.jpg
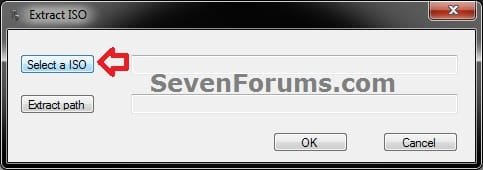
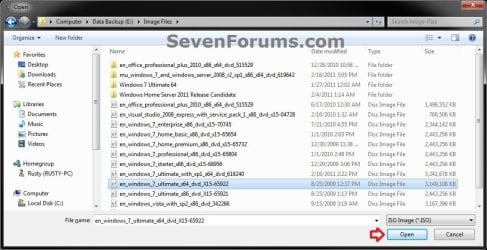
C) Navigate to and select the Windows 7 ISO file, and click on Open. (see screenshot below) ISO-3.jpg
D) Select the Extract path button. (see screenshot below) ISO-4.jpg
E) Select your Desktop, and click on the Make New Folder button. (see screenshot below) ISO-5.jpg
F) Select the New folder on the desktop, and click on OK. (see screenshot below) ISO-6.jpg
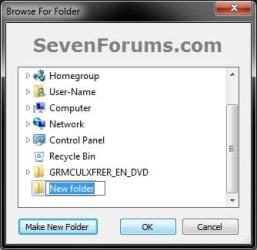
G) Click on OK. (see screenshot below) ISO-7.jpg
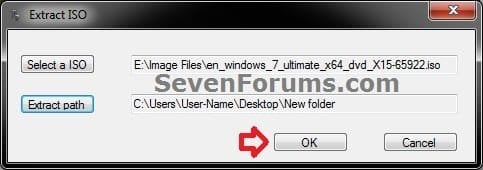
H) The contents of the Windows 7 ISO file from step 5C will now be extracted and copied into the New folder (step 5F) on the desktop. (see screenshot below)
NOTE: This may take only a few minutes to complete. ISO-8.jpg
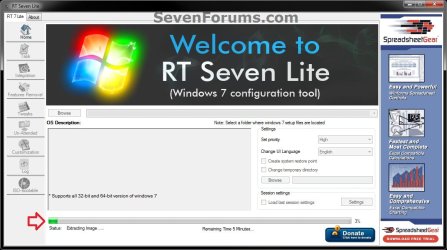
I) Continue on to step 6.
6. Do either step 7 or 8 below for what you want to do.

7. To Only Integrate New Windows Updates
NOTE: You would only select this option if used a previously created slipstream Windows 7 SP1 installation DVD, bootable USB flash drive, or ISO file using this tutorial in step 4 or 5 above, and only want to update it by integrating new Windows Updates. A) When finished, select (dot) the Windows 7 edition that you want to create a updated SP1 slipstream version of, and click on OK. (see screenshot below)
NOTE: When this window below opens it likes to hide behind another opened active window, so you may need to check behind them when the screenshot above (step 5H) shows it's "Status" as Loading Image.... and does not appear to be doing anything. Step2.jpg
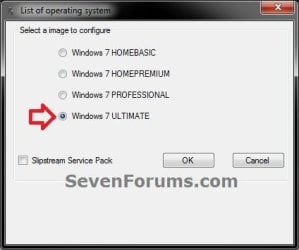
B) Go to step 9.
8. To Slipstream SP1 and to be able to Integrate Windows Updates
NOTE: You would select this option if you used a retail copy or student copy of a Windows 7 installation DVD, bootable USB flash drive, or ISO file that did not have SP1 slipstreamed in it in step 4 or 5 above. A) If you have not already, then you will need to download the same 32-bit (x86) or 64-bit (x64) Windows 7 SP1 EXE installation file for your same 32-bit or 64-bit Windows 7 installation DVD or ISO file at the Microsoft link below, and save it to your Desktop. Download details: Windows 7 and Windows Server 2008 R2 Service Pack 1 (KB976932)
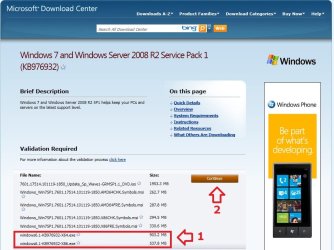
Download.jpg
B) Right click on the downloaded windows6.1-KB976932-X64.exe or windows6.1-KB976932-X86.exe file, click on Properties, click on the General tab, and click on Unblock.
NOTE: If you do not have a Unblock button under the General tab, then the SP1 exe file is already unblocked and you can continue on to step 8C.

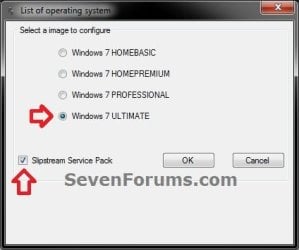
C) When RT Seven Lite is finished from step 4G or 5H, select (dot) only the one Windows 7 edition that you want to create a slipstream SP1 version of, check the Slipstream Service Pack box, and click on OK. (see screenshot below) Step3.jpg
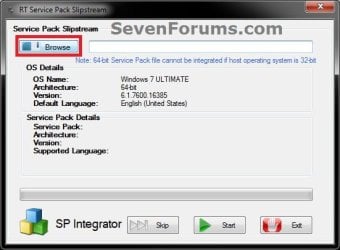
D) Click on the Browse button. (see screenshot below) Step4.jpg
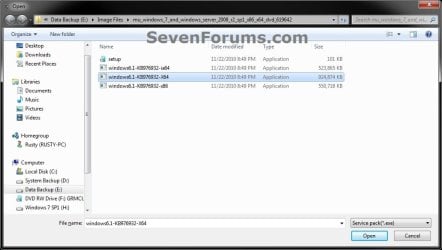
E) Navigate to and select the Windows 7 SP1 EXE installation file on your desktop from step 1, and click on Open. (see screenshot below) Step5.jpg
F) Click on the Start button. (see screenshot below) Step6.jpg
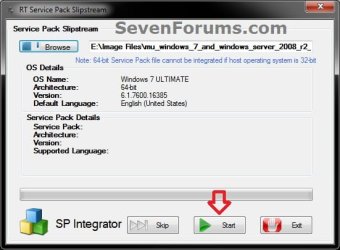
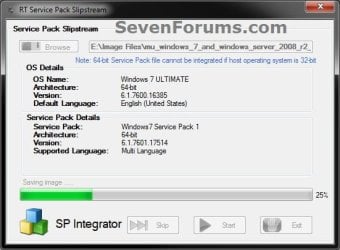
G) RT Seven Lite will now start preparing, integrating, and saving the SP1 (step 9) with the DVD (step 4) or ISO file (step 5). (see screenshots below)
NOTE: This will take a good while to complete depending on how fast your system is and what you have the priority level set as in step 4B. Step7.jpg

Step8.jpg

H) When finished, click on the Proceed button. (see screenshot below) Step10.jpg
I) RT Seven Lite will now start start loading the image. (see screenshot below)
NOTE: This will take a few minutes to complete. Step11.jpg
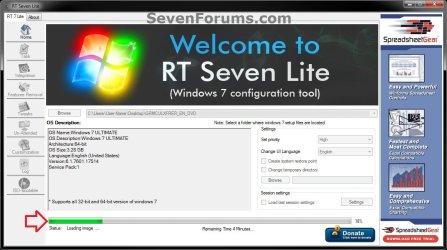
J) Continue on to step 9.
9. When finished, click on the Task tab in the left pane. (see screenshot below) Step12.jpg
10. Do either step 11 or 12 below for what you want to do.

11. To Only Slipstream SP1
NOTE: You would do this step if you did step 8 above and do not want to integrate any Windows Updates into the Slipstream Windows 7 SP1 installation DVD, bootable USB flash drive, or ISO file. A) In the Task tab, check the ISO Bootable box option, then click on the ISO-Bootable tab in the left pane. (see screenshot below)
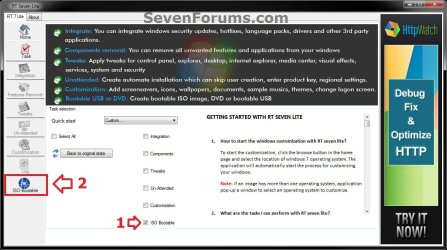
Step13.jpg
B) Go to step 12F.
12. To Integrate Windows Updates and still be able to Slipstream SP1 (if not already)
NOTE: You would do this step if you did step 7 above and want to integrate Windows Updates into this new or previously created Slipstream Windows 7 SP1 installation DVD, bootable USB flash drive, or ISO file. A) If you have not already, then you will need to download the standalone MSU installation files for each Windows Update that you want to integrate into the slipstream, and save them to your Desktop.

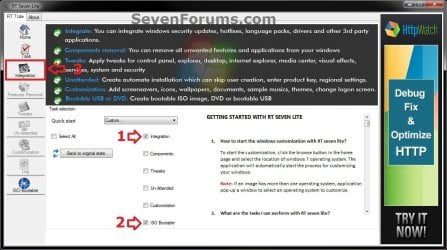
B) In the Task tab in RT Seven Lite, check the Integration box and ISO Bootable box options, then click on the Integration tab in the left pane. (see screenshot below) Update-1.jpg
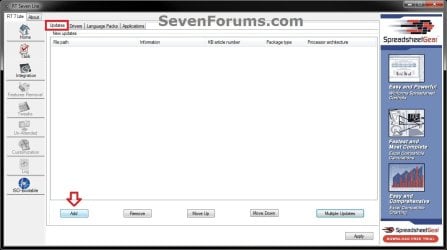
C) Under the Updates tab, click on the Add button. (see screenshot below) Update-2.jpg
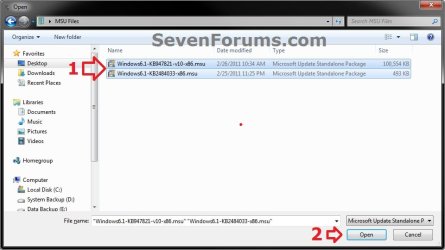
D) Navigate to and select all of the Windows Update MSU files that you want to integrate, and click on Open. (see screenshot below)
NOTE: You can press and hold the CTRL key to select more than one random MSU file. Update-3.jpg
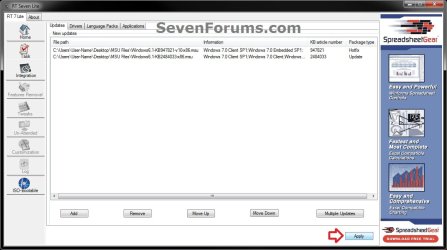
E) When finished adding MSU files, click on Apply. (see screenshot below) Update-4.jpg
F) Do either step 12G or 12H for what type of Slipstream Windows 7 SP1 you want.

G) To Create a Single Windows 7 SP1 Edition Slipstream

NOTE: This will create a Slipstream Windows 7 SP1 with only the one Windows 7 edition that you selected in step 7A or 8C.
  • Select High priority level, select (dot) Build current image only, and click on Commit. (see screenshot below)
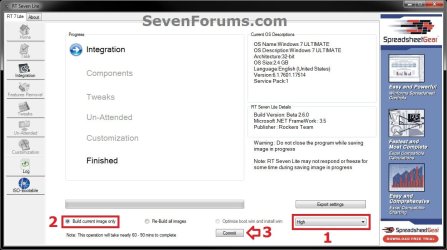
Update-5-single.jpg

  • Go to step 12I
H) To Create a All-in-One Windows 7 SP1 Edition Slipstream
NOTE: This will create a Slipstream Windows 7 SP1 with all Windows 7 editions that will allow you to select which one to install during installation. (see screenshot below) All-in-one.jpg
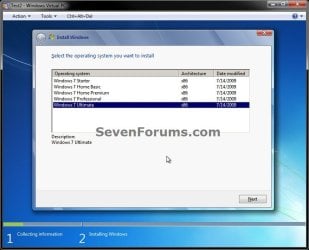
  • Select High priority level, select (dot) Re-build all images, and click on Commit. (see screenshot below)
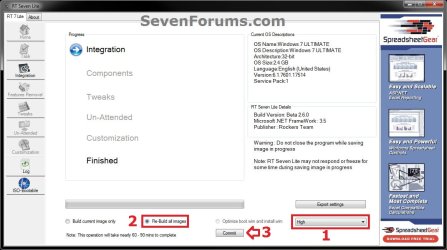
Update-5-all-in-one.jpg

  • Continue on to step 12I
I) RT Seven Lite will now start integrating the Windows Updates. (see screenshot below)
NOTE: This may take from a few minutes or longer depending on how many Windows Update MSU files you added. Update-6.jpg
J) When finished, click on the ISO-Bootable tab in the left pane. (see screenshot below) Update-7.jpg
K) Continue on to step 13.
13. Do either step 14, 15, or 16 for what you would like to have your Slipstreamed Windows 7 SP1 as.

14. To Burn a Slipstream Windows 7 SP1 Installation DVD A) Insert a blank DVD (ex: DVD-R) into the DVD drive and close it. If a AutoPlay pop-up opens, close it.

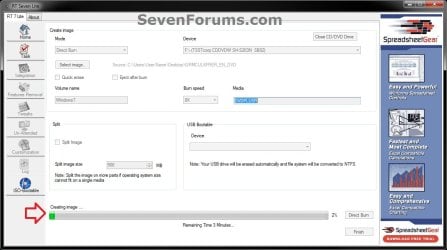
B) In RT Seven Lite, select the Direct Burn drop down menu option under Mode, select the drive letter used from step 14A under Device, then click on the Direct Burn button towards the bottom right. (see screenshot below) Step14-DVD.jpg
C) RT Seven Lite will now start creating the image. (see screenshot below)
NOTE: This will take a few minutes to complete. Step15-DVD.jpg
D) When finished, click on OK. If a AutoPlay pop-up opens, close it. (see screenshots below) Step16-DVD.jpg
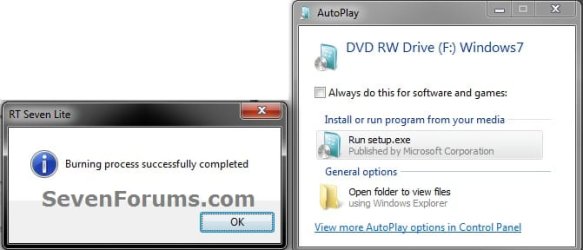
E) You now have a slipstream Windows 7 SP1 installation DVD.

F) Go to step 17.
15. To Create a Slipstream Windows 7 SP1 ISO File A) In RT Seven Lite, select the Create Image drop down menu option under Mode, then click on the Make ISO button towards the bottom right. (see screenshot below) Step14-ISO.jpg
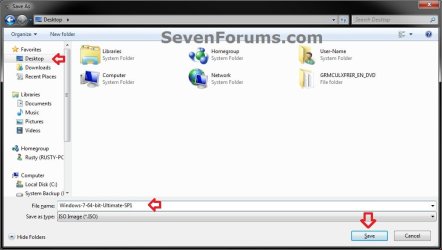
B) Navigate to and select your Desktop, type in a name that you want for the ISO file, then click on the Save button. (see screenshot below) Step15-ISO.jpg
C) When finished, click on OK. (see screenshot below) Step16-ISO.jpg

D) You now have a slipstream Windows 7 SP1 bootable ISO file.
   Note

  • You could also use this ISO file to burn and create a Slipstream Windows 7 SP1 installation DVD with.
  • You could also use this ISO file to create a Slipstream Windows 7 SP1 bootable installation USB flash drive with. For how, see part 2 here: Windows 7 USB/DVD Download Tool
  • You could also test or use this ISO file in a virtual machine if you like.

E) Go to step 17.
16. To Create a Slipstream Windows 7 SP1 Bootable Installation USB Flash Drive A) If you have not already, plug in your USB flash drive.
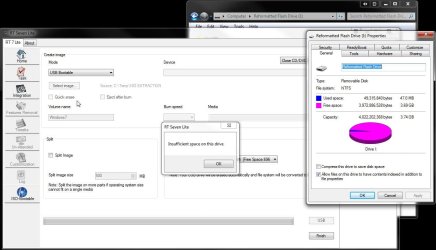
NOTE: You will need to have at least 4.5 GB free on the USB flash drive.

B) In RT Seven Lite, select the USB Bootable drop down menu option under Mode. (see screenshot below) USB-1.jpg
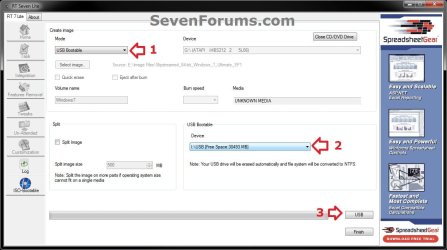
C) Select your USB flash drive from the drop down menu under USB Bootable. (see screenshot above)
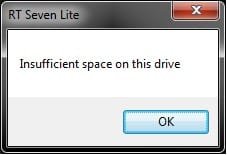
NOTE: If there is not enough free space on the selected USB flash drive, you will get a notice telling you so. You will then need to select a larger USB flash drive. (see screenshot below) USB-Error.jpg
D) Click on the USB button towards the bottom right. (see screenshot below step 16B)

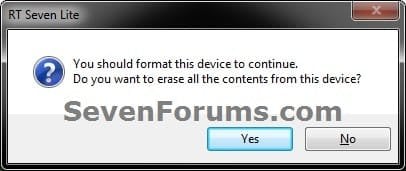
E) Click on OK to format the USB flash drive. (see screenshot below) USB-2.jpg
F) RT Seven Lite will now start formating the USB flash drive and copying the files to it. (see screenshot below)
NOTE: This will take a few minutes to complete. USB-3.jpg
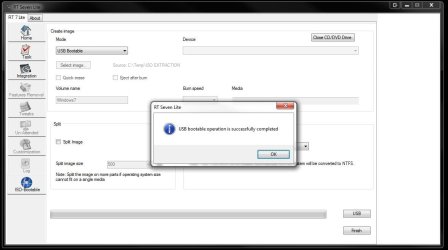
G) When it's finished, click on OK. (see screenshot below) USB-4.jpg
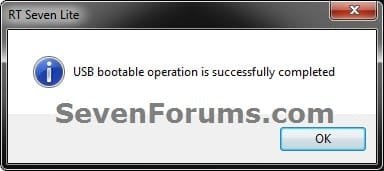
H) You now have a slipstream Windows 7 SP1 bootable installation USB flash drive.

I) Continue on to step 17.
17. Close RT Seven Lite.

18. Click on Yes to confirm closing RT Seven Lite. (see screenshot below) Step17.jpg
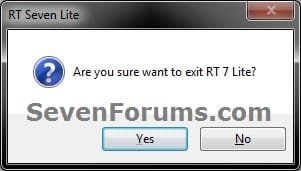
19. RT Seven Lite will now clean up it's temp files before closing. (see screenshot below)
:warn:WARNING: Do not stop or interrupt RT Seven Lite from cleaning it's temp files to avoid getting this error here the next time you try and run RT Seven Lite. Step18.jpg

20. You can now delete the New folder from step 4E or 5E and it's contents on the desktop if you like.
   Tip
You can keep your newly created slipstream Windows 7 SP1 installation DVD, bootable USB flash drive, or ISO file updated by doing this tutorial again with steps 7 and 12 to integrate any new Windows Updates released afterwards into it.

When you install Windows 7 SP1 using the slipstream Windows 7 SP1 DVD/ISO/USB created in this tutorial, you will be able to use the Windows 7 SP1 Disk Cleanup Tool (OPTION THREE at link) to delete the SP1 backup files.


That's it,
Shawn


Attachments

  • Step9.jpg
    Step9.jpg
    33.4 KB · Views: 252
  • Disk_Cleanup-1.jpg
    Disk_Cleanup-1.jpg
    35.9 KB · Views: 262
  • Disk_Cleanup-2.jpg
    Disk_Cleanup-2.jpg
    31.9 KB · Views: 276
Last edited:
Hiya David,

If you mean the old reverse integration method - it works fine, of course.

I mentioned earlier in the thread it might be quicker.

Shawn is probably right - most would prefer something with a simple GUI and that doesn't require downloading WAIK.

I'm not entirely sure what you mean about not using 3rd party tools.

Disk Management is a Veritas product, for example.

If you mean products that don't already come packaged with windows - then it sems to me they are very useful.

They often provide functions not already available (e.g. partition managers ), and/or provide an easier method - often GUI based.

Has anyone used the WAIK to integrate SP1 into Windows 7 yet? I prefer that method, because there's no third party software involved/required. I could write up a tut if needed, Shawn?

RT7lite is not quite as finished or polished as vlite it seems.

Nevertheless - according to the posts on this thread , it appears to do the job.
 

My Computers My Computers

  • At a glance

    7 X64i5 84002x8gb 3200mhz
    Computer type
    PC/Desktop
    OS
    7 X64
    CPU
    i5 8400
    Motherboard
    gigabyte b365m ds3h
    Memory
    2x8gb 3200mhz
    Hard Drives
    various
    PSU
    pure power 11 400w cm
    Case
    Coolermaster
    Cooling
    cryorig m9i
  • At a glance

    7x64g54008gb ddr4 2400
    Computer type
    PC/Desktop
    OS
    7x64
    CPU
    g5400
    Motherboard
    ga b365m ds3h
    Memory
    8gb ddr4 2400
    PSU
    xfx pro 450w
Hello David,

If you would like to write up a nice detailed tutorial for it, then that would be fine if it's easy to follow for even a noobie. :)

It's just that this 3rd party program makes it much easier to do this with many options that are also easier to do. That's all.
Well, if your target audience is noobs, then this method is definately the way to go. The WAIK is for advanced users. However, the finished product is simply amazing. :D
 

My Computer My Computer

At a glance

Windows 7 Ultimate SP1 x64 RTMAMD Athlon 64x2 3800+ Dual CoreOCZ Platinum Dual Channel 4x1GBPNY NVIDIA GeForce 9800 GT 1024MB DDR3 256 Bit
Computer Manufacturer/Model Number
NVIDIA
OS
Windows 7 Ultimate SP1 x64 RTM
CPU
AMD Athlon 64x2 3800+ Dual Core
Motherboard
NVIDIA GeForce 6100-M9
Memory
OCZ Platinum Dual Channel 4x1GB
Graphics Card(s)
PNY NVIDIA GeForce 9800 GT 1024MB DDR3 256 Bit
Sound Card
Creative Sound Blaster Audigy 24Bit
Monitor(s) Displays
Compaq 7500
Screen Resolution
1024x768
Hard Drives
C: 250GB Seagate Barracuda 7200.12 SATA-300
D: 500GB Seagate Barracuda 7200.12 SATA-300
PSU
OCZ 650Watt Dual 12-Volt Rails
Case
Thermaltake
Cooling
Fans, fans, and more fans
Keyboard
Logitech
Mouse
Logitech PS2
Internet Speed
300MBps
Other Info
LG CD-RW [IDE]
Pioneer DVD-RW [SATA-II]
Hello David,

If you would like to write up a nice detailed tutorial for it, then that would be fine if it's easy to follow for even a noobie. :)

It's just that this 3rd party program makes it much easier to do this with many options that are also easier to do. That's all.
Well, if your target audience is noobs, then this method is definately the way to go. The WAIK is for advanced users. However, the finished product is simply amazing. :D

Some of us that aren't 'casual users' would like to have access to an easily understood guide to using WAIK to accomplish this, that could be shown to members here to Seven Forums capable of the task.
 

My Computer My Computer

At a glance

W 7 64-bit UltimateIntel Q9550 Yorkfield8GB Dominator 8500C5DATI : XFX 5870
Computer Manufacturer/Model Number
* BFK Customs *
OS
W 7 64-bit Ultimate
CPU
Intel Q9550 Yorkfield
Motherboard
ASUS P5Q Pro
Memory
8GB Dominator 8500C5D
Graphics Card(s)
ATI : XFX 5870
Sound Card
Realtek HD Audio 7-1
Monitor(s) Displays
1x 47" LCD HDMI & 3x 26" LCD HDMI
Screen Resolution
1920x1080P & 1920x1200
Hard Drives
1x 80GB Intel X25-M G2 SSD : 1x 500GB & 1x 640GB WD Caviar Black(s)
PSU
Corsair 620HX
Case
Cooler Master RC-690
Cooling
Tuniq Tower 120, 2x 140mm and 3x 120mm case fans
Keyboard
Microsoft 500
Mouse
Razer Diamondback 3G
Internet Speed
14 Mb/s
Other Info
1x Koutech 3Gb/s SATA HDD Hot Swap Rack
Well, if your target audience is noobs, then this method is definately the way to go. The WAIK is for advanced users. However, the finished product is simply amazing. :D

Not all of the target audience are noobs - don't forget the advanced users who are just lazy :D
 

My Computer My Computer

At a glance

8 Pro x64i7 3770K 4.6GHz16GB G.Skill Trident X 2666mhzx2 EVGA 780 Ti Superclocked SLI
Computer type
PC/Desktop
Computer Manufacturer/Model Number
Systems by SmartEyeball
OS
8 Pro x64
CPU
i7 3770K 4.6GHz
Motherboard
ASUS P8Z77 WS
Memory
16GB G.Skill Trident X 2666mhz
Graphics Card(s)
x2 EVGA 780 Ti Superclocked SLI
Sound Card
SB X-FI Surround 5.1 PRO USB / ATH-AD900 Headphones
Monitor(s) Displays
x3 Dell U2410 / 58" Samsung
Screen Resolution
5760*1200/ 1920*1200
Hard Drives
2x Intel 520 240GB (RAID 0) * 2x WD Caviar Blacks 2TB (RAID 0) * 2TB WD Caviar Black * Sony Optirac DVD
PSU
Silverstone Strider Evolution 1200W
Case
Thermaltake Level 10 GT Snow Edition
Cooling
Noctua NH-D14
Keyboard
Topre Realforce // Ducky Shine MX Black // Filco Ninja TKL
Mouse
Thermaltake Theron (Highly Recommended) + Razer Imperator
Antivirus
MSE
Browser
IE, FF, WaterFox
Other Info
GT Extreme V2 Sim Racing Cockpit + 40" LCD and K/B Mouse stand ▼
Fanatec CSR Elite Wheel + Clubsport V1 Pedals + CSR shifter/7G-H ▼Saitek X52 Pro ▼ TrackIR 5 Pro
Buttkicker v2 Seat Rumbler with Dedicated 5.1 and Sub Woofer attached to frame ▼
=
Bloody Big Grin
Hello David,

If you would like to write up a nice detailed tutorial for it, then that would be fine if it's easy to follow for even a noobie. :)

It's just that this 3rd party program makes it much easier to do this with many options that are also easier to do. That's all.
Well, if your target audience is noobs, then this method is definately the way to go. The WAIK is for advanced users. However, the finished product is simply amazing. :D

Oh, no. Out target is everyone. It just makes it easier to follow and use when made easy. That's all.

I look forward to seeing the tutorial if you would like to create it. :)


Well, if your target audience is noobs, then this method is definately the way to go. The WAIK is for advanced users. However, the finished product is simply amazing. :D

Not all of the target audience are noobs - don't forget the advanced users who are just lazy :D

LOL, guilty as charged. :o
 

My Computer My Computer

At a glance

64-bit Windows 11 Pro for WorkstationsIntel i7-8700K OC'd to 5 GHz64 GB (4x16GB) G.SKILL TridentZ RGB DDR4 3600...ASUS ROG-STRIX-GTX1080TI-O11G-GAMING
Computer type
PC/Desktop
Computer Manufacturer/Model Number
Self built custom
OS
64-bit Windows 11 Pro for Workstations
CPU
Intel i7-8700K OC'd to 5 GHz
Motherboard
ASUS ROG Maximus XI Formula Z390
Memory
64 GB (4x16GB) G.SKILL TridentZ RGB DDR4 3600 MHz
Graphics Card(s)
ASUS ROG-STRIX-GTX1080TI-O11G-GAMING
Sound Card
Integrated
Monitor(s) Displays
2 x Samsung Odyssey G7 27"
Screen Resolution
2560x1440
Hard Drives
1TB Samsung 990 PRO M.2,
4TB Samsung 990 PRO PRO M.2,
TerraMaster F8 SSD Plus NAS
PSU
Seasonic Prime Titanium 850W
Case
Thermaltake Core P3
Cooling
Corsair Hydro H115i
Keyboard
Logitech wireless K800
Mouse
Logitech MX Master 4
Internet Speed
2 Gb/s Download and 100 Mb/s Upload
Antivirus
Malwarebyte Anti-Malware Premium
Browser
Google Chrome
Other Info
Logitech Z625 speaker system,
Logitech BRIO 4K Pro webcam,
HP Color LaserJet Pro MFP M477fdn,
APC SMART-UPS RT 1000 XL - SURT1000XLI,
Galaxy S23 Plus phone
Hello Steven,

Answers inline. :)


One thing to note about using the flash drive option is you need a good 4gb flash drive free of any files before selecting that option. The RT Seven Lite lacks the option to reformat flash drives.
The USB flash drive will need to have enough total space available (empty or full) for the image to be burned/extracted to it. RT Seven Lite will format (step 16E) the drive before doing so though.
Apparently it's not going to allow the new iso to be written with two errors seen. The first is any partition is seen as using up the entire drive space with the insufficient drive space message. Once cleaned with DiskPart and "raw" it won't see the flash drive present.
Yep, The USB drive cannot be RAW, or it will not be seen just like any HDD and Windows 7. If it's RAW you must format it first to create a partition/volume on it before it is recognized.
The other options for selecting the iso itself were greyed suggesting the write to flash drive may have to be from the start. :(
Yep, if you want to change a option like that, you will have to close and reopen RT Seven Lite to start over.
Hope this helps,
Shawn

It's definite on the restart all over. I have another test going for the 7 Home Premium x64 that will go direct to flash drive from the start this time around. Once you cancel the SP integration to then use the usb flash drive option everything is greyed and unavailble being how this one was intended to work.

An unpartitioned drive? No good from the start. A flash drive already assigned a logical drive letter required. The wipe of the flash drive is part of the automatic process since there are no separate manual options for that.

Now for those asking why you can't find any SP1 files when looking after the intergrated iso image, dvd, or flash drive is prepared is that you are still looking at the SP as one large file.

It's actually a form of large archive with several small files some temporary only designed to make the needed changes in the system registry and simply disappear while other files are simply spead out into the various folders/sub folders.

To find even some of them you would need to open up each folder or sub one at a time on the original 7 dvd for example and another window for viewing the new image in order to go over each of them entirely and then maybe spot a few of them.

As for the Windows Automated Installation Kit(WAIK) it would be good to well written guide for that. Most would of course particularly the novice user prefer the gui method not having come up through the old dos/Legacy days.

Here I've been looking to spend a little more time with that so write up a good one! :D

A slight update on the next try. I was able to grab a screen that shows how the lack of space error and check box for erasing the flash drive were still greyed when starting everything fresh from the start for the 64bit HP integration. I have to suspect this may be due to an installation problem since you are seeing results. :(

Hopefully once a newer version is available that will correct all this since this is a beta anyways.
 

Attachments

  • USB Install SP1 Key Options Greyed Out.jpg
    USB Install SP1 Key Options Greyed Out.jpg
    90.5 KB · Views: 654
Last edited:

My Computers My Computers

  • At a glance

    W7 Ultimate x64/W10 Pro x64/W11 Pro Triple Bo...AMD Phenom II X4 975 Deneb 3.6ghz - 965 2nd r...Kingston Hyper X DDR3 1600 1.5v 16gb - Hyper ...MSI HD Radeon 5750 1gb - MSI HD Radeon 6450 o...
    Computer type
    PC/Desktop
    Computer Manufacturer/Model Number
    Custom builds = 2
    OS
    W7 Ultimate x64/W10 Pro x64/W11 Pro Triple Boot - Main PC W7 Remote PC Micro ATX W7 Pro x64/W11 Pro
    CPU
    AMD Phenom II X4 975 Deneb 3.6ghz - 965 2nd remote pc
    Motherboard
    Gigabyte GA-790XTA-UD4-Gigabyte GA-880GM-D2H remote pc
    Memory
    Kingston Hyper X DDR3 1600 1.5v 16gb - Hyper X Fury 8gb 2nd
    Graphics Card(s)
    MSI HD Radeon 5750 1gb - MSI HD Radeon 6450 on mini tower
    Sound Card
    Creative Labs X-Fi Xtreme Audio P - Realtek onooard 2nd case
    Monitor(s) Displays
    ASUS VW199T-P 19" HP 2082a Main-HP 2082a 20" remote pc
    Screen Resolution
    Asus 1440x900 - HP 1600x900
    Hard Drives
    WD Black 1TB HD per OS W7, W10, and pending W11 presently on 500gb OS Drive - Pending Triple 1TB HDs for Spanned Storage/backup volume
    Single 2TB external USB enclosure, single 1TB System 7 Host/Boot drive, Pending 8TB external HD for system image b
    PSU
    Corsair 750TX - primary / Corsair CX600 - second
    Case
    Antec 900-2 - SSD compatible / NZXT Vulcan mini tower
    Cooling
    Zalman CNPS9900A
    Keyboard
    AZIO L70 Backlit Letters Gaming - ONN Cordless/USB
    Mouse
    MSI DS200 Programmable, Logitech Cordless
    Internet Speed
    30mbps upgrade - primary hard wired - mini tower usb WiFi
    Antivirus
    GFI VIPRE Internet Security 2014 on W7 2016 beta on W10,
    Browser
    Cyberfox, WaterFox 64bit FF variants, FireFox x64, Pale Moon
    Other Info
    Accomdata fan cooled usb 2.0 PIDE/Sata II, III external enclosure.
    Sambient usb/eSata PATA/Sata II, III external enclosure.
  • At a glance

    W7 Pro x64/W11 ProAMD Deneb 3.6ghz - 965Kingston Hyper X Fury 8gbMSI HD Radeon 6450 DVI Output
    Computer type
    PC/Desktop
    System Manufacturer/Model Number
    CUSTOM ASSEMBLY
    OS
    W7 Pro x64/W11 Pro
    CPU
    AMD Deneb 3.6ghz - 965
    Motherboard
    Gigabyte GA-880GM-D2H remote pc
    Memory
    Kingston Hyper X Fury 8gb
    Graphics Card(s)
    MSI HD Radeon 6450 DVI Output
    Sound Card
    Realtek onooard Creative or Other separate PENDING
    Monitor(s) Displays
    VIZIO 32" LCD TV Separate LCD Pending
    Screen Resolution
    1600x1080
    Hard Drives
    WD 500GB OS Host/Boot WD Green 1TB Storage/Backup
    PSU
    Corsair 600W - THERMALTAKE 600W spare case
    Case
    NZXT Vulcan mini tower
    Cooling
    Twin 120mm Top Fans - 240mm Side Cover
    Keyboard
    ONN Cordless/USB Logitech Cordless
    Mouse
    ONN USB/Cordless - Logitech Cordless
    Internet Speed
    DSL 5G
    Browser
    MS Edge, FireFox, WaterFox x64, FireFox Nightly
    Other Info
    OS Testing-Remote Access to Main TeamViewer
Steven,

I found that you really need at least around 4.5 GB free on the USB to not get the error.
 

My Computer My Computer

At a glance

64-bit Windows 11 Pro for WorkstationsIntel i7-8700K OC'd to 5 GHz64 GB (4x16GB) G.SKILL TridentZ RGB DDR4 3600...ASUS ROG-STRIX-GTX1080TI-O11G-GAMING
Computer type
PC/Desktop
Computer Manufacturer/Model Number
Self built custom
OS
64-bit Windows 11 Pro for Workstations
CPU
Intel i7-8700K OC'd to 5 GHz
Motherboard
ASUS ROG Maximus XI Formula Z390
Memory
64 GB (4x16GB) G.SKILL TridentZ RGB DDR4 3600 MHz
Graphics Card(s)
ASUS ROG-STRIX-GTX1080TI-O11G-GAMING
Sound Card
Integrated
Monitor(s) Displays
2 x Samsung Odyssey G7 27"
Screen Resolution
2560x1440
Hard Drives
1TB Samsung 990 PRO M.2,
4TB Samsung 990 PRO PRO M.2,
TerraMaster F8 SSD Plus NAS
PSU
Seasonic Prime Titanium 850W
Case
Thermaltake Core P3
Cooling
Corsair Hydro H115i
Keyboard
Logitech wireless K800
Mouse
Logitech MX Master 4
Internet Speed
2 Gb/s Download and 100 Mb/s Upload
Antivirus
Malwarebyte Anti-Malware Premium
Browser
Google Chrome
Other Info
Logitech Z625 speaker system,
Logitech BRIO 4K Pro webcam,
HP Color LaserJet Pro MFP M477fdn,
APC SMART-UPS RT 1000 XL - SURT1000XLI,
Galaxy S23 Plus phone
LOL, guilty as charged. :o

heh heh, Ditto. That's why this tutorial worked well for me :)


A belated thanks btw for this tut Shawn :p
 

My Computer My Computer

At a glance

8 Pro x64i7 3770K 4.6GHz16GB G.Skill Trident X 2666mhzx2 EVGA 780 Ti Superclocked SLI
Computer type
PC/Desktop
Computer Manufacturer/Model Number
Systems by SmartEyeball
OS
8 Pro x64
CPU
i7 3770K 4.6GHz
Motherboard
ASUS P8Z77 WS
Memory
16GB G.Skill Trident X 2666mhz
Graphics Card(s)
x2 EVGA 780 Ti Superclocked SLI
Sound Card
SB X-FI Surround 5.1 PRO USB / ATH-AD900 Headphones
Monitor(s) Displays
x3 Dell U2410 / 58" Samsung
Screen Resolution
5760*1200/ 1920*1200
Hard Drives
2x Intel 520 240GB (RAID 0) * 2x WD Caviar Blacks 2TB (RAID 0) * 2TB WD Caviar Black * Sony Optirac DVD
PSU
Silverstone Strider Evolution 1200W
Case
Thermaltake Level 10 GT Snow Edition
Cooling
Noctua NH-D14
Keyboard
Topre Realforce // Ducky Shine MX Black // Filco Ninja TKL
Mouse
Thermaltake Theron (Highly Recommended) + Razer Imperator
Antivirus
MSE
Browser
IE, FF, WaterFox
Other Info
GT Extreme V2 Sim Racing Cockpit + 40" LCD and K/B Mouse stand ▼
Fanatec CSR Elite Wheel + Clubsport V1 Pedals + CSR shifter/7G-H ▼Saitek X52 Pro ▼ TrackIR 5 Pro
Buttkicker v2 Seat Rumbler with Dedicated 5.1 and Sub Woofer attached to frame ▼
=
Bloody Big Grin
Steven,

I found that you really need at least around 4.5 GB free on the USB to not get the error.

I'm finding that to be true as well. You can edit the 4gb to read 5-8gb recommended for use to insure the best results at least for the 64bit. I still have one other test for the 32bit to run however to see if 4+gb is still required.

The final test will be a fast temp install of each edition with SP1 to check the integrity of the integration itself.

Update on 32bit attempt:

The first attempt was a success with the 4gb flash drive when trying this with the 32bit SP1. As figured the larger size of the 64bit requires an 8gb since you may find a smaller size available. Most brands see 1, 2, 4, 8gb and larger in that order.

As you will see in this next the results were immediate while the options were still greyed out but initially saw a prompt appear instead warning about all data being erased. From there it all went well until a fast temp install is made.

One other thing to mention is that you are still able to use the other options for dvd or saving the iso while the initial integrated image created is loaded.

Note if you should see a lengthy delay in this version starting up seemingly hung at the start screen simply right click on the taskbar to bring up the taskmanger>application tab and end the script error item. From there RT Seven Lite loads right up.
 

Attachments

  • USB Install SP1 Key 32Bit Works for 4gb.jpg
    USB Install SP1 Key 32Bit Works for 4gb.jpg
    58.4 KB · Views: 1,047
Last edited:

My Computers My Computers

  • At a glance

    W7 Ultimate x64/W10 Pro x64/W11 Pro Triple Bo...AMD Phenom II X4 975 Deneb 3.6ghz - 965 2nd r...Kingston Hyper X DDR3 1600 1.5v 16gb - Hyper ...MSI HD Radeon 5750 1gb - MSI HD Radeon 6450 o...
    Computer type
    PC/Desktop
    Computer Manufacturer/Model Number
    Custom builds = 2
    OS
    W7 Ultimate x64/W10 Pro x64/W11 Pro Triple Boot - Main PC W7 Remote PC Micro ATX W7 Pro x64/W11 Pro
    CPU
    AMD Phenom II X4 975 Deneb 3.6ghz - 965 2nd remote pc
    Motherboard
    Gigabyte GA-790XTA-UD4-Gigabyte GA-880GM-D2H remote pc
    Memory
    Kingston Hyper X DDR3 1600 1.5v 16gb - Hyper X Fury 8gb 2nd
    Graphics Card(s)
    MSI HD Radeon 5750 1gb - MSI HD Radeon 6450 on mini tower
    Sound Card
    Creative Labs X-Fi Xtreme Audio P - Realtek onooard 2nd case
    Monitor(s) Displays
    ASUS VW199T-P 19" HP 2082a Main-HP 2082a 20" remote pc
    Screen Resolution
    Asus 1440x900 - HP 1600x900
    Hard Drives
    WD Black 1TB HD per OS W7, W10, and pending W11 presently on 500gb OS Drive - Pending Triple 1TB HDs for Spanned Storage/backup volume
    Single 2TB external USB enclosure, single 1TB System 7 Host/Boot drive, Pending 8TB external HD for system image b
    PSU
    Corsair 750TX - primary / Corsair CX600 - second
    Case
    Antec 900-2 - SSD compatible / NZXT Vulcan mini tower
    Cooling
    Zalman CNPS9900A
    Keyboard
    AZIO L70 Backlit Letters Gaming - ONN Cordless/USB
    Mouse
    MSI DS200 Programmable, Logitech Cordless
    Internet Speed
    30mbps upgrade - primary hard wired - mini tower usb WiFi
    Antivirus
    GFI VIPRE Internet Security 2014 on W7 2016 beta on W10,
    Browser
    Cyberfox, WaterFox 64bit FF variants, FireFox x64, Pale Moon
    Other Info
    Accomdata fan cooled usb 2.0 PIDE/Sata II, III external enclosure.
    Sambient usb/eSata PATA/Sata II, III external enclosure.
  • At a glance

    W7 Pro x64/W11 ProAMD Deneb 3.6ghz - 965Kingston Hyper X Fury 8gbMSI HD Radeon 6450 DVI Output
    Computer type
    PC/Desktop
    System Manufacturer/Model Number
    CUSTOM ASSEMBLY
    OS
    W7 Pro x64/W11 Pro
    CPU
    AMD Deneb 3.6ghz - 965
    Motherboard
    Gigabyte GA-880GM-D2H remote pc
    Memory
    Kingston Hyper X Fury 8gb
    Graphics Card(s)
    MSI HD Radeon 6450 DVI Output
    Sound Card
    Realtek onooard Creative or Other separate PENDING
    Monitor(s) Displays
    VIZIO 32" LCD TV Separate LCD Pending
    Screen Resolution
    1600x1080
    Hard Drives
    WD 500GB OS Host/Boot WD Green 1TB Storage/Backup
    PSU
    Corsair 600W - THERMALTAKE 600W spare case
    Case
    NZXT Vulcan mini tower
    Cooling
    Twin 120mm Top Fans - 240mm Side Cover
    Keyboard
    ONN Cordless/USB Logitech Cordless
    Mouse
    ONN USB/Cordless - Logitech Cordless
    Internet Speed
    DSL 5G
    Browser
    MS Edge, FireFox, WaterFox x64, FireFox Nightly
    Other Info
    OS Testing-Remote Access to Main TeamViewer
Oh, no. Out target is everyone. It just makes it easier to follow and use when made easy. That's all.

I look forward to seeing the tutorial if you would like to create it. :)
Okie dokie then, I'll see what I can whip up for you guys. I can also provide some links to helpful articles I read at Microsoft while I was researching it, and ultimately created the disc. Is a new thread for this a good idea, Shawn?
 

My Computer My Computer

At a glance

Windows 7 Ultimate SP1 x64 RTMAMD Athlon 64x2 3800+ Dual CoreOCZ Platinum Dual Channel 4x1GBPNY NVIDIA GeForce 9800 GT 1024MB DDR3 256 Bit
Computer Manufacturer/Model Number
NVIDIA
OS
Windows 7 Ultimate SP1 x64 RTM
CPU
AMD Athlon 64x2 3800+ Dual Core
Motherboard
NVIDIA GeForce 6100-M9
Memory
OCZ Platinum Dual Channel 4x1GB
Graphics Card(s)
PNY NVIDIA GeForce 9800 GT 1024MB DDR3 256 Bit
Sound Card
Creative Sound Blaster Audigy 24Bit
Monitor(s) Displays
Compaq 7500
Screen Resolution
1024x768
Hard Drives
C: 250GB Seagate Barracuda 7200.12 SATA-300
D: 500GB Seagate Barracuda 7200.12 SATA-300
PSU
OCZ 650Watt Dual 12-Volt Rails
Case
Thermaltake
Cooling
Fans, fans, and more fans
Keyboard
Logitech
Mouse
Logitech PS2
Internet Speed
300MBps
Other Info
LG CD-RW [IDE]
Pioneer DVD-RW [SATA-II]
The slipstreamed installation ISO didn't work with my current installation either when trying to do a repair install. I suspect Windows Updates as being the culprit.

@ Brink:

Hello again. I have to ask you about post #66 (& #65) in this thread (also see the quote above) over the test you performed and your result. I think the light came on in my head and I am now making the mental connection on why you did what you did with this threads tutorial modification. Please clarify me if I am incorrect (This may be a dumb moment for me.), but you indicate that the 'Windows Updates' may be the 'culprit' over the test you performed regarding my questions and concerns in my prior post(s).

Okay, so if I were to integrate any additional Windows Updates into the slipstreamed Windows 7 SP1, I may be able to overcome your results when performing a Windows upgrade repair instead of receiving the message (per your clipping in post #66) stating, "The following issues are preventing Windows from upgrading. Cancel the upgrade, complete each task, and then restart the upgrade to continue." Your current version of Windows is more recent than the version you are trying to upgrade to. Windows cannot complete the upgrade..."???

In other words, you created this amended tutorial to accomodate more Windows Updates to the slipstreamed Windows 7 SP1 so a Windows upgrade repair could continue to completion with having any issues during the upgrade repair process (like the one you had during your test as a Windows upgrade repair)?

So basically, it is a never ending battle? (Please, no disrespect! It is not your fault at all! You're here to help me! Thank you! It is just the nature of the situation!) So for every Windows Update that is installed that modernizes or increases my installed version/build of Windows 7 SP1; I have to continually update my previously created slipstreamed Windows 7 SP1 so the Windows upgrade repair performs successfully with my installed Windows 7 SP1 (to keep ahead of the curve so the 'current version of Windows is *NOT* more recent than the version you are trying to upgrade to')? Am I correct to say this?

Next question: So what Windows Updates (using their standalone MSU installation files) do I need to add to my already slipstreamed Windows 7 SP1 to keep ahead of the curve? Is this the answer? Go to my Windows Update History and all the Windows Updates that have installed *AFTER* my installed Windows Update for 'Windows 7 Service Pack 1 for x64-based Systems (KB976932)' I would add those Windows Updates to my slipstreamed Windows 7 SP1? Am I correct here too?

Please reply.

Thank you!
 

My Computer My Computer

At a glance

Windows 7 Pro x64 SP1 & Windows 8 & 8.1 Pro x64
Computer type
PC/Desktop
OS
Windows 7 Pro x64 SP1 & Windows 8 & 8.1 Pro x64
Oh, no. Out target is everyone. It just makes it easier to follow and use when made easy. That's all.

I look forward to seeing the tutorial if you would like to create it. :)
Okie dokie then, I'll see what I can whip up for you guys. I can also provide some links to helpful articles I read at Microsoft while I was researching it, and ultimately created the disc. Is a new thread for this a good idea, Shawn?


Hello David, click this link to make an actual tutorial of it.
 
Last edited by a moderator:

My Computer My Computer

At a glance

W 7 64-bit UltimateIntel Q9550 Yorkfield8GB Dominator 8500C5DATI : XFX 5870
Computer Manufacturer/Model Number
* BFK Customs *
OS
W 7 64-bit Ultimate
CPU
Intel Q9550 Yorkfield
Motherboard
ASUS P5Q Pro
Memory
8GB Dominator 8500C5D
Graphics Card(s)
ATI : XFX 5870
Sound Card
Realtek HD Audio 7-1
Monitor(s) Displays
1x 47" LCD HDMI & 3x 26" LCD HDMI
Screen Resolution
1920x1080P & 1920x1200
Hard Drives
1x 80GB Intel X25-M G2 SSD : 1x 500GB & 1x 640GB WD Caviar Black(s)
PSU
Corsair 620HX
Case
Cooler Master RC-690
Cooling
Tuniq Tower 120, 2x 140mm and 3x 120mm case fans
Keyboard
Microsoft 500
Mouse
Razer Diamondback 3G
Internet Speed
14 Mb/s
Other Info
1x Koutech 3Gb/s SATA HDD Hot Swap Rack
Hello Montecarlo,

Answers inline below. :)


Okay, so if I were to integrate any additional Windows Updates into the slipstreamed Windows 7 SP1, I may be able to overcome your results when performing a Windows upgrade repair instead of receiving the message (per your clipping in post #66) stating, "The following issues are preventing Windows from upgrading. Cancel the upgrade, complete each task, and then restart the upgrade to continue." Your current version of Windows is more recent than the version you are trying to upgrade to. Windows cannot complete the upgrade..."???

It really depends on how Windows 7 was installed originally on whether or not the Slipstream Windows 7 SP1 may be able to do a repair install or not. I find that you have the highest chance of being able to do a repair install if you do a clean install of Windows 7 again with the Slipstream Windows 7 SP1 instead of trying to do a repair install on a retail Windows 7 installation that has had SP1 installed separately. Plus, you have the newer Windows Updates to take in consideration as well.

In other words, you created this amended tutorial to accomodate more Windows Updates to the slipstreamed Windows 7 SP1 so a Windows upgrade repair could continue to completion with having any issues during the upgrade repair process (like the one you had during your test as a Windows upgrade repair)?
The main purpose was to allow people to be able to add new Windows Updates to a Slipstream Windows 7 SP1 installation DVD, ISO, or USB that they already created instead of having to start completely over. This way if they ever had to do a clean install of Windows 7, they will be able to do so with all the Windows Updates they added already installed as well. In theory, with all new Windows Updates added to the Slipstream Windows 7 SP1 installation DVD, ISO, or USB since doing a clean install with it, you should be able to do a repair install with it.

So basically, it is a never ending battle? (Please, no disrespect! It is not your fault at all! You're here to help me! Thank you! It is just the nature of the situation!) So for every Windows Update that is installed that modernizes or increases my installed version/build of Windows 7 SP1; I have to continually update my previously created slipstreamed Windows 7 SP1 so the Windows upgrade repair performs successfully with my installed Windows 7 SP1 (to keep ahead of the curve so the 'current version of Windows is *NOT* more recent than the version you are trying to upgrade to')? Am I correct to say this?
Unfortunately yes. It will be a never ending job to keep the Slipstream Windows 7 SP1 installation DVD, ISO, or USB updated with new Windows Updates when they are released every second Tuesday of each month. At least you will not have to start completely over each time a update is realed though. ;)

Next question: So what Windows Updates (using their standalone MSU installation files) do I need to add to my already slipstreamed Windows 7 SP1 to keep ahead of the curve? Is this the answer? Go to my Windows Update History and all the Windows Updates that have installed *AFTER* my installed Windows Update for 'Windows 7 Service Pack 1 for x64-based Systems (KB976932)' I would add those Windows Updates to my slipstreamed Windows 7 SP1? Am I correct here too?
I find it easier to know what Windows Updates to add afterwards if you did a clean install of Windows 7 again with the Slipstream Windows 7 SP1. Otherwise it's pretty much a crap shoot as to what to add with an existing retail Windows 7 installation that has had SP1 manually installed. The best guess would be anything after SP1 was installed though.

This really depends on what you want to use the Slipstream Windows 7 SP1 installation DVD, ISO, or USB for.

If your goal is to hopefully be able to use it to do a repair install with if needed, then you will need to add all Windows Updates to it.

If your goal is to use it to do a clean install and/or boot to System Recovery Options with it, then you could get away with only adding Windows Updates that you do not want to have to reinstall again through Windows Updates after a clean install.
 

My Computer My Computer

At a glance

64-bit Windows 11 Pro for WorkstationsIntel i7-8700K OC'd to 5 GHz64 GB (4x16GB) G.SKILL TridentZ RGB DDR4 3600...ASUS ROG-STRIX-GTX1080TI-O11G-GAMING
Computer type
PC/Desktop
Computer Manufacturer/Model Number
Self built custom
OS
64-bit Windows 11 Pro for Workstations
CPU
Intel i7-8700K OC'd to 5 GHz
Motherboard
ASUS ROG Maximus XI Formula Z390
Memory
64 GB (4x16GB) G.SKILL TridentZ RGB DDR4 3600 MHz
Graphics Card(s)
ASUS ROG-STRIX-GTX1080TI-O11G-GAMING
Sound Card
Integrated
Monitor(s) Displays
2 x Samsung Odyssey G7 27"
Screen Resolution
2560x1440
Hard Drives
1TB Samsung 990 PRO M.2,
4TB Samsung 990 PRO PRO M.2,
TerraMaster F8 SSD Plus NAS
PSU
Seasonic Prime Titanium 850W
Case
Thermaltake Core P3
Cooling
Corsair Hydro H115i
Keyboard
Logitech wireless K800
Mouse
Logitech MX Master 4
Internet Speed
2 Gb/s Download and 100 Mb/s Upload
Antivirus
Malwarebyte Anti-Malware Premium
Browser
Google Chrome
Other Info
Logitech Z625 speaker system,
Logitech BRIO 4K Pro webcam,
HP Color LaserJet Pro MFP M477fdn,
APC SMART-UPS RT 1000 XL - SURT1000XLI,
Galaxy S23 Plus phone
Here I don't worry as much about any updates seen from this time on if I end up needing to perform a clean install. Using a usb install key or dvd with the SP1 integrated saves a great of time waiting for each and every update plus a separate install of the service pack.

Once installed with SP1 included some 15+ subsequent updates would be a consideration if you take notes on which ones come out from this time forward for subsequent integration. I just went through a laptop with the previous version where no SPs were included in the factory preinstall to see those added. I'll take the SP1 integrated the way it is and worry about a few others later! :D

Meanwhile I compared on disk sizes once the 64bit went onto a 16g flash drive showing the 32bit at 2.75gb while the 64bit ended with 3.74gb. That was the exact same size as what was seen as available drive space on a reformatted drive.

Plus the RT Seven Lite might also need to reserve a small amount of space temporarily as part of the process explaining why you need an 8gb drive over a smaller 4gb for the 64bit. Despite the hinderance of the error I mentioned before for this beta each time the write to disk has started and finished the results have been found positive showing a high degree of reliability in the plus side. The finished version will be something to look forward to! :thumbsup:
 

My Computers My Computers

  • At a glance

    W7 Ultimate x64/W10 Pro x64/W11 Pro Triple Bo...AMD Phenom II X4 975 Deneb 3.6ghz - 965 2nd r...Kingston Hyper X DDR3 1600 1.5v 16gb - Hyper ...MSI HD Radeon 5750 1gb - MSI HD Radeon 6450 o...
    Computer type
    PC/Desktop
    Computer Manufacturer/Model Number
    Custom builds = 2
    OS
    W7 Ultimate x64/W10 Pro x64/W11 Pro Triple Boot - Main PC W7 Remote PC Micro ATX W7 Pro x64/W11 Pro
    CPU
    AMD Phenom II X4 975 Deneb 3.6ghz - 965 2nd remote pc
    Motherboard
    Gigabyte GA-790XTA-UD4-Gigabyte GA-880GM-D2H remote pc
    Memory
    Kingston Hyper X DDR3 1600 1.5v 16gb - Hyper X Fury 8gb 2nd
    Graphics Card(s)
    MSI HD Radeon 5750 1gb - MSI HD Radeon 6450 on mini tower
    Sound Card
    Creative Labs X-Fi Xtreme Audio P - Realtek onooard 2nd case
    Monitor(s) Displays
    ASUS VW199T-P 19" HP 2082a Main-HP 2082a 20" remote pc
    Screen Resolution
    Asus 1440x900 - HP 1600x900
    Hard Drives
    WD Black 1TB HD per OS W7, W10, and pending W11 presently on 500gb OS Drive - Pending Triple 1TB HDs for Spanned Storage/backup volume
    Single 2TB external USB enclosure, single 1TB System 7 Host/Boot drive, Pending 8TB external HD for system image b
    PSU
    Corsair 750TX - primary / Corsair CX600 - second
    Case
    Antec 900-2 - SSD compatible / NZXT Vulcan mini tower
    Cooling
    Zalman CNPS9900A
    Keyboard
    AZIO L70 Backlit Letters Gaming - ONN Cordless/USB
    Mouse
    MSI DS200 Programmable, Logitech Cordless
    Internet Speed
    30mbps upgrade - primary hard wired - mini tower usb WiFi
    Antivirus
    GFI VIPRE Internet Security 2014 on W7 2016 beta on W10,
    Browser
    Cyberfox, WaterFox 64bit FF variants, FireFox x64, Pale Moon
    Other Info
    Accomdata fan cooled usb 2.0 PIDE/Sata II, III external enclosure.
    Sambient usb/eSata PATA/Sata II, III external enclosure.
  • At a glance

    W7 Pro x64/W11 ProAMD Deneb 3.6ghz - 965Kingston Hyper X Fury 8gbMSI HD Radeon 6450 DVI Output
    Computer type
    PC/Desktop
    System Manufacturer/Model Number
    CUSTOM ASSEMBLY
    OS
    W7 Pro x64/W11 Pro
    CPU
    AMD Deneb 3.6ghz - 965
    Motherboard
    Gigabyte GA-880GM-D2H remote pc
    Memory
    Kingston Hyper X Fury 8gb
    Graphics Card(s)
    MSI HD Radeon 6450 DVI Output
    Sound Card
    Realtek onooard Creative or Other separate PENDING
    Monitor(s) Displays
    VIZIO 32" LCD TV Separate LCD Pending
    Screen Resolution
    1600x1080
    Hard Drives
    WD 500GB OS Host/Boot WD Green 1TB Storage/Backup
    PSU
    Corsair 600W - THERMALTAKE 600W spare case
    Case
    NZXT Vulcan mini tower
    Cooling
    Twin 120mm Top Fans - 240mm Side Cover
    Keyboard
    ONN Cordless/USB Logitech Cordless
    Mouse
    ONN USB/Cordless - Logitech Cordless
    Internet Speed
    DSL 5G
    Browser
    MS Edge, FireFox, WaterFox x64, FireFox Nightly
    Other Info
    OS Testing-Remote Access to Main TeamViewer
Well, if your target audience is noobs, then this method is definately the way to go. The WAIK is for advanced users. However, the finished product is simply amazing. :D

Not all of the target audience are noobs - don't forget the advanced users who are just lazy :D
I know that not everyone at this forum are noobs. The comment you quoted was in reference to Shawns post. He said that his method, as opposed to mine, would be preferred by noobs.....and I merely agreed.

So I'm going to write up a tut for the WAIK method. However, it won't be for noobs at all. There's some "hard coding" involved with this method, and prior knowledge of HTML, and C++ is a prerequiste. It will take some time to write it up, but I think everyone will like it. This method allows you to make a completely unattended installation disc, and also allows you to apply just about any settings you want right at installation. It's actually pretty awesome.

I'm not entirely sure what you mean about not using 3rd party tools.
What I meant about "third party software" is that you don't have to use any software other than Microsoft. I've never really liked the idea of depending on software other than Microsoft to compile my operating system's installation disc. However, a good CD/DVD burner program is neccesary. I happen to use Nero 7 Premium.

Hello David, click this link to make an actual tutorial of it.
I'm not really sure why you posted that link. I was planning on using the exact same format for the tut that Shawn uses, if that's why you posted it?
 

My Computer My Computer

At a glance

Windows 7 Ultimate SP1 x64 RTMAMD Athlon 64x2 3800+ Dual CoreOCZ Platinum Dual Channel 4x1GBPNY NVIDIA GeForce 9800 GT 1024MB DDR3 256 Bit
Computer Manufacturer/Model Number
NVIDIA
OS
Windows 7 Ultimate SP1 x64 RTM
CPU
AMD Athlon 64x2 3800+ Dual Core
Motherboard
NVIDIA GeForce 6100-M9
Memory
OCZ Platinum Dual Channel 4x1GB
Graphics Card(s)
PNY NVIDIA GeForce 9800 GT 1024MB DDR3 256 Bit
Sound Card
Creative Sound Blaster Audigy 24Bit
Monitor(s) Displays
Compaq 7500
Screen Resolution
1024x768
Hard Drives
C: 250GB Seagate Barracuda 7200.12 SATA-300
D: 500GB Seagate Barracuda 7200.12 SATA-300
PSU
OCZ 650Watt Dual 12-Volt Rails
Case
Thermaltake
Cooling
Fans, fans, and more fans
Keyboard
Logitech
Mouse
Logitech PS2
Internet Speed
300MBps
Other Info
LG CD-RW [IDE]
Pioneer DVD-RW [SATA-II]
David,

I look forward to reading your tutorial when it's finished. If you need any help or have any question on doing it, then please just send be a PM. I'll be happy to help. :)
 

My Computer My Computer

At a glance

64-bit Windows 11 Pro for WorkstationsIntel i7-8700K OC'd to 5 GHz64 GB (4x16GB) G.SKILL TridentZ RGB DDR4 3600...ASUS ROG-STRIX-GTX1080TI-O11G-GAMING
Computer type
PC/Desktop
Computer Manufacturer/Model Number
Self built custom
OS
64-bit Windows 11 Pro for Workstations
CPU
Intel i7-8700K OC'd to 5 GHz
Motherboard
ASUS ROG Maximus XI Formula Z390
Memory
64 GB (4x16GB) G.SKILL TridentZ RGB DDR4 3600 MHz
Graphics Card(s)
ASUS ROG-STRIX-GTX1080TI-O11G-GAMING
Sound Card
Integrated
Monitor(s) Displays
2 x Samsung Odyssey G7 27"
Screen Resolution
2560x1440
Hard Drives
1TB Samsung 990 PRO M.2,
4TB Samsung 990 PRO PRO M.2,
TerraMaster F8 SSD Plus NAS
PSU
Seasonic Prime Titanium 850W
Case
Thermaltake Core P3
Cooling
Corsair Hydro H115i
Keyboard
Logitech wireless K800
Mouse
Logitech MX Master 4
Internet Speed
2 Gb/s Download and 100 Mb/s Upload
Antivirus
Malwarebyte Anti-Malware Premium
Browser
Google Chrome
Other Info
Logitech Z625 speaker system,
Logitech BRIO 4K Pro webcam,
HP Color LaserJet Pro MFP M477fdn,
APC SMART-UPS RT 1000 XL - SURT1000XLI,
Galaxy S23 Plus phone
David,

I look forward to reading your tutorial when it's finished. If you need any help or have any question on doing it, then please just send be a PM. I'll be happy to help. :)
Alrighty then, thanks for the offer, I'll keep that in mind.
 

My Computer My Computer

At a glance

Windows 7 Ultimate SP1 x64 RTMAMD Athlon 64x2 3800+ Dual CoreOCZ Platinum Dual Channel 4x1GBPNY NVIDIA GeForce 9800 GT 1024MB DDR3 256 Bit
Computer Manufacturer/Model Number
NVIDIA
OS
Windows 7 Ultimate SP1 x64 RTM
CPU
AMD Athlon 64x2 3800+ Dual Core
Motherboard
NVIDIA GeForce 6100-M9
Memory
OCZ Platinum Dual Channel 4x1GB
Graphics Card(s)
PNY NVIDIA GeForce 9800 GT 1024MB DDR3 256 Bit
Sound Card
Creative Sound Blaster Audigy 24Bit
Monitor(s) Displays
Compaq 7500
Screen Resolution
1024x768
Hard Drives
C: 250GB Seagate Barracuda 7200.12 SATA-300
D: 500GB Seagate Barracuda 7200.12 SATA-300
PSU
OCZ 650Watt Dual 12-Volt Rails
Case
Thermaltake
Cooling
Fans, fans, and more fans
Keyboard
Logitech
Mouse
Logitech PS2
Internet Speed
300MBps
Other Info
LG CD-RW [IDE]
Pioneer DVD-RW [SATA-II]
@ Brink:

Hello Brink! Thank you for your time and cooperation in answering my questions in detail! I absolutely appreciate this! :))

In summary, it will be *always risky* for a successful Windows upgrade repair because of the installed version/build is newer than the one you are trying to upgrade issue appearing, but there are measures a user can perform to try to overcome (lessen the chance of) a Windows upgrade repair denial using slipstreaming techniques with the latest Windows updates.

There is one final point I want to inquire about and I need your response please...

Even using a Microsoft factory purchased DVD genuine copy that has Windows 7 SP1 integrated *may* have the *same* issues if say I plan to use this Microsoft factory DVD genuine copy to do a repair install, I still could possibly end up not being able to complete a Windows upgrade repair as well because of the installed version/build is newer than the one you are trying to upgrade issue, correct? Given:
1. The Microsoft factory DVD genuine copy of Windows 7 SP1 was initially used as the install on the Windows 7 SP1 system.
2. If *new* Windows Updates have *already* been installed on the installed Windows 7 SP1 system since the initial installation of Windows 7 SP1.
I could still have issues with a Windows upgrade repair because of the installed version/build is newer than the one you are trying to upgrade issue? Correct?

Bottom line: *It doesn't matter* if you use your created slipsteamed DVD of Windows 7 SP1 (*Note: Regardless of adding any more new Windows Updates or not.) -or- a Microsoft factory purchased DVD genuine copy that has Windows 7 SP1 integrated, you *may still* have issues completing the Widows upgrade repair process because of the installed version/build is newer than the one you are trying to upgrade issue? Correct?

I will let my questions regarding this topic rest here.

Please reply.

Thanks again!!! :)
 

My Computer My Computer

At a glance

Windows 7 Pro x64 SP1 & Windows 8 & 8.1 Pro x64
Computer type
PC/Desktop
OS
Windows 7 Pro x64 SP1 & Windows 8 & 8.1 Pro x64
Montecarlo,

Correct. Anytime new Windows Updates are installed, there is a chance of not being able to do a repair install with the same installation disc. This all just depends on what the Windows Updates changed or updated though.
 

My Computer My Computer

At a glance

64-bit Windows 11 Pro for WorkstationsIntel i7-8700K OC'd to 5 GHz64 GB (4x16GB) G.SKILL TridentZ RGB DDR4 3600...ASUS ROG-STRIX-GTX1080TI-O11G-GAMING
Computer type
PC/Desktop
Computer Manufacturer/Model Number
Self built custom
OS
64-bit Windows 11 Pro for Workstations
CPU
Intel i7-8700K OC'd to 5 GHz
Motherboard
ASUS ROG Maximus XI Formula Z390
Memory
64 GB (4x16GB) G.SKILL TridentZ RGB DDR4 3600 MHz
Graphics Card(s)
ASUS ROG-STRIX-GTX1080TI-O11G-GAMING
Sound Card
Integrated
Monitor(s) Displays
2 x Samsung Odyssey G7 27"
Screen Resolution
2560x1440
Hard Drives
1TB Samsung 990 PRO M.2,
4TB Samsung 990 PRO PRO M.2,
TerraMaster F8 SSD Plus NAS
PSU
Seasonic Prime Titanium 850W
Case
Thermaltake Core P3
Cooling
Corsair Hydro H115i
Keyboard
Logitech wireless K800
Mouse
Logitech MX Master 4
Internet Speed
2 Gb/s Download and 100 Mb/s Upload
Antivirus
Malwarebyte Anti-Malware Premium
Browser
Google Chrome
Other Info
Logitech Z625 speaker system,
Logitech BRIO 4K Pro webcam,
HP Color LaserJet Pro MFP M477fdn,
APC SMART-UPS RT 1000 XL - SURT1000XLI,
Galaxy S23 Plus phone
@ Brink:

Thank you for all your help and guidance!!! I fully understand now!!! :D
 

My Computer My Computer

At a glance

Windows 7 Pro x64 SP1 & Windows 8 & 8.1 Pro x64
Computer type
PC/Desktop
OS
Windows 7 Pro x64 SP1 & Windows 8 & 8.1 Pro x64
Back
Top