How to Create a Windows 7 System Repair Disc
InformationThis will show you how to create a Windows 7 system repair disc to be able to use to boot to system recovery options to help recover your Windows 7 installation if you don't have a Windows installation disc, can't find your Windows installation disc, or can't access the recovery options provided by your computer manufacturer.
A system repair disc is not able to install Windows 7.
NoteIf you are unable to boot your Windows 7 to create a Windows 7 System Repair Disc, then you could create it on another computer to use on your computer.
Warning
- A system repair disc is not the same as a OEM factory recovery/restore disc.
- A system repair disc is not an installation disc. You cannot do a repair install or install Windows 7 with a system repair disc.
- A system repair disc can only be used to repair Windows 7 through the system recovery options.
- 32-bit System Repair Disc can only be created on a 32-bit Windows 7.
- 64-bit System Repair Disc can only be created on a 64-bit Windows 7.
- 32-bit System Repair Disc can only be used to repair a 32-bit Windows 7.
- 64-bit System Repair Disc can only be used to repair a 64-bit Windows 7.
For Windows 10, see the following link - System Repair Disc - Create in Windows 10 - Windows 10 Tutorials
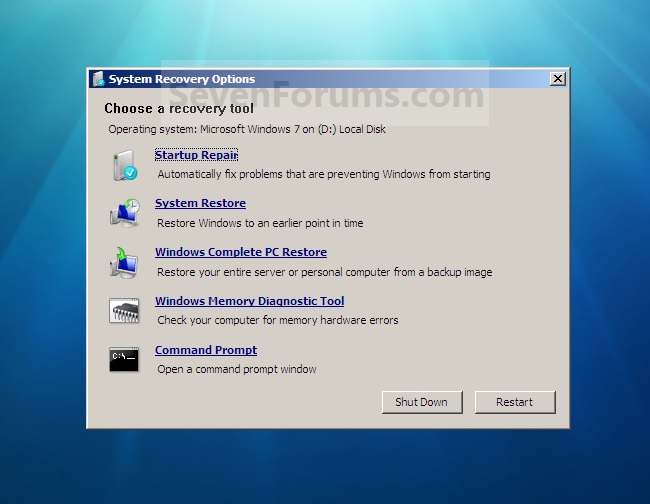
EXAMPLE: System Recovery Options
NOTE: Using the System Repair Disc that you have created below, you can boot to the system recovery options screen below.
Here's How:
1. Open the Start Menu, then type recdisc.exe in the search box and press Enter.That's it,
A) Go to step 3.OR
2. Open the Control Panel (icons view), and click on the Backup and Restore icon.
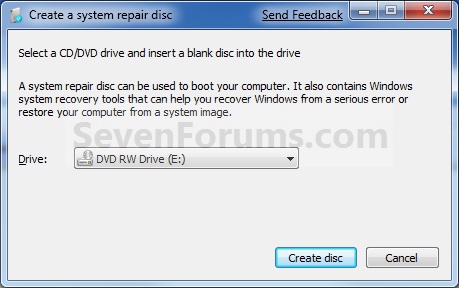
3. Insert a blank unformatted CD or DVD into your CD/DVD drive and click on the Create disc button. (See screenshot below)
NOTE: If you are prompted to insert a Windows installation disc, it means that the files needed to create the system repair disc cannot be found on your computer. Insert a Windows 7 installation disc.
4. It will now start creating the System Repair Disc. (See screenshot below)
NOTE: If a AutoPlay window pops up, just close it.
5. When it's finished, click on the Close button. (See screenshot below)
6. Click on OK. (See screenshot below)
7. Remove and label your new Windows 7 System Repair Disc from the CD/DVD drive.
TipIf you would like to create a bootable System Repair USB flash drive, then you could use the free program ImgBurn to create an ISO file with this Windows 7 System Repair Disc (DVD), then use the Part 1 section in the tutorial below to extract the ISO file to a USB flash drive.
Windows 7 USB/DVD Download Tool
Shawn
Related Tutorials
- How to Tell if Windows 7 is a 32-bit or 64-bit System Type
- How to Create a Windows 7 Recovery Partition
- How to Create a Windows 7 Installation USB Key
- How to Boot to the System Recovery Options in Windows 7
- How to Boot to the Advanced Boot Options in Windows 7
- How to Run a Startup Repair in Windows 7
- How to Do a System Restore in Windows 7
- How to Do a System Image Recovery in Windows 7
- How to Run the Memory Diagnostics Tool in Windows 7
- How to Open a Command Prompt at Startup in Windows 7
- How to Do a Repair Install to Fix Windows 7
- How to Extract Files from the Windows 7 Installation DVD
- How to Make a MS-DOS Bootable Flash Drive
- How to Create a System Recovery Shortcut in Windows 7
- How to Create a Windows 7 Backup and Restore Shortcut
- How to Create a Windows 7 Universal Installation Disc
- How to Boot Windows 7 System Repair Disc from USB Pen Drive or External Hard Disk Using Grub4Dos
- How to Recover from an Infinitely Looping Startup Repair Loop without Reinstalling Windows
- How to Slipstream Windows 7 SP1 and Updates to Create a Bootable USB, Installation DVD, or ISO File
- How to Hide or Show "Do you want to create a system repair disc?" Message
System Repair Disc - Create
-
-
-
-
New #4
Hello Rakcs,
Unfortunately this method will only let you create one using a DVD. However, you can create a Windows 7 installation USB key to use to do the same thing with instead from your Windows 7 ISO file.
Hope this helps,
Shawn
-
New #5
Recovery console like in in WinXP
Hi all,
I have a bunch of questions on that repair disk issue.
Does that procedure include 3rd party disk drivers (like the Intel storage management drivers for RAID) include into that repair disk.
Is it necessary to produce one DVD per installation or is it a universal approach, where I can produce the repair DVD just once?
In WinXP it was possible to do something similar by entering
WinNT32 -cmdcons and you got a second instance of the OS for repair tasks - that was very useful some times (disable freshly installed hardware services which prevent XP from boot).
Is there a similar option in Win7?
Or is it possible to
manally generate the Repair DVD,
transfer that content to a VHD-File
and
enable that VHD as a addition boot option in BCDedit
Actually I run the Ultimate RTM x64 from MSDN so VHD-boot is allowed
Thanks for your comments and advices
Oblomow
-
New #6
Hello Oblomow,
This only creates a repair disc that boots to the System Recovery Options screen to allow you to only repair any Windows 7 on any computer with. It does not install Windows 7, but you can use the command prompt option to run commands though.
-
-
-
Related Discussions


 Quote
Quote